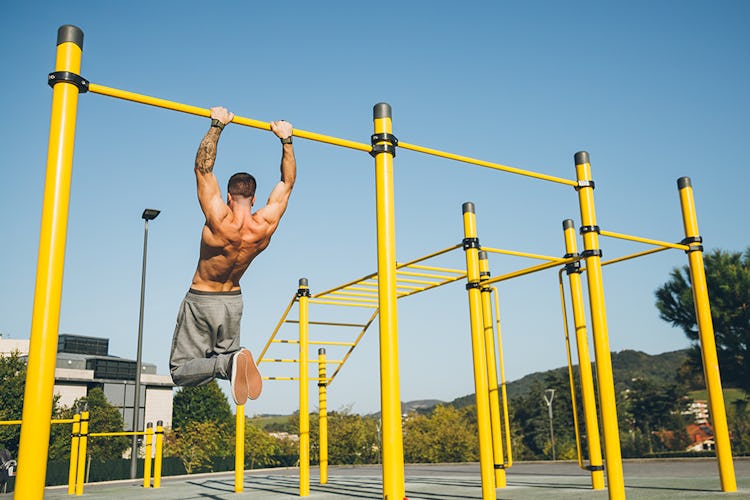
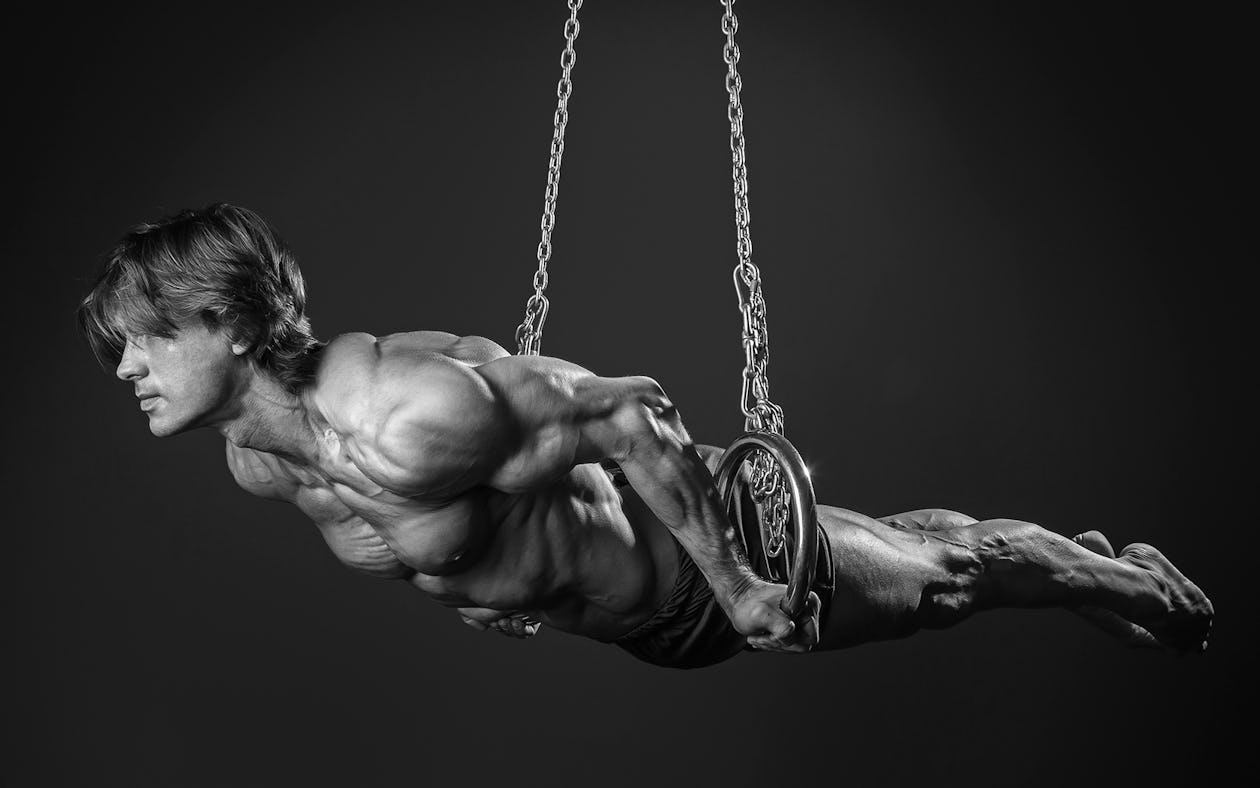
I used to be into heavy powerlifting, but recently moved to a purely bodyweight training regimen.
I noticed a big change in both my physique and strength.
I actually felt a difference in my body; doing my unique exercises opened up a totally new door.
I noticed I was using muscles that I had never even used before.
Believe it or not, all my workouts involve calisthenics circuit routines now. In a circuit, you move from one exercise to the next with little or no rest between moves.
Circuit training doesn’t allow your heart to rest or slow down. It keeps it up consistently throughout your workout allowing you to burn more calories and build conditioning.
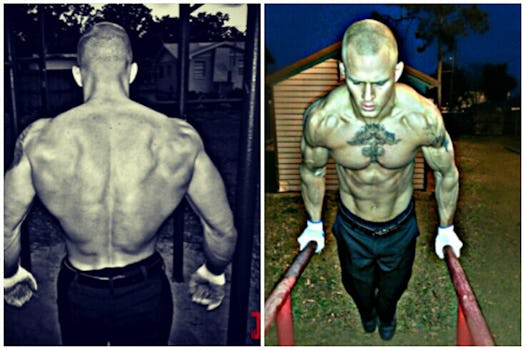
I do hundreds of different calisthenics circuits and I never touch the weights. I’ve lost 37 pounds of fat in six months doing my exercises. I went from 202 pounds to a lean 165 pounds.
I get at least 50 messages a day just on my transformation and how I did it.
The best part is, anyone can do it themselves with hard work and dedication.
I’m going to share four of my circuit workouts with you. One is for beginners and can be done at home. Two are for intermediate and advanced exercisers, and one is only for extreme athletes.
Find the workout that’s best for you and, if you stick to it, you will see results in less than two months.
How Long Should You Train For In a Calisthenics Workout?
The At-Home (beginner level), Intermediate, and Extreme Athlete routines shown here should all take 30 minutes or less to complete. The Advanced workout may take as long as 45 minutes. In general, you can save time by trying to move at a brisk pace between exercises and circuits, but give yourself enough rest time so that you can complete your exercises safely and with good form. You can work on reducing rest periods as your conditioning improves over time. Have a timer handy to track the length of your sets and your rest periods; you’ll need one for the Advanced and Extreme Athlete workouts.
How Long Should You Recover After A Calisthenics Workout?
Each of these workouts can be performed up to four times per week on non-consecutive days. Three to four workouts per week is enough. For example, Monday, Wednesday, Friday, and Sunday. You can also combine them, performing the At-Home workout one day, the Intermediate on another, and the Advanced (if you dare!) on a third day. If you feel extra sore or run down on a day you had planned to train, take another day’s rest before your next workout (or perform light exercise or aerobic activity, such as walking/jogging, cycling, yoga, mobility work, etc.).
Calisthenics Vs. Weight Training
The term calisthenics refers to training that uses primarily bodyweight exercises to develop strength, endurance, mobility, and coordination. It’s the kind of exercise that gymnasts and martial artists have done for eons using their own body weight, and while it develops muscle mass too, that’s more of a byproduct. You can expect to get very strong relative to your bodyweight when you do calisthenics training, and master your control of your body in various positions and movements. I.e., you’ll become stable and athletic.
Weight training uses external loads—free weights, cables, machines—to strengthen the body, and while it can develop the same qualities that calisthenics can, it’s better-suited for those who want to build maximum muscle mass, power, and absolute strength. This makes it a potentially better choice for athletes in sports like football, baseball, and track and field. A gymnast will usually be able to do more pullups and pushups than a bodybuilder or powerlifter, but the one who lifts heavy weights can probably move more overall load and will look bigger and stronger. Neither kind of training is superior to the other— both have their advantages, depending on your goals.
For the best, most well-rounded results, include both calisthenics, cardio and weight training in your regimen. You can alternate the styles, spending a few weeks working on one and then switch to another, or you can combine them in the same workout. For instance, you can start with weight training exercises to peak your power and strength, and then finish your routine with bodyweight training that works more on endurance and movement skills.
How To Stretch For A Calisthenics Circuit Workout
Follow the video below for a routine to warm up your entire body before the calisthenics workouts offered here. For more tips on mobility and stretching, follow Onnit-certified Durability Coach Brian Butz (aka @themobilemammoth on Instagram).
1. Lateral Squat to T-Spine Rotation
Sets: 2–5 Reps: 5–10
[See 00:58 in the video above]
Lunge out to your left side and lower your body until your left leg is bent about 90 degrees and your trailing leg is straight. Hold for a moment, and then reverse the motion, twisting your body to get into a lunge position on the right leg, facing that direction.
Plant your left hand on the floor and twist your torso to the right, reaching your right hand overhead.
Repeat the entire movement on the opposite side.
2. Adductor to T-Spine Rotation
Sets: 2–5 Reps: 5–10
[See 01:30 in the video]
Get on all fours and extend your right leg to the side. Use your hands to gently push your hips back so your feel a stretch on the inner side of your right thigh. Allow your foot to roll backward and point upward.
Push your hips forward again and twist your torso to the right, reaching your right arm overhead. Complete your reps and then repeat on the opposite side.
3. Mountain Climber to Hip Flexor Stretch
Sets: 2–5 Reps: 5–10
[See 02:00 in the video]
Get on all fours, and then step your left foot forward, planting your foot outside your left hand. Try to straighten your back so that it’s flat from your head to your pelvis. Relax, and reach back to grasp the top of your right foot.
Gently pull it forward so you feel a stretch on your right thigh and hip. At the same time, extend your back and use your left hand to push on your left knee so you end up in a tall kneeling position.
Hold the stretch for a moment, and then let your right foot go. Repeat the movement on the opposite side. Avoid hyperextending your lower back when you pull on your foot.
4. Shinbox to Hip Extension
Sets: 2–5 Reps: 5–10
[See 03:06 in the video]
Sit on the floor with your left leg bent in front of you and your right leg bent behind you. Press your hands into the floor and push your chest up and out. Now rotate your right leg up off the floor as you rotate your left leg up and to the right, so your body turns and you end up in the same starting position but with your legs opposite. From there, extend your hips so you rise to a tall kneeling position.
Lower your hips back to the floor, plant your hands, and repeat the movement to the other side.
At-Home Calisthenics Circuit Workout

Here’s a bodyweight workout that’s appropriate whether you’re a total beginner to training or you have a little experience with lifting weights but you want to get back to basics with calisthenics training. You can do this routine at home if you have a pullup bar, and it may help to have an elastic exercise band as well, which can help to unload some of your bodyweight and make exercises like chinups and dips easier.
Perform the exercises as a circuit, completing one set for each in sequence. Rest 60 seconds between exercises, and repeat the circuit for 3 total rounds. Except where otherwise noted, do as many reps as possible for each exercise, but stop one short of failure—that means when you feel your form is about to break down. For example, if you’re doing chinups and you get to the eighth rep and feel like you’re slowing down and won’t get a ninth rep with good form, stop the set there.
1. Chinup
Reps: As many as possible
[See 00:49 in the video above]
Use a shoulder-width grip and turn your palms to face you. If you can’t get at least 5 reps on your own, attach an elastic exercise band around the bar and stand in the open loop to unload some of your bodyweight.
2. Dip
Reps: As many as possible
[See 01:00 in the video]
Lower your body until your upper arms are parallel to the floor. If you can’t get at least 5 reps on your own, attach an elastic exercise band to the dip bars and stand (or kneel) in the open loop to unload some of your bodyweight. If you don’t have dip bars, you can use the backs of two chairs.
3. Jump Squat
Reps: As many as possible
[See 01:15 in the video]
Stand with feet between hip and shoulder-width and quickly lower your body until your thighs are parallel to the floor. Explode upward as high as you can. Land softly, and reset yourself before you begin the next rep.
4. Pushup
Reps: As many as possible
[See 01:28 in the video]
Place your hands just outside shoulder width and lower your body until your chest is about an inch above the floor. Keep your body in a straight line with your core braced. Your lower back shouldn’t arch and your elbows should point 45 degrees from your torso.
5. Crunch
Reps: As many as possible
[See 02:08 in the video]
Raise your torso until your shoulder blades are off the floor.
6. Mountain Climber
Reps: Go for 30 seconds
[See 02:19 in the video]
Stand with feet shoulder width and squat down to place your hands on the floor. Now shoot your legs behind you fast so you end up in the top position of a pushup. Jump your legs back up so they land between your hands and then stand up quickly.
BONUS: Jump Rope
Reps: Jump for 30 seconds
[See 02:26 in the video]
If you have a jump rope, jump for 30 seconds, landing on the balls of your feet. Any type of jump is OK, or mix a few together.
Intermediate Calisthenics Circuit Workout
This workout is good for people with a year or more of strength training or bodyweight-only training under their belt. You can do it at home, but you’ll need a pullup bar and some space to run, so a public park or a gym may be more appropriate.
Perform the exercises as a circuit, completing one set for each in sequence. Rest 60 seconds between exercises, and repeat the circuit for 3 total rounds. Except where otherwise noted, do as many reps as possible for each exercise, but stop one short of failure—that means when you feel your form is about to break down. For example, if you’re doing jump squats, you might get to rep 10 and feel like you’re slowing down. If you’re pretty sure you won’t be able to get the 11th rep at the same speed or with a safe landing, stop the set there.
1. Feet-Elevated Pushup On Rings
Reps: As many as possible
[See 00:58 in the video above]
Set the handles of a suspension trainer around shin level and rest your feet on a bench behind you. Suspend yourself over the handles in a pushup position and then lower your body until your chest is just above your hands. Keep your body in a straight line with your core braced.
2. Feet-Elevated Inverted Row
Reps: As many as possible
[See 01:20 in the video]
Set the handles of a suspension trainer low enough so that when you hang from them with arms extended, your body is angled 45 degrees to the floor, or lower. (If you’re strong enough, rest your feet on a bench for an added challenge.) Keep your body in a straight line and brace your core as you pull yourself up.
3. Jump Squat
Reps: As many as possible
[See 01:39 in the video]
Stand with feet between hip and shoulder-width and quickly lower your body until your thighs are parallel to the floor. Explode upward as high as you can. Land softly, and reset yourself before you begin the next rep.
4. Burpee
Reps: As many as possible
[See 01:55 in the video]
Stand with your feet between hip and shoulder width, and squat down to place your hands on the floor in front of you. Jump your legs back into the top of a pushup position, then reverse the motion to come back up to standing.
5. Leg Flutter
Reps: Repeat for 60 seconds
[See 02:38 in the video]
Flatten your lower back into the floor and brace your abs. Extend your legs overhead and then lower them as far as you can before you feel your lower back is about to buckle up from the floor. Begin raising and lowering both legs, alternately, a few inches (as if you were kicking your legs while swimming).
6. Sprint
Reps: Run for 30 seconds
[See 02:58 in the video]
Run as fast as you can maintain for 30 seconds. Other options are to run up a hill, or run in place.
Advanced Calisthenics Circuit Routine
If you’ve been training for a few years and feel pretty strong on bodyweight exercises, give this advanced routine a shot.
Perform the exercises as a circuit, completing one set for each movement in sequence. Set a timer and perform each exercise for 30 seconds. Try to limit your rest between exercises. Do 1–3 total rounds.
1. Crow Pose
Reps: Hold for 30 seconds
[See 00:28 in the video above]
Get into a deep squat position and plant your hands on the floor. Tip your body forward and rest your knees on your elbows. Extend your back and hips so that your bodyweight is supported on your hands, and hold the position.
2. Jump Squat with Rotation
Reps: Jump in the 3 directions shown for 30 seconds
[See 01:02 in the video]
Lower your body into a squat quickly and then explode upward as high as you can. Swing your arms back as you go down, and throw them forward as you jump. Land softly, driving your knees outward. Hop 90 degrees to your right side, and repeat the jump. Hop back to face forward again, jump, and then rotate to face your left side, and jump again. Continue in this manner, jumping in the three different directions. Don’t let your knees cave inward on your landings, and make each jump as vertical as possible.
3. Hindu Pushup
Reps: Repeat for 30 seconds
[See 01:40 in the video]
Get into pushup position and drive your hips backward as you extend your arms overhead. You’ll end up in a downward dog pose. Now lower your chest toward the floor in an arcing motion, finishing the pushup with your chest facing forward and your hips just above the floor (an upward dog pose). Keep your core braced so that your ribs don’t flare, and avoid shrugging your shoulders. Keep your shoulder blades together and pulled downward as you move toward the floor, and spread them apart as you push up.
4. Candlestick Roll
Reps: Repeat for 30 seconds
[See 02:30 in the video]
Get into a deep squat and roll backward onto your shoulders. Roll forward again and go into the bottom of a deep lunge with your back knee pointing 90 degrees to the side. The heel of your front foot should stay flat on the floor. Repeat on the other side.
5. Lateral Squat w/ Rotation
Reps: Repeat for 30 seconds
[See 02:59 in the video]
Shift your weight to your left leg so you feel like you’re sitting into your left glute. Now raise your right knee up and outward, planting your right foot on the floor at a 90 degree angle—both heels should be in line. Lower your body into a squat, keeping a long spine from your head to your pelvis. Alternate sides each rep.
6. Xs and Os
Reps: Repeat for 30 seconds
[See 03:25 in the video]
Lie on your back and extend your arms and legs to form an X shape. Flatten your lower back into the floor. Perform a crunch, drawing your knees to your chest along with your arms.
7. Planche with Scapular Protraction
Reps: Repeat for 30 seconds
[See 03:46 in the video]
Get into pushup position and turn your palms around so that your fingers point behind you. Hold your body in a straight line with your core braced and squeeze your shoulder blades together so that only your torso moves closer to the floor. Spread your shoulders apart to raise it back up while you hold your body in position.
8. Jumping Lunge
Reps: Repeat for 30 seconds
[See 04:16 in the video]
Get into a lunge position—rear knee just above the floor and front knee bent 90 degrees. Jump and switch legs in mid air, landing with the opposite leg forward. Drive the arm that’s opposite the front leg forward on every rep.
9. Lateral Hop
Reps: Repeat for 30 seconds
[See 04:55 in the video]
Hop side to side, landing with control. It may help to place an object on the floor to jump over.
10. L-Sit Pullup
Reps: Repeat for 30 seconds
[See 05:10 in the video]
Grasp the bar with hands outside shoulder width. Raise your legs up straight in front of you as you pull your body up until your chin is over the bar.
Extreme Athlete Calisthenics Circuit Routine
This workout is for very strong individuals who feel they’ve mastered their bodyweight on the basic exercises. It will challenge you with different movements you’ve probably never tried before, many of which are borrowed from the routines of gymnasts and MMA fighters.
Perform the exercises as a circuit, completing one set for each movement in sequence. Perform each exercise for the amount of time shown, and rest 30 seconds between exercises. Do 3 total rounds of the circuit, resting as little as possible between rounds.
1. Hanging Somersault
Reps: Repeat for 30 seconds
[See 00:37 in the video above]
Hang from a pullup bar with hands at shoulder width and raise your knees to your chest. Roll your body backward until your shins face the ceiling, and then reverse the motion.
2. Reverse Curlup
Reps: Repeat for 30 seconds
[See 00:52 in the video]
Lie on your back on the floor and place a block or other light object between your knees. Squeeze your legs to keep it in place. Grasp a heavy or sturdy object with both hands behind your head. Keeping your legs straight, flatten your lower back into the floor and raise your legs up until your hips are off the floor.
3. Modified Front Lever
Reps: Hold for 10 seconds
[See 01:22 in the video]
Hang from a pullup bar with hands shoulder width. Tuck your knees to your chest and roll your body back so your torso is nearly parallel to the floor. Hold the position.
4. Planche with Single-Leg Pushup
Reps: 2 on each side, alternating for 30 seconds
[See 01:44 in the video]
Get into pushup position and turn your palms around so that your fingers point behind you. Hold your body in a straight line with your core braced, and raise one leg off the floor. Maintain this position as you perform two pushups. Switch the leg that’s raised and repeat. Continue until the time is up.
5. Handstand Hold
Reps: Hold for 30 seconds
[See 02:15 in the video]
Get into pushup position in front of a wall and walk your feet up the wall until your torso is nearly vertical. Brace your core so your ribs are pulled down and your torso is a solid column. Hold the position, then walk your feet down the wall slowly to return to the floor.
6. Mammoth March
Reps: Do 1 rep of each lunge, then squat, and repeat on the opposite leg. Continue for 30 seconds.
[See 02:38 in the video]
Step forward with your right leg and lower your body into a lunge position. Step back and all the way behind you to do a reverse lunge. Then step out to your right side for a lateral lunge, come back, and step behind you to the opposite direction for a dragon lunge. Step back until your feet are parallel, squat, and repeat the lunges on the opposite side. Squat again, and repeat the entire sequence until time runs out.
]]>The steel club—the ultimate evolution of the age-old club tool—may be the best training implement you haven’t tried. Here’s what you need to know to start implementing it in your workouts.
What Is A Steel Club?
The club is an offset-loaded weight-training tool, often called a leverage-challenge tool, that works similarly to a kettlebell or steel mace. The bulk of the club’s weight is set at a distance from its handle, making it difficult to stabilize and control. Because of this design, the club lends itself to rotational movements better than perhaps any other piece of equipment (which we’ll discuss in depth further down). Clubs range in length from about one foot to a little more than two feet, and generally come in weight increments ranging between five and 45 pounds.
“The club was our first tool and our first weapon, going back to pre-historic times—think, caveman,” says Shane Heins, Onnit’s Director of Fitness Education, and a steel club coach. “It helped us hunt and fight. People figured out that swinging a club increased the torque on it, and that increased the force it could strike with and the damage it could inflict. So armies learned to swing clubs in battle.”
Over time, warriors realized that swinging clubs—and maces, which developed the same way—strengthened their bodies, and they began formalizing club and mace use for sports training and fitness purposes. Every continent had its own version of the club. To this day, some still call the tool an Indian club, or Persian club (sometimes referred to as a “meel”), as the Indians and Iranians (not least of all the Iron Sheik) did so much to popularize it. In modern times, martial arts fitness expert Scott Sonnon has perhaps been the club’s most vocal champion, helping to spread awareness of club training in the Western world with the popularity of his Clubbell® line over the past 20 years.
Traditionally, clubs were made of wood, but that made progressing to heavier weights problematic. To get a heavier club, you had to upgrade to a bigger piece of wood, making the club cumbersome and difficult to travel with. Due to their greater density, modern-day steel clubs offer heavier weight in a more compact size.
What are the Benefits of Steel Club Training?
As with the kettlebell, steel mace, or any other tool where the weight is offset from the handle, the club presents a number of challenges that you can’t get to the same degree with more conventional equipment. It also has a few features that make it unlike any other implement you can use.
Training with the steel club helps you¦
1. Build Core Strength
Kettlebells are praised for promoting core strength due to their offset load. The weight is positioned at a distance from the handle, so it’s harder to stabilize, and your body must call on numerous muscles to keep you in alignment. The club takes this to the next level, as the weight is displaced even further at the end of a long lever.
Imagine holding a heavy weight right in front of your chest. It’s close to your center of mass, so you have about as much control over it as you possibly can. Extend the weight away from you, however, and you’ve reduced your leverage advantage. Now it’s harder to lift the load, especially in different planes (say, in a circular fashion as opposed to straight up and down). All club exercises put you at a significant leverage disadvantage, which is bad for making workouts feel easy, but great for activating muscle—especially in your abs and throughout your back.
2. Build Rotational Strength
The leverage disadvantage and shape of the club really feed into its greatest feature—allowing you to train rotational movements.
“Our body works in rotation all the time,” says Heins. For example, swinging a bat, throwing a ball, lifting heavy groceries out of your car, or wrestling with your kids. Some of the best steel club exercises are swinging and spiral patterns that force you to stabilize your body over a long range of motion, and develop power in the rotary plane.

“We also need to be able to resist rotation when it isn’t wanted,” says Heins. “When you’re walking, and you pick one foot up, forces act on it to try to twist it in one direction or the other. When you’re squatting with a barbell, you think you’re going up and down, but there’s rotational force acting on your shoulders, spine, hips, knees, and feet. The club highlights this resistance, and it helps you create greater stability.” Because of its dimensions, doing something as simple as a squat while holding a club is difficult to accomplish without bending or twisting to one side (rotation). But, over time, you’ll learn to move in exactly the planes you want, and the resulting stability will translate to other exercises and athletic movements.
Similar to unilateral exercises, “the club also shows you which of your sides is stronger,” says Heins, “so you can begin to correct the imbalance between the left and right halves of the body.”
3. Build Grip Strength
When you train rotation, you create centrifugal force. As a lever moves around an axis, it wants to pull away from that axis and move outward. In addition to having a thick handle and an offset load, the club is tough to grip because it wants to fly out of your hands when you swing it. “The steel club is great for building a grip that’s really alive,” says Heins. “You can’t just clamp down on it like you do a barbell before a 500-pound deadlift. Wherever you’re holding or moving it, the club is always pushing down or pulling away from you, so you need the dexterity and articulation and sensitivity, in combination with appropriately applied tension, to hold on and control it.” With this in mind, imagine how club training could help a grappler who needs to hang on to an opponent’s gi, a construction worker who hauls heavy materials up a scaffold with a rope, or a fisherman trying to reel in a fighting marlin.
“When you use a club, you have to feel the load transition from between your thumb and forefinger to the pinky and palm of your hand,” says Heins. “The information it sends to your central nervous system is constantly changing.”
The steel mace works the grip in a similar fashion, but the club is harder to hold on to. The handle is shorter, giving you less surface area to grasp. It’s easy to regress the challenge on a steel mace exercise by holding the handle nearer to the ball on the end, or widening your grip, which increases your control. But the load on the club is elongated, and more offset. You have a lot less handle to spread your hands apart on, and gripping the fat end totally changes the nature of the load. It can sometimes feel like your only option is to hold on for dear life. Sound scary? Take it slow, and it’s not as hazardous as you may think. (See Steel Club Safety below.)
4. Decompress Your Joints and Tissues
Most weight-training exercises tighten your body up, literally. Think of what happens to your spine when you do a back squat: the bar rests on your back, shoving your vertebrae closer together. When you press heavy weights, your shoulders and elbows get squeezed. Continually compressing your joints and shortening the muscles that act on them can lead to pain and loss of flexibility, but the steel club can help to alleviate both.
“You have to pull back on the club a bit as it swings,” says Heins, lest you want the centrifugal force to rip it out of your hands. “That creates some traction in your wrists, elbows, and shoulders, which allows fluid to pass through them, helping recovery. You can strengthen a joint with traction just like you can with compression. Pulling it apart makes the muscles and connective tissues work to hold the joint together, and it’s a nice counterbalance to compressive forces you get in your other training.”
Heins says to think of club training like an accordion. “If you squeeze it, you’re only getting half the music. You have to pull the ends apart again to play a song.”
Traction and rotation also have the effect of helping your muscles into new ranges of motion they wouldn’t otherwise explore. Look at a pullover exercise (see the workout below) with the club, in which you hold it vertically and lift it over your shoulder and behind your back in an arcing motion. The weight of the club will help to stretch your triceps, lats, and shoulders as it moves downward behind you. At the same time, holding your ribs down with your core tight to maintain good spine and hip alignment trains your core. You get stretching and strengthening in one movement. How’s that for training economy?
Big weightlifters and powerlifters often report that working the club into their routines helps to open up their shoulders and backs, adding longevity to their competitive careers and easing aches and pains.
5. Get More Out of Light Weight

The handle, the offset load, and the rotational nature of club training make it virtually impossible to use heavy weight, and that’s perfectly alright. If you’re expecting a 10-pound club to feel like a 10-pound dumbbell, get that thought out of your head right now.
“The top-end weights we work with are 35 pounds,” says Heins. “That’s super heavy for club training, but it’s still only 35 pounds of overall load, so even when you get strong on the club, it isn’t hard to recover from. It’s certainly not like recovering after a one-rep max squat with 400 pounds.” Heins notes that doing a long session of club training might leave you mentally zonked, similar to how you’d feel after taking a final exam, because the club requires so much nervous system activation. But it’s too light to leave you physically wrecked for days. For athletes who need to compete frequently, it’s helpful to have a tool that lets them train hard and bounce back fast.
Light weight also makes clubs highly portable. If you’re planning a road trip that will take you away from your gym, clubs can fit easily into the car, providing you with a workout you can do anywhere from a hotel room to an empty parking lot.
6. Make Training Fun!
“I’ve taught training certifications for the club all over the country,” says Heins, “and every time people walk in and pick up a club for the first time, it’s always funny. They think it’s going to feel like a baseball bat or a bowling pin, and then you watch them have to put it down right away because they realize they can’t control it. They take a step back, and then try again.”
To say club training provides a novel workout experience is a given, but it also taps into a primal instinct in us all that’s inherently fun. Clubs can even be used for creative expression. As you master club exercises, you can begin to transition from one to the next seamlessly, creating what’s known as a flow. There’s no wrong order or movement, per se, you just move gracefully from one position to the next, working your whole body in the process. Workouts then become more like warrior dances than weight training.
What Club Should I Buy?

As mentioned above, steel clubs are denser than wood, so they offer easier handling for a wider array of loads (plus, they take up less space). We recommend starting with steel that has a powder-coated handle. Some club handles have knurling (rough texture, same as you see on barbells), which makes for an easier grip, but they can tear up your hands over time—especially if you do a lot of swinging, where the club is pulling away from you with centrifugal force.
Other clubs have handles that are completely smooth, which Heins says presents an even worse problem. “When you sweat, the handle becomes slick,” he says, “which can turn the club into a missile.” The powder coat on Onnit’s clubs provides just enough friction for the club to change positions in your hand without you losing control of it, and it won’t chafe your palms in the process. Additionally, a club should have a knob on the end of its handle—where the pinky end of your grip gets firm purchase—to help stop your hand from sliding back off it.
Heins recommends men start with a pair of 15-pounders and a single 20 or 25-pound club, and says most women will do well with one pair of 10 pounders and a single 15 or 20-pound club. Most of your club training will be done using both hands on one club to start, as this provides the greatest stability. As you progress, you’ll find that exercises done above the waist (such as presses and pullovers) are hardest when utilizing a club in each hand. Those that are done below the waist (swings and leg drivers) are easier when done with a club in each hand versus two hands on one.
How To Warm Up For a Steel Club Workout
Use the following warmup drills to increase mobility and prepare your body for training. Perform 5 reps for each exercise in sequence, and repeat for 3 total rounds.
- Kneeling Spinal Wave (See 00:42 in the video below.)
2. Kneeling Arm Thread (02:17)
3. Kneeling Hip Flexor Twist (03:43)
4. Clasped-Hand Elbow Rotation (04:45)
5. Pullover Spiral Down (06:35)
3 Steel Club Exercises You Have to Try
Experiment with steel club training by incorporating the following exercises into your workouts wherever you see fit. The spiral lift around is great for improving shoulder mobility, and can help to stretch the wrist flexor muscles, which can cause elbow pain when tight. That makes it a good choice before an upper-body training session as part of your warmup, or after a workout to help you lengthen the muscles again.
The side pullover opens up your shoulder and lat, and helps you maintain a tight core position, making it a natural for inclusion in any kind of ab training you do. Lastly, the front swing can be used anywhere you would normally do a kettlebell swing or other deadlift/hinge movement. Suggestion: try it as a finisher at the end of a session, combining short rest periods and high reps to get your heart rate soaring (once you’re experienced and familiar with the movement, that is).
Directions: In your first session, take it slow, and focus on your technique so that you learn the exercises correctly. Perform each for time rather than reps, starting with 30 seconds. So you’ll do reps for 30 seconds straight and then rest. On the spiral lift around and side pullover, work for 30 seconds on one side, and then switch sides and repeat. Perform 3 to 5 sets for each movement.
Spiral Lift-Around
Step 1. Stand with feet between hip and shoulder-width apart, and hold a club at your side in your left hand. It should point vertically to the floor below. Tuck your tailbone so that your pelvis is parallel to the floor, brace your core, and squeeze your glutes. Draw your shoulders down and back—think “proud chest.” Maintain this body position throughout the exercise.
Step 2. Begin raising the club straight up in front of your body, pulling from your elbow and allowing the weight of the club to bend your wrist and stretch your forearm. Let the weight of the club pull down as you continue moving the club around the back of your head, and lower the club back to your side, extending your elbow as it comes down. The end of the club should point to the floor throughout the movement.
Try to keep the club as close to your body as you can during the exercise without bumping into it. Heins says to visualize the club as a candle that’s floating around your body—keep it vertical and control its path.
Side Pullover
Step 1. Hold the club with the end pointing upward, and your elbow bent 90 degrees. Turn your arm so that your knuckles point out 90 degrees from your torso with your elbow by your ribs. Maintain the tight core, pelvis position, and proud chest described above.
Step 2. Reach the club over and behind your head, as if you were raising it to deliver a blow. Turn your head so that your eyes can focus on your arm. Swing the club back down to the start position by driving your elbow next to your ribs until the club is pointing vertically again.
As you raise the club on each rep, allow the weight of it to pull your elbow back and stretch your triceps and shoulder, but don’t relax anything. You may find that your range of motion increases over the course of a set. Bring the club down with force, but not so fast that you can’t control its descent and lose alignment.
Front Swing
Step 1. Hold a club in each hand and, keeping your head, spine, and pelvis in a straight line, swing the clubs down and back behind you at a 45-degree angle as you hinge at the hips.
Step 2. Drive your hips back as far as you can without losing alignment, and then explosively extend your hips to stand tall. Use the momentum to swing the clubs up to eye level. Control the downswing to go back into the hinge and repeat for reps.
Beginner Steel Club Workout
The following routine works well on its own as a fat loss-focused conditioning workout, or (if done for only 3 rounds only) a finisher at the end of a heavy training session. If doing the former, perform it three times per week on non-consecutive days (Monday, Wednesday, Friday, for instance).
Directions: Perform the exercises as a circuit, so you’ll complete one set of each movement in turn. (For unilateral exercises, work one side and then the other before going on to the next exercise). At the end of the circuit, rest 45 seconds. Repeat for 3–5 total rounds.
Instead of aiming for a specific number of reps, you’ll perform your sets for time. Complete as many reps as you can in 30 seconds, and aim to perform one more in the same amount of time each time you repeat the workout, or perform the set with better form and greater control. Don’t rush to get as many reps as possible; focus on perfect execution.
1. One-Arm Pullover
(See 01:20 in the video above)
Reps: Work for 30 seconds (each side)
Step 1. Hold the club in front of you with the end pointing upward, and your elbow bent 90 degrees. Tuck your tailbone so that your pelvis is parallel to the floor, brace your core, and squeeze your glutes. Draw your shoulders down and back—think “proud chest.” Maintain this body position throughout the exercise.
Step 2. Reach the club over your shoulder and behind your head, as if you were raising it to deliver a blow. Swing the club down to its starting position by driving your elbow forward again and down next to your hip, so the club is pointing vertically again.
As you raise the club on each rep, allow the weight of it to pull your elbow back and stretch your triceps and shoulder (but don’t relax anything). You may find that your range of motion increases over the course of a set. Bring the club down with force, but not so fast that you can’t control its descent and lose alignment.
2. Double Leg Driver
(See 02:46 in the video.)
Reps: Work for 30 seconds
Step 1. Stand two clubs on the floor so they sit vertically, a little outside shoulder width. Stand just behind them with a hip to shoulder-width stance, and, keeping your head, spine, and pelvis in a long line, hinge your hips back and bend your knees so you can reach down and grasp the clubs by their handles.
Step 2. Tip the clubs back toward you and extend your hips and knees enough to pick the clubs off the floor and allow them to swing back behind your body.
Step 3. Reverse the momentum and swing the clubs in front of your legs, bending your knees to decelerate them. The range of motion is fairly short. Continue swinging the clubs in this pendulum motion, bending your hips and knees to power the movement. Do not allow your hips and knees to lock out at any time, and maintain a proud chest position and alignment from your head to your pelvis.
3. Two-Hand Front Press
(See 04:44 in the video.)
Reps: Work for 15 seconds with right hand on top, then 15 seconds left on top
Step 1. Stand with feet between hip and shoulder width and hold one club with both hands to the right side of your torso. Your right hand should be on top of the left, and your left should be at the bottom of the handle.
Step 2. Keeping a proud chest, level pelvis, and shoulders square with your hips, press the club straight in front of your chest until your hands are at eye level and your elbows are locked out.
4. Mountain Climber to Down Dog
(See 06:28 in the video.)
Reps: Work for 30 seconds
Step 1. Get on all fours on the floor. Your hands should be directly under your shoulders and your knees under your hips. Your toes should also dig into the floor. Tuck your tailbone so that your pelvis is perpendicular to the floor, and brace your core. Draw your shoulder blades down and together (“proud chest”).
Step 2. Try to maintain your shoulder and hip position as you step your left leg forward and place your foot on the floor to the outside of your left hand. Take a second to retract your shoulders and extend your hips after the rep. Return your leg to the all-fours position, and repeat on the opposite side.
Step 3. When you’ve done the mountain climber on both legs and returned to the all-fours position, push your hands into the floor, extend your knees, and drive your hips back into downward dog. Your head, spine, and tailbone should form a straight line as you balance on the balls of your feet. From there, you can pedal your feet, extending one knee at a time to help loosen your hamstrings. Afterward, return to all fours to begin the next round of mountain climbers.
Steel Club Safety
There’s no denying that the club was originally created to bash things over the head, so we understand if you’re a little reluctant to start swinging it around your living room near your spouse or children. But with a little practice, you’ll see that the club poses no more danger than any other piece of exercise equipment—and maybe even less. Consider this: you’ll never get trapped under a 400-pound squat with it and have to call spotters to pull it off of you.
Heins offers the following safety tips: “Keep your eyes on the club at all times. Turn your head and follow it wherever it goes. When you feel your hands get sweaty, or you’re losing your grip, or you notice your form is starting to break down, end the set and put the club down. There’s no ’just one more rep!’ with club training. Also, be aware of your surroundings and make sure you give yourself space.”
]]>
What Is A Box Jump?
While the exercise does clearly involve jumping from the floor onto a box, it’s not quite as simple as it seems. Not any box will do, and the object isn’t just to get up on top of the surface by any means necessary.
The box jump is a low-level plyometric exercise. That is, it trains the muscles’ stretch reflex to develop explosive power. You quickly lower your body into a half-squat to stretch the glutes and hamstrings, and then use the resulting release of elastic energy to help power you up in the air. So as not to come down too hard, the box is there to break your fall, but it also teaches you to land like a cat—decelerating your body mass and absorbing the force of your jump. These skills are highly valuable to athletes who jump and sprint, so the box jump is a staple in many sports training programs.
At the same time, because it’s not particularly complex or dangerous to perform (if done as intended), the box jump can be done by recreational gym rats who want to add a bit of power training to their routines.
The boxes used can vary in height from a few inches to a few feet, and can be constructed of hard wood, rubber, firm padding, and even steel. Whichever kind you have access to, make sure you start with one that’s not too high (more about this below) and offers a stable surface for your feet to land on—and an even base that doesn’t wobble. Some boxes have fairly small foot surfaces, so, in general, the wider or larger the platform you have to jump on to, the better. (You’ll have less chance of missing it!)
How To Do The Box Jump
Before we get into how to execute the jump correctly, let’s go over a few ground rules for safe box jumping. You’ll also want to check out the five progressions for building up to a box jump from Onnit Director of Fitness Education Shane Heins, beginning at 1:03 in the video above.
Use A Moderate-Sized Box
First of all, be conservative with the height you choose. You should warm up on boxes that are very low to the ground—just a few inches to a foot or so high—and do your work sets with a box that’s only around knee height. Twenty-four to 30 inches high is plenty for all but the most experienced jumpers. Yes, we know you see people jumping onto 50-inch boxes and higher on YouTube and Instagram, but believe it or not, most of them are just trying to impress you, and they aren’t using good form.
The depth you squat to in your takeoff and your landing should be almost the same. That is, you should be landing in approximately a half-squat position, or where your knees are bent about 45 degrees. If you land so deep that your knees are practically to your chest and your lower back is rounded, the box is much too high!
Think about it like this: the point is to build athletic power. If you’re a football player exploding off the line of scrimmage, would you start in the bottom of a squat? Do you bend your knees 90 degrees to take a jump shot in basketball? Do sprinters curl up into a ball before they take off down the track at the sound of a starter’s pistol? Of course not. The goal of a box jump isn’t to leap as high as possible—it’s to train the mechanics that let you develop power when it counts.
Stand Far Enough Back
It matters how far away from the box you set up. Stand back a few feet and extend your arms so that your fingertips touch the box when you reach forward with both hands. That represents the distance that should exist between you and the box when you’re about to perform your first rep, so make a note of it and stand in that spot when you begin your set. Respecting this space ensures you won’t catch your fingers on the box during your upswing when you propel yourself upward into the air. It’s also a good distance to prevent you from overjumping your target and tipping the box forward when you land.

Swing Your Arms Up
Speaking of upswing, understand how much your arms contribute to your jumping momentum. Your arms should swing down by your sides as you descend into the half-squat—the mechanics are somewhat like compressing a spring—and then swing upward with force as you jump. Many people do the opposite, driving their arms down toward the floor as they extend their hips and legs. While this may make you look like a human rocket ship, it’s utterly pointless in jump training, as it does not transfer forces from the floor and through your body to facilitate height.
Land With Control
You know the old saying, “What goes up must come down,” so we have to talk about how to land. Your landing should be quiet and soft. Coming down like a ton of bricks puts a lot of stress on the joints of the lower body and can cause injury. Also, as mentioned above, one of the benefits of a good box jump is learning to slow the force of your movement down, so try to stick your landings like a gymnast. If you find that you’re landing hard and loudly, guess what? The box is probably too high.
Step Down From The Box
Lastly, don’t jump off the box to return to the floor between reps. STEP down off it. Jumping down is the most common box jump technique mistake, and it’s a dangerous one. There’s no benefit to jumping backward off a box, and even at fairly low heights, it can injure your Achilles tendons. (Yes, advanced athletes sometimes jump backward to dismount the box, but we don’t recommend it for folks reading this article.) Set a smaller box, bench, or step next to the box you’re jumping onto and use it as a staircase to get down (if the box you’re jumping on is too high to comfortably step down from directly).
With all these caveats and details out of the way, here’s a step-by-step guide to performing the box jump movement.
Step 1. Set a box on the floor that’s roughly knee height. It should be high enough to provide some challenge but not so high that you can’t land safely. Twenty-four to 30 inches should do it. Extend your arms straight in front of you and stand at a distance that allows your fingertips to touch the edge of the box.
Step 2. Stand with your feet about hip-width apart. (If you deadlift, your deadlifting stance should be about right.) Quickly dip your hips, bend your knees, and swing your arms back to gather power.
Step 3. As soon as you feel your body drop into a half-squat position, explode upward, extending your hips and knees and throwing your arms up and forward to jump off the floor.
Step 4. Land softly in the middle of the box with both feet at the same time. Step down from the box carefully and take a moment to set up for the next jump.
What Muscles Are Used In A Box Jump?

The box jump is a major compound movement that requires a transfer of energy through the entire body, so you can pretty much point to an anatomy chart at random and land on a muscle that’s involved in the exercise in some way. Of course, the quads, hamstrings, and glutes are the prime movers, creating the hip and knee extension that lifts you off the floor, and your shoulders work to drive the upswing of your arms, which helps to propel you upward.
However, because you don’t load the body like you do in a squat, deadlift, or other resistance exercise, you probably won’t feel sore in these muscles the next day, and you won’t see size gains in them from jumping alone. The box jump doesn’t create a great deal of muscular tension, or maintain that tension for a length of time, so it’s not going to build bigger muscles. Using it in place of a leg exercise for muscle mass is not a good idea.
You may be surprised, however, to find that your deep abdominal and oblique muscles are in fact sore a day or so later. That’s indicative of how involved your core is in transmitting forces to your arms for the takeoff. Remember that the goal of box jumping is power, and the result is a highly trained chain of faster, more explosive muscles that work together as a unit.
Best Box Jumping Exercises
Most of the time, you should practice box jumps with a 24–30-inch high box, using the technique described above. Three to five sets of three to five reps is a good general prescription for power gains, but end each set the moment you feel yourself slowing down or losing control of your landing.
Occasionally, to test yourself, you can use a higher box and attempt bigger jumps that might cause you to land deeper than a half-squat. In this case, you can work up to sets of three, two, or just one all-out jump. But for safety’s sake, do this sparingly, and have a spotter handy in case you stumble on the box. One to three times a week is enough frequency for box jumps.
Please be cautious. Unlike with strength training, where you need to add weight or reps on a semi-regular basis to keep making gains, progressing jump training isn’t so linear. Most athletes don’t need more than a moderate-height box, so don’t think that because you leapt up onto a 24-inch box last week, you need to use a 25-inch one this week. If you get to the point where box jumps feel easy at a certain height, work on jumping higher and landing on the same-size box before you bother to increase the elevation. Then, as explained, you can sporadically test your training by attempting higher boxes.
If you’ve done CrossFit WODs or attended a HIIT (high-intensity interval training) exercise class, you might have been instructed to do box jumps as part of a circuit or conditioning drill, using high reps and short rest periods. We suggest that you don’t train like this with box jumps. Explosive exercises and high repetitions don’t mix. That is, power movements like the box jump must be done for lower reps to prevent your form from breaking down due to fatigue. And you simply can’t generate the same explosiveness on a 10th jump as you can on the first three of a set, so high reps don’t suit the goal. Box jumps should also be done with longer rest periods for this same reason—two minutes or more between sets.
If you want to get an endurance boost from your training, you can get it with any number of other, safer exercises. That said, if you’re determined to mix power and conditioning in the same session, we have a safe plan to do so below under HIIT Box Jump Workout.
The earlier in your workout that you do box jumps, the more power and height you’ll be capable of getting. But realize that the box jump does cause some impact on your joints. You also shouldn’t do any kind of fast movement without thoroughly warming up your muscles first, and even a great mobility routine done at the start of your workout may not be enough. Therefore, we suggest placing box jumps toward the beginning of your session, so you’re fairly fresh when you do them, but not cold. For instance, you might do them as your second or third exercise, after a few sets of hamstring and glute work. Leg curls, hip thrusts, or glute-ham raises will pump blood into the posterior chain (the muscles on the back side of the body) and lubricate the hips and knees.
There are other exercises you can do to that sometimes don’t require a box, or even a jump, but will support your box jump training and improve your overall jumping ability. By choosing movements that train the upper body to generate upward force, or that strengthen the posterior chain, you can tighten up the component mechanics that make for gravity-defying leaps.
Weighted Jump With Kettlebell
See the video above at 0:25
Step 1. Place a kettlebell on the floor and stand with feet hip-width apart. Get into a half-squat, as if you were winding up for the box jump—you should be able to reach the kettlebell handle from that position. If the weight is too low, elevate it by resting it on a weight plate or mat. Now deadlift the kettlebell so you’re standing tall.
Step 2. Quickly dip your hips and knees as if jumping, lowering the kettlebell to just above the floor (don’t let it smack into the platform you created), and then explode up. Don’t worry about jumping high, just focus on the power of your explosion. Your feet may rise off the floor, but it’s OK if they don’t. Land softly, reset, and repeat. Do 3 sets of 3–6 reps.
Weighted Stepup
See the video at 1:22
The stepup can help familiarize you with the use of a box while building the glutes, hams, and quads. You can do it with dumbbells, kettlebells, a barbell across the back of the shoulders, or a weighted vest.
Step 1. Hold onto your weight and place your foot on a box or bench. It should be high enough so that your thigh is about parallel to the floor when the foot is resting on it.
Step 2. Drive through your heel to step up onto the bench without letting your rear leg rest on it—let it dangle behind you. Step back down, starting with the trailing leg. Do 3 sets of 8–12 reps.
Push Press
See the video at 1:45
Doable with a barbell, kettlebells, or dumbbells, a push press is just an overhead press that uses the legs for assistance. By dipping the knees, similar to how you move in a jump, and then driving up explosively, you can press more weight overhead, which makes the exercise effective for upper-body strength as well as generating power from the ground up. Push pressing is also a great way to learn to keep your body tight and braced. If any muscles are relaxed, you won’t be able to move the weight effectively.
Step 1. Hold the weight at shoulder level and stand with feet about hip width. Brace your core.
Step 2. Drop into a quarter-squat, initiating the descent by bending your knees. Keep your head, spine, and pelvis in line so your back is flat and your eyes and head are forward. You don’t want to turn this leg drive portion of the lift into a squat, so only bend your knees enough to get some momentum, and don’t hinge your hips too much. Imagine yourself doing the move against a wall and sliding your torso up and down it—you should be that upright.
Step 3. As soon as you’ve dipped, extend your hips and knees explosively to stand up straight, driving through your heels, and simultaneously press the weight straight overhead. You’ll need to push from your shoulders and triceps, but with a strong and quick leg drive, most of the power for the press should be provided by your lower body. Keep your core tight throughout the move so your spine is stable and safe. Lower the weight back to your shoulders, take a moment to reset, and then begin the next rep. Do 3 sets of 5–10 reps.
HIIT Box Jump Workout
We’ve established that box jumps should be used conservatively and for athletic performance, but we can’t deny that they spike the heart rate and involve almost every muscle in the body, so we understand if you’re tempted to use them in a conditioning workout that burns calories and boosts endurance.
A way to do this safely is to perform a low-rep EMOM, meaning that you set a timer and perform a set of jumps every minute on the minute. Find a fairly low box—low enough that you know you won’t have trouble landing on it even if you’re tired—and start the clock. Do three jumps, and then rest for the remainder of that minute. When the timer reaches 1:00, do another set. So let’s say the three jumps takes you 15 seconds to do; you’ll get 45 seconds to recover.
Continue this for 20 minutes. It may seem easy for the first five minutes or so, but those short rest periods will catch up with you. This kind of workout probably won’t do much for speed and power, but it can serve as cardio.
If you’re a recreational gym-goer who mainly trains for a better physique and functional strength, but you’d like to add another athletic component to your workouts, incorporating box jumps before your biggest lift of the day can help to prime your nervous system. This can improve your performance on lower-body compound exercises like the squat and deadlift by supporting the recruitment of your fast-twitch muscle fibers. A few sets of box jumps done prior to a big barbell lift won’t fatigue you for the heavy training, but it may allow you to lift heavier and with better form.
Another option is to combine box jumps with a barbell movement, doing the two back to back. This is called contrast training, and it’s a method research has shown can maximize power development in athletes.
In a contrast set, you might do deadlifts with 80% of your max for a set of five (you should have at least a rep or two left in you; don’t go to failure), and then take about 30 seconds rest—during which you can walk over to the box. Now do a set of three jumps at a challenging height. Rest three to five minutes, and repeat for three to four total sets. This is stressful training, so it should be your only exercise for the session, and you should only do contrast training for three weeks at a time.
]]>
What’s the whole truth, bottom line, and final answer on abs? We’re about to clear up all the misconceptions. Consider the following your tome on ab training.
What Muscles Make Up The Abs?
The term “abs” can refer to all the muscles of the midsection, ranging from the deep core muscles that stabilize your spine to the obliques on the side of your torso that help you twist your shoulders and hips and bend to each side. But when most people say abs, they mean the rectus abdominis, more popularly known as the six-pack muscle.
The rectus abdominis originates on the pubic bone and stretches up to the xiphoid process (the bottom of the sternum), as well as the cartilage between the fifth, sixth, and seventh ribs. It works to bend the lumbar spine forward (spinal flexion), pull the rib cage down, and help stabilize the pelvis when you’re walking. When an individual is very lean with well-developed musculature, the rectus abdominis can appear to be six distinct muscles, but it’s only one. The six-pack look is due to a web of connective tissue that compartmentalizes the muscle. Whether someone has a six pack or an eight pack comes down to genetics alone—it’s the way nature shaped their abs—and has nothing to do with training or diet. (For all his gargantuan muscles, Arnold Schwarzenegger’s abs were always comparatively less impressive; he famously sported only a four pack!)
How Is Working Your Lower Abs Different From Upper Abs?

(See 00:30 in the video above.)
Bodybuilders have long believed that exercises that bring the ribs toward the pelvis (crunch variations, for example) work the upper portion of the rectus abdominis, while movements that do the reverse—lifting the pelvis toward the ribs—train the lower portion. Scientists and some trainers, however, have disputed this, arguing that, since there’s only one rectus abdominis muscle and its function is pretty simple, any movement that brings the ribs and pelvis closer together is going to work the whole muscle.
So who’s right?
A study from the Journal of Strength and Conditioning Research measured rectus abdominis activation across six different ab exercises, concluding that, while some of the moves worked the muscle more than others, none showed much of a difference in which part of the abs (upper or lower) was activated. Still, other research has shown the opposite. One trial found that the old-school curlup worked the upper portion of the muscle to a greater degree, and the posterior pelvic tilt (basically a reverse crunch, in which the tailbone is tucked under, lifting the pelvis toward the upper body) favored the lower abs—just as the bodybuilders have claimed for years.
So far, the correct answer seems to be a little from Column A and a little from Column B. In his 2021 book, Science and Development of Muscle Hypertrophy, Brad Schoenfeld, PhD, CSCS, the world’s foremost muscle-growth researcher, concludes that while the entire rectus abdominis will be worked during exercises that target it, it is also possible to emphasize recruitment of the upper abs over the lower abs, and vice versa.
He writes: “Although somewhat speculative, there is a sound rationale for performing traditional crunch variations to target the upper abdominal region and performing reverse crunch variations to develop the lower aspect of the muscle… Not only do the tendinous intersections [of the rectus abdominis] suggest some degree of functional independence of the muscle, but its upper and lower aspects are segmentally innervated by the ventral rami of the lower six or seven thoracic nerves, providing a further mechanism for selective activation.”
Schoenfeld goes on to cite pro tennis players whose abs are bigger on their non-dominant side, which he says indicates that people can, to some degree, recruit not only the upper and lower abs selectively, but also the sides of the muscle.
Long story short: you can target different areas of the abs to shape them according to your goals, but you’ll never be able to isolate any one area of the muscle completely while turning off another one.
What’s The Difference Between Situps and Crunches?
Before we go any further, we should clarify some terms. If ab training really comes down to situp and crunch-type movements, let’s define what these are.
For many years, the situp was the primary ab exercise. You lie on your back with knees bent, and raise your upper body off the floor and up to your knees. This works the entire abdominal area, but it also recruits the legs and hip flexors, and it can be hard on the lower back (as we’ll examine in the next section). In the past few decades, trainers began recommending crunches in place of the situp—a more isolated movement for the rectus abdominis that requires you only lift your head and shoulders off the floor. It’s the safer, more targeted ab workout option between the two, but crunching alone won’t get you a six pack. These days, it seems best to favor crunches over situps, but perform them with different tools—such as a cable machine, stability ball, or inclined bench—to get more muscle activation without sacrificing safety.
Is It Safe To Do Situps and Crunches?

Whether you’re trying to work upper abs, lower abs, or both, the standard prescription is to perform some kind of spinal flexion exercise—i.e. situps or crunches—because bending the spine is a major function of the rectus abdominis.
In recent years, however, some athletes and trainers have contended that repeatedly bending the spine over time can lead to lower-back injury, including disc prolapse or herniation. The idea is that bending the spine pinches the intervertebral discs, gradually pushing them backward until they bulge out and press against a nerve, causing pain. While situp and crunch exercises may not cause back problems entirely on their own, they could throw gas on a fire that’s already burning in many athletes and recreational lifters. If you’ve been following a program that includes regular back squats and deadlifts, which compress the spine, and your lifestyle includes a lot of sitting and slouching (spinal flexion), you can understand how the concern arose.
For these reasons, some experts recommend developing the abs using only variations of the plank exercise, where the ribs and pelvis are held still and the rectus abdominis, along with the other core muscles, contracts isometrically. Schoenfeld agrees that well-chosen plank exercises can effectively train both the upper and lower abs, but argues that there’s nothing inherently dangerous with spinal flexion exercises either, assuming you’re not already contending with a back issue. In a review he co-authored, Schoenfeld determined that, if an individual has no pre-existing back problems, spinal flexion exercises are not only safe when done as normally prescribed, but probably necessary for maximizing development of the rectus abdominis. If you have aspirations of competing in a physique show, where your opponents will surely have well-defined abs, you’ll probably have to do some spinal flexion exercises to get the ab development needed to keep up with them.
For abs that look great and perform well, including having the ability to protect your back, healthy people should probably perform both planks and spinal flexion. Schoenfeld and spinal-flexion critics do agree, however, that too much spinal flexion isn’t good for anyone. If you’re old-school and think that 100 crunches or situps every day is the only way to see results, you could be setting yourself up for injury. Whatever the ab exercises you choose, they should be performed with moderate sets and reps like training any other muscle, with time off for recovery afterward. (We’ll give more specific recommendations below.)
Tips for Isolating Your Upper Abs
Just to recap, you can’t completely isolate your upper or lower abs, but you can emphasize one section over the other with different exercises and careful technique. To lock in on the upper abs, “You want exercises that are going to bring your ribcage down toward your hips,” says Jonny Catanzano, an IFBB pro bodybuilder and owner of Tailored Health Coaching, a fitness coaching service (@tailoredhealthcoaching on Instagram).
This means crunch/situp motions of all kinds, generally starting with your spine straight and finishing where it’s fully flexed at the lumbar. Yes, that means you’ll be rounded in your lower back, which is a major no-no for most loaded exercises such as squats and deadlifts, where the spine has to be kept neutral for safety’s sake. But to fully activate your abs, you have to take them through a full range of motion, and that means crunching your body into a tight ball. If you have lower-back pain, you may want to skip these kinds of exercises and do plank variations (we have a good one for you below), but otherwise, a few sets done two or three times a week shouldn’t present a problem.
Perform your crunch exercises for moderate sets and reps (2–4 sets of 6–15, generally speaking); don’t train them heavy. This will help to prevent placing unnecessary stress on the lower back.
To get the most out of your upper abs, “Squeeze your glutes to tilt your pelvis back, so your tailbone tucks under you when you begin a rep,” says Catanzano. Called a posterior pelvic tilt, this helps take your hip flexor muscles out of the exercise, so that your abs do the majority of the crunching.
What Exercises Work Your Upper Abs?
(See 00:52 in the video.)
A study by the American Council on Exercise showed that, out of 15 exercises tested, crunches done on a stability ball—as well as reverse crunches done on an inclined surface—both worked the upper abs the hardest, and nearly equally. (Incidentally, the reverse crunch on the incline also ranked highest for lower-ab activation.)
But don’t take these findings as gospel. Only 16 subjects participated, and two of them weren’t counted because they didn’t complete the study. Still, the results do suggest that you’d be smart to include crunches done on both a stability ball and an inclined bench in your program, provided you can do them safely.
In addition to those two moves, Catanzano recommends the following.
Kneeling Cable Crunch
(See 01:00 in the video.)
This exercise isolates the upper abs as much as possible, and the cable ensures that there’s tension on the muscles even when the spine is extended (where they would normally rest in a crunch done on the floor). The cable stack also makes it easy to increase the load as you get stronger. Use a V-grip to go heavier, or a rope handle for greater range of motion.
Step 1. Attach a V-grip or rope handle to the top pulley of a cable station, and grasp it with both hands. Kneel on the floor a foot or so in front of the cable so that you have to reach forward a bit with your hands to grasp the handle, and you feel a stretch on your abs. You may want to place a towel or mat under your knees for comfort.
Step 2. Squeeze your glutes and tuck your tailbone under so your lower back rounds a bit and you feel your abs engage. Crunch down, pulling the cable down behind your head as you bring your ribs to your pelvis. When your abs are fully contracted, that’s the end of the range of motion. Slowly return to the starting position. That’s one rep.
Don’t get carried away with the weight you’re using. It should never be so heavy that it pulls you up off the floor at the top of each rep.
Seated Pulley Crunch
(See 01:47 in the video.)
Performing a cable crunch on a lat pulldown machine may be a more comfortable option than the kneeling cable crunch, as it makes it easier to keep your hips stable.
Step 1. Attach a lat-pulldown bar to the pulley of a lat-pulldown station and sit on the seat facing away from the machine. Reach overhead and grasp the bar with hands shoulder-width apart and palms facing behind you.
Step 2. Squeeze your glutes and tuck your tailbone under so your lower back rounds a bit and you feel your abs engage. Crunch down, pulling the cable down behind your head as you bring your ribs to your pelvis. When your abs are fully contracted, that’s the end of the range of motion. Slowly return to the starting position. That’s one rep.
Hanging Leg or Knee Raise
(See 02:29 in the video.)
The pelvis flexes toward the ribs on this one, so it’s a good lower-ab move too, but it will hit the upper part of the rectus abdominis as well. Doing the movement with legs extended creates a longer lever and puts more tension on the muscles, but that will be too advanced for many people. If that’s the case for you, performing the motion with knees bent (a hanging knee raise) is a good modification. In either case, Catanzano warns that you don’t just lift your legs/knees. “That just works the hip flexors,” he says. “Make sure you bring your hips all the way up,” rounding your back as you do so.
Step 1. Hang from a pullup bar with your palms facing forward or toward each other. You may want to use lifting straps to reinforce your grip, so your hands don’t tire before your abs do.
Step 2. Tuck your tailbone under and raise your legs up, keeping your knees as straight as you can until your abs are fully contracted. Control the motion as you lower your legs back down. That’s one rep.
For the hanging knee raise, perform the same movement, but keep your knees bent 90 degrees the whole time. On either exercise, be careful not to swing your legs up or let them swing behind you at the bottom. You want your abs to do the lifting, not momentum, and swinging can strain your lower back.
Crossover Crunch
(See 03:52 in the video.)
Here’s an upper-ab exercise that also hits the obliques, the muscles on your sides that help you bend and twist.
Step 1. Lie on your back on the floor with your arms extended 90 degrees from your sides. Raise your right leg straight overhead, and then twist your hips to the left, resting your right leg on the floor. Cup the back of your head with your right hand.
Step 2. Crunch your torso off the floor and toward your right leg. Hold the top position for a second, and then return to the floor. That’s one rep. Complete your reps, and then repeat on the opposite side.
Pushup Plank with Tailbone Tucked
(See 04:45 in the video.)
If crunching movements aggravate your lower back, try plank exercises instead. Catanzano likes the classic yoga plank done a little differently—with the tailbone tucked under and knees bent to work the rectus abdominis more.
Step 1. Get into pushup position. Squeeze your glutes and tuck your tailbone under to activate your abs. Bend your knees and arms a bit so you feel like your midsection is hollowed out—abs braced, preventing your lower back from sagging.
Step 2. Hold the position for time. Aim for 30 seconds to start.
Your upper abs may get sore just from reading all this, but don’t make the mistake of thinking that training alone will produce a six pack. Exercise builds the ab muscles, but only a healthy diet can lower your body fat levels enough to reveal them, so if your belly currently hangs over your belt line, cut calories from your meals. Catanzano says that most men aren’t able to see ab definition until their body fat is in the range of 8–12%, and women need to be 14–18%.
See this guide on how to diet for abs.
How To Stretch Before Working Your Abs
Catanzano offers the following mobility drills for preparing your midsection for a session of ab training. Perform 10–12 reps for each exercise in turn, and repeat for 2–3 total sets of each.
Walking Knee Hug
Step 1. Stand tall and take a step forward, raising one knee to your chest as high as you can. As the knee rises, grab hold of your shin with both hands and pull it into your chest for a deep glute and inner-thigh stretch. Avoid slouching or bending forward as you do. Try to keep the support leg straight as well.
Step 2. Release the leg, plant your foot, and repeat on the opposite leg, walking forward with each rep.
Bird Dog
Step 1. Get on all fours with your hands under your shoulders and your knees under your hips. Tuck your tailbone so that your pelvis is perpendicular to your spine, draw your ribs down, and brace your core.
Step 2. Extend your right arm and left leg at the same time while maintaining your tight core. Don’t let your back arch. (Think about reaching forward with the arm and leg, not just raising them up.) Lower back down, and repeat on the opposite side. Each arm and leg raise is one rep.
Prone Scorpion
Step 1. Lie facedown on the floor and reach your arms out to your sides. Tuck your tailbone so that your pelvis is perpendicular to your spine, draw your ribs down, and brace your core.
Step 2. Raise your right leg up and reach it across toward your left arm. Reverse the motion and repeat on the other side. A touch on each side is one rep.
Prone Cobra
Step 1. Lie facedown on the floor with your hands on the floor at shoulder level, as in the bottom of a pushup.
Step 2. Press your hands into the floor as you extend your spine and raise your torso off the floor. Hold the top a second, and then return to the floor. That’s one rep.
Windmill Lunge
Step 1. Step forward and lower your body into a lunge. Extend your arms 90 degrees out to your sides.
Step 2. Twist your torso away from the front leg until it’s 90 degrees, with one arm reaching in front of you and the other behind. Come back to the starting position, and then repeat on the opposite leg, twisting and reaching in the other direction. Each lunge is one rep.
The Ultimate Upper-Ab Workout
Below are two sample ab workouts, courtesy of Catanzano, that you can add at the beginning or end of your current sessions, or on an off day. Alternate between the two workouts (A and B) for no more than three total ab workouts in a week. They’ll both work the entire abdominal region, but will emphasize the upper part of the rectus abdominis.
Workout A
1. Kneeling Cable Crunch
Sets: 3 Reps: 12–15
2. Hanging Leg or Knee Raise
Sets: 3 Reps: 6–12
3. Pushup Plank with Tailbone Tucked
Sets: 3 Reps: Hold 30 seconds
Workout B
Perform exercises 2A and 2B as a superset. So you’ll do one set of 2A and then one set of 2B before resting. Rest, and repeat until all sets are completed for both exercises.
1. Crossover Crunch
Sets: 3 Reps: 12–15
2A. Hanging Knee Raise
Sets: 3 Reps: 12
2B. Pushup Plank with Tailbone Tucked
Sets: 3 Reps: Hold 30 seconds
3. Seated Pulley Crunch
Sets: 3 Reps: 12–15
]]>
Bodyweight training is all about the basics and the truth is, no matter how advanced you are, your body will always fall back on its base level of strength. Your overall bodyweight strength will always serve as the foundation and bridge to your other strengths.
When it comes to the basics of bodyweight training, you should be familiar with all of the essential movements: squats, lunges, push ups, pull ups, rows, and plank variations. You should also have the ability to climb, crawl, sprint, and jump. These are primal movements.
Obviously there are hundreds, if not thousands of different variations for each of the basic bodyweight training movements out there, but no matter what, all of them come back to being able to perform the basics.
Bodyweight training serves as your foundation and is the driver of all of your other strengths and skills. Strength tools such as kettlebells, dumbbells, barbells, and sandbags are useless without having the proper bodyweight strength and conditioning foundation.
One of my biggest pet peeves is when young athletes or new clients come into my gym and they get frustrated when I don’t quickly put them under a heavy barbell to see how much weight they can lift.
Most of my clients (and even advanced athletes) have HORRIBLE form and technique when they first come in; this is totally normal, and quite frankly, all too common.
I’ve always made it a point to go bodyweight training first and to make my clients prove to me and themselves that they are strong enough to handle their own bodyweight correctly and efficiently before using other strength tools extensively.
Bodyweight Workout Program for Strength and Conditioning: Bodyweight Standard
Duration: 30-40 minutes
Frequency: 3x per week
Exercise Type: Strength training
Intensity: Steady, deliberate
Repetitions: Varies by workout
Rest: As needed
The rule of thumb I have for my clients and athletes is that they have a solid level of bodyweight strength before they go on to any external types of resistance. You should easily be able to perform the following:
- Standing Poses – Build leg strength as well as flexibility in the hips and hamstrings.
2. 25 “Ass to Grass” Bodyweight Squats.
3. 5 Chest-to-Bar Pull Ups (any variation).
4. 25 Chest-to-Deck Push Ups
5. 25 Lunges per Leg Non-Stop.
6. 3 Handstand Push Ups OR 5 Pike Presses.
7. 20 Recline Rows.
8. 10 Hanging Knee Tucks.
9. 90 sec Basic Plank Hold.The Bodyweight Gauntlet

One of the best types of tests that I like to put my athletes and clients through challenge their general bodyweight conditioning and strength levels is the Bodyweight Gauntlet.
I’ve always been a huge believer of training aggressively and pushing your body to the limit in order to take your results to the next level. Yes, there are progressions to follow, but the bottom line is that in order to get the best results possible, you must attack your workouts relentlessly.
Basics are always important, but intensity and focus should be number one over everything else!
The Bodyweight Gauntlet features four essential movements:
1. Push Ups – any variation
2. Strict Pull Ups – all grips and variations
3. Squats – ass to grass only!
4. Burpees – chest to floor with a jump at the top
Perform an all out, three minute set of each exercise and keep track of all of your reps.
For a beginner, this can get brutal real quick. As a person progresses overtime, they’ll start to see the differences in strength and overall conditioning quickly.
I don’t recommend an absolute beginner to take this on. I’ll usually have a complete beginner progress through each of the four basic movements first to get a solid base of bodyweight strength and conditioning built up before I let them loose on the Bodyweight Gauntlet.
While this may look like nothing more than a simple conditioning test, the real key to success is having a solid base of bodyweight strength to begin with. From there, it’s all about improving on this strength and increasing your efficiency of each movement over time.
Try it out and take the test to see where you’re at. Are you a BEAST or just a Proven Soldier? Leave your comments and score!
Beyond Bodyweight Training Basics
Now, beyond the basics of bodyweight training, you must understand that in order to get stronger with your own bodyweight, you must start to progress in difficulty.
Being able to bang out squats, push-ups, lunges, and pull-ups by the dozens or even hundreds is pretty good, but to what point? This will indeed help you achieve more conditioning-wise, but overtime, you won’t get that much stronger maximum strength-wise.
In order for your training to be truly effective in helping you gain more strength, you must start to build more strength with more progressed movements over time.
This is where different forms of advanced bodyweight exercises come into play.
A great way to enhance your training and make it more advanced is to make it explosive by increasing the speed of the movement.
While this won’t work strength directly, it will help the body move with more force and speed which will ultimately crossover into helping you increase in overall strength. The faster you can move, the better.
One of my main coaching cues to my athletes and clients is to always be as explosive as possible with your movements during the concentric phase. I want my people to be thinking about lifting fast, never slow.
Obviously, I want people to be under control during the eccentric portion of the movement, but when it’s time to contract, you must contract with speed!
An example of this would be the push-up. Imagine yourself at the top of the movement; as you descend down into the push-up, you want to keep your whole body tight from head to toe (core especially).
A key point is that your whole body should work as one solid unit, never in parts, so keep your whole body engaged throughout the movement. As you come down you want to be in control.
You don’t have to go slow, but make sure to be under control. This is the eccentric portion of the movement. Now, as you come back up, you want to imagine moving your body as fast and as explosively as possible.
This is the concentric portion of the movement and you always want to focus on moving as fast as possible here.
Once you start to really slow down with your movement and you can’t move as fast as you know you can, (i.e. you start to grind out your reps), that’s a good point to stop your set.
This is known as “submax” training and this is a very important key to focus on to help increase bodyweight strength overtime. I refer to this point a lot when training push ups, pull ups, and rows.
I see too many people do these movements to failure, and when you train like this all the time, you fry out your central nervous system.
To make a long story short, it takes your central nervous system a lot longer to recover than it does for your muscles, so whenever you train to failure, it’s going to take your body a lot longer to recover from your workout.
Recovery and Bodyweight Training

Getting stronger requires your body to recover, and if you’re always cashed out from taking all of your movements to clear failure, you’ll be struggling at getting stronger, faster.
The overall point of this is to focus on being FAST with your movements and avoiding taking your sets to failure most of the time. Be efficient and crisp with your movements and you’ll continue to progress. Just think: quality over quantity.
Another way to increase your overall strength is to use advanced variations of movements. Obviously, if you’re not someone who can do advanced movements, you need to work through your progressions.
When it comes to building up more strength via bodyweight movements, it should be a no-brainer to make the movement harder.
One of the simplest ways to make a bodyweight movement more advanced is by moving the positioning of your feet or hands.
I’ll use the push up as an example again: a simple beginner’s push up would be your regular push up from the floor, the next level would be a push up with your feet elevated on a box.
You could also implement the use of a suspension trainer and do push ups while holding the straps or having your feet suspended in the straps. You could also do extended range of motion push ups with your hands on medicine balls or boxes.
There’s pretty much a limitless amount of things you can do to progress.
You can implement speed and power into the mix by doing explosive plyometric push-ups which would be another way to make your normal push-ups even harder.
One of the top progressions would be to totally remove the opposite arm out of play and perform single arm push ups.
The point is, there are literally thousands of ways you could progress your different bodyweight training movements to make them harder. The harder you make them, the more strength you’ll build up in the end.
Switching over to the lower body, another example would be squat progressions. Obviously, you would start off with your basic bodyweight squat, making sure to always get your “ass to the grass” first and then progress from there.
One of the first things you could do to make it more difficult is to add an explosive jump at the end of your squat. This would be another example of manipulating the speed of your movement.
You could also hold your hands overhead in a prisoner position or an overhead position to make it more difficult. To take things up another notch, implement the single leg squat (also known as a pistol squat).
Bodyweight Standard Tips and Tricks

1. Focus On The Basics First
Master your basic squat, push up, pull up, row, lunge, and your abilities to sprint, jump, climb, and crawl. Once you get those down, you can then move on to the more advanced movements.
2. Train FAST
Focus on performing your movements as crisp, clean, and explosive as possible.
3. Avoid Failure
Grinding out reps by going to complete failure will have you regressing in the long run. Leave a few reps left in your tank each set. This will keep you fresh and allow you to train aggressively more often.
4. In Reference To The Bodyweight Gauntlet
Make sure you only do this type of challenge every 4-6 weeks since you will be pushing yourself beyond failure when doing so. Doing the Bodyweight Gauntlet or a similar type of extreme workout too much and too often will result in a decrease in overall results.
How To Stretch For A Bodyweight Workout
Follow the videos below for routines to warm up your entire body before a workout. For more tips on mobility and stretching, follow Onnit’s Durability Coach, Cristian Plascencia, on Instagram (@cristian_thedurableathlete).
Bodyweight Exercises and Workouts
The following are three different levels of workouts: Beginner A and B, Intermediate A and B, and Advanced A and B. The workouts are progressive in nature, so if you are a beginner, you would want to start on the beginner workouts A and B and then progress to the intermediates then hit up the advanced.
The workouts are set up in such a way that you’ll first hit an explosive/plyo-type movement to get the body moving fast, hyping it up for the rest of the workout.
From there, you’ll hit a few non-combative supersets using a mixture of upper and lower body strength movements, then you’ll end your sessions off with some core work. The advanced workouts end off with a short conditioning interval via a Tabata set.
If you wanted to use these workouts as a whole program, spend four weeks on each level like this:
Week 1 – A, B, A
Week 2 – B, A, B
Week 3 – A, B, A
Week 4 – B, A, BWith this, you would hit each workout six times, giving you plenty of time to increase efficiency on the different movements contained in each workout. After the fourth week, I would take an off-week to allow the body to recover, then come back with the next set of workouts at the next level.
Beginners Bodyweight Workout A
Muscles Worked: Legs, back, rear delts, core.
Beginners Bodyweight Workout B
Muscles Worked: Back, legs, shoulders, core.
Intermediate Bodyweight Workout A
Muscles Worked: Legs, chest, back, core.
Intermediate Bodyweight Workout B
Muscles Worked: Legs, chest, shoulders, core.
Advanced Bodyweight Workout A
Muscles Worked: Legs, chest, shoulders, back, core.
Advanced Bodyweight Workout B
Muscles Worked: Legs, chest, shoulders, back, core.
What is a Plank Jack?
The plank jack is a combination of two very common exercises: the plank and (big surprise) the jumping jack. You get on all fours in a plank position, and then hop your feet outward and inward while trying to keep your spine and pelvis aligned. The plank jack first started to hit the pages of fitness magazines in 2014, when it was offered up as a more advanced alternative to the standard plank—a longtime staple of core workouts because of the total-body stability it demands.
Celebrity trainers like Tracy Anderson, Anna Kaiser, and Erin Oprea started including plank jacks in their programming for ab/core workouts, and that catapulted the humble plank jack into the fitness mainstream. Whether you train at a big box gym, a boutique studio, or work out at home with a fitness plan you found online, you’re likely to come across the plank jack.
What are the Benefits of Doing Plank Jacks?

Plank jacks are similar to the mountain climber exercise, in that you try to stabilize the hips and spine while moving the lower limbs. Because pretty much the whole body is active, there’s a great demand placed on your heart, so plank jacks build cardio capacity while also developing strength and stability. “Plank jacks get your heart rate up quickly, and are lower-impact than exercises like high-knees or burpees,” says Carmen Morgan, a Houston-based trainer (@mytrainercarmen on Instagram). “So they’re suitable for a wide range of clients. The hopping component of the exercise allows you to feel your core engage more than when doing a regular plank, and most people seem to enjoy the plank jack more, too.”
What Muscles Do Plank Jacks Use?

Plank jacks require some muscles to maintain the isometric hold of the plank while asking others to generate motion in the hips and legs. First, they call the internal and external obliques, rectus abdominis, transversus abdominis, and other core muscles into action to keep your body straight. On the other side of the body, plank jacks activate the muscles of the posterior chain to help you remain stable. These include the hamstrings, glutes, spinal erectors, rhomboids, rear delts, and lats. Since you’re elevated off the floor, plank jacks activate the forearms, biceps, triceps, front deltoids, and pecs to help you retain a stable plank position.
Then there’s the dynamic portion of the exercise. Your abductors pull your legs away from you when you hop, and the adductors draw them back toward your midline as you return to the starting position. Meanwhile, the calves (gastrocnemius and soleus) and quads also contribute to the explosive hop.
Wow¦ that’s quite the list, isn’t it? If you thought the plank jack was a basic bodyweight movement, you can see that there’s a lot more to it. It may be used to target the core, primarily, but it’s really a total-body exercise.
How To Do a Plank Jack
Step 1. Kneel down on the floor and place your hands on the floor. Bend your elbows so that your forearms rest on the floor. Your elbows should be directly beneath your shoulders.
Step 2. Extend your legs behind you and tuck your tailbone slightly so that your pelvis is perpendicular to the floor. Squeeze your glutes and brace your core. Your body should be in a straight line, your back flat. Focus your eyes on the floor.
Step 3. Keeping your body in a straight line, slightly bend at the knees and hop both feet out to the sides as if doing a jumping jack.
Step 4. Land on your toes, allowing your knees to bend slightly again, and then hop your legs back to the starting position.
The movement should look like a jumping jack performed from a plank position. Make sure you keep your belly button pulled in (core engaged) so you don’t let your hips drop. “That will prevent you from feeling all the bouncing in your lower back,” says Morgan.
Also, be careful not to move your feet out too wide with each hop. Morgan adds that, “Some people go a lot wider than is needed, which means they move slower and do fewer reps than they’re capable of.” Instead, hop your feet out just three or four inches from the starting position.
How Many Reps Should I Do?
Morgan advises performing reps for 20 seconds at a time, because “most people get gassed pretty quickly doing plank jacks.” The longer your set goes, the more likely you’ll fatigue and break form, and sloppy plank jacks where your hips bounce up and down aren’t good for anything.
When programming for HIIT workouts or bootcamps, Morgan usually includes three to four sets of plank jacks, and only prescribes them once her clients have thoroughly warmed up. “If you’re pushed for time and want to do a quick workout at home,” says Morgan, “you could do three sets of plank jacks by themselves to get your heart rate up and challenge your core strength.”
If you want to do plank jacks as part of a fat-loss circuit, Morgan typically sandwiches the exercise between renegade rows and floor presses. “It’s a quick and easy transition into and out of plank jacks when you combine them with other floor-based exercises,” she says. You can also use plank jacks as a finisher. Morgan often pairs them with regular planks. Try ending your workout with a superset in which you do 10 seconds of plank jacks followed immediately by 20 seconds of a plank hold. Rest 30–60 seconds, and repeat for three rounds.
Alternatives to the Plank Jack
Like all good exercises, the plank jack can be modified based on your experience level. The following are options you can use to regress or progress the plank jack as needed.
Regression
Can’t do a full plank jack? Don’t despair. Just work on mastering the regular stationary plank, which will help you improve head-to-toe stability before adding in the dynamic movement component. Perform three sets, holding the position as long as you can. When you can hold one set of the plank for two minutes, you should have ample stability to move on to a tougher plank variation.
When you’re ready to add a little motion to your plank, start with the plank jack toe tap (see the video below). While in the plank position, slowly move your right leg out to the side by a couple of inches and, as the name suggests, tap your toes lightly on the floor. Pull your leg back to the starting position and then repeat on the other side. Continue for 20 seconds, rest for a minute, and then do another set. Do this twice a week until it feels comfortable, and then try the full plank jack.
Progression
As you become more confident in and competent with the plank jack, you can increase your speed, the length of your sets, or do it in conjunction with other exercises, such as pullups, pushups, or jumping rope, as well as the movements Morgan suggested earlier.
If you want another exercise that combines a similar level of stability and motion, you can perform mountain climbers, particularly the hip-opening version, to improve your mobility.
]]>
Yoga Rule #1: Focus on Your Breath
No need to be flexible or even warm-up before class! The purpose of yoga is not to do all those fancy, pretzel-like poses. The purpose is to breathe and find the edge – not to jump off of it.
Yoga Rule #2: Bring a Yoga Mat
A non-skid, yoga mat that is at least the length of your body and preferably a foot wider than your shoulder girdle.
Yoga Rule #3: Wear Comfortable clothing
Comfortable clothing you can move in. From sweats to shorts and t-shirts, make sure your clothes won’t get in the way and offer the most mobility. You’ll sweat for sure, so synthetics are generally the best bet.
Yoga Rule #4: Show Up to Class!
Sweaty classes at Black Swan Yoga are great to start with because the standard sequence will not only work and release your entire body but will allow you to benchmark your progress as well.
Yoga Rule #5: Embrace Bare Feet
Yes! Many beginning yogis come to their mats wearing socks. You’ll be less stable in the standing poses with socks — so take those suckers off!
Yoga Rule #6: Power Down Your Electronics
Nothing is more embarrassing than your phone going off during opening or closing meditation.
Yoga Rule #7: Non-comparison and Non-judgment
Don’t compare yourself to other yogis in the room and don’t judge yourself for not being able to do all the poses. Take things at your own pace. Really! This isn’t a competition.
Yoga Rule #8: Bring a Sense of Humor
You may over exert yourself or completely fall out of a pose. No worries! That’s part of the process and the fun of it. Laugh it off, kick back into Child’s Pose or give it another shot.
Yoga Rule #9: Arrive on Time and Stay Until the End
Yoga is a progression, so you don’t want to miss the warmup by arriving late or skip out early and miss the most important (and yummy) pose of them all: corpse pose.
Yoga Rule #10: Stay Relaxed
The awesome, euphoric, centered feeling you’ll experience at the end of class. Wanna know what brings people back to the mat time and time again? It’s the sense of lightness, presence and ease one feels after a good class. There ain’t nothin’ like it!
]]>
Resistance band movements seem simple and the amount of resistance generated may seem like it does nothing to add strength, muscle, or the ability to increase your athletic performance.
Resistance band movements seem simple and the amount of resistance generated may seem like it does nothing to add strength, muscle, or the ability to increase your athletic performance.
However, before writing off this seemingly trivial piece of equipment, adding some resistance band exercises to your training protocol might be the exact thing you need to increase your mobility and correctly activate some dormant muscles.
In this article, I will give you my 4 essential resistance band exercises and how to add them into your current training program without making it look like you are taking an exercise class at the local senior center.
The nice thing about resistance band exercises is that they are easy to execute and you can perform countless reps without taxing your body. However, because of the general ease of movement and the moderate resistance compared to traditional strength exercises, it is easy to use resistance bands sub-optimally.
When working with resistance bands, it is crucial to execute the exercises slowly and controlled through the largest range of motion (ROM) possible. The most common mistake I see are trainees pulling a resistance band to forcefully in the concentric motion and letting the band snap back during the eccentric portion.
Doing the exercises in this manner will not activate or strengthen the stabilizing muscles of the movement; it will actually limit the potential increase in mobility of the joint you are trying to train.
When performing any of the exercises below you will get the most out of the movements by maintaining correct posture throughout the exercise, moving slowly, and keeping constant tension on the resistance band. It is important to concentrate on how your body is responding during the movement to see if you are activating the correct muscles while increasing your ROM.
It is best to perform these movements as a part of a dynamic warm-up. After your usual mobility warm-up, a few sets of resistance band exercises, focusing on the muscles and joints you are using for your main workout, can warm up the muscles and get the joints fine tuned.
One other way to perform these exercises is in between your main lift as an active recovery set. For example, after you finish your set of squats throw in 15 reps of Resistance Band Front Pull Aparts as you rest.
Resistance Band Exercise #1: Front Pull Aparts

Onnit recently posted an article by Joe DeFranco about Resistance Band Front Pull Aparts and I first learned this great exercise from him years ago. Resistance Band Front Pull Aparts are a staple in my training as well as in my athletes’ programs. This exercise is particularly easy to fall into the traps mentioned above by thinking it is easy.
This mindset will not allow you to get the most out of the movement. However, if done properly, Resistance Band Front Pull Aparts are one of the best ways to improve scapular mobility and strength in the back and shoulder muscles.
Set up with a resistance band in front of you, wrists as straight as possible, shoulder blades and rib cage down. When you draw the resistance band towards your body maintain a neutral posture throughout the exercise, and use your back to perform the exercise allowing your shoulder blades to move freely.
Imagine your shoulders gliding along the side of your body. Do not allow the resistance band tension to forcibly retract to the starting position, maintain your posture, and control the movement back to the beginning.
Resistance Band Exercise #2: Shoulder Flexion

Resistance Band Shoulder Flexion is my favorite resistance band movement for the upper body, because of the shoulder mobility gained through the movement.
Our daily lives constantly pull our shoulders forward. Activities such as driving, doing work on the computer, and carrying around children cause our shoulders to get pulled forward and can limit mobility, especially overhead.
Set up the resistance bands just like you do for the Front Pull Apart, and move the resistance band upwards like a front raise. Maintain your posture throughout the movement. Focus on keeping your ribcage and shoulder blades down as the resistance band gets overhead.
Stop and reset the movement if you feel your shoulders and ribcage move away from neutral posture. Also, do not try to gain more false ROM by pulling the resistance band apart; rather keep the same amount of tension on the resistance band during the movement.
Resistance Band Exercise #3: Lateral Walks

Most lower body exercises are performed in the saggital plane. While playing sports, we move in different planes and getting the hip rotator muscle to activate by training laterally is essential. Resistance Band Lateral Walks are great for activating the hip rotator muscles.
I prefer a small resistance band set up between the legs, just above the knees. If you do not have access to a small resistance band, you can use a full reistance band by placing it under the feet and holding it up with your arms.
Keeping your foot and knee aligned take a set outward, laterally. I like to complete the step in a quarter or half squat, then with slow control, bring the other foot towards the first, reset, and step again.
Resistance Band Exercise #4: Knee Stabilizers

Resistance band exercises are a great way to train stability of certain joints and add some isometric tension. The resistance band tension creates a perturbation effect (vibration) which activates the muscles to contact and stabilize a joint during side to side motions that are common in sporting activities.
Use a large resistance band and set up a slip knot around a squat rack or post. Wrap the resistance band around your thigh just above the knee, and move away from the anchor so you are facing 90 degrees in either direction.
When the tension feels right, bend you knee slightly and work to maintain knee and foot alignment while your quads activate to stabilize your knee joint. I usually like to set a timer and go for about 30 seconds.
Add these resistance band exercises into your training program to work your way to better mobility and joint stability.
]]>Upper Body Warmup
1. FOAM ROLL/LAX BALL
2. CATCAMEL – 15 REPS
3. T-SPINE ROTATION – 10 EACH SIDE
4. WALL SHOULDER CIRCLES 10 EACH SIDE
5. LYING SHOULDER SWIMS 10 EACH SIDE
6. 4-WAY PLANK ROLLS – 10 EACH SIDE
7. MB HALO – 10 EACH SIDE
8. MB AROUND THE WORLD – 10 EACH SIDE
9. MB OVERHEAD THROW – 10 REPS
10. MB SLAM 10 REPS
11. POWER PUSH UP 10 REPS
Lower Body Warmup
1. FOAM ROLL/LAX BALL
2. CAT CAMEL 15 REPS
3. T-SPINE ROTATION – 10 EACH SIDE
4. ANKLE FLOW – 1-2 MINUTES
5. 90/90 HIP FLOW 2-3 MINUTES
6. BAND HIP STRETCH 1-2 MINUTES
7. 4-WAY PLANK ROLLS – 10 EACH SIDE
8. FACE THE WALL SQUAT – 10 REPS
9. HIP HINGE – 10 REPS
10. WALKING LUNGE – 10 YARDS FORWARD & BACKWARDS
11. A-SKIP/HIGH KNEE – 10 YARDS EACH
12. HIP CIRCLES – 10 EACH SIDE
13. GATE SKIP – 10 YARDS FOWARDS & BACKWARDS
14. LEG SWINGS – 10 EACH SIDE
15. TIN MAN SKIP – 10 YARDS DOWN & BACK
16. SIDE LINGE – 5 EACH SIDE
Monday
Power & Max Effort Upper Body
PERFORM DYNAMIC WARMUP
1A. KNEELING MED BALL CHEST PASS INTO WALL 3 X 5
1B. ISOMETRIC SHOULDER Y-W-T (ON BENCH) 3 X 15 SECONDS EACH POSITION
02. BARBELL BENCH PRESS – WORK UP TO 5 X 1 AT 90% 1RM
*LAST SET PERFORM 1 OR MORE REPS
03. STRIP SET CHAIN PUSH UPS – 2 SETS OF THE FOLLOWING:
4 CHAINS X 10 REPS
3 CHAINS X 8 REPS
2 CHAINS X 6 REPS
1 CHAIN X 4 REPS
BODYWEIGHT X MAX REPS
4A. STANDING HAND OVER HAND ROPE PULL W/SLED – 3 TIMED SETS
4B. BAND FACE PULLS – 3 X 15
05. DEFRANCO “SHOULDER SHOCKER”
2-3 REPS OF 8 EACH VARIATION
6A. THICK ROPE CURLS W/70LB KB 3 X 10
6B. BAND TRICEPS PUSHDOWN 3 X 100 TOTAL REPS
(USE LIGHT/MODERATE BAND)
Tuesday
Power & Dynamic Effort Lower Body
PERFORM DYNAMIC WARMUP
01. MB CHEST THROW INTO SPRINT - 6 X 10-15 YARDS
02. PUSH UP INTO SPRINT - 6 X 10-15 YARDS
03. KNEELING JUMP INTO BOX JUMP – 6 X 3
*START AT 30″ AND INCREASE BOX HEIGHT EACH SET
04. BARBELL DYNAMIC BOX SQUAT W/CHAINS – 8 X 3 70% 1RM
05. DOUBLE KB SWING - 4 X 12
6A. KB GET UP (FIRST MOVEMENT) - 3 X 10 EACH SIDE
6B. PLATE PINCHES (45 LB BUMPER PLATE) – 3 X 30-60 SECONDS
6C. MANUAL NECK – 3 X 10 EACH POSITION
Wednesday
REST DAY
Thursday
Repetition Effort Upper Body
PERFORM DYNAMIC WARMUP
1A. EXPLOSIVE PUSH UP ONTO BOXES 5 X 5
1B. BAND PULL APART 5 X 10
02. DB INCLINE BENCH WITH 5-SECOND NEGATIVE – 4 X 6
3A. FAT BAR LAT PULLDOWN W/PAUSE – 4 X 12
3B. INCLINE DB REVERSE FLY – 4 X 15
4A. 1-ARM DB ROW W/ FAT GRIPZ – 3 X 8 EACH ARM
4B. TOWEL BARBELL SHRUGS – 3 X 10
4C. PLANK W/ TRICEP LOCKOUT – 3 X 10
Friday
Power & Max Effort Lower Body
PERFORM DYNAMIC WARMUP
01. SLED RESISTED SPRINTS – 6 X 10-15 YARDS
02. MOUNTAIN CLIMBER INTO SPRINT – 6 X 10-15 YARDS
03. KNEELING JUMP INTO BROAD JUMP – 6 X 3
*MEASURE DISTANCE OF EACH JUMP AND AIM TO GET FARTHER EACH SET
04. TRAP BAR DEADLIFT – WORK UP TO 3 X 3 AT 85% 1RM
05. 2-KB FRONT SQUAT – 4 X 10
6A. AB WHEEL ROLL OUT – 3 X 10
6B. FAT BAR HOLD W/ 185 LBS. – 3 X AS LONG AS POSSIBLE
Saturday
REST DAY
Sunday
REST DAY
Download A PDF Of The Brain Cushing Workout Below:

]]>
If you’re reading this right now, you are someone who wants to take their training to the next level and find the most efficient ways to reach your optimal fitness goals.
As an MMA conditioning coach I understand that combat fighters are some of the best conditioned athletes in the world. The intensity of fights are non-stop and one mistake can lead to defeat.
As important as skill training is, if you don’ t have the strength and conditioning to utilize your skills, then you are useless.
Developing peak overall physical condition is the ultimate goal while training for power, explosiveness, strength, speed, agility and muscular endurance.
This is where metabolic conditioning workouts step up to the plate and deliver.
You don’t need to be an MMA athlete to gain the benefits from these workouts. This type of training has become popular with fitness enthusiasts who want to improve their VO2 max, strength, power, and agility while burning fat and building lean muscle.
What Are Metabolic Conditioning (MetCon) Workouts?
Metabolic conditioning workouts use exercises that burn lots of calories during your workout and keep the body burning calories after your workout ends. They usually involve the entire body, short periods of rest and are designed to push the limits of your body to build strength and endurance while getting toned. The workouts below are some of the toughest and most challenging exercise plans on the planet, which means you, will improve your overall conditioning fast.
My metcon workouts are a mixture of burpee variations with strength, plyometric, core and abs movements. Each circuit consists of 10 exercises; five are burpee variations and the other five are strength exercises.
Each metabolic conditioning workout is full body and will target the following movements:
â Kettlebell or Compound Strength Movement
â Abs or Core
â Lunge or Squat
â Push or Pull
â Press
The burpee variations will also consist of these movement as well, making metabolic conditioning the ultimate workout.
The metabolic circuits consist of power training, plyometrics, strength and conditioning, cardio, muscular endurance and core development.
These metabolic circuits will help you improve your overall fitness – using your Bodyweight, Kettlebells, Dumbbells, Barbells, Medicine Balls, Stability Balls, Resistance Bands, Sandbags and other fitness equipment to jack up your metabolism, burn body fat and improve your overall work capacity.
The bi-product is usually a strong, lean and ripped body.
Finally metabolic circuits will test you mentally and push you to your physical limits. Be prepared for battle and DO NOT QUIT!
Metabolic Conditioning Workout Instructions
Perform as many reps as possible of each exercise for 60 seconds followed by a 15 seconds rest one after the other with no rest in between.
â Rest for 2 minutes and repeat for 3 Full Rounds.
â Workout Time = 41 minutes.
Warm up before and stretch after this workout.
1. MMA Metabolic Conditioning Workout
Exercise List
1. Side-to-Side Kettlebell Swings
2. Alternating Single Leg Burpees
3. Alternating Abs Bicycle Kicks
4. Plyo Push Up Burpees
5. Zercher Forward Lunges
6. Dumbbell Burpees
7. Barbell High Pulls
8. Speed Climber Burpees
9. Dumbbell Punches
10. Burpees
2. MetCon Exercises for Strength and Conditioning
Exercise List
1. Heavy Kettlebell High Pull Swings
2. Burpee Sprawls
3. Rotational Mountain Climbers
4. Side-to-Side Slalom Burpees
5. Dumbbell Side to Side Lunges
6. Double Burpees (2 Push Ups and 2 Prisoner Jump Squats)
7. Stability Ball Roll Ups
8. Grasshopper Burpees
9. Ground and Pound – Alternating Dumbbell Rows
10. Burpee Speed Thrusters
3. Metabolic Conditioning Exercises – Metabolic Monster
Exercise List
1. Dumbbell Deadlift Curls
2. Slalom Burpees
3. Abs V-Ups
4. Double Knee Tap Burpees
5. Dumbbell Step Ups
6. Double Push Up Burpees
7. Hand to Hand KB Depth Rows
8. Quad Thrust Burpees
9. Alternating Side to Side Lateral Raises
10. Alternating Kick Thru Toe Touch Burpees
4. MetCon Workout for BJJ and Grapplers – Submit to Nothing
Exercise List
1. DB Clean And Press
2. Burpee Kick Thrus
3. Alternating Knee Hip Thrusts
4. Rotating Burpees
5. Goblet Lunge
6. Bunny Hop Sprawls
7. Inverted Rows
8. Rolling Burpees
9. SandBag Shouldering Side To Side Cleans
10. Burpee Thrusters Speed
5. Muay Thai/Kickboxing Metabolic Conditioning Workout
Exercise List
1. Alternating DB Swings
2. Mountain Climber Burpees
3. Stability Ball Knee Strikes
4. Med Ball Thai Power Thrust Burpees
5. Alternating Jump Knees
6. Burpee Switch Kicks
7. Speed Push Ups
8. Tuck Jump Burpees
9. Shoulder 15’s
10. Alternating Burpees Knees
6. MetCon Workout for Fighters – Sucker Punch
Exercise List
1. Heavy Kettlebell Swings 36 KG.
2. Regular Burpees
3. Abs V-Ups
4. Alternating Knee to Chest Push Up Burpees
5. Dumbbell Thrusters – 30 lbs.
6. Alternating One Leg Kick Back Burpees
7. DB Renegade Row – 30 lbs.
8. Plyo Lunge Burpees (Jump Lunge Burpees)
9. Kickouts
10. Tuck Jump Burpees
7. Bodyweight Metabolic Conditioning Workout
Exercise List
1. Pull Ups/Chin Ups
2. Overhead Clap Burpees
3. Side-to-Side walking Plank
4. Sprint Burpees
5. Alternating Reverse-forward bodyweight lunge
6. Alternating Side jump burpees
7. Dive Bombers
8. 8-Count Burpees/Leg Split Burpees
9. Plyo Push Ups
10. Double Jump Squat Burpees
8. Gauntlet MetCon Workout
Exercise List
- DB Deadlift and Curl
2. Pull Up Burpees
3. Bench/Floor In and Outs
4. Everest Climber Burpees
5. Alternating Barbell Lunges
6. Double Burpee Thrusters with Jump
7. Alternating DB Chest Press
8. Burpee Plank Raises (Bridges)
9. DB Front Raise
10. 6 Count Burpees – (Burpee – Push Up – Jump)
]]>
With the help of Bobby Maximus, owner of the Maximus Gym in Salt Lake City, and author of The Maximus Body (@bobbymaximus on Instagram), we’ve put together the quintessential guide to two-a-day training.
Benefits of Two-A-Day Workouts
It makes sense that the more work you put in, the better the results. That usually holds whether you’re studying for an exam, or trying to build muscle with strength training (but not always, as you’ll see below). According to a recent study in Medicine and Science in Sports and Exercise, training volume is the make or break factor that determines gains. The researchers discovered a “dose-response” relationship, where more sets led to greater improvements in muscle mass. Other research has found that training twice a day may better help your central nervous system adapt to exercise, and in turn improve your strength.
Two-a-days can also boost your stamina. Two studies (1, 2) showed that training twice a day can increase your endurance, and help your body burn fat and glycogen (stored carbohydrate) more efficiently.
But remember: too much of a good thing is bad. When subjected to higher training volumes, your body can adapt, but it needs time to do so, and there is a tipping point. If you’re putting in so much work that you can’t recover from your sessions, you’ll become overtrained, and you won’t see progress. Be warned: “If you have trouble recovering from one-a-days now,” says Maximus, “you shouldn’t be doing two-a-days.” Nutrition, sleep, stress management, and active recovery practices (foam rolling, massage, cold therapy, meditation, etc.) are hugely important for anyone to see gains, but they become even more so when doing two-a-days.
If you work too hard, too soon, and recover too little, you can hurt yourself. Research in the British Journal of Sports Medicine revealed that training-related injuries are largely due to excessive and rapid increases in work performed, but noted that high training volumes can actually help protect against injury as long as you ease into them.
The key is to up your workload gradually, and in a way that balances out your training. Maximus says to think opposites. “On days you train twice, train opposite energy systems or opposite movements. For example, weights in the morning and cardio at night, pushing exercises in the morning and pulling exercises at night, or lower body in the morning and upper body at night.”
This works because it “builds recovery in,” says Maximus. One energy system or group of stressed muscles rests while another works, maximizing training efficiency. You never hit any one area of the body or style of training (such as HIIT or long-duration cardio) more often than you can handle. The evening sessions complement the morning ones, and vice versa.
“Training twice per day by separating resistance training from a cardio metabolic workout allows you to perform better during each individual workout, without sending your body conflicting training signals,” says Eric Bach, C.S.C.S., a Georgia-based online performance coach (bachperformance.com). He adds that lifting twice a day is fine for those who want to bulk up, but you should train heavier, lower-rep exercises in the morning, and higher-rep, bodybuilder-esque accessory work in the evening. For instance, do your heavy squats and deadlifts in the a.m., and light dumbbell pressing and rows in the p.m.
None of this should give you the impression that bidaily wokouts are only for the most dedicated athletes. “Two-a-days are also a good approach for people who are busy and constantly racing the clock,” says Bach. “Breaking up your workouts can be an effective way to piece together a training plan for busy professionals and parents.” You could take the amount of training you were doing in one-hour sessions and simply split it in half, performing 30 minutes of training in the morning, and 30 minutes after work, if that better suits your schedule.
Is Working Out Twice A Day Bad for Building Muscle?

Two-a-days work by stressing your body more than it’s used to, forcing it to adapt faster. But if you don’t prioritize your recovery, you could overtrain and get injured. So the upside to two-a-day training is huge, but it comes at a higher risk. In addition to the guidelines Maximus and Bach gave above, consider the following to decrease that risk and improve your odds of making the best gains of your life.
First, both coaches say it’s key to have at least four to six hours between workouts. This will give your body enough time to rest and recover for the next round. Have a meal with protein and carbs after your first training session, and another small meal before your second session. This replenishes your energy stores and elicits the repair and rebuilding process. Maximus suggests you eat a meal that’s roughly 75% carbs and 25% protein (you don’t need to include fat at this time that isn’t a byproduct of your protein consumption). If you’re trying to bulk up, make sure this meal contains at least 500 calories.
“Don’t try to perform two full workouts in the same day,” says Bach. “You should cut back your training volume and do two shorter sessions. Doing less but better is a key to making two-a-day training work for you.” Streamline your workouts so that each session is 70–80% of what you’d usually do for a full-intensity workout.
Avoid any exercises that have plagued you in the past. If you’ve hurt your back deadlifting, this is not the time to add deadlifts back to your routine. Extra training can drain your recovery ability, and it may put your body in a more vulnerable state, setting you up for injury. Furthermore, the additional fatigue you’ll experience from the increased workload can compromise your form on lifts, especially ones you’re not proficient in or that have proven problematic for you in the past. By the same token, this is a good time to revisit old standby exercises that you know work for you and that you can perform safely.
For example, in the Advanced Two-A-Day plan below, one day calls for overhead squats. It’s a massively beneficial exercise, but many lifters struggle to do it with perfect form. If you’re one of them, find an easier swap, like rear-foot elevated split squats. Both exercises train the quads hard, but the split squat is easier on your lower back, and doesn’t require the same degree of shoulder and thoracic mobility.
Make sure your form on all your exercises is damn near perfect. “The biggest thing I tell people to watch is their knees and shoulders,” says Maximus. “The worst offenders for the knees are improper squats.” Maximus also stresses keeping your program balanced. “The shoulders get hurt when you do too much pushing [like bench pressing] without enough overhead work and pulling exercises [like rows and pullups].”
No matter what exercises you choose or how you set up your program, you’ll need to bulk up your recovery practices. “If you’re going to do two-a-days, you’re essentially doubling the stress on your body,” says Maximus. “So think of it in business terms: If your operating expenses double, you need to pay for that somehow. We pay for workouts through recovery practices—so plan on increasing your efforts there.”
For example, if you used to sleep seven hours a night, you may need to plan on getting eight or even nine. You might need to do more foam rolling, or get massages, or incorporate yoga and other stretching. “Whatever it is you usually do for recovery, double down on it,” says Maximus.
Understand that you don’t need to do two-a-days every day you work out, and if you haven’t been training long, you shouldn’t (see the sample schedules for two-a-days below). With all that said, you can do two-a-days for as long as you want, particularly if you feel healthy. Let your body be your guide—and know when to back off if you’re feeling down.
Sample Schedule for Multiple Workouts Per Day


The number of twice daily workouts you should perform each week depends on your training history.
If you’re new to training (or are coming back after a year or so off), you probably only want to perform two-a-day workouts once each week. “Dip your toe into the water rather than jump into the deep end,” says Maximus. “And, if after a couple of weeks, you feel good and like you’re acclimatizing well, then you can add on another two-a-day each week. And when you’re acclimatized to that, you can add another day, so you’re doing three a week.”
You can continue building up until you are doing four or five two-a-days a week, max (8–10 total workouts). Anything more than that, and you’re certain to get injured, say both Maximus and Bach. “How much people can take is often dependent on genetics, training history, how they pay attention to recovery, and more,” says Maximus. But a program of three or four two-a-days is plenty for most people and most goals.
Below, Maximus offers two sample two-a-day programs that will accelerate fat loss and muscle growth. Expect to get in the best shape of your life!
Two-A-Day Workout Plan for Beginners

If you’re a “I haven’t been in a gym for years¦” type of beginner, then this plan isn’t for you. But if you’ve been lifting religiously for at least a few months and have hit a plateau, or you want to peak your fitness in a few weeks for an upcoming event, give this program a try. It’s a six-day a week schedule, but you’ll perform three two-a-day workouts per week. If that’s intimidating, ease in by selecting just one of the multi-session days, and build up to three from there.
Monday A.M.
Warmup: 10 minutes of easy cardio, just to break a sweat. You could use a rowing machine, ski erg, or run.
Cardio Workout: “Can’t” Vs “Won’t” Rowing
Set a rowing machine computer’s interval setting to 30 seconds of work and 90 seconds rest. Row 140 meters (115 for women), and stop there, even if you have time left in the 30-second interval. Rest 90 seconds. That’s 1 round. Next round, row 141 (or 116) meters and no more, followed by 90 seconds rest. Continue to add 1 meter to each round until you “can’t” or “won’t” go any farther.
Step 1. Sit on the rower and strap your feet down. Pick up the handle and extend your arms. Bend your hips and knees so that your shins are vertical and your chest is just behind your knees with your back straight. Your hips are behind your shoulders.
Step 2. Push through your legs until they’re extended, and then lean back slightly. Now row the handle to your chest. Keep your wrists straight and in line with your arms.
Step 3. Extend your arms, bend at the hips to close the angle between your torso and your legs, and then bend your knees to slide back to the starting position.
Cooldown: 10 minutes of easy rowing.
Monday P.M.
Warmup 1: 10 minutes of easy cardio.
Warmup 2: Take 10 minutes to practice and warm up with pullups, barbell bench press, barbell overhead press, and barbell bent-over row. Do light reps of each to prepare yourself for the workout.
Strength Workout: “Ticket To Gainzville”
Do the exercises as a circuit, completing one set for each in sequence. Do 10 reps of each exercise the first round, 9 reps the second, then 8, and so on until you’ve completed a final round of just 1 rep of each exercise. Choose a weight that makes it moderately difficult to complete the first 10 reps, and stick with it throughout (you may have to change weights for each barbell exercise). Rest as long as you need between circuits to complete the next round with good form (try starting at 2 minutes).
Bench Press
Step 1. Lie on the bench and arch your back, pulling your shoulder blades down and together. Grasp the bar just wider than shoulder width, and pull it out of the rack.
Step 2. Take a deep breath, tighten your glutes, and lower the bar to your sternum, tucking your elbows to your sides at 45 degrees on the descent. When the bar touches your body, push your feet into the floor and press the bar up at the same time.
Pullup
Step 1. Hang from a bar with your hands shoulder-width apart and your palms facing away. Pull your ribs down and keep your core tight.
Step 2. Draw your shoulder blades back and together and pull yourself up until your chin is over the bar. If your body weight isn’t challenging enough, attach extra weight with a belt, or hold a dumbbell between your feet.
Overhead Press
Step 1. Place a barbell in a power rack and grasp it with hands shoulder-width apart. Take the bar out of the rack and stand with feet shoulder-width apart. Rotate your elbows forward so that your forearms are vertical, and the bar is just below your chin. Tuck your pelvis slightly so that it’s parallel to the floor, brace your core, and tighten your glutes.
Step 2. Press the bar overhead, pushing your head through as the bar passes it. Shrug your shoulders at the top, and then lower the bar back down under control.
Bent-over Row
Step 1. Place a barbell on a rack set to hip level. Grasp the bar with your hands at shoulder width, and pull the bar out of the rack. Step back, and set your feet at hip width; hold the bar at arm’s length against your thighs. Take a deep breath, and bend your hips back—keep your head, spine, and pelvis aligned. Bend until your torso is nearly parallel to the floor.
Step 2. Draw your shoulder blades together as you pull the bar up to your belly button.
Core Workout: Pushup Plank Holds
Finish the workout with pushup plank holds. Hold the position for 30 seconds, and then rest 60 seconds. Repeat for 6 total sets. As you gain core strength, work up to 10 sets.
Pushup Plank Hold
Step 1. Get into a pushup position with hands shoulder-width apart and legs extended behind you. Tuck your pelvis so that it’s perpendicular to the floor, and brace your core.<iframe width="560" height="315" src="https://www.youtube.com/embed/VVoAsUrSTOw?si=ia_W1ij_ZKGCRw3u" title="YouTube video player" frameborder="0" allow="accelerometer; autoplay; clipboard-write; encrypted-media; gyroscope; picture-in-picture; web-share" referrerpolicy="strict-origin-when-cross-origin" allowfullscreen></iframe>
Step 2. Hold the position, keeping your body straight from your shoulders to your heels.
Cooldown: 10 minutes of easy cardio.
Tuesday
Warmup: 10 minutes of easy cardio.
Cardio Workout: 30/30 Intervals
Use a rowing machine and row as hard as you can for 30 seconds. Rest 30 seconds. That’s 1 round. Do 6 total rounds, and then rest 4 minutes. That’s 1 block. Do 3 total blocks (you’ll have completed 18 total rounds).
Men should aim to row 150 meters each round. Women should shoot for 120.
Note: If you don’t have access to a rower, you can use a fan bike, stair stepper, or treadmill, and focus on the intensity rather than distance.
Cooldown: 10 minutes of easy cardio
Wednesday A.M.
Warmup: 10 minutes of easy cardio.
Cardio Workout: “The Long Road”
Row 500 meters in 2 minutes, and then rest 1 minute. That’s 1 round. Do 10 total rounds, trying to take 1 or 2 seconds off your time each round. So, for example, you’d want to finish your second round in 1:58, and your last round somewhere around 1:40.
Cooldown: 10 minutes of easy cardio.
Wednesday P.M.
Warmup 1: 10 minutes of easy cardio.
Warmup 2: Take 10 minutes to practice and warm up with the barbell deadlift, barbell bench press, pushup, pullup, and barbell back squat. Do light reps of each to prepare yourself for the workout.
Strength Workout: “555”
Do the exercises as a circuit, completing one set for each in sequence. Do 10 reps of each exercise the first round, 9 reps the second, then 8, and so on until you’ve completed a final round of just 1 rep of each exercise. Choose a light weight for the barbell exercises—one that you don’t have to work up to so that you can keep the circuit moving fast. We recommend no more than 135 pounds. Rest as needed between rounds of the circuit, but aim to finish the workout in 20 minutes.
Maximus calls this workout 555 because you do 5 exercises for 55 total reps each!
Bench Press
See the description from Monday.
Deadlift
Step 1. Stand with feet hip-width apart and tilt your tailbone back. Bend your hips back to reach down and grasp the bar with hands just outside your knees.
Step 2. Keeping a long spine with your head in line with your hips, take a deep breath into your belly, brace your abs, and drive through your heels. Pull the bar up along your shins until you’re standing with hips fully extended and the bar is in front of your thighs. Keep the bar pulled in tight to your body the whole time with your shoulder blades pulled together and down (think “proud chest”).
If you can’t keep your lower back flat throughout the exercise, it’s OK to elevate the bar on some weight plates or mats, as shown.
Pushup
Step 1. Place your hands on the floor, shoulder-width apart, and extend your legs behind you. Tuck your pelvis so that it’s perpendicular to the floor, and brace your core.
Step 2. Keeping your body straight from shoulders to heels, bend your elbows and lower your chest until it’s about an inch above the floor. Press yourself back up.
Pullup
See the description from Monday.
Squat
Step 1. Set up in a squat rack and grasp the bar with your hands as far apart as is comfortable. Step under the bar and squeeze your shoulder blades together and down, wedging yourself under the bar so that it rests on your traps or the back of your shoulders.
Step 2. Nudge the bar out of the rack and step back, setting your feet at shoulder width with your toes turned slightly outward. Without letting your feet actually move, try to screw both legs into the floor as if you were standing on grass and wanted to twist it up—you’ll feel your glutes tighten and the arches in your feet rise. Take a deep breath into your belly and bend your hips back, then bend your knees and lower your body down. Push your knees out as you descend.
Step 3. Go as low as you can while keeping your head, spine, and pelvis aligned, and then extend your hips and knees to return to standing.
Cooldown: 10 minutes of easy cardio.
Thursday
Warmup: 10 minutes of easy cardio.
Strength Workout Part A: “Gut Punch”
Grab two kettlebells or dumbbells (men should use 16-kilogram kettlebells or 35-pound dumbbells; women should use 12kg or 24 pounds)—and do 20 reps of each of the following exercises in circuit fashion. Rest 1 minute, and then do 15 reps, then 10, then 5. As you improve week to week, increase the number of reps you do. Build up to where you can complete sets of 50, 40, 30, and so on down to 10 reps.
Dumbbell Stepup
Step 1. Hold a weight in each hand and place your foot on a box or bench. It should be high enough so that your thigh is about parallel to the floor when the foot is resting on it.
Step 2. Step up onto the bench without letting your rear leg rest on it—let it dangle behind you. Step back down with the trailing leg. Do 10 reps on each leg (20 total).
Feet-to-Hands
Step 1. Hang from a pullup bar with your hands shoulder-width apart.
Step 2. Raise your feet to your hands. If that’s too tough, pull your knees to your elbows instead.
Strength Workout Part B: Pushups
Do 100 pushups, breaking them into however many sets you need to in order to complete all the reps. Tip: Don’t go to failure on any of the sets. For example, if you can do 20 reps when going all out, do sets of only 10 to 15. This will ensure you keep enough in the tank to reach the total without burning out.
Cooldown: 10 minutes of easy cardio.
Friday A.M.
Warmup: 10 minutes of easy cardio.
Cardio Workout: “Row To Hell”
Hop on a row machine and set its computer to “Single Distance.” Enter 500 meters into the computer. Row as hard as you possibly can until you finish 500 meters. Now rest as long as it took you to complete the 500-meter row. So, for example, if you rowed 500 meters in 1:30, you’d rest for 1:30. Repeat the process for 400 meters, and so on down to 100 meters.
Cooldown: 10 minutes of easy cardio.
Friday P.M.
Warmup: 10 minutes of easy cardio.
Strength Workout: “The Holy Trinity”
Set a timer for 30 minutes. Do as many reps of each of the three exercises as you can in circuit fashion, resting as needed, until the timer goes off. Tip: Don’t go to failure. Instead, cycle through small sets of each. If this feels like a lot, take longer rest breaks between exercises.
Pullup
See the description from Monday.
Dip
Step 1. Suspend yourself over parallel dip bars with hands just outside shoulder width. Lean slightly forward, and lower your body until your upper arms are parallel to the floor.
Step 2. Push yourself back up.
Pushup
See the description from Wednesday.
Core Workout: 100 Curlups
Take as many sets as you need to complete 100 total reps of the curlup.
Curlup
Step 1. Lie on your back on the floor with feet flat on the floor and knees bent.
Step 2. Slowly lift your shoulder blades off the ground, curling your torso upward while you slide your hands forward on the floor.
Cooldown: 10 minutes of easy cardio
Saturday
Perform steady-state cardio for 30–90 minutes. You can row, run, or bike at 70–90% of your max heart rate.
This is meant to be hard but not crushing. The goal is to get a really good sweat. If you like, you could do the workout “Fartlek” style. Fartlek is Swedish for “speed play.” That means an unstructured interval run, where you go from easy to moderate to hard efforts at random. Fartlek is fun to do with friends by playing games like follow the leader. There’s a huge mental benefit from this training due to its unpredictability. So, ditch your watch, your distance goals, and all your other numbers, and just go out, have fun, and keep it free flowing.
Sunday
Rest day
Advanced Two-A-Day Workout Plan
If you’ve trained regularly for years, and are ready to take your body and performance to the next level, this is the plan for you. It’s designed to help you build muscle, burn calories, and enhance your athleticism.
The program features five two-a-day workouts—the maximum allowable—which should be enough to bust any rut. However, it’s also a lot to recover from. If you feel run down at any point during the program, it’s OK to skip a training session, or reduce your intensity for a session or two. Make sure you’ve put in some time doing 3 two-a-days per week before you attempt five.
Monday A.M.
Warmup: Do the exercises in the order shown.
Wall Squat
Sets: 3 Reps: 5
Step 1. Stand facing a wall with your toes touching it.
Step 2. Squat as low as you can. (The wall is used to keep your torso upright.)
Bodyweight Squat
Sets: 2 Reps: 20
Step 1. Stand with your feet between hip and shoulder-width apart.
Step 2. Push back your hips, bend your knees, and squat as low as you can while keeping your back straight.
Walking Lunge
Sets: 3 Reps: 20
Step 1. Take a long step forward. As your foot lands, bend your knee and lower your body until your front thigh is parallel to the floor.
Step 2. Step forward with your rear leg and lunge on that side. Each rep should have you walking forward.
Strength Workout: Deadlifts
Deadlift
Sets: 4 Reps: 4
See the description in the beginner’s workout above. Slowly add weight to the bar, working up to about 80% of what you know or estimate you can lift for one perfect rep. Use that weight to perform 4 sets of 4 reps, resting 4 minutes between sets.
Core Workout: Pushup Plank Hold
See the description in the beginner’s workout above. Take as many sets as you need to complete 5 total minutes of holding, or as much time as you can.
Monday P.M.
Warmup: 10 minutes of easy cardio, just to break a sweat. You could use a rowing machine, ski erg, or run.
Strength Workout: Walking Lunge/Wall Sit Ladder
Do 20 walking lunges on each leg, and then immediately perform a wall sit, holding the position for 30 seconds. Next, do 19 walking lunges on each leg, and then immediately perform a wall sit, holding the position for 30 seconds. Continue the pattern, doing one fewer walking lunge on each leg, until you’ve performed just one lunge on each leg.
Walking Lunge
See the description from Monday a.m.
Wall Sit
Step 1. Get into a squat position with your back supported by a wall and your hips and knees 90 degrees.
Step 2. Hold the position.
Cooldown: 10 minutes of easy cardio
Tuesday A.M.
Cardio Workout: Perform 60 minutes of cardio at a pace that would allow you to easily hold a conversation. You could run, row, climb stairs, etc.
Tuesday P.M.
Cardio Workout: Perform 60 minutes of cardio at a faster pace than you used in your morning session. Think: a pace that would make it challenging to have a conservation. If possible, perform a different activity than you did in the morning.
Wednesday A.M.
Warmup: Do the exercises in the order shown.
Wall Squat
Sets: 2 Reps: 5
See the description from Monday.
Bodyweight Squat
Sets: 2 Reps: 10
See the description from Monday.
Goblet Squat
Sets: 2 Reps: 5
Step 1. Hold a dumbbell or kettlebell close to your chest and under your chin with both hands. Stand with feet between hip and shoulder-width and turn your toes out slightly.
Step 2. Push your hips back, bend your knees, and squat as deeply as you can while keeping your torso upright.
Walking Lunge
Sets: 2 Reps: 10 (each leg)
See the description from Monday.
Strength Workout: Barbell Complex and Front Squat
Do the exercises in the order shown. For the clean + front squat + hang clean complex, use a light weight that allows you to maintain good technique.
Clean + Front Squat + Hang Clean Complex
Set a timer for 20 minutes, and perform 1 rep of the complex every minute on the minute until the time is up. For example, when the clock starts (0:00), you’ll do one rep. Rest until that minute is up, and then perform your next rep when the clock reads 1:00.
Step 1. Hold the bar at hip level with arms straight and shoulder-width apart. Stand with feet between hip and shoulder-width.
Step 2. Keeping a long spine (a straight line from your head to your pelvis), push your hips back, and then quickly lock them out, using the momentum to pull the barbell up to shoulder height. Catch the bar at your shoulders, your palms facing the ceiling and upper arms parallel to the ground. The bar should be resting on your front delts.
Step 3. From this position, push your hips back, bend your knees, and descend into a front squat. Go down as fat as you can without your lower back rounding. Come back up.
Step 4. Lower the barbell back to your hips. Now put both moves back together into one: clean the bar up to your shoulders, immediately squat with it, stand back up, and lower it. That’s one rep.
Front Squat
Sets: 5 Reps: 2
Work up to a weight that’s 80–85% percent of your one-rep max, and use that load for your 5 sets of 2. Rest 2–3 minutes between sets.
Step 1. Set the barbell on a power rack and grasp it with hands shoulder-width apart. Roll your elbows under the bar so that they point forward, and lift the bar off the rack with arms parallel to the floor. Step back into your squat stance.
Step 2. Lower your body into the squat, and come back up.
Core Workout: Knees-To-Elbows
Perform 100 reps of knees-to-elbows, taking as many sets as you need. If that’s too hard, aim for 50 total reps, and build up from there.
Step 1. Hang from a pullup bar with your hands shoulder-width apart.
Step 2. Bend your knees and raise them to your hands.
Wednesday P.M.
Warmup: Do the exercises in the order shown.
Wall Squat
Sets: 2 Reps: 5
See the description from Monday.
Bodyweight Squat
Sets: 2 Reps: 10
See the description from Monday.
Goblet Squat
Sets: 2 Reps: 5
See the description from Monday.
Walking Lunge
Sets: 2 Reps: 10 (each leg)
See the description from Monday.
Banded Shoulder Circles
Sets: 2 Reps: 10
Step 1. Stand holding an elastic exercise band (or dowel) with both hands outside shoulder width. Draw your ribs down, tuck your pelvis so it’s parallel to the floor, and brace your core.
Step 2. Keeping your arms straight, raise the band over and behind your head as far as you can. Reverse the motion to bring the band back in front of you.
Push Press Hold
Sets: 2 Reps: 10
Step 1. Grasp two light dumbbells and hold them at shoulder level. Stand with feet shoulder-width apart. Tuck your pelvis and brace your core.
Step 2. Dip your knees quickly and, keeping your torso upright, use the rebound to press the weights overhead to lockout. Complete 10 reps, holding the lockout position of the last one 30 seconds. Repeat for 2 total sets.
Strength Workout: Overhead Squat and Turkish Getup
Do the exercises in the order shown.
Overhead Squat
Sets: 5 Reps: 10
Step 1. Load a bar with a light weight and grasp it with hands wider than shoulder width. Press the bar overhead, and get into your squat stance.
Step 2. Squat down, keeping the bar behind your head and a long line from your head your pelvis. Rest 2 minutes between sets.
Turkish Getup
Sets: 1 Reps: 6 (each side)
Step 1. Lie on your back on the floor and hold a kettlebell or dumbbell over your chest with your right hand. Bend your right knee and plant that foot; extend your left arm out at 45 degrees and push your hand into the floor for stability.
Step 2. Roll your torso up off the floor, using your left arm for support. Keep the kettlebell overhead and pointing to the ceiling. Drive your right foot into the floor to bridge your hips up, and swing your left leg under you to rest on your left knee.
Step 3. Windshield wiper the left lower leg so it’s in line with the right leg, and you’re resting in the bottom of a lunge.
Step 4. Stand up tall, with the weight still raised overhead.
Step 5. Reverse the steps to return to the floor. Complete 6 reps on the right side and then 6 on the left. That’s one set. Rest 1–2 minutes between sets.
Cooldown: 10 minutes of easy cardio.
Thursday A.M.
Warmup: 10 minutes of easy cardio.
Cardio Workout: “Can’t” Vs “Won’t” Rowing
Set a rowing machine computer’s interval setting to 30 seconds of work and 90 seconds rest. Row 140 meters (115 for women), and stop there, even if you have time left in the 30-second interval. Rest 90 seconds. That’s 1 round. Next round, row 141 meters (or 116) and no more, followed by 90 seconds rest. Continue to add 1 meter to each round until you “can’t” or “won’t” go any farther.
Cooldown: 10 minutes of easy cardio.
Thursday P.M.
Warmup: 10 minutes of easy cardio.
Strength Workout
Do the exercises in the order shown. For the barbell overhead press, slowly work up to a weight that is 80% of what you think you can lift for a one-rep max. Use that load for all 4 sets, resting 3 minutes between sets.
Overhead Press
Sets: 4 Reps: 4
See the description in the beginner’s workout.
Bent-over Row
Sets: 10 Reps: 10
See the description in the beginner’s workout.
Push Press Hold
Sets: 4 Reps: 10
See the description from Wednesday.
Cooldown: 10 minutes of easy cardio
Friday A.M.
Warmup: Do the exercises in the order shown.
Wall Squat
Sets: 2 Reps: 5
See the description from Wednesday.
Bodyweight Squat
Sets: 2 Reps: 10
See the description from Wednesday.
Goblet Squat
Sets: 2 Reps: 5
See the description from Wednesday.
Walking Lunge
Sets: 2 Reps: 10 (each leg)
See the description from Wednesday.
Strength Workout: Back Squat and Wall Sit Hold
Do the exercises in the order shown.
Squat
Sets: 9 Reps: 8
See the description in the beginner’s workout. Work up to 90% of what you estimate to be your one-rep max and perform 1 rep. Then back off to 55% of your max and perform 8 sets of 8 reps, resting 2 minutes between sets.
Wall Sit
Sets: 10 Reps: Hold for 30 seconds
See the description from Monday.
Cooldown: 10 minutes of easy cardio
Friday P.M.
Cardio Workout: Perform 60 minutes of cardio at a pace that would allow you to easily hold a conversation. You could run, row, climb stairs, etc.
Saturday
Warmup: 10 minutes of easy cardio.
Strength Workout: “The Holy Trinity”
Set a timer for 30 minutes. Do as many reps of each of the three exercises as you can in circuit fashion, resting as needed, until the timer goes off. Tip: Don’t go to failure. Instead, cycle through small sets of each. If this feels like a lot, take longer rest breaks between exercises.
Pullup
See the description in the beginner’s workout.
Dip
See the description in the beginner’s workout.
Pushup
See the description in the beginner’s workout.
Core Workout: 100 Curlups
Take as many sets as you need to complete 100 total reps of the curlup.
Curlup
See the description in the beginner’s workout.
Cooldown: 10 minutes of easy cardio
Sunday
Rest day
]]>
The Strict Push Up is one of the most basic bodyweight exercises and is still a primary test for upper body strength and conditioning. While the Push Up fully engaging your shoulders and lats in a pushing movement, the exercise also engages your core, requiring you to maintain a neutral spine throughout the movement by holding a plank position.
Exercise Steps
Step 1: Start with your hands on the ground, shoulder width apart. Your wrists, elbows, and shoulders should be stacked in a vertical line from the ground. Keep your middle fingers pointed straight ahead of you with your fingers spread. Place your feet straight behind you and keep them together. Get into a plank position with your spine neutral, including your neck (don’t look forward).
Step 2: Bend your elbows at a 45 degree angle out from your body, lowering yourself steadily towards the ground.
Step 3: Once your sternum is 3-4 inches from the ground, pause briefly before raising your body back up to the starting position. Each rep requires that you lock out your arms prior to proceeding with the next repetition. Your body should never flex or break at any point during the Push Up.
Tips & Safety: If you have wrist issues, point for index finger forward rather than your middle finger; this should relieve some strain.
]]>Relax. You don’t have to scrap your current workout to do isotonic exercises, because, chances are, you’re doing them already. While the technical-sounding name makes for a good buzzword—hence the reason you see it showing up in articles and videos online from time to time and getting attention—isotonic exercise is an umbrella term for most of the movements you’ll do in a typical gym workout. With that said, it’s helpful to understand how and why they work to build muscle and strength (as well as aid your fat-loss goals), so prepare for a crash course on the topic—streamlined in layman’s terms so there’s no heavy lifting.
What Is Isotonic Exercise?

The term isotonic means “same tension,” which refers to the tension that’s placed on the muscles you’re contracting while they’re moving the joint(s) they act on. The idea is that you’re keeping the same amount of tension on the muscle throughout the full range of motion. Most of the exercises you’re no doubt already familiar with do this: pushups, squats, running, etc.
There is some nuance to this concept, though. “The term isotonic in resistance training has evolved away from its technical definition,” says Eddie Jo, PhD, CSCS*D, Director of the Human Performance Research Lab at Cal Poly, Pomona. “In real-life situations, your typical resistance exercise is not truly isotonic because of a variety of interwoven factors.”
One of these factors, according to Jo, is the relationship between a muscle fiber’s length and the amount of force it can produce, called the “length-tension relationship” by exercise scientists. This is a description of how much force a muscle fiber can produce at different lengths. Each muscle fiber has an optimal length—a degree at which it can produce the most amount of force—which is often dictated by the ability of the two major contractile components of a muscle fiber (the protein filaments actin and myosin) to interact with one another. The farther the fiber is stretched or shortened past this optimal point, the less tension you’ll see in the muscle and the less force it will be able to produce.
Need a visual? Imagine doing a biceps curl. Due to the length-tension relationship in the muscle, your biceps will be strongest when the elbow is bent around 90 degrees. If it’s bent more than 90 degrees, the structures that make the muscles contract overlap too much, and it can’t contract as strongly. If the elbow is straighter (less than a 90-degree bend), there’s too little overlap and, again, the muscles can’t produce as much force.
Therefore, it’s technically impossible to maintain the exact same amount of tension on a muscle throughout the entire range of motion in an exercise—even a so-called isotonic one.
The second concept that you have to consider with isotonic exercise is biomechanical advantage—the fact that different joint angles produce different mechanical advantages (or disadvantages) during a given movement. We’re talking about leverage.
The horizontal distance that the weight (or other source of resistance) is held from the point of rotation (the working joint) determines the force that’s needed to move that load. Further away (a longer lever) requires more force, and closer, less force.
Let’s look at how the glutes work during a back squat¦
As you lower your body into the squat, the distance between your glutes and the barbell on your back gets longer and longer. As a result, their mechanical advantage gets worse and worse. When it’s time to power you out of the hole at the bottom of the lift, extending your hips to come back up to lockout, the glutes have to work much harder than if you had just done a half squat, descending only part of the way so that your glutes were nearer to the bar throughout the whole rep.
As you come back up, the glutes get closer to the bar, your leverage improves, and they don’t have to work as hard to extend the hips. In short, this is why the last few inches of a squat feel a lot easier to perform than coming up from the very bottom.
Because of these two considerations, pure isotonic movement doesn’t really exist, especially in compound exercises that most of us do (squats, pushups, pullups, and so on). Dr. Jo explains: “There is no situation during dynamic resistance exercise where you produce constant tension, because in most cases, if not all, biomechanical factors are always changing and thus a change in tension is required.”
Therefore, the term isotonic is something of a misnomer. When trainers and exercise scientists throw it around, their intention is to describe the load that’s being moved to provide the muscle tension—i.e., it’s constant. The weight you lift on a squat or a pushup is the same throughout the entire rep—it’s not being modified by a machine or some interference. Nevertheless, the tension on the muscles will vary depending on the changing length of the muscle fibers and the muscles’ biomechanical advantage. So, while the weight may remain the same during the exercise, the way it feels to your muscles is changing all the time.
Did we say “no heavy lifting” to read this article? Sorry. But now that you understand the concept, it will get lighter from here.
What Are Examples of Isotonic Exercises?

Virtually any traditional exercise you can think of can be filed under the isotonic category. As we said above, you don’t absolutely have to know what isotonic exercises are because, more than likely, you’re doing (or have done) them already. Here are a few examples:
– Back squat
– Bench press
– Deadlift
– Pushup
– Pullup
– Biceps curl
– Triceps extension
– Dumbbell, barbell, or bodyweight lunge
– Leg extension
– Ab crunch
You may be wondering, then, what exercises are NOT isotonic. We’ll discuss that next.
Isotonic vs. Isometric Exercises
While the name isotonic might be somewhat new to you, you’re certainly familiar with the term isometric, as it’s been a part of the muscle vernacular for eons. Isometric means “same length,” as in, during an isometric muscle contraction, the length of the muscles does not change (and neither does the angle of the joint they act on). Any time you’ve stopped to hold and squeeze a rep in a particular position, you’re doing an isometric (which is why they’re sometimes called “iso holds”). Pausing your arm at the halfway point in a curl, or holding your body at the top of a chinup, are both examples of isometric training—your muscles are working hard, but there’s no actual movement being performed.
Isometrics can be added to isotonic exercises to increase the intensity of the workout. For instance, after you finish a set of squats, you could walk over to a wall and perform a wall sit (“sit” with your hips and knees 90 degrees and your back against the wall for support) and hold for time. This is a good way to fry your legs.
You can use isometrics to make light weights feel heavier. If you have an injury, say, and you don’t want to risk aggravating it with heavy weights, you can hold isometric contractions at different points in the range of motion to make the exercise feel much harder, thereby removing the need for more challenging loads. This is also a smart strategy when you find yourself at an ill-equipped hotel gym, or your Aunt Tilly’s house—when you’re visiting for the holidays and only have access to the pink dumbbells she left to collect dust in the garage. By slowing down your lifting speed and holding the middle, bottom, or top of certain exercises, you can make the weight feel much heavier and get more out of it.
Slowing down your sets with isometrics is also a good way to ensure that your form stays tight. You’re less apt to race through your set and get sloppy if you have to stop and hold every rep.
You might also do isometrics to strengthen a weak point in a lift you’re trying to improve. If you find that your sticking point on the bench press is a few inches from lockout, you could perform bench presses with an isometric hold at that point in the range of motion. Set the safety catches of a power rack at that position and rest the bar on them. Load the bar with a super-heavy weight—one you can’t actually lift—and set up as if you were benching like normal. Try to press the bar, pushing as hard as you can for three seconds. Of course, the weight won’t move, but you will have performed an isometric that trains your muscles to be stronger in that position. With a few weeks of isometric training, your sticking point should be gone.
Another fancy exercise science term you may hear in conjunction with isotonics and isometrics is isokinetic training. Isokinetic means “same speed.” These exercises are done on special machines that adjust the resistance they provide based on your movement speed, ensuring that the pace of your reps is constant no matter how hard you work. That means that the tension on the muscles is maximal throughout the full range of motion. The best way for most of us to see how isokinetic exercise works is to watch the training montage in Rocky IV. The leg extension and machine ab twists that Ivan Drago does are isokinetic!
The major benefit of isokinetics is safety. Since the machine controls the pace, it’s commonly used in rehab settings to help people come back from injury with low-risk training. Research suggests that isokinetic lifting may be more efficient for rehab than isotonic exercise, but unless you train at an elite facility, or you’re paying for the best possible physical therapy, isokinetic training is impractical and out of reach, so we won’t spend any more time on it.
Remember also that Drago got KO’d at the end of that movie, so if isotonic exercise was enough for Rocky, it’s enough for you.
Benefits Of Isotonic Workouts
Isotonic exercises are effective and efficient. You train the target muscles through a full range of motion, which maintains, and can even increase, their flexibility. Training through full ranges also activates the greatest number of muscle fibers. To achieve similar gains in muscle and strength from isometric training, research shows you may have to train the muscle at four different joint angles—that is, hold and squeeze your reps in four different places. Ain’t nobody got time for that.
Isotonic exercises are also intuitive. You’ve probably been doing them for years, but even if you’re brand new to exercise, you can learn to perform the basic ones proficiently without much of a learning curve. There’s no fancy equipment required (unlike with isokinetic training), and you don’t need a protractor and a guy in a lab coat present to help you figure out the joint angles you need to train. Simple bodyweight training is isotonic training.
Whether your goal with exercise is to build muscle and strength, power and endurance for sports, change your body composition, or just stay active as you age, isotonic exercise should be your foundation. Isometric training and, if possible, isokinetic work, will only be adjuncts.
Good Stretches for Loosening Up
Regardless of whether you’re doing isotonic, isometric, or isokinetic training, you need to warm up and prepare your muscles to handle resistance safely. Many people stretch as part of their warmup, intending for the temporary increase in range of motion to help them get more out of their exercises, but stretching alone doesn’t raise the temperature in the muscles sufficiently, and it can cause injury if your stretches are too aggressive. A better warmup strategy is mobility training, which combines stretching and light movement to both raise your core temperature and prepare the muscles to work through the ranges of motion that you’ll use during your workout.
Integrate some or all of the following mobility drills into your warmup routine, courtesy of Natalie Higby, co-founder of the Durable Athlete app. Perform 5–10 reps for each, and repeat for 2–3 total sets.
Straight-Leg Hip Circle
Step 1. Hold onto a sturdy object for support, and raise one leg up in the air 90 degrees. Keep the knee as straight as you can.
Step 2. Keeping your shoulders facing forward, draw your leg outward and away from you to the side. When you feel you’re running out of range, begin turning your foot over to face the floor.
Step 3. When you’ve made a complete circle, return your foot to the floor. Reverse the entire motion on your next rep.
Wide-Stance Hinge
Step 1. Stand with feet outside shoulder width and bend only at the hips, driving your butt straight back to lower your torso as far as you can. Allow your knees to bend as needed.
Step 2. Take a deep breath and then let it out, folding your body forward on the exhale so your fingers can touch the ground (or close to it).
Step 3. Bend your knees further as you tuck your pelvis under and slowly extend your spine to come up to standing again.
Ankle Roll
Step 1. Stand with feet outside shoulder width and place your hands on your knees.
Step 2. Begin making big circles with your knees, shifting your weight to the balls of your feet, then the edges of your feet, and then your heels and arches as your knees move. You can reverse direction on your next set.
Sky Reach To Arm Thread
Step 1. Get on all fours with your hands under your shoulders and your knees directly beneath your hips. Brace your core.
Step 2. Draw your right arm up and across your chest as you twist your right shoulder toward the ceiling and reach overhead. Be careful to keep your hips facing the floor.
Step 3. Reverse the motion, reaching your arm across your body and behind the support arm. Twist as far as you can, ideally until the back of your right shoulder touches the floor. Complete your reps on that side, and then switch sides.
Floor Hand Rotation
Step 1. Get on all fours with your hands under your shoulders and your knees directly beneath your hips. Brace your core.
Step 2. Reach your right arm up and forward, and then, keeping your elbow straight, rotate it down to reach for your lower back. Turn your wrist so your palm faces up as you move. When the back of your hand touches your low back, draw your elbow down to the floor.
Step 3. To reverse the motion, raise your elbow back up, lift your hand off your low back, and rotate the arm back in front of you again. Complete your reps on that side and then switch sides.
See other mobility exercise options HERE.
Sample Beginner’s Isotonic Workout
Here’s a sample upper-body strength workout using isotonic exercises.
1. Bench Press
Sets: 4 Reps: 4 Rest: 3 to 5 minutes
Step 1. Set up with the bar just over your eyes. Make sure that your feet are flat on the floor and your shoulders, back, and butt maintain contact with the bench. Grasp the bar with hands about shoulder-width apart (you may have to slide them an inch or two in either direction), so that when you lower the bar to your chest, your elbows make a 90-degree angle.
Step 2. Unrack the bar and hold it over your chest. Lower the weight to your chest. After touching your chest, press the bar back to the starting position.
2. Dip
Sets: 3 Reps: 15 Rest: 90 seconds to 2 minutes
Step 1. Suspend your body over the bars of a dip station and brace your core.
Step 2. Drive your elbows back as you lower yourself down. Once your shoulders are parallel with your elbows, press yourself back to the starting position.
3. Pullup
Sets: 3 Reps: 15 Rest: 90 seconds to 2 minutes
Step 1. Place your hands on the bar with palms facing forward, just outside your shoulders. Hang from the bar but keep your core braced.
Step 2. Pull yourself up until your chin is over the bar.
4. Overhead Banded Triceps Extension
Sets: 3 Reps: 20 Rest: 60–90 seconds
Step 1. Attach a circle band to a sturdy object overhead and grasp an end in each hand. Step away from the anchor point and raise your arms overhead. Your legs should be staggered. Bend your hips back to put tension on the band. Your body should form a straight line from the top of your head to the heel of the back foot.
Step 2. Extend your elbows without moving your upper arms or torso. Switch the front leg on each set.
5. Dumbbell Reverse Fly
Sets: 3 Reps: 20 Rest: 60–90 seconds
Step 1. Hold a light dumbbell in each hand and hinge your hips back to about a 45-degree angle. Brace your core, and extend your arms in front of your body with a slight bend in your elbows (but don’t relax your shoulders).
Step 2. Raise the dumbbells out to your sides by squeezing your upper back and shoulders together. Make sure that your shoulders stay down and you are not shrugging during the lift. Lower the weights under control.
]]>
Summary
If your are looking to build or improve explosiveness, try one or all of these 5 barbell exercises. These full body movements will develop explosive power and have you ready for any athletic challenge. Power is the combination of strength and speed. The ability to generate high levels of power output is dependent on how well you can recruit fast twitch muscle fibers. In doing so, the end result is better performance in the gym in the form of both increased speed and strength. Grab a barbell and get to work!
Barbell Exercise #1: Power Clean

The Power Clean is a powerful exercise that builds explosive power and strength throughout your entire body. Performing the Power Clean will help you build a powerful grip. You will also develop a powerful hip snapping motion that will transfer into any sport or physical activity you choose.
Barbell Exercise #2: Thruster

The Barbell Thruster hits your whole body, burns fat, and increases strength. The Barbell Thruster is really a combination of two exercises, the front squat and the overhead press, and is a very effective exercise. The Barbell Thruster works both the upper and lower body in a compound movement for a complete body workout.
Barbell Exercise #3: Power Snatch

The Barbell Snatch will strengthen you from head to toe. The Barbell Snatch is used in many instances as a test because it is one the best exercises to demonstrate ones strength. This exercise not only has a strengthening effect, but will also cut body fat very fast. Building an iron grip is not a problem since any ballistic exercise performed repeatedly will do so. Try the Power Snatch to add a ton of power and muscle to your frame.
Barbell Exercise #4: 1-Arm Fighter Stance Axle Press

The 1-Arm Fighter Stance Axle Press works nearly every muscle on one side of your body at a time, but specifically hits the glutes, deltoids, and quads. This exercise is great for lifters who lack the shoulder integrity to perform overhead presses with barbells due to the fact that the lift puts less load on the joints than if you were using a barbell sans landmine.
Barbell Exercise #5: Alternating Axle Squat Toss

The Alternating Axle Squat Toss is another barbell landmine variation that will strengthen movements in all planes of motion and build power and explosiveness in the fast-twitch muscle fibers. The lift also integrates muscle groups putting heavy emphasis on the core as well as training the body through the vertical load.
]]>
Official Seth Rollins Workout
Dynamic Warmup
1. JUMPING JACKS x 10 REPS
2. GATE SWING X 10 REPS
3. POGO HOP X 10 REPS
4. SEAL JACK X 10 REPS
5. BODYWEIGHT SQUAT X 10 REPS
6. SIDE LUNGE X 10 REPS (EACH SIDE)
7. LUNGE AND ROTATE X 10 REPS (EACH SIDE)
8. REVERSE LUNGE AND REACH OVER TOP X 5 REPS (EACH SIDE)
9. CARIOCA X 10 YDS
10. LIZARD CRAWL X 10 (EACH SIDE)
11. SKIPPING FORWARD X 10 YDS
12. SKIPPING BACKWARDS X 10 YDS
13. FRANKENSTEIN WALKS X 10 YDS
14. FRANKENSTEIN SKIPS X 10 YDS
15. INCHWORM X 5-10
16. HIP SWING X 10 (EACH LEG)
Monday
1. PERFORM DYNAMIC WARMUP
2. PRACTICE SKILL WORK FOR 15 MIN.
¢ HANDSTAND PUSH-UPS
¢ MUSCLE UPS
¢ KNEES-TO-ELBOWS
3. MAIN LIFT*
¢ MILITARY PRESS 6 X 3
4. METCON
¢ FULL SQUAT SNATCHES 9-7-5
¢ BAR MUSCLE UPS 9-7-5
Tuesday
1. PERFORM DYNAMIC WARMUP
2. PRACTICE SKILL WORK FOR 15 MIN.
¢ TRIPOD TUCK TO HEADSTAND
¢ TRIPOD STRADDLE TO HEADSTAND
¢ TRIPOD PIKE TO HEADSTAND
3. MAIN LIFT*
¢ CLEAN & JERK 6 X 3
4. METCON
¢ ROW FOR 5 MIN. REST 2 MIN.
¢ ROW FOR 3 MIN. REST 2 MIN.
¢ ROW FOR 3 MIN. REST 2 MIN.
Wednesday
REST DAY
Thursday
1. PERFORM DYNAMIC WARMUP
2. PRACTICE SKILL WORK FOR 15 MIN.
¢ L-SIT
¢ PARALLETTE PUSHUPS
¢ HANDSTAND WALKS
3. MAIN LIFT*
¢ FRONT SQUAT 6 X 3
4. METCON
¢ 50 BOX JUMP, 24 INCH BOX
¢ 50 JUMPING PULL-UPS
¢ 50 KETTLEBELL SWINGS, 1 POOD
¢ WALKING LUNGE, 50 STEPS
¢ 50 KNEES TO ELBOWS
¢ 50 PUSH PRESS, 45 POUNDS
¢ 50 BACK EXTENSIONS
¢ 50 WALL BALL SHOTS, 20 LB BALL
¢ 50 BURPEES
¢ 50 DOUBLE UNDERS
Friday
1. PERFORM DYNAMIC WARMUP
2. PRACTICE SKILL WORK FOR 15 MIN.
¢ BOX JUMP
¢ HOLLOW BODY
¢ STRICT PULL UP
3. MAIN LIFT*
¢ POWER SNATCH 6 X 3
4. METCON
¢ 7 MUSCLE-UPS
¢ 21 BURPEES
Saturday
ROW 5000 METERS FOR TIME
Sunday
REST DAY
*RECORD WEIGHT USED FOR ALL SETS

]]>
One of the oldest forms of training around is becoming a staple of building fantastic results for athletes and everyone else looking to become a force to be reckoned with.
I can remember many years ago using sledgehammers for destruction; tearing down walls and breaking up concrete when I worked in construction.
When I was done with a long day’s work with the sledgehammer, I felt like a badass, even though I was tired as hell.
My forearms would be the size of grapefruits, and my core, shoulders, back, and grip would be sore for days.
An Introduction To Sledgehammer Workouts
When you think of old school training methods, the sledgehammer is one of the first things that probably comes to mind. In regards to building and developing raw strength and explosive power, nothing beats it.
Of course, the primary recipient of your “destructive” sledgehammer swings is a large tractor tire.
Sledgehammers come in many weights: from 4 pounds, all the way up to 30+ lbs, and some are even bigger.
Along with many of the physical benefits that come with sledgehammer training, you also feel damn good just swinging and slamming it down.
It brings out your innate raw power and leaves you feeling like a superhero (or villain, depending on your mood).
You just can’t get this feeling from any piece of equipment that a fancy gym might provide.
The Benefits Of Sledgehammer Exercises

For fighters and athletes, sledgehammer exercises are great tools to use from time to time, whether it’s included in your circuit training program or as the primary tool you use for strength and power development.
Along with developing strength and power, you can also look to enhance wrist stability as well as strengthen the forearms and grip.
Grip strength is key for both strikers and grapplers along with the other major sports athletes.
Sledgehammer workouts are some of the meanest tools that you can train with, improving your strength, endurance, flexibility and explosive power.
When using a sledgehammer for strength training, it causes you to use the full range, multiple-joint movements focusing on acceleration, agility, coordination, speed, and mental toughness.
You can use it as a full-body workout with or without a tire. You can also use the sledgehammer as a warm up exercise before starting your workout with another tool.
Sledgehammers will strengthen muscles, tendons, and ligaments in the wrist, elbow and shoulder girdle.
This is the perfect tool for fighters looking to strengthen those areas and increase explosive power.
It allows for circular weight training exercises not possible with other traditional equipment. Your hand-eye coordination even improves!
Selecting A Sledgehammer For Your Workouts
Buying the right size hammer is key, if you are starting off, don’t go out and get a 16-pound hammer; this will only get you injured.
Start off light and work your way up; a good weight for first timers is the eight pounder.
You can learn the technique and form with this weight and master the main exercises while increasing your endurance levels.
Even a small handle sledgehammer that weighs only 4 pounds with a 12-inch handle are great to use for Donkey Kongs, short range slams while kneeling, and double slams (one small hammer in each hand).
Sledgehammer Exercises
When training with sledgehammers, emphasize repetitive slams into the program; this can develop endurance in a lot of key areas like your back, shoulders, traps, core, and arms.
You can also use one-handed slams (also known as Tomahawks) which will cause you to use balance and core strength.
Footwork is key: you have to pivot one foot in some exercises and then make sure that your feet are set firmly every time (the last thing you want is the hammer coming back at you and hitting your shin).
You can also square your feet up with the tire and do overhead slams, keeping your body straight and aligned.
Slams require major muscle groups and stabilizer muscles to work together during the movement, causing an awesome exercise for raw power and endurance.
If you are a beginner, this is the first exercise to start with before progressing into single arm slams and so on.
The Main Benefits of Sledgehammer Exercise
â Improve work capacity
â Muscle conditioning
â Develop core strength
â Grip/forearm strength
â Full body strength & endurance
â Rotational strength
Advanced Sledgehammer Workout Techniques
As you get comfortable with the sledgehammer and doing slams and other exercises become easy, you can try juggling them. This is a true skill and takes time to develop, so start off using a very light weight and progress up.
With juggling sledgehammers, you start to develop a whole new level of strength and reflex along with hand-eye coordination. I would recommend starting off practicing on sand, grass, or other soft surface; you don’t want the sledgehammer to bounce if you drop it.
Sledgehammer Workouts

Beginner Sledgehammer Workout
A1: Right Side Slams – 4 x 15
A2: Left Side Slams – 4 x 15
A3: Overhead Slams – 4 x 15
Perform as a non-stop circuit, resting 15 seconds in between rounds.
Advanced Sledgehammer Workout
A1: Tomahawks (Right Hand) – 15 to 1
A2: Tomahawks (Right Hand) – 15 to 1
A3: Double Arm Slams – 15 to 1
After each circuit round, rest 15 seconds. Start with 15 reps for the first circuit and decrease reps for each progressive circuit until you are only performing one rep per exercise.
Check Out Some Killer Sledgehammer Workouts In This Video
]]>Sandbag Shouldering is a relatively simple exercise. You lift the sandbag to your shoulder, then repeat. But don’t be fooled by its simplicity, if you focus on the work as opposed to the skill, you will run into problems.
Sandbag Shouldering is a full body movement that works strength and conditioning simultaneously. Ideally, this exercise variation should be more efficient than breaking down the movement into different parts.
It extremely important to work this sandbag exercise as a skill. If you think about shouldering a sandbag as a conditioning exercise before you work it as a skill, then you will get caught in the trap of “hard work,” meaning that you will only think about getting the sandbag into the shouldered position through whatever means necessary (this is wrong).
There are certain aspects of the Sandbag Shouldering exercise that are important to focus on. You want to break up the different components of movement and make sure alignments are sound before you insert it into a conditioning workout. Here are three steps to achieving a perfect execution of the Sandbag Shouldering exercise.
Sandbag Shouldering Step #1: The Set Up

- Place the sandbag length ways, forward and back, located between your feet and the middle of the bag.
- Make sure the sandbag is lined up somewhere around the middle of your big toes.
- As you hinge back maintaining a neutral spine position, you are going to need to drop your hips to keep your back flat.
- This positioning will make sure alignment of the hinge stays true.
- Make sure the shin angle is as vertical as possible keeping your hips as far back and relatively high as possible
- Keep a neutral, to slighlty extended spine with your shoulders at least slightly higher then your hips.
- What that means is your hips are going to have to drop as you reach down towards the floor. You need to find out the give and take of how high can you keep your hips, while keeping them lower then your shoulders.
- Keep your hips higher then the knees while maintaining neutral to slightly extended spine.
Sandbag Shouldering Step #2: The Pull

- Reach down and grab under the middle of the sandbag.
- While grabbing the bag, you want to continue tracking the shoulders to avoid any roundness in the upper back. It is an important focal point to prevent the shoulders from collapsing forward.
- Maintain a proud chest, extended in the thoracic spine, and keeping the shoulders from any internal rotation.
- Pinch the shoulder blades back so it amplifies the load on the posterior chain. This will create an intensified load into the Hamstrings and Glutes.
Sandbag Shouldering Step #3: The Catch

- Forcefully drive your feet downward into the floor to extend the hips into a tall standing position.
- Accelerate the bag along the front line of your body. As it passes the hips you are going to pull the elbows back and in, keeping the bag close to your body.
- You want the bag to land on the shoulder softly, stabilizing your standing tall position with your hips and shoulders square.
- Always keeping a proud posture, I want you to finish the exercise and sell that finished position.
- From there, pitch the hips back as you follow the bag back down into that original hinge position for one repetition.
Tips for the Sandbag Shouldering Exercise
- Make sure there is no rotation of the hips or shoulders.
- Stand tall with the sandbag shouldered squarely on one shoulder or the other, with no excessive amount of rotation at the torso, hips, or knees.
- Ideally you will, alternate shoulders from one side to the other.
- When you accelerate the bag up towards the shouldering portion, keep the elbows and sandbag as close to the body as possible during the entire range of motion.
- Do not let the bag swing away from your body
- Do not lock out your arms, this will create a long arc. You want to keep the bag as close to the body as possible, while avoid any rotation of any body parts.
Nowadays, the fitness industry defines cardio more broadly, and while you’re still welcome to do long jogs if that’s your thing, you have another option as well: high-intensity interval training—often called HIIT. Interval workouts can use any type of exercise, from cardio machines to bodyweight to free weights, so you can customize your workout to your own needs.

Burn Belly Fat With These 3 Great HIIT Workouts For Women
Here’s how HIIT works: you alternate fast, intense periods of exercise with bouts of light activity or complete rest. While it takes a fraction of the time a traditional aerobic workout does, HIIT can be just as effective for reshaping your body—and many people (including yours truly) think it’s a lot more fun and challenging.
HIIT may be the perfect kind of cardio for busy moms or women who can’t (or won’t) run anymore, as well as those who don’t have access to a gym. In fact, low-impact HIIT workouts are the number-one request I get from my clients and female Instagram followers. HIIT can be tailored to your experience level and the equipment you have available, including if you work out at home.
What Are HIIT Workouts?
There are many ways to do high-intensity interval training, but the concept is always the same: work hard for a few seconds to get your heart rate up, and then take it easy to recover. Repeat for rounds. Unlike traditional cardio (jogging, swimming, cycling, etc.), where you work at a moderate and steady pace for long periods (usually 30 minutes or more), HIIT workouts are anaerobic—they don’t use oxygen as their primary energy source. Instead, they rely on creatine phosphate to provide the power for explosive, rapid-fire activity, which means HIIT has more in common with weight training than it does jogging. So if you love to lift as much as I do, chances are you’ll enjoy HIIT more than steady-state cardio!
Because HIIT workouts are so intense, you simply can’t perform them for long (just as you can’t lift weights steadily for minutes on end). Work intervals are usually much less than 60 seconds (rest intervals may be longer or shorter, depending on how hard the work bouts are), and the whole workout typically lasts 20 minutes or less.
How Females Can Benefit From HIIT Workouts
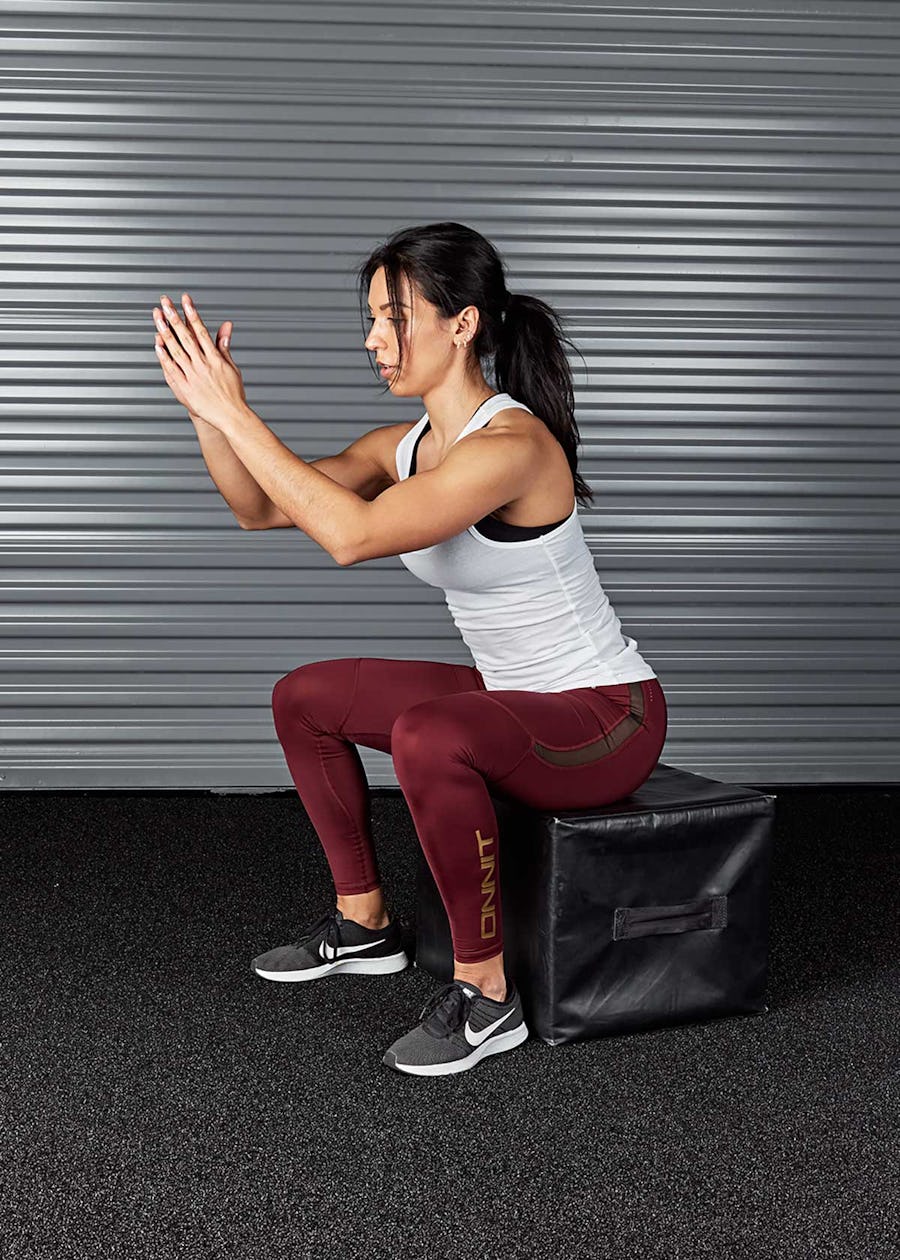
HIIT workouts may not last long, but they can provide just as good a workout as sessions that take much more time. According to the American College of Sports Medicine (ACSM), HIIT workouts can burn more calories per minute of exercise than aerobic training does, making it the better cardio option when you’re short on time.
The other big benefit of HIIT is the effect it has on your metabolism. Like weight training, HIIT increases post-exercise oxygen consumption (EPOC). Says the ACSM: “This is generally a two-hour period after an exercise bout where the body is restoring itself to pre-exercise levels, and thus using more energy. Because of the vigorous contractile nature of HIIT workouts, the EPOC generally tends to be modestly greater, adding about six to 15% more calories to the overall workout energy expenditure.” In other words, HIIT has you burning more calories—including more fat—when you’re recovering after the workout. That means you’ll actually be getting leaner when you’re hanging out around the house, watching TV, and sleeping! You don’t get this same effect with aerobic training.
Since HIIT has the muscles working hard, it also has the potential to boost muscle growth. Look at power athletes such as sprinters and sprint cyclists—their workouts are variations of HIIT, and they typically have ripped bodies to show for it.
How Many Times Per Week Should You Do HIIT Workouts?
As with lifting weights, HIIT is stressful to the body and requires recovery time. You can’t do it every day. I generally recommend that my clients do two or three HIIT sessions per week, done either on the same day that you lift (preferably right afterward or several hours apart) or on days in between.
For as many advantages as HIIT has over steady-state cardio, it’s still important to fit some long-duration aerobic training into your week if you can. I’ll jog or jump rope at a light pace at least one day per week, and for a minimum of 15 minutes. Steady-state cardio builds an aerobic base that your body can use to fuel all its other activities, and it’s good for your heart, as well as burning extra calories.
Beginner HIIT Workout For Women
If you’re new to HIIT, or working out in general, this routine is a perfect place to start. You’ll use only your bodyweight, and every move is low impact—so if you’re overweight, or have back, knee, or shoulder problems, these exercises shouldn’t aggravate them.
Directions: Perform reps of each exercise in turn for 30 seconds, resting 15 seconds between sets. After you complete one round, rest about a minute (more if you need to), and then repeat for 3 to 5 rounds.
Workout duration: 20–30 min.
1. Squat Twist
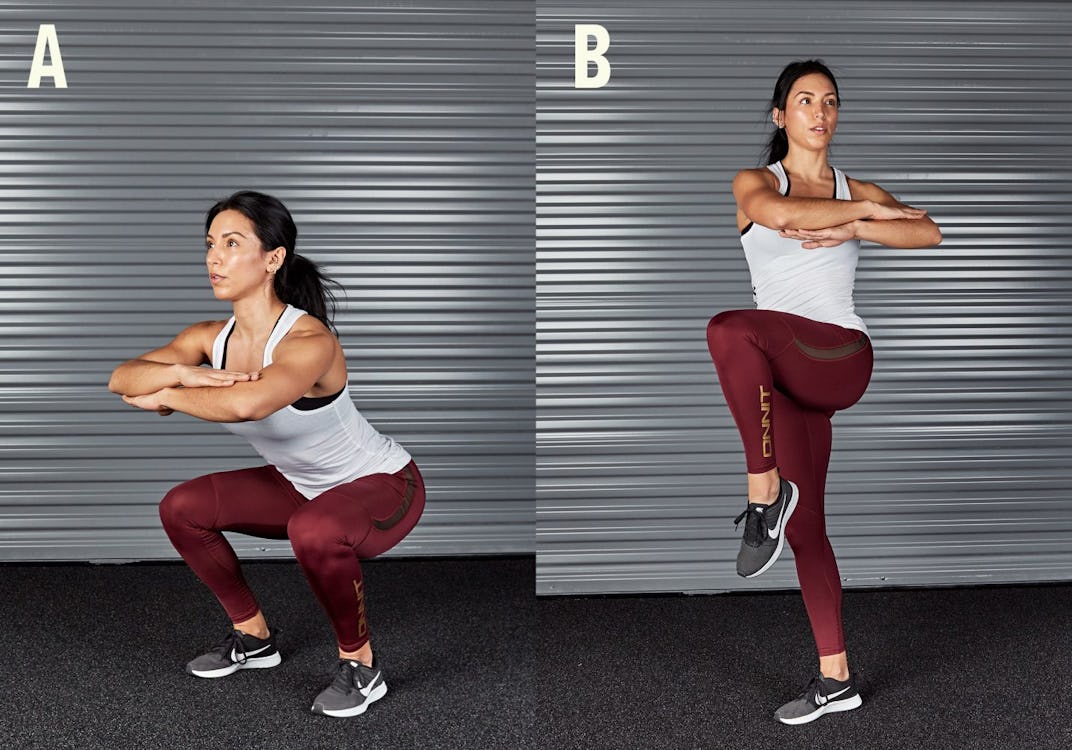
Step 1. Stand with feet between hip and shoulder-width apart and cross your arms in front of your chest to help you balance. Twist your feet outward and into to the floor (as if you were standing on turf and trying to twist it up beneath your feet), but without moving their position—you just want to create tension and feel your hips and glutes fire up. You should feel the arches in your feet rise.
Step 2. Begin to lower your body, pushing your knees apart and sitting back as if into a chair. Go as low as you can while keeping your head, spine, and pelvis in a long line. If you feel your tailbone is about to tuck under, stop there.
Step 3. Come up out of the squat and twist your torso to the left, raising your left knee into the air 90 degrees. Squeeze your abs. Reverse the motion and repeat the squat, twisting to the opposite side.
2. Reach and Crunch
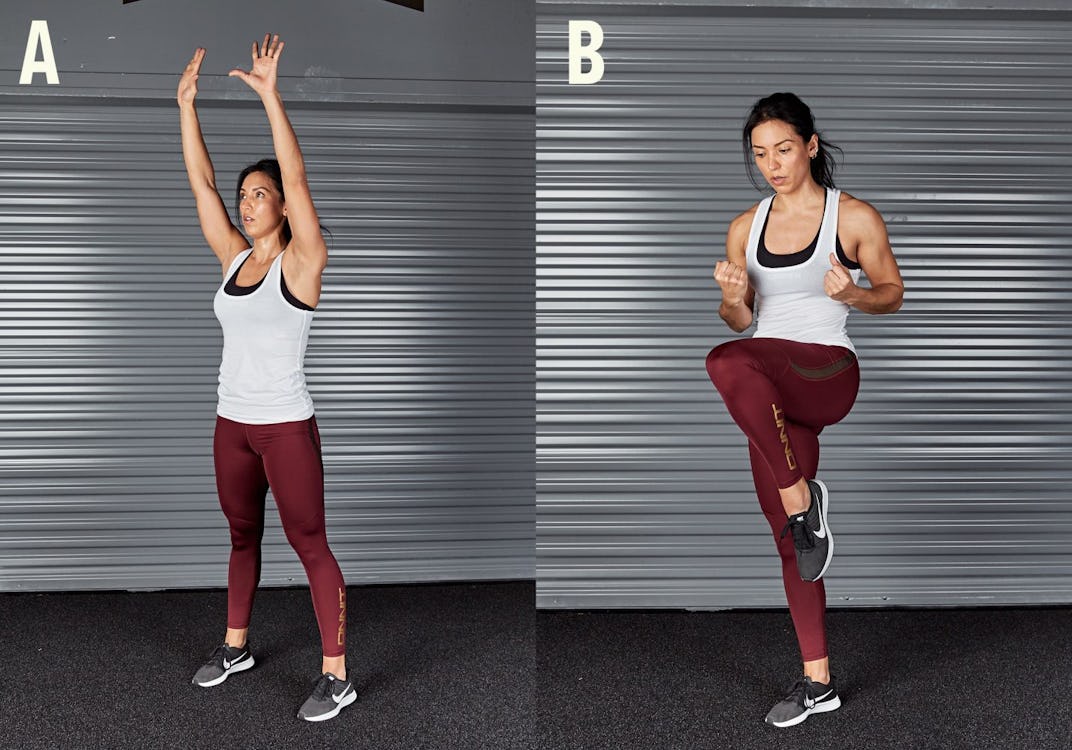
Step 1. From standing, pull your ribs down and tuck your tailbone slightly so that your core is braced. Raise your arms straight overhead—keep your core tight so that your ribs don’t flare out and your back doesn’t hyperextend.
Step 2. Twist your torso to the left as you bring your left knee up and pull your arms down, as if delivering a knee strike. Crunch your abs, trying to bring your ribs and hips together.
3. Shuffle Punch

Step 1. Stand with feet together and your arms chambered at your sides, ready to throw straight punches.
Step 2. Shuffle your feet to your left and land in a deep squat with feet outside shoulder width. As you drop into the squat, punch your right arm straight out, and then shuffle to the right and punch with your left arm.
4. Squat and Reach
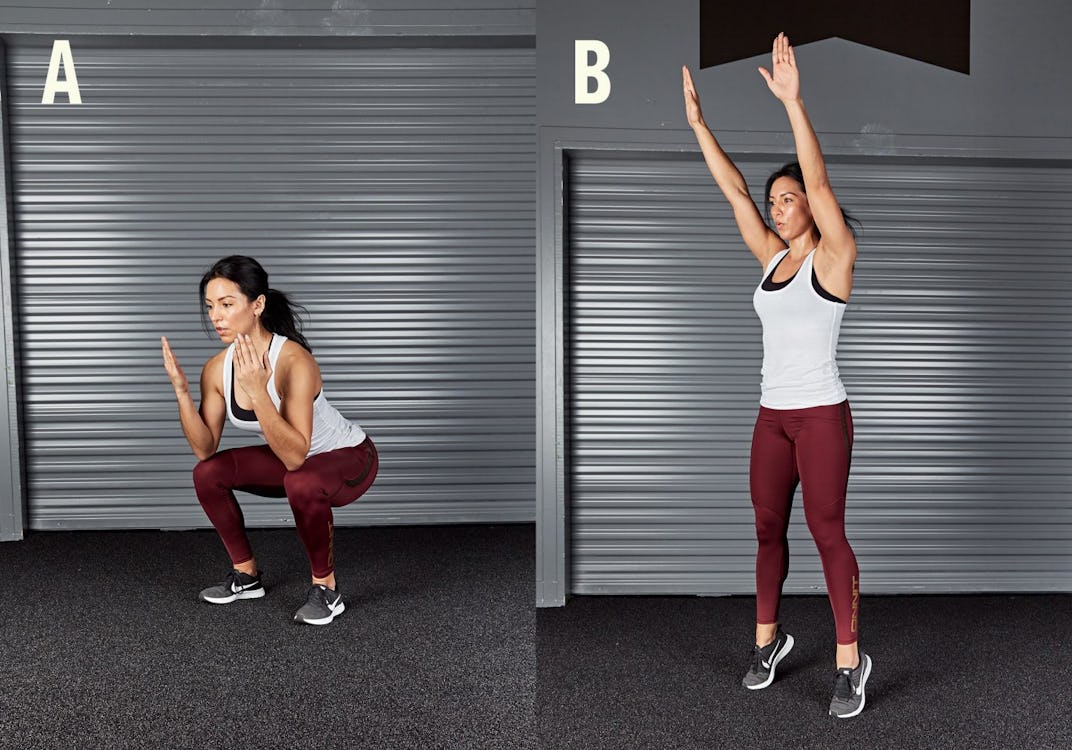
Step 1. Perform a squat as you did in the squat twist above, but start with your arms bent in front of you, as if you had just curled a barbell. Squat until your elbows touch your knees.
Step 2. Come out of the squat quickly so the momentum makes you come up on the balls of your feet. Reach your arms overhead while keeping your ribs pulled down and core engaged.
5. Side-To-Side Knee Drivers

Step 1. Stand with feet outside shoulder width and reach your arms overhead and slightly to the left.
Step 2. Draw your arms down while driving your right knee up and to the left, as if delivering a knee strike. Repeat on the opposite side.
6. Mountain Climber
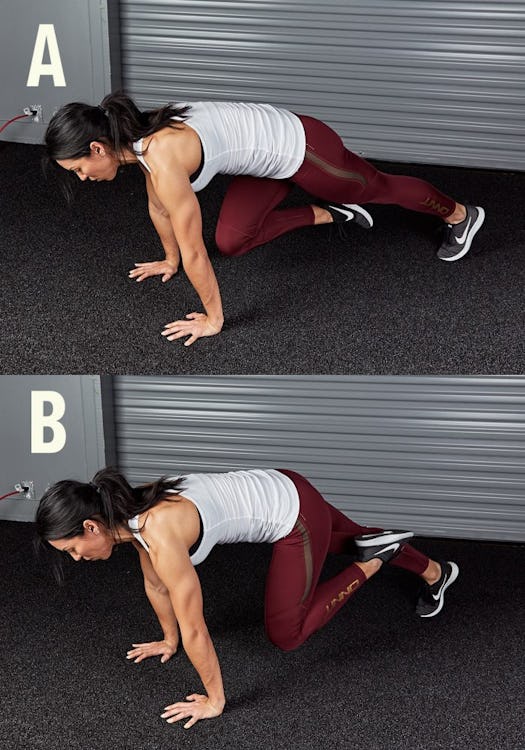
Step 1. Get into the top of a pushup and then drive your right knee to your chest while keeping your hips level with the floor.
Step 2. Replace your right foot and raise your left knee to your chest. Continue alternating sides at a brisk pace.
7. Table Top Reach and Lift
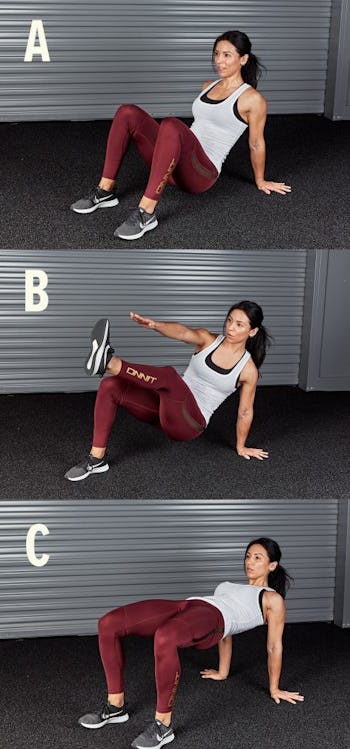
Step 1. Sit on the floor with feet planted in front of you and hands underneath your shoulders. Brace your core.
Step 2. Push through your heels to raise your hips off the floor. Raise your left leg straight out in front of you and reach for it with your right arm. Lower your hips and repeat on the other side.
Step 3. Raise your hips into a full table-top position, tucking your pelvis under slightly and bracing your core so that your lower back doesn’t hyperextend in the top position.
Advanced HIIT Workout For Women
When you’re ready to take it up a notch, try this HIIT routine, which employs some light plyometric exercises—jumping moves that train explosive power. Not only do they get your heart rate up and challenge your muscles, but they’re fun to do. You’ll feel like an athlete again (or, if you didn’t play sports in school, for the first time—it’s never too late!)
Directions: You’ll need a small box, step, or other platform. Perform reps of each exercise in turn for 20 seconds, resting 10 seconds between sets. After you complete one round, rest about a minute (more if you need to) and then repeat for 3 to 5 rounds.
Workout duration: 12–20 min.
1. Toe Tap

Step 1. Set a box or step that’s about a foot high in front of you. Quickly raise one leg and tap the top of the box with your foot.
Step 2. Return your foot to the floor and repeat on the opposite leg. Get into a rhythm that’s like you’re running, tapping the box quickly with each foot and staying light on your feet.
2. Explosive Hop Up
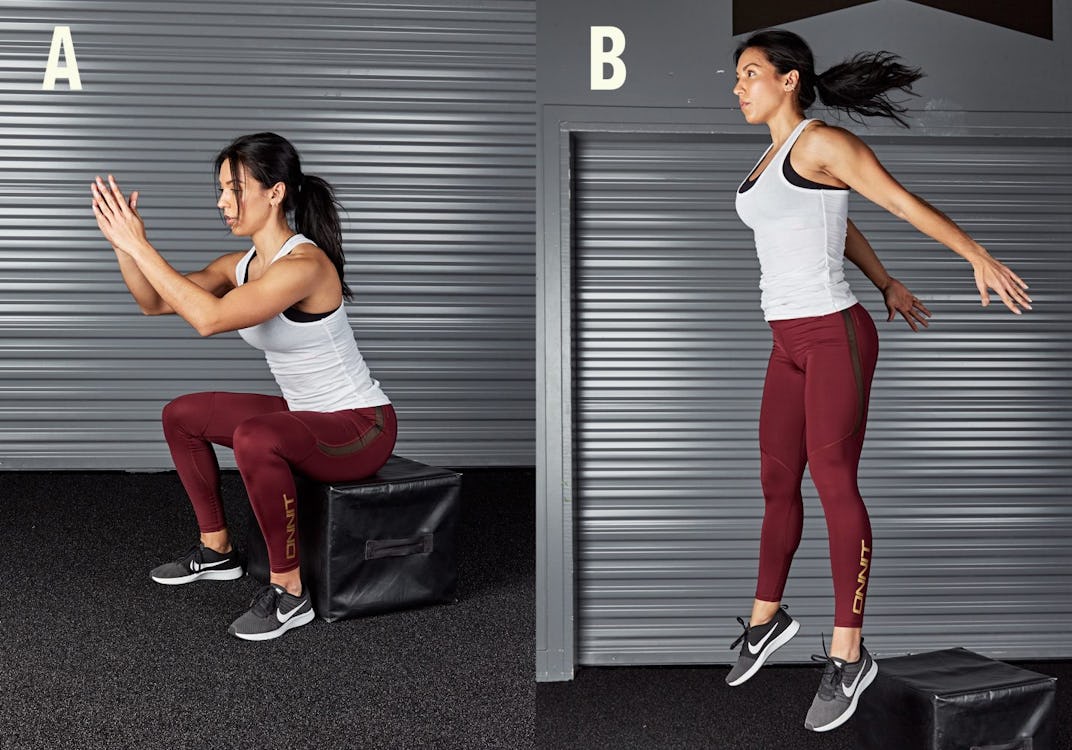
Step 1. Sit on the box with feet on the floor at hip width. Raise your arms up in front of you.
Step 2. Swing your arms back as you jump off the box as high as you can. Land with soft knees and lower yourself back onto the box. Reset before you begin the next rep.
3. Hop Over
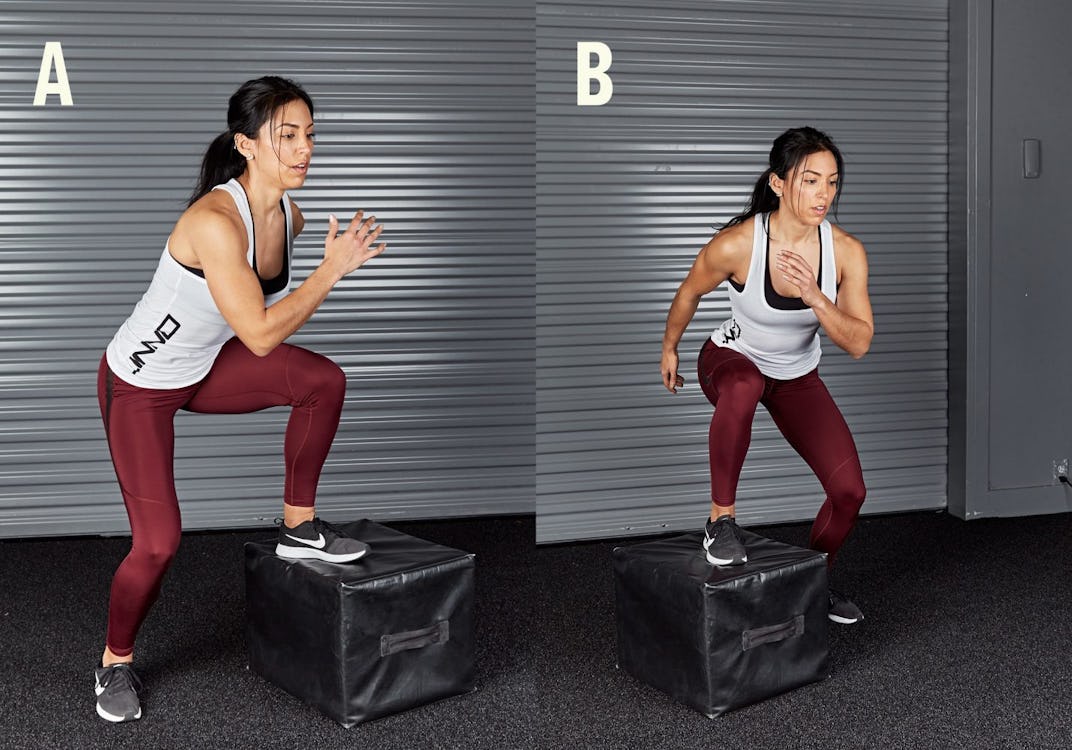
Step 1. Stand to the right side of the box and place your left foot on top of it.
Step 2. Push off the box to hop over it laterally, landing with your right foot on the box and your left foot on the floor. Immediately repeat to the right side and continue performing reps in a rhythm.
4. Quad Hop

Step 1. Stand behind the box and place your left foot on it.
Step 2. Press through your foot to hop up into the air. Swing your left arm forward as you come up to increase the height of your hop. Land softly and repeat immediately. After you’ve spent 20 seconds on your left side, rest, then switch sides, and repeat.
5. Hands-On Climber
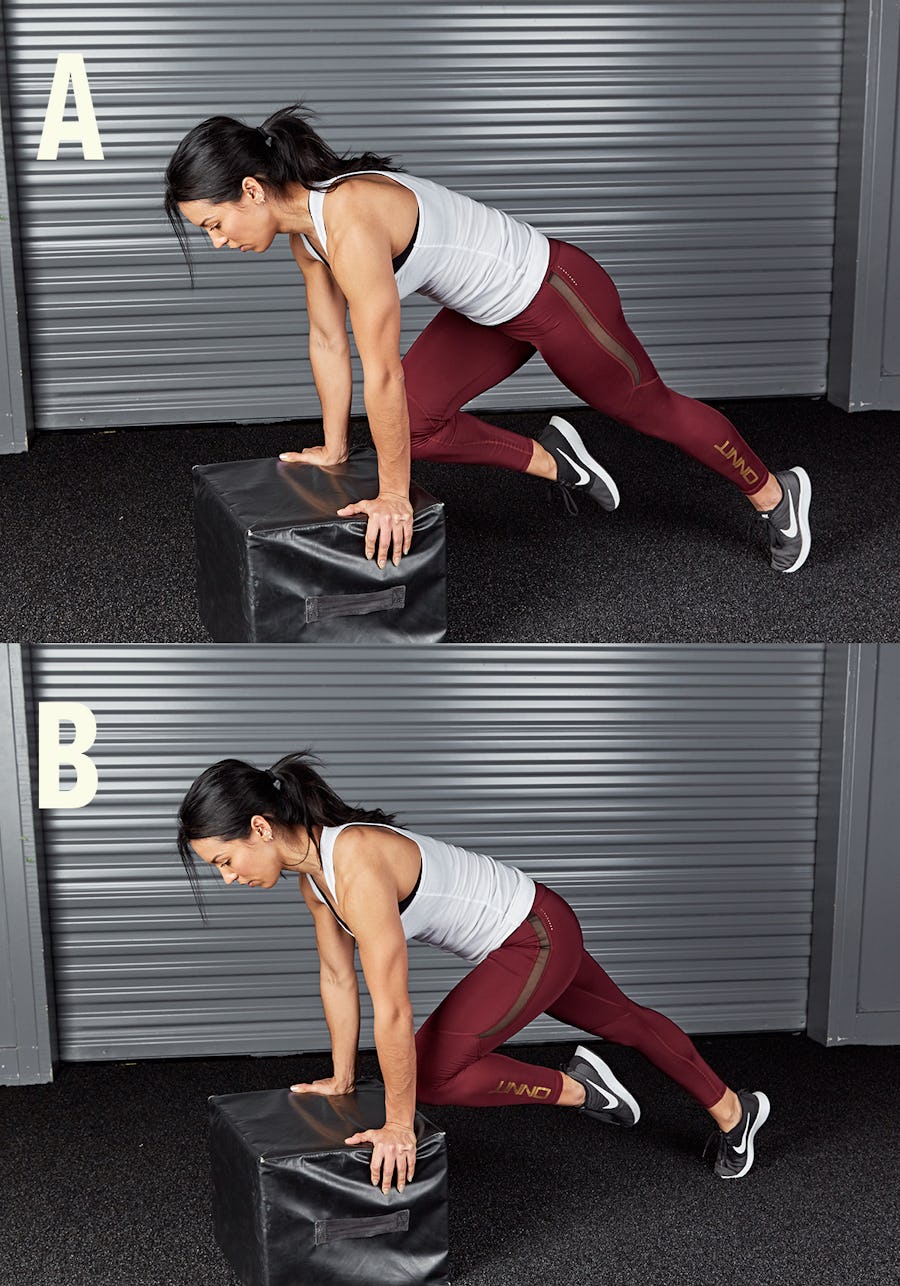
Step 1. Place your hands on the box and get into a pushup position.
Step 2. Perform mountain climbers as described in the beginner’s workout above.
6. Feet-On Climber

Step 1. Rest your feet on the box and get into pushup position.
Step 2. Perform mountain climbers as you have above, alternating each knee to your chest, but move more methodically, being careful to replace each foot on the box before you lift the other one.
7. Single-Leg Switch
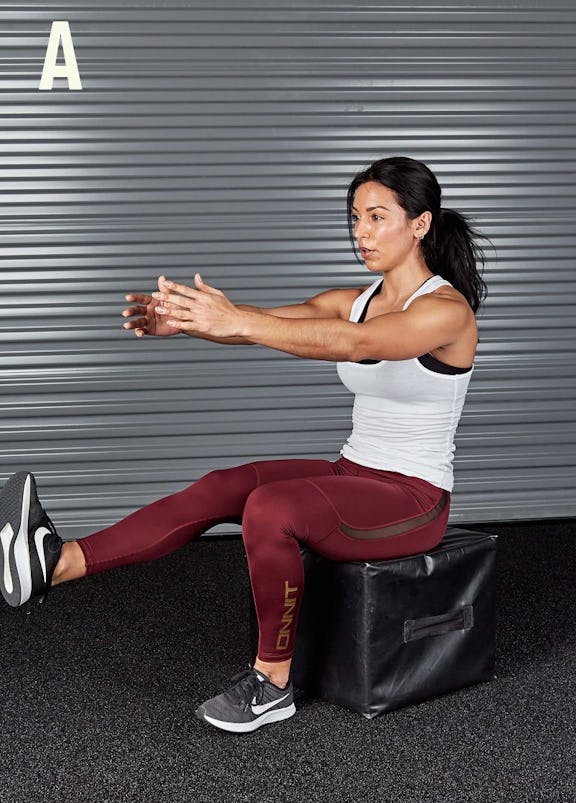
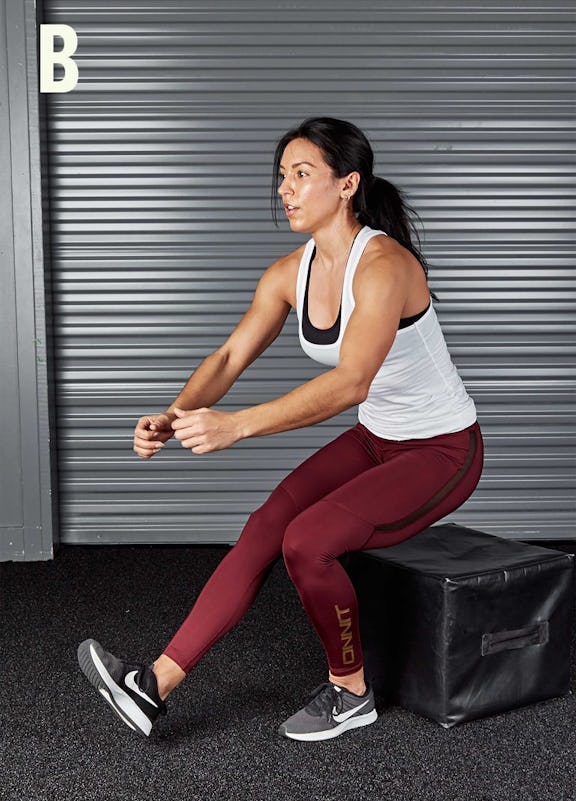
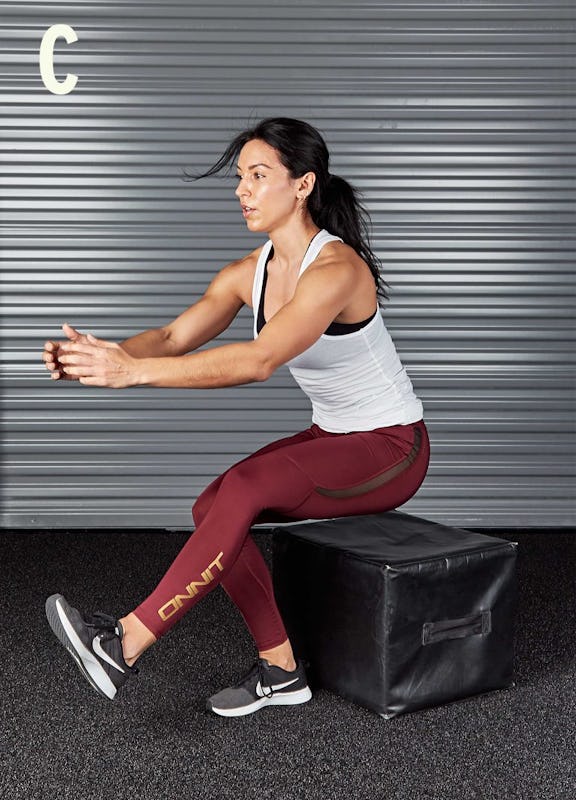
Step 1. Sit on the box and extend your right leg straight out in front of you. Reach your arms forward to help you balance.
Step 2. Stand up from the box using only your left leg and then quickly hop onto the right foot and sit back down. Now stand up on the right leg. Get into a rhythm.
HIIT Workout You Can Do At Home
HIIT doesn’t need to be done in a gym. All you need is some light dumbbells (even a pair of three-pounders will do) and a few feet of open floor space.
Directions: Perform reps of each exercise in turn for 30 seconds, resting 15 seconds between sets. After you complete one round, rest about a minute (more if you need to), and then repeat for 3 to 5 rounds. To make your glutes work harder, wrap an elastic exercise band just above your knees so that it resists your legs (optional).
Workout duration: 20–30 min.
1. In/Out Squat Jump Press

Step 1. Stand with feet close together, holding a pair of light dumbbells at your sides with elbows bent 90 degrees.
Step 2. Jump and spread your legs, landing in a deep squat at the same time you press both weights out in front of you at arm’s length. Jump back to the starting position.
2. Alternating Kickback Press
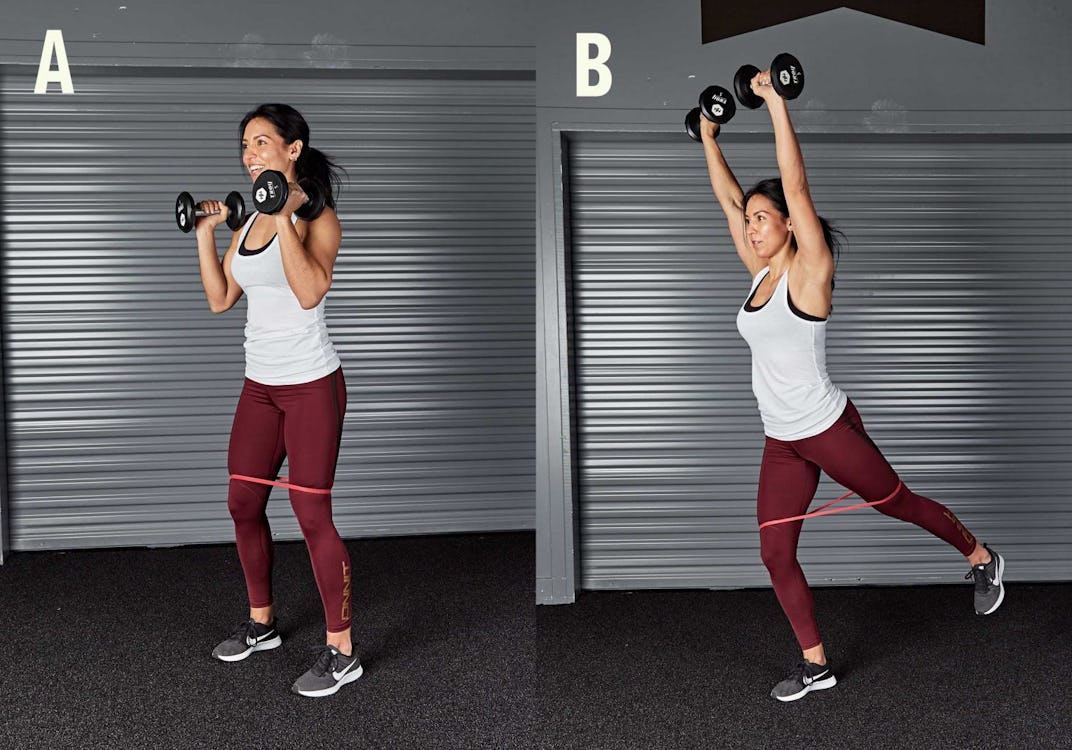
Step 1. Stand holding dumbbells at shoulder level with feet closer together.
Step 2. Extend your left leg behind you with knee straight as you press the dumbbells overhead. Return to the starting position and repeat on the opposite leg.
3. Jumping Jack Press
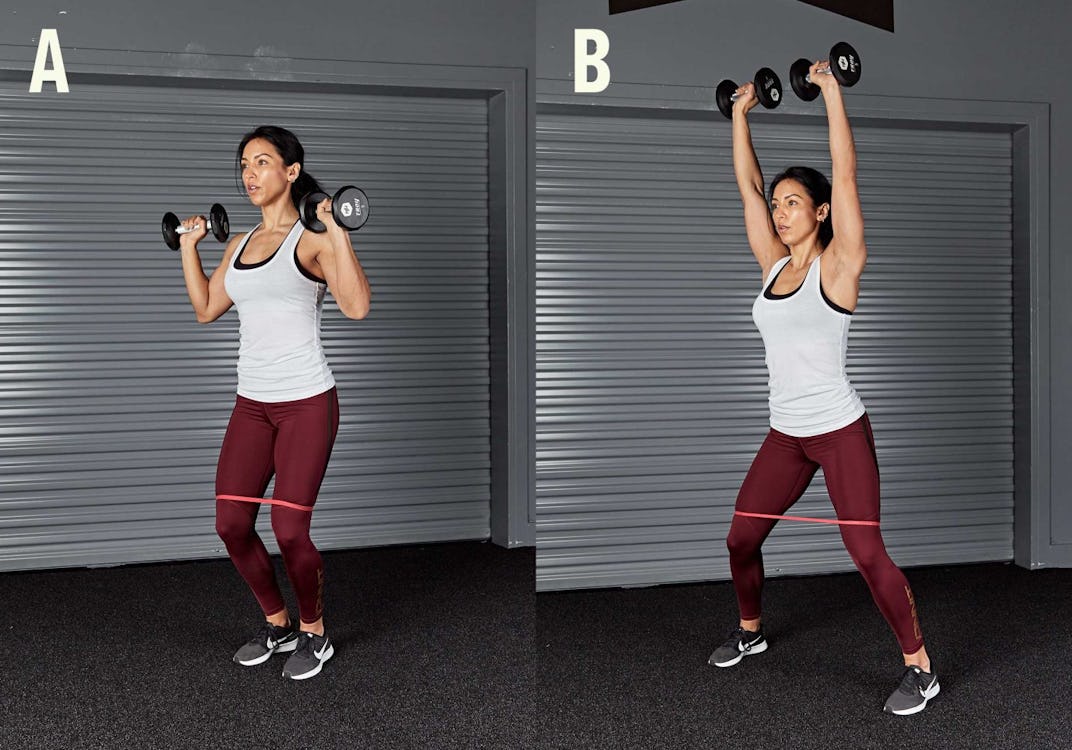
Step 1. Hold dumbbells at shoulder level and stand with feet close together.
Step 2. Dip your knees quickly to gather momentum, and then jump your legs to outside shoulder width as you press the weights overhead. Land with soft knees.
4. Squat Press
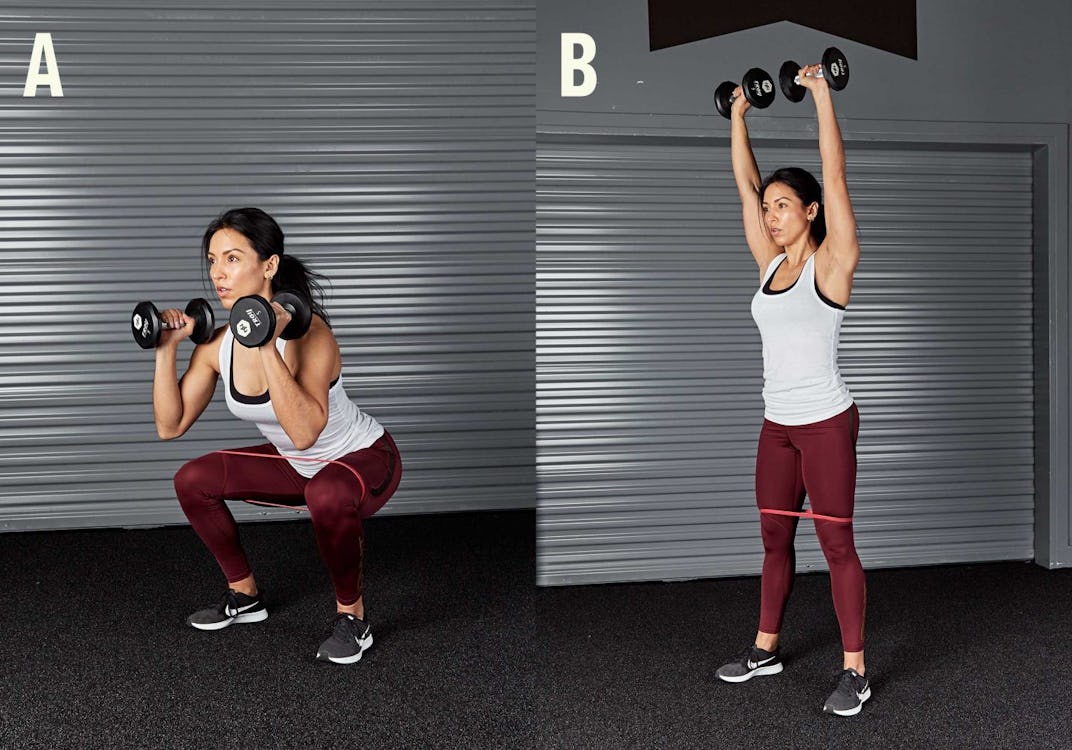
Step 1. Hold dumbbells at shoulder level and squat.
Step 2. As you come up, press the weights overhead.
5. Lunge Press (right leg)

Step 1. Hold dumbbells at shoulder level and step back into a staggered stance so your right leg is front. Lower your body so that your left knee nearly touches the floor and your right knee is bent 90 degrees.
Step 2. Stand straight up from the lunge position and press the weights overhead.
6. Side-To-Side Squat Front Raise

Step 1. Stand with feet together and dumbbells at your sides.
Step 2. Step out to your left side and squat as you raise the dumbbells up to shoulder level in front of you. Step back to the starting position and then repeat to the right side.
7. Lunge Press (left leg)

Perform the lunge press again but with the left leg in front.
8. No-Jump Jack

Step 1. Hold dumbbells at your sides with palms facing forward, and stand with feet together.
Step 2. Step to your right side as you raise the weights overhead in an arcing motion, as if doing a jumping jack. Repeat to the opposite side.
How To Create Your Own HIIT Workout
Once you’ve gotten the hang of HIIT, feel free to make up your own HIIT workouts to keep your training fun and challenging. Here are some guidelines to remember.
1. Choose exercises you can do in one place (more or less). Because the work and rest intervals tend to be brief, you don’t want to create a workout that has you running around your gym from station to station. Keep your equipment and setups simple.
2. Alternate really hard exercises with easier ones. If you squat with weights in one interval, you probably shouldn’t do burpees in the next one. The point of HIIT is too work hard, but not so hard that you burn yourself out early and can’t finish the workout with intensity. Another tip: play with your work-to-rest ratios. You may want to use shorter work intervals and longer rests when you’re just getting started, and add work and subtract rest as you get fitter.
3. You can make HIIT workouts with mobility exercises. If you want to spend more time opening your tight hips or stretching your hamstrings, use mobility drills like the hip-opening mountain climber and twist and sit-knee in your HIIT sessions. You can alternate them with tougher bodyweight or weight-training moves, or use mobility exercises exclusively. You may be surprised how fast mobility moves done with focus and precision can raise your heart rate.
]]>
But if you think your standard gym rat training sessions are going to lift you to new heights, you’re mistaken. To jump like an elite athlete, you need to train like one, starting with the five exercises we’ll outline here.
How To Jump Higher: 5 Exercises To Improve Your Vertical
This list of movements was compiled by a pair of trainers who know a thing or two about making athletes more explosive: Jason Benguche, former assistant strength and conditioning coach for the Carolina Panthers and Director of Performance for Jet Movement Labs (@movement_mogul on Instagram), has worked one-on-one with NFL quarterback Cam Newton. And Firdose Khan (@dose_9), head trainer at Nine Innovations athlete training facility in Houston, has worked with such athletes as former NBA MVP Derrick Rose and NFLers Arian Foster, Braxton Miller, and Brian Cushing.
Follow their advice, as demonstrated in the video above by the talented Hannah Eden (@hannaheden_fitness), a distinguished coach in her own right, and you’ll be jumping out of the gym in no time.
Muscles Used for Jumping
A jump is the result of triple extension: the simultaneous and explosive extension of the hips, knees, and ankles. Whether you’re watching an Olympic weightlifter perform a clean, a sprinter take off down the track, or a basketball player go up for a dunk, triple extension is the driver. Below are the muscles that make it possible.
–Glutes (gluteus maximus, gluteus medius), for hip extension
–Quadriceps (vastus lateralis, intermedius, and medialis; rectus femoris), for knee extension
–Hamstrings (biceps femoris, semimembranosis, semitendonosis), for hip extension, knee flexion, and absorbing landings
–Calves (gastrocnemius, soleus), for ankle extension (plantarflexion)
–Abdominals and core (transverse abdominis, rectus abdominis, internal and external obliques, multifidi, erector spinae), for trunk stability
How To Test Your Vertical

Before we explain how to build your jump, let’s make sure you know how to jump properly in the first place and can get a baseline measurement for it. See 00:25 in the video above for Eden’s demonstration and a walk-through of all the steps.
How To Jump
Step 1. Stand with your feet directly under your hips. If they’re wider than that, you won’t be able to translate as much power from your legs directly into the ground. Drive your knees outward without moving your feet, so you feel tension in your hips. This will turn the hips on for better jumping power.
Step 2. Quickly dip your hips and knees, throwing your arms behind you to gather momentum. Picture a half-squat position or slightly shallower—your hips must be behind your knees. The hip action in a jump is the same as the hinge pattern you perform with your hips during a deadlift or clean—bend them back while keeping a long spine.
Step 3. Jump as high as you can while flinging your arms forward and overhead. When you leave your feet, only reach up with one arm; you’ll be able to reach a higher point this way versus reaching with both arms. Land softly with a slight knee bend, being careful not to let your knees cave inward. Drive them outward as you did when preparing to jump in the first place.
How To Measure Your Jump
At the competitive level (i.e., the NFL and NBA combines), vertical leap is measured using a “jump tester”—a tripod with a series of thin plastic sticks one inch apart. If you have access to this equipment, it’s your best bet for getting an accurate measurement. A cheaper, more feasible option is to do your jump next to a wall and mark the highest point you touch with a piece of chalk.
Whichever equipment you use, the first thing you’ll need to do is measure your reach standing flat-footed on the floor with one arm fully extended straight overhead. (You can measure your reach up against a wall for the chalk option.) Then, when you mark the highest point you touched, you’ll subtract your reach from that number. For example, if your reach is 90 inches and you touched 115 inches up on the wall with your chalk, your vertical leap is 25 inches.
After warming up, make anywhere from 3 to 5 jump attempts.
Most official vertical jump tests do NOT permit any steps to be taken leading into the jump. No running start or even a power step allowed. Stand on both feet in one spot and jump from that spot.
How To Stretch Before A Jump Workout
Before we get into the exercises that will build your jump height, warm up with these moves from Onnit’s Director of Fitness Education, Shane Heins (@shaneheins). They will help to improve mobility in your hips as well as durability in your knees and ankles, improving performance and reducing the risk of injury.
Jump Higher with These 5 Exercises
1) Depth Jump
(See 01:26 in the 5 Exercises To Improve Your Vertical video)
The defining characteristic of the depth jump is that the jump is preceded with the strong eccentric (negative) muscle action caused by dropping down from a raised surface, as opposed to a standard box jump where you start on the floor. This makes the depth jump a true plyometric movement, where the muscles are stretched suddenly (by the impact of the landing), producing a powerful shortening of the muscle fibers.
“The depth jump utilizes the stretch-shortening cycle to improve CNS activation and rate of firing,” says Benguche. “The shock of rapidly absorbing, and then producing, force trains the body to respond with greater levels of reactive force to improve the elastic components of the lower body.”
Step 1. Stand on a plyo box that is 10–30 inches high (start with a lower one if you’re brand new to depth jumps). Your body should be fully upright and your feet hip-width apart, hands at your sides.
Step 2. Step off the box, leading with one foot and then following with the other, to drop yourself down to the floor. You’re not hopping or jumping off the box; your body should simply fall to the floor.
Step 3. Land squarely on the floor on both feet (again, around hip-width apart) and immediately jump as high as you can, straight up in the air. It’s important that you spend as little time as possible with your feet on the floor before the jump—it should be a split-second reaction. Don’t lower down into a squat before leaving your feet. Just let your hips and knees dip naturally, then extend them explosively to launch upward. Drive your arms straight up as you do so.
Step 4. Land back down on the floor with soft knees, settle yourself, then step back onto the box and repeat the sequence for reps. Don’t be in a rush between reps; the objective of this exercise is explosive power, not conditioning.
Technique Tip: Be mindful of your body position as you land on the floor and go into the explosive jump. Your hips should be over your heels, and your weight over the center of your feet. You want to jump straight up (vertical), not out in front of you.
How to Use the Depth Jump
Timing: Do depth jumps early in your workout, after you’ve warmed up thoroughly and before lower-body strength exercises like squats.
Sets/Reps: Benguche recommends keeping the total volume of reps very low on depth jumps: 2–4 sets of 2–5 reps.
“No additional load is necessary,” he says. “However, the height of the box for the depth jump can be progressed over time to increase the challenge and stimulus.”
Regression
In the absence of a plyo box, depth jumps can be performed using a standard weight bench. Since benches are lower to the ground than many boxes, they’re a good option for those new to the exercise.
Progression
Athletes often do depth jumps with two plyo boxes: one to step off of and another to jump onto. Essentially, it’s a depth jump into a box jump. When doing this variation, make sure to leave enough room between the boxes to allow you to land and jump safely (3–5 feet between boxes should work). To advance within this progression, increase the height of the second box gradually as you develop more strength and power.
2) Medicine-Ball Broad Jump
(See 02:31 in the video.)
Adding resistance to jumping exercises (versus using bodyweight only) can help increase strength and power. And it doesn’t take much weight to get the job done—a 10-pound med ball will suffice.
With this exercise, you’re going for maximum distance instead of height, but the benefits will carry over to your ability to jump vertically. “The med-ball broad jump is great for developing hip explosion, due to the power aspect that comes from loading the hips with the hinge-type motion,” says Khan.
Step 1. Stand a few feet back from a wall holding a medicine ball (about 10 pounds) in both hands. You should have plenty of floor space in front of you to jump. Start with the ball overhead, arms extended, and your feet hip-to-shoulder-width apart.
Step 2. Lower your arms toward the floor and bend at the hips and knees to create elastic energy for the jump. (This is technically the eccentric, or negative, phase of the exercise.)
Step 3. Without hesitating, explode out of the “hole,” pressing through the balls of your feet and throwing your arms out ahead of you. Toss the ball into the wall and jump as far out in front of you as possible.
Step 4. Land with bent knees, through your heels, and absorb the eccentric force by going into a squat if necessary. (This finishing squat is not a crucial part of the exercise—just a safe way to land.) Catch the ball as it rebounds if you can, or, if the wall is further away, let the ball fall. Then pick it up and repeat for reps.
Technique Tip: When doing a broad (long) jump for maximum distance, you want to get some height, but not too much. Aim for your trajectory to be under 45 degrees.
How to Use the Medicine-Ball Broad Jump
Timing: Do medicine-ball broad jumps early in your workout, before heavy lower-body strength movements. Khan prescribes glute activation work with his athletes before jumping exercises, such as hip bridges or lateral band walks, to help the glutes “wake up” and fire harder.
Sets/Reps: Khan recommends 3 sets of 5 reps, using a 10-pound medicine ball.
Regression
Those new to explosive jump training should start with no added resistance. In this case, simply do the standing broad jump without the med ball.
Progression
Khan often adds an extra layer of resistance to the med-ball broad jump with his athletes: a heavy-duty elastic band attached to the back of the waist with a belt and anchored to a solid structure behind the athlete at floor level. As the athlete jumps and travels through the air, the resistance from the band increases as it stretches.
3) Back Squat
(See 03:29 in the video.)
Strength begets power, which leads to a better vertical, and there’s no better exercise for increasing lower-body strength than the classic barbell back squat.
“The squatting pattern is one of the best ways to train the body for improved strength and power,” says Benguche. “Quads, hamstrings, and glutes will be the primary drivers of the squat, and all have high importance for helping improve the vertical jump.”
Step 1. Set up in a squat rack and grasp the bar with your hands as far apart as is comfortable. Step under the rack and squeeze your shoulder blades together and down, wedging yourself under the bar so that it rests on your traps or the back of your shoulders.
Step 2. Nudge the bar out of the rack and step back, setting your feet at shoulder width, with your toes turned slightly outward. Without letting your feet actually move, try to screw both legs into the floor, as if you were standing on grass and wanted to twist it up—you’ll feel your glutes tighten and the arches in your feet rise. Take a deep breath into your belly and brace your core, pulling your ribs down so your torso forms a solid column.
Step 3. Keep your weight over your mid foot and your eyes facing forward. Bend your hips back and spread your knees apart as you lower your body down. Go as low as you can, while keeping your head, spine, and pelvis aligned.
Step 4: Push through your feet to come back up, extending your hips and knees.
Technique Tip: Keep your heels on the floor while squatting. The bar should remain over your mid foot (not the balls of your feet) throughout both the positive and negative portions of the lift. If your heels come off the floor, it means the weight has shifted too far forward.
How to Use the Back Squat
Timing: For maximum strength gains, do back squats as either the first or second strength exercise in your workout.
Sets/Reps: For general strength and lower-body development, Benguche recommends 3–6 sets of 3–8 reps with moderate loading—70%–85% of your one-rep max (1RM). For developing more speed and power, he recommends lighter loads (55%–70% of 1RM) for 3–6 sets of 2–5 reps. Squats performed with light weights but done so explosively that your feet leave the floor when you come up are called jump squats (see “Progressions” below).
Regression
Scaling the back squat for beginner-level athletes generally entails sticking to lighter loads (even bodyweight only to start) while learning proper technique. Goblet squats with a kettlebell or dumbbell can be used to practice form, but keep in mind that goblets are an anterior (front-loaded) variation and won’t directly mimic the mechanics of the back squat.
Progression
As you gain experience, multiple barbell squat variations should be rotated into your program. Jump squats in particular will help you develop more explosive strength that translates directly to a vertical jump.
In the jump squat, you lower your body only until your thighs are parallel to the floor (you don’t go for maximum depth, as in the conventional back squat). As you come back up, do so explosively so that your feet leave the floor at the top—three to six inches is high enough. Land softly with a slight knee bend, reset, and repeat for reps.
4) Rear-Foot Elevated Split Squat (Bulgarian Split Squat)
(See 04:48 in the video.)
This isn’t just some light-duty assistance exercise. The rear-foot elevated split squat (aka, Bulgarian split squat) is a legitimate movement for increasing pure glute and quad strength, which will in turn enhance power and vertical jumping performance. Even if you’re a two-foot jumper, focusing on one leg at a time like you do here will ensure that your dominant side isn’t compensating for your weaker leg during the movement.
The exercise is also a great option for those with lower-back issues, as the rear-foot elevated position requires a more upright torso than a standard squat. This prevents shearing forces on the lumbar spine, which are a common cause of injury in the classic back squat.
Step 1. Hold a dumbbell in each hand and stand lunge-length in front of a bench that’s 18–24 inches high. Reach back with one leg and rest the top of that foot on the bench.
Step 2. Take a deep breath, brace your core, and lower your body as far as you can, or until your rear knee is just above the floor (you should feel a stretch in the hip of the trailing leg). Keep your front heel grounded—don’t allow it to rise off the floor. Complete your reps on one side and then repeat on the other immediately.
Technique Tip: Determining how far out in front of you to place your front foot may require some trial and error. At the bottom of the motion, your front knee should be somewhere above your heel to mid foot. If your knee is behind your heel, your foot is too far forward; if it’s out over your toes, step out further. One trick to find the right distance is to start in the bottom position and adjust your stance from there.
How to Use the Rear-Foot Elevated Split Squat
Timing: Perform split squats as one of the first two exercises in the strength portion of your workout. If done for low volume with no added resistance, it can also be done as part of a warmup prior to explosive jumps (see below for the isometric hold variation).
Sets/Reps: 3–4 sets of 5–8 reps, using a moderate weight. Because balance will be an issue with the staggered stance and rear foot elevated, you’ll have to go lighter than you would doing a standard split squat or lunge.
One training method Khan utilizes is a 30-second isometric hold in the bottom position of the split squat, followed by 5 reps; this is typically done with no added resistance, pumping the arms in a running motion on each rep. “The time hold creates endurance and strength in the quads and glutes,” says Khan.
Regression
The rear-foot elevated split squat can be a difficult exercise from a balance standpoint. The first time you try it, use no added resistance (bodyweight only) to practice the technique. If you’re unable to keep your balance, perform a standard split squat with your back foot on the floor (not elevated).
Progression
Holding the resistance in a higher position can increase the difficultly of the exercise and call on more core engagement. Examples of this include holding a kettlebell or dumbbell with both hands in the “goblet” position below your chin, or doing the movement with a barbell across your shoulders (the most advanced version).
5) Kettlebell Hike Swing
(See 05:32 in the video.)
A variation on the basic kettlebell swing, the hike swing gets you used to exploding from a dead-stop position, so you learn to generate force quickly out of nowhere.
Step 1. Place a kettlebell on the floor and stand behind it with feet shoulder-width apart. Soften your knees.
Step 2. Hinge your hips back until you feel a stretch in your hamstrings. Your head, spine, and pelvis should form a long, straight line.
Step 3. Grasp the kettlebell and try to snap the handle in half. This should cause your shoulder blades to drive downward and your lats to tighten.
Step 4. Hike the kettlebell back between your legs until you feel your forearms contact your inner thighs.
Step 5. As soon as you feel your forearms touch your thighs, extend your hips explosively, as if you were standing up quickly and tall. Squeeze your glutes as you come up. Allow the power to raise the kettlebell up in front of you to shoulder level.
Step 6. Control the kettlebell on the way down and park it back on the floor. That’s one rep.
Technique Tip: This is an explosive lift, where the objective is to get the kettlebell moving upward as fast as possible. That said, keep the exercise safe, particularly for the lower back, by staying tight in the core and having your hips low coming off the floor—do lift the kettlebell with a rounded lower back, and avoid hyperextending your back at the top of each rep (i.e. don’t lean back).
How To Use the Kettlebell Hike Swing
Timing: Do hike swings early in your workout, before lower-body strength exercises.
Sets/Reps: 4 sets of 3–5 reps.
Regression
If starting and stopping each rep feels awkward, just work on the regular kettlebell swing instead, going for fluid reps (and higher reps, like 10 or more). If you’re not familiar with this move, we’ve got the ultimate guide to the kettlebell swing.
Progression
When you’ve got your explosive hip hinge mechanics down, a squat clean exercise can be a good next step. See our guide to the squat clean.
How to Dunk a Basketball
Once you’ve boosted your lower-body strength and power via the aforementioned five movements, it’s time to carry that newfound explosiveness over to the court—because if your goal is to jump higher, chances are dunking a basketball is high on your list of things you’d like to do with that skill.
These expert tips will help you with the finer points of dunking. Combine them with a respectable vertical leap, and you’ll be throwing one down soon enough.
7 Tips for Parlaying Better Hops into Monster Jams

1) Wear the Right Shoes
Remember the Spike Lee (as Mars Blackmon) 1989 Nike commercial? (Yeah, we’re old too.) In reference to Michael Jordan’s epic hops, Lee exclaims, “It’s gotta be the shoes.” The line was a tad hyperbole, but it is worth putting some thought into your footwear.
A pair of relatively new basketball shoes (i.e. not Chuck Taylors) is a good choice for dunking, especially if you have unstable ankles; basketball shoes offer good lateral support, as opposed to running shoes, which can easily lead to a turned ankle.
“It doesn’t matter too much as long as they’re not sandals or boots, but I would say the lighter the shoe the better,” says Bobby Jones, a former NBA player and all-Pac-10 standout in college at the University of Washington, who currently plays professionally in Italy. (Visit Jones at BobbyRayJonesJr.com.)
Tyler Harris, a professional basketball player for the Sendai 89ers in Japan and brother of NBAer Tobias Harris, has one pair of shoes in particular he prefers to dunk in: “Kobe [Bryant] low-top Nikes are one of the best shoes to wear for dunking,” he says.
2) Warm Up Properly
Dunking (or attempting to dunk) is a high-impact, highly intense activity that deserves a sufficient warm-up prior to a throw-down session. Just as you would for a lifting workout, start your warmup with a few minutes of low-intensity cardio, then progress to more dynamic movements—dynamic stretching/mobility drills as well as jumping. Before attempting your first dunk, take a couple dry runs with no ball where you’re touching or grabbing the rim at the top.
“Warming up is very important for preventing injuries,” says Harris. “I would recommend warming up and stretching for at least 30 minutes before any basketball game or just practicing dunking the basketball.”
Harris recommends warmup and stretching drills (both dynamic and static) such as: jumping and touching the rim; high knees; ladder drills; lateral defensive slides, seated and standing hamstring stretches; seated straddle stretch; and Achilles stretches. Hold each stretch 15 seconds.
3) Decide If You’re a One-Foot or Two-Foot Jumper
Should you go off of one foot or two feet when dunking? That depends on what you’re more comfortable with as well as your athletic ability and coordination.
Jumping off one foot means you’ll be taking a running start and launching a few feet in front of the rim (since your momentum will carry you forward as well as up). When going off two feet, you won’t take a running start—more like a few hard steps and a power dribble. You’ll take off right in front of the rim and go straight vertical.
“When most people first start trying to dunk, it’s usually off one leg,” says Jones. “You’re banking on your speed, so this means you want to have a running start to gain momentum. If you want to dunk off two, that requires more athletic ability, more coordination, and using the power dribble to gain momentum. If you have a nice set of calves and a big butt, this might be the way to go.”
4) Dunk One-Handed, if Possible
It takes a higher vertical leap to get both hands up to the rim versus just one (and don’t forget, you’ll be holding a basketball as well), so if you’re cutting it close, try for a one-handed jam. Being able to palm the ball will obviously help, but it’s not totally necessary; just make sure you keep the ball in both hands until you leave the floor so you don’t lose it.
“Dunking with one hand is definitely easier than two,” says Jones. “It’s one less thing to worry about, so you can focus better on the task at hand.” When the time comes that you’re dunking easily, then you can start dunking with two hands for more authority.
5) Approach the Rim from the Baseline
When your goal is simply to throw one down, you want to be as focused as possible on your target: the rim. Because of this, Jones recommends coming in from the side (along the baseline) instead of straight on.
“Starting from the mid baseline or corner to dunk, I think, gives your mind an easier target and is less distracting,” he says. “That way, you can just focus on getting as high as you can, sort of like doing the long jump. When you’re trying to dunk straight on, you visually see the entire basket and might get distracted, scared, and lose focus.”
6) Take Plenty of Rest Between Dunks
Giving yourself the best chance to throw one down requires you to be as fresh and explosive as possible. You want full rest between dunking attempts—just as you would when maxing out on a big lift like a squat, deadlift, or bench press. After each dunk attempt, take at least a minute or two to rest and recover.
7) When Performance Diminishes, Call it a Day
In any power and strength activity, there comes a point of diminishing results. This is why powerlifters typically don’t do more than three heavy sets or one-rep max (1RM) attempts for any lift in a given session.
Dunking isn’t much different. You’ll likely find yourself getting slightly higher with each attempt at first, but before long, fatigue will set in and your vertical leap will decrease. At this point, it’s a good idea to end the session, rather than try to push through and force yourself to jump higher. It’s an indication that your nervous system has mustered all the energy it has to help you jump, and you need to let it rest. Give your legs a couple days’ off, then come back again and try.
]]>
Efficiency in fitness is found in full body exercises! Meaning, you have to do exercises that stimulate multiple muscle groups at once, and these exercises will save your ass a lot of time in the gym.
Let’s be honest. In this day and age, most of us don’t have an hour a day, 5 days a week to spare for training. For the luck few of you who do, wouldn’t it be nice to cut that back a bit?
We are living in the new age of fitness. Gone are the days of muscle isolation – separating back days from chest and leg days to reach optimal personal fitness.
Think QUALITY over QUANTITY when it comes to you workouts and you will be far more productive and efficient with your training program.
Now this isn’t rocket science or is it groundbreaking news, but it is vital you understand the benefits of full body exercises, who they are best for, and which exercises you have to choose from.
5 Benefits from Doing Full Body Exercises
â Greater caloric expenditure in less time.
â Build strength & muscle tone.
â Increases training program efficiency.
â Allows for more training variety and decreases your chances of overtraining and burning out.
â Challenges aerobic capacity.
Who benefits from full body training?
Almost everyone can benefit from full body training. Full body training incorporates the most muscle recruitment per exercise, which means you get more caloric expenditure, muscle activation, culminating in more muscle tone.
This helps build size, strength and endurance. The only time full body training isn’t ideal is for serious bodybuilders because they need to focus all their energy and efforts into one muscle group to make specific gains.
My 7 Favorite Full Body Exercises
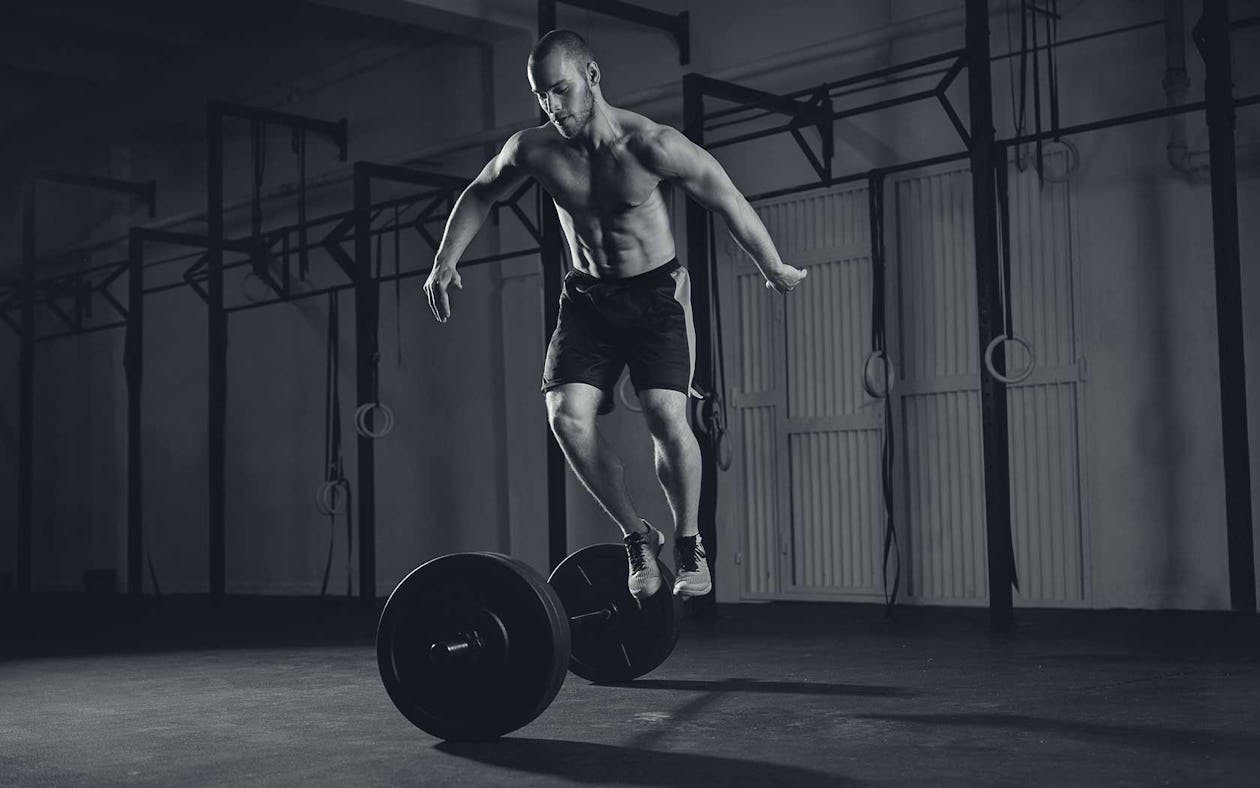
1. Overhead Lunge
This brutal exercise is extremely demanding and dynamic as you are holding a pair of dumbbells, kettlebells or barbell overhead while walking into a traveling lunge. Great for upper and lower body strength.
2. Burpees
Come on, you cannot train without tossing in a few sets of burpees. Burpees are the epitome of fitness. As much as they suck, this bodyweight exercise is a complete upper and lower body exercise.
3. Dive Bomber Push Up
Also known as a Hindu Push Up, this dynamic push up challenges strength, shoulder, and hip flexibility. It takes a traditional push up and transforms it into a super push up.
4. Thrusters
This upper and lower body combination is torturous. This exercise combines a front squat to an overhead press in one unbroken movement. Perfect for building full body strength and making you feel miserable.
5. Pull Up
The pull up is a must-do-exercise! It enhances the shoulder and posture, builds bicep and grip strength, and activates the core. Make sure to include all types: mix grip, under/overhand, close/wide grip and slow/fast pulling.
6. Farmer Walks
The farmer walk is amazing in building grip, core, back and posture strength. Usually done carrying a heavier load, the farmer walk is tested by traveling varied distances.
7. The Plank
While some may laugh at the simplicity of the plank, it is genuinely a phenomenal exercise that targets the glutes, core, posture, quads, shoulders, and many small stabilizer muscles. The plank is a great exercise that never gets old!
Are these the only full body exercises that you can do? Of course not! There are plenty of others but I feel these bad boys really drive results.
Below is a sample to give you an idea of how to incorporate these exercises into your training (reps and sets are dependent on your goals). Feel free to mix things up, add in both core and conditioning sets to boost your results.
The key is to do the bulk of your training with full body exercises.
Sample Workout Plan for the Week
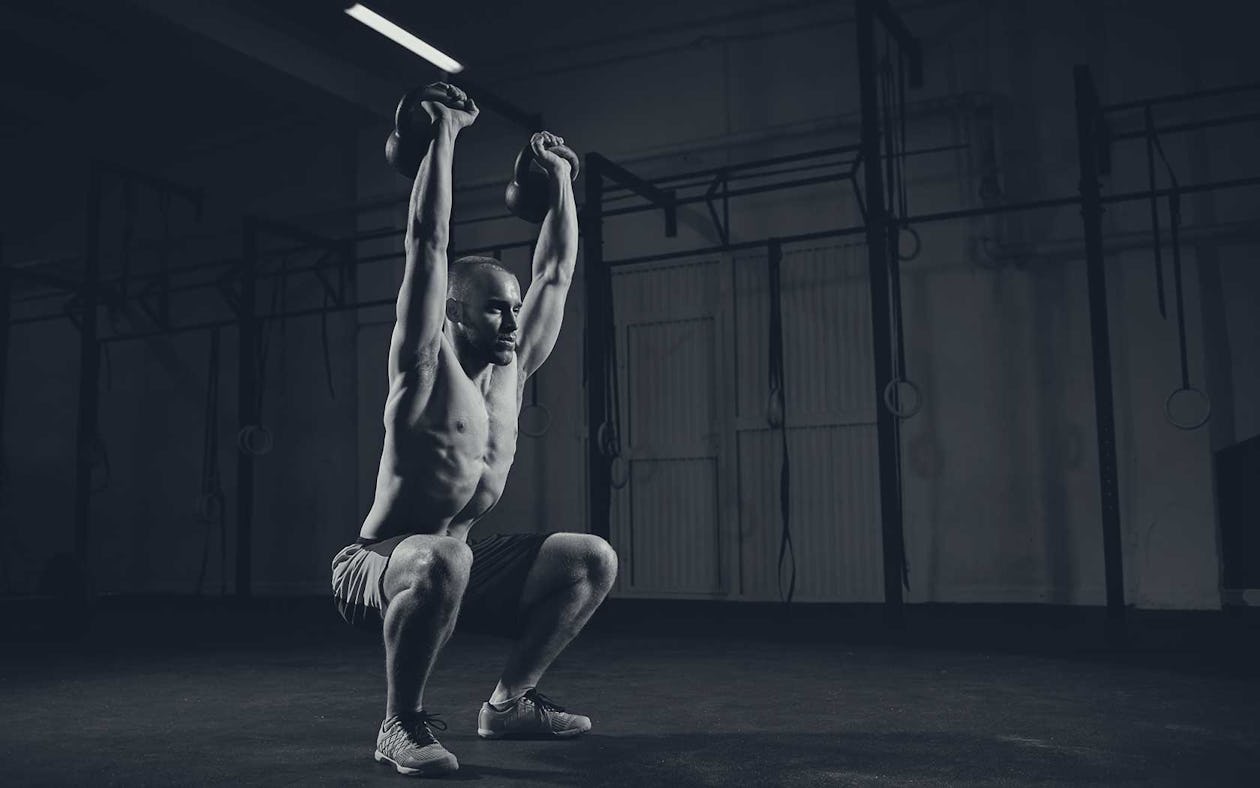
MONDAY
Strength
A1: Pull Ups x 7-10 reps x 3-5 sets.
A2: Burpees x 20 reps x 3-5 sets.
MetCon
B1: Jump Rope x 50 reps x 3 sets.
B2: Plank x 30-60 sec x 3 sets.
TUESDAY
OFF
WEDNESDAY
Strength
A1: Thrusters x 7-10 reps x 3-5 sets.
A2: Dive Bomber Push Ups x 15-20 reps x 3-5 sets.
MetCon
B1: Kettlebell Swings x 10 reps x 3 sets.
B2: Plank x 30-60 sec x 3 sets.
THURSDAY
OFF
FRIDAY
Strength
A1: Overhead Lunge x 60 sec x 3-5 sets.
B2: Farmer Walks x 30 sec x 3-5 sets.
MetCon
B1: Double Unders x 10-15 reps x 3 sets.
B2: Plank x 30-60 sec x 3 sets.
SATURDAY
OFF
SUNDAY
Mobility & Flexibility Work
A1: Foam Rolling.
A2: Dynamic Stretching.
A3: Static Stretching.
Full body training can save you time in the gym without sacrificing your results. Make your workouts count and don’t waste time. But wait!
Couldn’t increasing your training frequency help you to achieve faster results? Sure it can, but that doesn’t mean you need to stress out and force yourself to train all week to get fit.
Cycle in my top 7 full body exercises regularly and witness your fitness go from zero to hero!
Good Luck!
]]>
– The tuck jump builds lower-body power and coordination
– It works all the major lower-body muscles and the core.
– Tuck jumps should not be used for conditioning, due to safety concerns. (Don’t do them for high reps as part of a circuit workout.)
– To prepare your body for tuck jumps, work on landing safely.
There’s a famous photo of Bruce Lee jumping in the air with dumbbells in each hand and his knees tucked to his chest. His body is so neatly folded it almost looks like he’s crouching on the ground. The photo perfectly illustrates The Dragon’s mystique: a man who made incredible displays of power and athleticism seem simple and effortless.
In case you haven’t deduced as much already, Lee was doing a tuck jump in that pic, and the move was one of many he used in a workout regimen that was ahead of its time. If you hope to capture some of his explosiveness, this guide to tuck jumps will help you master an exercise that put spring in the step of one of the greatest martial artists of all time.
What Is The Tuck Jump?
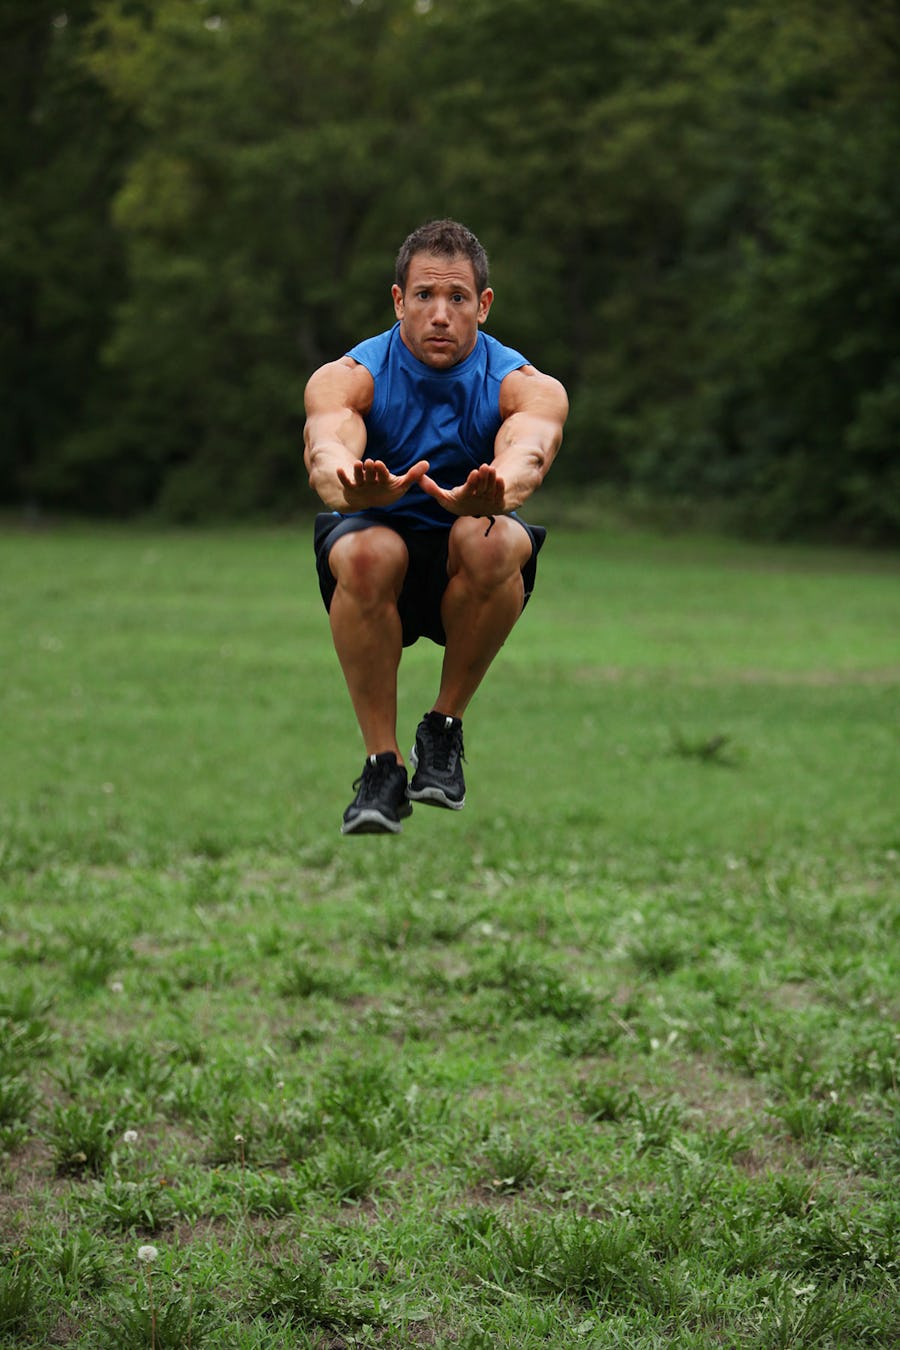
The tuck jump is a vertical jump in which you raise your knees to your chest as you rise into the air. Interestingly, unlike other vertical jumps, the tuck jump is not purely a triple-extension movement. That is, vertical jumps, along with Olympic weightlifting exercises such as the clean, have the hips, knees, and ankles all extending simultaneously to generate explosive movement. While the tuck jump begins like a vertical jump, the knee tuck causes hip-, knee-, and ankle-flexion, which contributes greatly to its effectiveness. Tuck jumps are primarily done by athletes to develop power and coordination.
Like all jumps, tuck jumps are a full-body exercise that work a lot of big muscles, so you often see them used in exercise classes and circuit workouts for the sake of raising the heart rate, but we don’t suggest that you perform them for that purpose. The tuck jump is a high-impact exercise—even more so than most other jumps, due to the height and the tucking of the knees—and performing it with anything less than perfect form is dangerous. So is jumping into tuck jumps too soon (no pun intended), failing to build up to them gradually.
For those reasons, we recommend starting with lower-intensity jump exercises for a while to condition your joints for the impact of tuck jumps, and ultimately using the tuck jump for its original intention—to develop explosive power. (See “Alternatives To The Tuck Jump” below.)
“The majority of people who do tuck jumps aren’t ready for them yet,” says Sam Pogue, CPPS, FRCms, VP of Brand at TrueCoach, and a performance coach to athletes, including World Series champion pitcher Jake Arrieta. But we’ll show you how to prep your body the best way possible to fast-track your hops.
What Muscles Does The Tuck Jump Use?
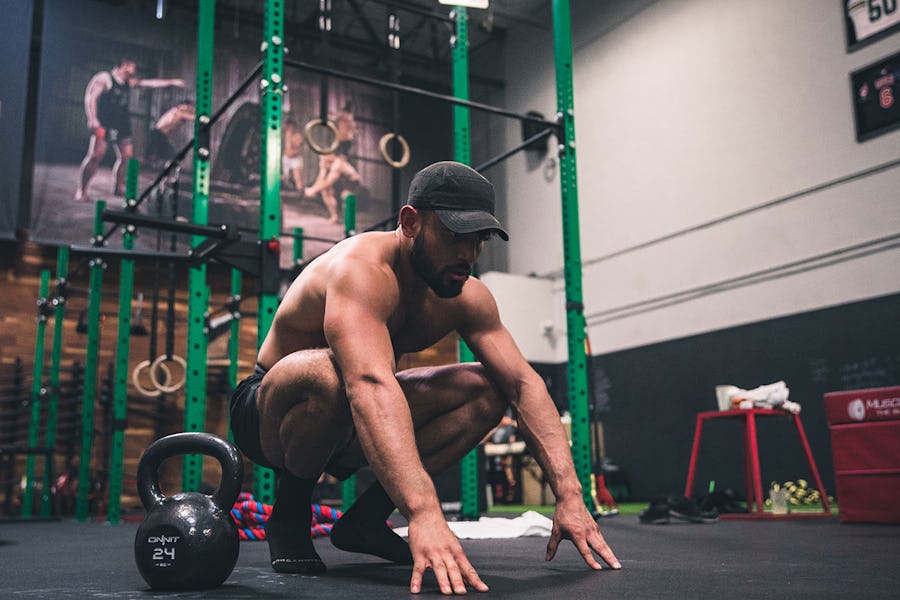
The tuck jump works all the muscles of the lower body and the core. Here’s a breakdown of how they contribute to the movement.
Glutes and hamstrings. Both muscle groups have an eccentric contraction (that is, they tense while lengthening) as you lower your hips toward the floor during the jump’s countermovement—think: coiling the spring. Then, when you explode upward, the glutes and hamstrings shorten rapidly to drive the hips forward, creating the power that propels the jump.
Quads. Like the glutes and hamstrings, they contract eccentrically on the way down and then concentrically to extend the knees as you jump. When you’re in the air, the rectus femoris quad muscle works again, along with the hip flexor muscles, to pull your knees up toward your chest.
Calves. The calves extend the ankles, assisting the glutes, hamstrings, and quads in getting your feet up off the floor.
Core. The abs and lower back must brace the spine as you lower into the jumping position, as well as when you tuck the knees and land back on the floor.
All of the above muscles also work as shock absorbers, reducing the force that acts on the joints upon landing.
While tuck jumps work many muscles, don’t make the mistake of thinking that they’re a great way to “tone” your legs. Jumps work primarily fast-twitch muscle fibers to provide explosive movement, but the volume you’ll train them for isn’t enough to build serious leg muscle, and no muscle group stays under tension long enough to induce the metabolic stress that’s associated with muscle gains. Jumps are done to translate the strength you build with more traditional lower-body exercises (squats, deadlifts, lunges, etc.) into powerful movements you can make on an athletic field, such as running, jumping, and cutting.
Benefits of the Tuck Jump
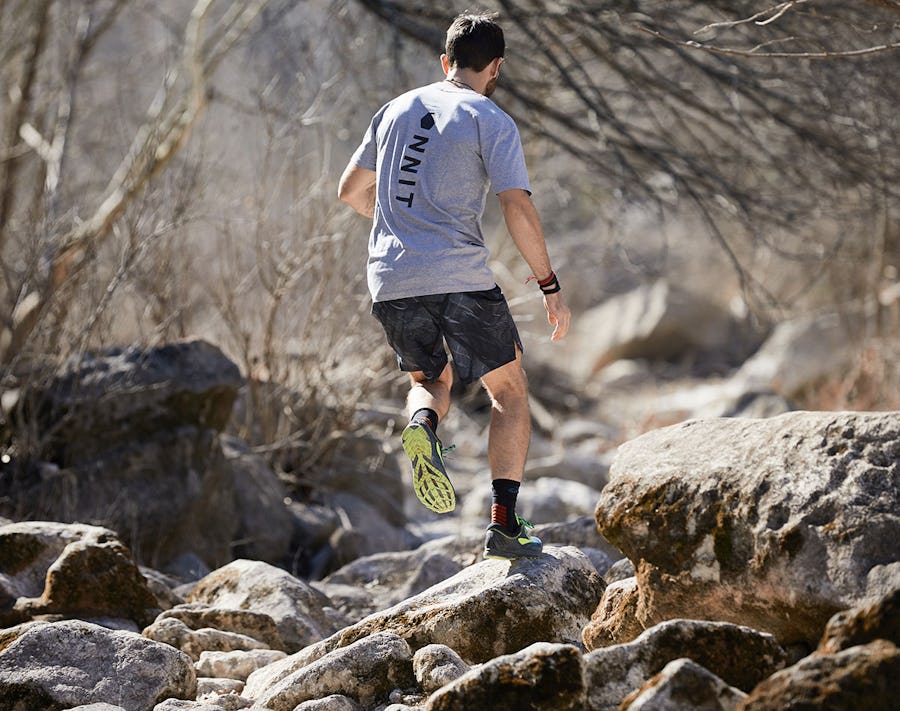
Tuck jumps are mainly used to increase bilateral power output. That is, to train your ability to move explosively on two feet. “Jumps are also really good for developing coordination,” says Pogue, “increasing your understanding of where your body is in space.” Because the tuck jump has the added hip and knee flexion at the end, its coordination demands are higher than a typical vertical jump. “It’s akin to the long jump,” says Pogue, the track and field event where you kick your legs out in front of you to get as much distance as possible. If you can tuck jump proficiently, it’s pretty much a given that you’ll be able to run fast, jump high, and turn on a dime when needed during sports play.
Nevertheless, you’ll notice that athletes get tested on their vertical jump height, not their tuck jump performance. “The tuck jump isn’t as applicable to sports as a vertical jump,” says Pogue, “but it’s a good jump to practice if you want to maximize athleticism.”
Pogue, himself a former baseball player, liked to use tuck jumps during games, because of their effect on the central nervous system. Explosive, reactive movements make the mind more alert and focused, so you can use tuck jumps to “wake you up” before you need to do something that’s explosive, fast, or requires maximum attention. “Baseball can be slow sometimes,” says Pogue, “so I used to use tuck jumps to recharge if I’d been standing around for a while.” Doing one or two reps before you step up to bat could make the difference between a strike and a base hit.
As tuck jumps place so much stress on the hips, knees, and ankles, they’re sometimes used in clinical settings to help identify an athlete’s risk of injury, particularly to the knee. A study published in Athletic Therapy Today concluded that tuck jumps may be a useful assessment tool in gauging neuromuscular control, and risk of ACL injury among female athletes.
How To Stretch Before Doing A Tuck Jump
Use the following warmup drills from Onnit Durability Coach Cristian Plascencia (@cristian_thedurableathlete on Instagram) before performing tuck jumps in a workout.
How To Do A Tuck Jump
Step 1. Stand with your feet between hip and shoulder-width apart and soften your knees.
Step 2. Bend your hips and knees to lower your body into a quarter-squat. You’ll end up in the universal athletic stance (picture a lineman in football)—hips and knees bent, chest lined up with your toes, looking forward, and ready to explode. Your torso should be about 45 degrees to the floor with your lower back in its natural arch. Swing your arms back as you bend your hips back so that they run parallel to your spine.
All of the above must happen quickly and in one movement. Think of it as coiling a spring as you dip your hips down and back before you reverse the movement to explode upward.
Step 3. Immediately rise up, extending your hips, knees, and ankles (come up onto your toes) and swinging your arms forward and up to jump as high as you can into the air. As you rise, pull your knees upward with you, tucking them under your chest. Your thighs should end up parallel to the floor. Try to stay tall as you tuck—don’t actively crunch yourself into a ball.
Step 4. Extend your knees on the descent and use your toes to buffer your feet as you land. “Land like a ninja,” says Pogue, bending your hips and knees as needed to absorb the force of the ground, although you should end in the same athletic position that you started the jump.
Take a moment to reset your feet before you begin the next jump, and begin it from a tall standing position again. You can also begin each successive jump immediately, rebounding out of your landing, but we don’t recommend this unless you’re an experienced jumper, and we definitely don’t like it as a means to get cardio. “Doing multiple reps like that can get really sloppy,” says Pogue. As you fatigue, your form will break down, and that’s when people get hurt. “If you want to get your heart rate up,” says Pogue, “there are other ways to do it without risking a blowout of your ACL.” When you can do 2–3 sets of 1–3 reps with good landings, you can attempt doing the tuck jump with continuous reps (no reset).
Don’t think you have to jump to the moon to demonstrate your explosiveness. If you can jump to where your feet are at the level your hips would be while standing, Pogue says you’re getting some pretty good air. As for loading the jump with dumbbells, a la Bruce Lee, it isn’t necessary, and it increases your risk of a bad landing.
When Should I Do The Tuck Jump?
For maximum power development, do tuck jumps when you’re fresh, at the beginning of a workout (but after you’ve warmed up thoroughly). They’re a great way to kick off lower-body sessions, so try them before squats or deadlifts, or any running/sprinting you do. As stated above, you can also do them during downtime from sports activities, for the sake of keeping your energy up.
Alternatives To The Tuck Jump
As you might have guessed, if you don’t land the tuck jump properly, you’re going to land hard, and that can wreak havoc on your ankles, knees, and hips. Pogue recommends building up to tuck jumps by first mastering the depth jump and box jump, in which you practice proper landings and absorbing the impact.
Depth Jump Prerequisite
Start with the most basic version of the depth jump, which has you rising onto your toes and then dropping your heels. It may not look like much, but it will go a long way toward conditioning your joints for a hard landing, especially if you haven’t jumped since you were a kid.
Step 1. Stand with feet hip to shoulder-width apart and raise your arms overhead.
Step 2. Raise your heels up, balancing on the balls of your feet.
Step 3. Now, in one motion, drop your heels and drive your arms down behind you, landing in a quarter-squat/athletic position. Stick the landing so that your ankles and knees have a moment to fully absorb the force.
Perform 3 sets of 3 reps, 1–2 times per week. Pay attention to how you land (it may help to have a friend watch you, or set your phone up to film your sets). You should be able to land without your knees caving inward, feet rotating out, or losing your spine position. Do not move on to any other jumping exercises until these problems are corrected.
Depth Jump
When you feel you’re doing the prerequisite exercise smoothly, and you’re sure it’s not aggravating your knees or ankles, move on to the classic depth jump and box jump below. (Note that it may take a few weeks to feel comfortable with the depth jump prerequisite; don’t rush it.)
Step 1. Place a box or step that’s about 12 inches high on the floor. Stand on the box with feet between hip and shoulder width.
Step 2. Step off the box with one foot and let yourself drop to the floor, landing with both feet in the quarter-squat/athletic position with arms driving behind you and parallel to the spine. Stick the landing, and step back up on the box to repeat for reps.
Perform 3 sets of 3 reps, 1–2 times per week. Again, be aware of any changes in your shin position (they must be vertical upon landing) and be sure that you’re landing with feet forward and flat on the ground. When you feel comfortable doing the depth jump from a 12-inch box, increase the box height to 24 inches. When you can perform depth jumps safely from a 24-inch box, you should be ready to do tuck jumps.
Box Jump
While you work on the depth jump, practice the box jump too (in the same session or in another workout that week). The box jump develops power similar to the tuck jump, but is safer and less demanding.
Step 1. From a standing position, bend one knee and raise it in front of you until your thigh is parallel to the floor. Notice where your foot is—the height of the box you use should be below that level. Place an appropriate-sized box on the floor and stand a foot or so behind it.
Step 2. Bend your hips and knees as described in all the jump variations above, lowering into the athletic position, and then jump up onto the box, controlling your landing.
Perform 3 sets of 3–5 reps. Gradually increase the height of the box over time.
In addition to lower-level jumping movements like those above, lower-body strength lifts such as squats and Romanian deadlifts will help enormously to prepare your body for tuck jumps. Pogue recommends doing the single-leg version of these exercises too, as most landings won’t happen on perfectly even feet.
]]>Obstacle racing is a sport in which, traveling on foot, you must overcome various physical challenges. Obstacles include, but are not limited to, climbing over walls, carrying heavy objects, traversing bodies of water, crawling under barbed wire, and jumping through fire.
With a history of heavy military influence, it’s no surprise that many obstacles are similar to those used in military training. But other obstacles are unique to obstacle racing and test endurance, strength, speed, mobility, and mental toughness. Races vary in both distance and challenge level, combining trail running, road running, and cross-country running in distances ranging from 1 mile arena sprint events to 26.2+ mile “death races”!
When you train for an obstacle race, you not only build full body fitness that allows you to hoist heavy sandbags over your head, but you also build the mobility to crawl under barbwire, the resilience to dive into cold mud pits, and an overall uncanny ability to conquer the unknown and withstand just about anything that gets thrown at your body.
In this article, you’re going to get 10 slightly insane obstacle training workouts that will spice up your workouts like nothing else, and completely redefine the way you train. You don’t need much equipment for these – just some heavy stuff and the willingness to tolerate physical discomfort. Ready? Let’s jump right in. If you can tackle a few of these a week, you’ll be ready to race obstacle courses – or at least be a helluva lot tougher.
Top 10 Insane Obstacle Course Workouts

Obstacle Course Workout #1: Butt Burner
A simple workout that requires just you and your body.
- 400M walking lunges
- Run max distance for 5 minutes
- 400M walking lunges
- Run max distance for 4 minutes
- 400M walking lunges
- Run max distance for 3 minutes
- 400M walking lunges
- Run max distance 2 minutes
- 400M walking lunges
- Max distance run for 1 minutes
Obstacle Course Workout #2: Battle Rounds
Perfect when you have one set of dumbbells and you want a lung-sucking workout that includes some significant load lifting.
Preferably wearing Elevation Training Mask, do 3-5 rounds for time of:
- 50 leg levers
- 40 mountain climbers
- 30 burpees
- 20 kettlebell or dumbbell swings
- 10 dumbbell manmakers (40lb men/25lb women)
Obstacle Course Workout #3: The Running Bear
It’s called the bear because it feels like you have a bear on your back. Enjoy that feeling.
- Do 10 Bear complex using 95lbs for females or 135lbs for males. Then run 1 Mile.
- Then 8 Bear Complex, followed by running 800M.
- Then 6 Bear complex, followed by running 400M.
- And finally 4 Bear Complex followed by 200M and a final 2 Bear Complex.
Obstacle Course Workout #4: Sandy Stairs
All you need for this is something heavy to carry and a flight of stairs. You get to work your core during your “rest periods”.
- Find a flight of stairs, preferably 3-5 flights
- At bottom of stairs, do 5-10 sandbag, rock or dumbbell clean and jerks (here’s how to make your own sandbag)
- Carry sandbag to top of stairs. Carry sandbag back down stairs.
- Set sandbag down and hold plank position for 60 seconds.
- Repeat for as many rounds as possible in available time.
Obstacle Course Workout #5: Row Your Boat

Don’t have a rowing machine? Then use a bike. But double the distance if done on a stationary bike.
Row 1000m, rest 2 minutes, row 800m, rest 90 seconds, row 600m, rest 60 seconds, row 400m, rest 30 seconds, and finally row 200m for an all out effort. Finish by hopping off the rowing machine for 30 burpees.
Obstacle Course Workout #6: Hotel Room Workout
I travel a ton and do body weight workouts like this quite a bit. I’ve also done similar workouts (without the cold shower of course) in airport terminals, parks, etc.
As many rounds as possible of:
- 10 lunge jumps per side
- 15 burpees
- 20 box jumps onto bed
- 25 chair dips
- 30 jumping jacks
Finish with a 2-5 minute cold shower
Obstacle Course Workout #7: The Wrestler
You’ll feel like you’ve been in a wrestling match after this one.
Complete 3 rounds of:
Obstacle Course Workout #8: 5Ã5 With Sprint Finisher
very good combination of strength, speed and muscular endurance.
5 sets of 5 reps of:
- Benchpress
- Deadlift
- Backsquat
- Shoulder Press
- Power clean
Finisher: 10Ã30 second sprint at 8-10mph on 8-10% incline
Obstacle Course Workout #9: Hotel / Stairs Workout
very good option for when the hotel gym is crappy.
- Run one flight of stairs one step at a time. Stop on landing for 20 second isometric squat.
- Run next flight of stairs two steps at a time. Stop on landing for 20 push-ups.
- Run next flight of stairs by box jumping as many steps at a time. Stop on landing for 20 mountain climbers.
- Repeat for as many flights as possible.
Obstacle Course Workout #10: The Stairmaster
If you really fancy yourself as fit, try going from 5 to 1 minute, and then back up.
- 5 minutes hard stair climb, 100m walking lunges with 40lb dumbbells
- 4 minutes hard stair climb, 100m walking lunges with 40lb dumbbells
- 3 minutes hard stair climb, 100m walking lunges with 40lb dumbbells
- 2 minutes hard stair climb, 100m walking lunges with 40lb dumbbells
- 1 minutes hard stair climb, 100m walking lunges with 40lb dumbbells
Want over a hundred more workouts just like this? You can get them, along with Onnit’s Unconventional Guide To Obstacle Course Training, a complete 12 week nutrition plan from Ben Greenfield, obstacle how-to training videos with top Spartan athlete Hunter McIntyre, a guide to making your own backyard obstacles, top-secret interviews with the world’s top obstacle racing athletes and much more! Just head over to https://www.ObstacleDominator.com.
]]>And if you had to attach a superlative to him, he may be the fittest. The UFC middleweight is a Special Forces sniper and Green Beret who weathered tours of duty in Afghanistan and Iraq. He walks around at 220 pounds and trains three times daily.
Kennedy starts with a strength and conditioning session in the morning followed by sparring in the afternoon and jiu-jitsu in the evening. Below is an abbreviated example of the kind of metabolic conditioning workout he does.
The Tim Kennedy Workout

Warmup
Workouts begin with mobility drills to warm up, including hip circles, fire hydrants, and runner’s lunges.
Ladder Drills
Place an agility ladder on the floor and run the length of it. Do one pass by putting one foot in each box. On the second time through, put both feet in each box. Repeat both drills moving laterally in each direction. (Kennedy does 10 varieties of ladder drills in all.)
Cone Drills
Place 4 cones on the floor in a straight line 10 meters apart. Sprint to one, lateral shuffle to the next, then crossover step to the third and backpedal to the fourth. Reverse the order going back and repeat for 5 rounds.
Pullup Ladder
Perform 1 rep and drop from the bar. Then do 2 reps, 3, and so on up to 6 reps. Then work back down to 1. Repeat for 3 sets.
Rooney Complex
Load a barbell with 95–135 pounds and perform the following lifts in sequence: deadlift, bentover row, hang clean, front squat, push press, back squat, and pushups on the bar. Complete 6 reps for each lift and do 4 rounds total. Add 10 pounds each set. End every set with a 45-second sprint.
Med Ball Burpee-to-Box-Jump
Perform a burpee holding a medicine ball. When you come up to standing, pick up the ball, reach overhead, and then slam it into the floor and catch it on the rebound. Now perform a box jump holding the ball. That’s one rep. Do 4 sets of 10.
Rower
Row for 500 meters as fast as you can and then rest for as long as it took to row. Repeat for 400 meters, and so on down to 100.
Decompression
Perform stretches and yoga poses (plank, downward dog) to promote recovery.
Kennedy takes a bevy of supplements to aid his performance and recovery. These include MCT oil, Total Strength + Performance pre-workout formula, Shroomtech Sport, Total Human, grass-fed whey protein, Powerfood Active, and Oatmega Protein Bars.
]]>
While the purpose of any training method is defined by the user and their goals, sandbag training is especially good for functional strength and conditioning.
Unlike other methods that require particular form and technique, sandbags are incredibly simple tools that can be used by almost anyone as long as you know how to pick up a weight properly (i.e. straight back, core tight, knees tracking over your toes, etc.).
The key to the effectiveness of sandbag training has to do with the shifting of the sand itself. During typical sets with other implements like kettlebells, you can get in a “groove” while lifting the weight, making the set easier as you start to flow.
Conversely, the shifting nature of the weight within a sandbag makes that flow impossible; every lift is like the first rep of a set. This makes the workout more challenging by engaging your stabilizer muscles over and over again.
If you’re looking for strength training, you just need to get a heavier sandbag and concentrate on lower rep sets. If you want to add in conditioning, get a lighter sandbag and add reps and intensity. Pretty simple!
What Sandbag Weight Should I Start With?

The weight of the sandbag depends on several factors including your ability level, training experience, and purpose.
Luckily, sandbags are extremely adjustable; sandbags made specifically for fitness applications usually come with filler bags that you can vary in weight depending on your routine.
Even if you have a homemade sandbag, you can still lighten the load by pouring out some sand (which might get messy, but who cares).
Sandbag Training for Conditioning
Let’s say you’re familiar with kettlebell training, you use a 16kg (35lb) kettlebell for most lifts, and you’re looking to enhance your conditioning level and fat loss.
In this situation, I would recommend a medium-sized sandbag ( medium being a bag with a stretched length of 20-30 inches) with a capacity of 10-50 pounds.
Unlike your 16kg kettlebell, the sandbag will be primarily lifted with two hands, allowing you to use at least as much weight as you usually would with your kettlebell.
Some of the standard lifts, such as the Clean from the Ground, may be more difficult because of the floppiness of the bag depending on how much you fill it, but not to worry!
Sandbags can hold more than just sand! If you want to make them tighter (making high repetition lifts like Shouldering easier), simply fill the void with other items like old blankets or clothing.
You’ll still get the weight-shift you want from sandbag training without the tendency for the bag to flop onto your back or arms.
Another thing to consider with sandbags for conditioning is whether or not the sandbag has handles.
Since you want to lift with intensity for higher repetitions, I would recommend that the sandbag has at least one set of handles, either at the ends or across the middle.
The handles make gripping and throwing the sandbag much easier, allowing you to concentrate on the full body movement, rather than just your grip.
Sandbag Training for Strength
Let’s say that you’re looking for strength training with your new sandbag. You squat and deadlift heavy; you use 24-32kg (53-70lb) kettlebells for most of your lifts, and you want to increase your core and grip strength with sandbag movements.
In this case, you need a larger sandbag (36+ inches) with a capacity of 70-125 pounds.
With a larger sandbag, you’ll be able to use a bear-hug type hold to lift and carry the weight, allowing for Atlas stone-type platform lifts as well as strongman carries.
Chances are that you will be dropping the weight to the ground as you exhaust yourself, so make sure your sandbag is good enough to handle it (unless you’re outside and you don’t mind sand clouds).
As for whether or not your sandbag needs handles, that’s up to you. I would usually say no (since you’re probably interested in heavy sandbag training for the grip strength benefits), however, if core strength is your goal, they can still come in handy.
Homemade Sandbags vs. Fitness-Specific Sandbags

Should you buy a sandbag that is made specifically for sandbag training, or should you make one yourself? This is a battle that unconventional gym owners and garage-warriors have waged for years!
Fortunately, fitness-specific sandbags have become much more affordable. The choice is still dependent on what you plan to do with your sandbag training so here are some things to consider with both options:
Homemade Sandbags
Homemade Sandbags are cheap and relatively easy to build. The recipe is simple: buy a $3.00 bag of sand from Home Depot, wrap it up in as much duct tape as you can, and that’s it!
If you want to step it up, throw the sandbag you just built into an old duffle bag or backpack. Cheap, simple, easy.
If you want a good “How-to” on making a sandbag at home, refer to this article by My Mad Methods Contributor Alex Zinchenko: How to Make a Sandbag.
The problem comes in the form of durability, longevity, and movement limitations. You will not be slamming this thing on the ground or grabbing handles to help with high repetition sets (even with a backpack, those handles will quickly break).
You will be cleaning up sand, breathing sand dust, and running out of duct tape. If you’re a gym owner, you’ll be busting out the shop-vac often, and if you’re a homeowner, you’ll be getting yelled at by your significant other.
Fitness-Specific Sandbags
Thanks to the increasing popularity of sandbag training, in general, there are now a variety of vendors that sell sandbags for fitness applications in a variety of sizes, shapes, and even colors.
Again, the one you choose will be dependent on the objectives of your training as outlined above. Type in “buy a sandbag” in google and go nuts.
Well-made, fitness-specific sandbags don’t leak sand or dust, provide a variety of options for handles based on your preferences, and feature filler bags that make them easy to adjust the weight based on the workout (or even during the workout if you want to).
My personal opinion (based on training with sandbags for the last 5 years) is that you should buy a fitness-specific product if you’re serious about adding sandbag training into your standard regimen.
I have a few preferences based on what I use them for, which is high intensity conditioning. I like to have at least two sets of handles, one on each end and two in the middle.
I want the handles to be made of cloth (plastic handles will smack you in the face, neck, and shoulders during lifts and that sucks) and I want the main zipper to be covered by a piece of material so it doesn’t scrape the crap out of me.
This isn’t to say that I’m afraid of a few cuts and bruises, but if the point of your training is to increase strength and conditioning, pain from your training implement is a distraction from the workout itself!
]]>
Rope Climbing Exercise #1: Seated to Standing Rope Climb
Hang a rope from a pull up bar and straddle the rope, seated on the ground. Climb up and down the rope one hand over the other. Use the assistance of your feet on the ground as much or as little as you’d like, depending on your skill level.
Rope Climbing Exercise #2: Towel Pull ups
Throw a gym towel over a pull up bar and do pull ups holding the towel in each hand. If you do not have a pull up bar, hang the towel from a barbell in a squat rack and perform the same with your feet on the ground. To make this more dynamic, pull the towel to either side of your head alternating sides.
Rope Climbing Exercise #3: Negative Pull Ups
Negative pull ups or chin ups are great for improving your pulling strength while working on your grip. Start with your chin over the pull up bar and lower yourself over a 5 count. This can be scaled by performing with your feet on the ground or progressed by holding weight between your ankles.
Rope Climbing Exercise #4: Lat Pull Downs
If you have sticky points in your pull up or rope climb a great way to get through them is by doing strict form lat pull downs with as much weight as you can for sets of 3-6 reps/
Rope Climbing Exercise #5: Rope Climbing
If you already have rope climbing in your arsenal, you can always increase your speed and efficiency by practicing them, these single movement can cost you the race! It is best to practice after a workout when you are already fatigued, as you will be in a race.
Rope climbing is one of the more challenging obstacles in a race. Don’t make the mistake of rushing to climb the rope, trying to save time. Even if you are confident on the rope, slow down when you approach it; take a couple breaths, wipe off hands of anything that might impede you and select a rope that doesn’t look too muddy from previous racers.
Top 3 Physical Attributes for Rope Climbing
- Taller people have a bit of an advantage on the rope because they start higher and get a little more out of each pull.
- Strong Lats to get that big pull
- Callused or tough hands. Ropes and pull up bars are brutal on the hands. If you have been practicing you should be all set.
Functional training is all the rage at the moment and battle ropes, along with kettlebells, are leading the unconventional training movement in gyms across the country.
Using battle ropes improves strength and endurance by engaging the muscles of the entire body including the hands, forearms, shoulders, back, legs, abs, and core.
Once only thought of as a conditioning tool for elite athletes in high-performance centers, they’re now appearing in gyms across the country.
Although battle ropes offer a broad range of physical benefits, trainees face a lack of guidance on how to correctly program battle ropes workouts.
The following tips on setting up your battle ropes will provide you with a complete training regimen that goes beyond conditioning and gives you enough variations to keep your workouts fresh.
#1. Setting Up Your Battle Rope Anchor for Testing
Battle ropes are most commonly implemented for conditioning purposes. Many trainees simply wrap them around a pole or tree and begin wave exercises.
When programming your workouts, it’s always a wise choice to include some measure or “test” to gauge your progress. This may be accomplished by simply counting the number of waves done within a given time frame, but this seems incredibly tedious and is very unrealistic.
A great battle ropes conditioning test involves wrapping the ropes around the squat rack and using the safety bar as a measuring point.
Count the number of times the ropes hit the safety bar or “rings the bell.” This conditioning test is an adequate benchmark in tracking your progress.
#2. Setting Up Your Battle Rope Anchor for Climbing
Athletes looking to increase upper body endurance can utilize battle ropes as a climbing tool. When attempting to use a climbing rope, you were limited to gyms with high ceilings.
Using battle ropes, all you need is a squat rack or a sturdy tree branch to integrate several pull-up and climbing techniques. Refer to the video at the beginning of the article to create a double loop climbing system to perform single rope climbs, L-sits or countless other pull up variations.
#3. Setting Up Your Battle Rope Anchor for Grip Strength
Few trainers realize the potential of battle ropes for grip and strength work. Grab a heavy kettlebell and thread either end of the rope through the handle. Using the rope as a handle, as opposed to the kettlebell, further, develops functional grip strength.
This modification can be used for heavy rows, curls, or triceps extensions; allowing you to add or reduce the weight to your comfort level. This technique develops max effort strength and explosive power employing unconventional methods.
With a little imagination, the strength training programming possibilities are limitless!
#4. Setting Up Your Battle Rope Anchor for Dragging & Pulling Exercises
Dragging and pulling exercises are extremely useful for improving conditioning, developing strength and building explosive power. Typically associated with sled work, dragging and pulling implements can be applied using battle ropes and a few kettlebells.
To forge your “sled,” place one end of the rope through the handles of the kettlebells leaving enough slack to create a knot. Using this simple knot you’ve effectively created a powerful dragging and pulling instrument.
#5. Setting Up Your Battle Rope Anchor on the Go
One of the many benefits of incorporating battle ropes into your training is versatility. Let’s say you lack a post or tree to bind your ropes around. If you have a kettlebell and multiple sandbags you can produce a battle ropes station on the fly!
Place one end of the line through the kettlebell’s handle, much like you would around a squat rack, lay the kettlebell down, place some sandbags or steelbells on top as a weight and you’re ready to go!
]]>
And if you’ve done one before, you also know that it’s no jog in the park—you need to train for it seriously to have a good performance.
Whether you’re revving up for your first race or you’re looking to score your best time ever, I’ve got a 10-week plan that makes it simple for you.
It’s so effective that you’ll only need to pound the pavement three days per week.
While most 5K programs out there focus on having you run fixed distances each workout, the best way to build your conditioning is to let your workout intensity be your guide.
That means you’ll adjust the length of your training in real time based on how hard you’re working, which allows you to target the specific energy systems (aerobic and anaerobic) involved in the race.
Self-regulating your training also ensures that you get a better cost-benefit ratio from your workouts, so you’re never working harder than what you can recover from.
Here’s How It Works

You can measure intensity by your heart rate or your perceived running speed. To find your max heart rate, subtract your age from 220. When you run, you’ll aim to keep your heart rate at a certain percentage of this number. So, if you’re 30 years old, your max heart rate will be approximately 190 beats per minute, and a workout calling for 80% of your max will be done at around 150 beats per minute. You can wear a heart rate monitor to keep track or estimate it by holding two fingers at the pulse in your neck. Count the beats for six seconds and then multiply by 10 to find the number in one minute.
If you go by your perceived running speed (which is more practical for certain workouts), use this 1–10 scale: 1 represents an easy slow jog and 10 an all-out sprint. A speed of five would then be a moderate-paced run.
In each session, you’ll be given a range of sets to perform, and the exact number you do will be determined by your ability to maintain the given intensity. If at any time your heart rate or speed changes by 15% or more, the workout stops there. So instead of trudging along for miles when your body isn’t up to it, and greatly raising your risk for overtraining and injury as a result, you’ll quit while you’re ahead. As a result, you’ll find that, overall, you have more energy when you run and you’ll log more “good” workouts than bad ones.
For example, if you’re supposed to be working at a pace that’s 80% of your max heart rate—let’s say that’s 150 beats per minute—and you notice that it’s jumped to 170 beats per minute (according to either your heart rate monitor or when you measure your own pulse), end the workout there. Continuing to train beyond the intensity needed to get the training effect that you want is simply counterproductive. Don’t be a hero and try to push through; listen to your body when it says you’ve had enough.
The same principle applies to the perceived speed scale. If you’re supposed to run at a 6 but you feel yourself having to slow down to more of a 4.5 (15% less than 6 on a scale of 1–10), stop. Be as objective as you can.
This kind of training can be an adjustment mentally. If you’re used to logging upwards of 25 miles per week, you’ll notice that self-regulating your workouts will have you running a little less. Trust that the quality of your training is more important than the quantity.
The Program

There are four workouts that you will rotate through for three sessions per week for 10 weeks. So you’ll do Workouts 1, 2, and 3 in Week 1 and pick up with Workout 4 in Week 2 and repeat the cycle. You can spread the workouts out however you like as long as you get them in the order shown. Weeks 1–5 will consist of the same workouts repeated, and you’ll switch to different routines in Weeks 6–10.
In your last week before the race, take 2–3 days completely off to ensure proper recovery.
Weeks 1–5
Workout 1
Run 90 seconds at 90% of your max heart rate (HR), or a perceived speed of 6–7. Rest 60 seconds. Repeat for 8–12 rounds, starting with 8 rounds in Week 1 and building gradually to 12 as the weeks go on and your intensity allows.
Workout 2
Run 10 seconds at a perceived speed of 10, then 20 seconds at a 5, or at least 80% of your max HR. Afterward, slow down to an easy jog or walk (a speed of 2) for 30 seconds. That’s one “rep.” Do 5 reps like this and repeat for 3 sets, resting 2 minutes between sets. Add a fourth set as intensity allows.
Workout 3
To do this workout you must first determine your race pace—the speed you intend to maintain for most of the 5K. Choose a goal time to complete the race and divide it by 5 so you have a goal for each interval. A good finish time for most beginners is 25 minutes. So, assuming that, you’ll want to aim to complete each kilometer of the race in 5 minutes.
Run 1,000 meters slightly faster than your race pace. If you’re trying to run the 5K in 25 minutes, you’d want to run these 1,000 meters at about 4 minutes and 40 seconds (1,000 meters = 1 kilometer). Rest 5 minutes and repeat for 2–3 sets. Work up to 5 sets over time as intensity allows.
Workout 4
Run at 60–65% of your max HR for 20–25 minutes.
Weeks 6–10
Workout 1
Run two minutes at 90% of your max HR, or a perceived speed of 6–7. Rest 60 seconds. Repeat for 8–12 rounds, starting with 8 rounds in Week 6 and building gradually to 12 as the weeks go on and your intensity allows.
Workout 2
Run 10 seconds at a perceived speed of 10, then 20 seconds at a 5, or at least 80% of your max HR. Afterward, slow down to an easy jog or walk (a speed of 2) for 30 seconds. That’s one “rep.” Do 5 reps like this and repeat for 5 sets, resting 2 minutes between sets.
Workout 3
Run 1,000 meters slightly faster than your race pace. Rest 5 minutes and repeat for 5 sets as intensity allows. Try to reduce your rest gradually between sets as intensity allows.
Workout 4
Run at 60–65% of your max HR for 20–25 minutes.
]]>
Iwas trying to figure out how I wanted to train today to get my heart rate up and keep it there. I
didn’t want to run or jump rope and I wanted to use a kettlebell. Bring on the VOâ Max Protocol!
You may have heard of VOâ Max being tested using a treadmill in a sports lab and that’s where
it is most often used. VOâ Max is essentially the body’s maximal oxygen uptake threshold. This
is generally considered the best indicator of physical fitness and cardiovascular health.
Here, we’re going to use a kettlebell to train our VOâ Max! It’s intense, not only from a muscular
endurance standpoint but a cardiovascular one as well. It will leave you breathing heavy and
sweating from every pore in your body.
Before doing a VOâ Max Protocol, make sure you are adequately warmed-up. I like to do a few
light kettlebell drills to prime to posterior chain such as swings, squats, cleans and then light
snatches.
Prior to performing, you need to determine your cadence, or how many swings you will get in
each work interval. The proper way is to do a 6-minute snatch test. For the first 5 minutes, start
out slow with the reps spread out evenly and then gradually increase your reps per minute. On
the 6th minute, go all out and perform as many snatches as you can. You will then take 60% of
this number to use as your cadence. For example, if you do 15 snatches in the 6th minute then
your cadence will be 9 snatches per work interval (15 x 60% = 9).
Here’s how to perform the VOâ Max Protocol:
- Set a timer for 15 seconds work and 15 seconds rest. (The best physical timer for this is the Gymboss timer; or you could download a timer app).
- Perform your determined number of snatches in the 15 second work interval with your right arm (9 using the example above)
- Rest 15 seconds
- Perform your determined number of snatches with the left arm
- Rest 15 seconds
- Repeat (Ultimate goal is 80 sets but will take quite a while to achieve if you’re just starting out)
I have done this with both a 35lb and a 55lb kettlebell. Once I hit 80 sets (40 with each arm) with the 35lb bell then I moved up to the 55lb bell. This is a test that I perform every so often to determine my progress.
This will push your body hard and will really elevate your heart rate. It is a great exercise that I constantly come back to and truly have a love/hate relationship with.
Give it a shot¦.push your potential!
Get Onnit
]]>When you are performing Push Ups, you are really trying to keep in full balance, utilizing your entire body. Before you try to take on this challenge, here are the rules as well as how to perform a strict Push Up.
How to Do a Strict Push Up
- Begin in the Plank position with your arms straight and your hands under the shoulders with your core engaged and held tight.
- Keep your feet together (or as close as you can).
- The arms should be rotated so that the crease of the elbow faces forward.
- Keep the back straight and lower the torso to within about 2-4 inches of the ground (about the size of a clenched fist) while keeping the elbows close to the body.
- Extend at the elbows to return to the original position while maintaining a plank position throughout the entire movement.
The 2-Minute Max Strict Push Up Test
- Begin in the starting position of the Strict Push Up.
- Start the timer before the first rep (it would be best to have a partner start/stop the timer and count the reps).
- For a rep to count, you must go all the way down to within 2-4 inches of the ground and lock the elbows at the top.
- You can stop and rest any time during the 2 minutes, but only completely Strict Push Ups count towards your reps.
- Stop counting when the 2 minutes have elapsed.
How to Prepare for the Strict Push Up Test
- Begin by performing 5 sets of 10 Push Ups at least 4 times a week if you are a beginner, and 20 Push Ups if you are intermediate/advanced.
- At the end of the first week, perform the 2-Minute Max Strict Push Up Test.
- After the first week, begin performing the Push Up Test instead of the reps (start by substituting one of the rep days with a test day).
- The goal should be to perform the Push Up Test at least 3 times a week, while doing at least 5 sets of 20 Push Ups on the other days.
- 100 Push Ups goal in 2 minutes should be your goal (this is a standard for elite soldiers).
Fat Burning Battle Ropes HIIT Workout Summary
The Fat Burning Battle Ropes HIIT Workout can be used as a finisher or just a stand alone workout if you are crunched for time.
For those who do not know, HIIT stands for High-Intensity Interval Training, and the fat burning battle ropes HIIT workout is a sure fire way to strip the last bit of fat off for summer.
Not only will the Fat Burning Battle Ropes HIIT Workout build work capacity and aerobic conditioning, it will also increase muscle endurance in the upper and lower body.
Try this workout as soon as possible, all you need is a single Onnit battle rope and a small area to whip yourself into shape!
Fat Burning Battle Ropes HIIT Workout Instructions
Perform as many waves as possible in 30 seconds. Once finished rest 30 seconds, move onto the next exercise in the group and repeat. Once finished with the entire round. Rest for two minutes and repeat for a total of 6 rounds.
For the Circle Wave and Low to High Chop, alternate which direction you perform the movement every round.
A1: Battle Rope Jump Slam – 6 rounds x 30 sec
A2: Battle Rope Alternating Wave with Squat – 6 rounds x 30 sec
A3: Battle Rope Alternating Wave with Side Lunge – 6 rounds x 30 sec
A4: Battle Rope Circle Wave – 6 rounds x 30 sec
A5: Battle Rope Low to High Chop – 6 rounds x 30 sec
A6: Battle Rope Kneel to Stand Wave – 6 rounds x 30 sec