https://www.onnit.com/blogs/the-edge.atomOnnit - The Edge2025-07-15T17:22:41-05:00Onnithttps://www.onnit.com/blogs/the-edge/how-to-do-b-stance-romanian-deadlifts-rdls-like-a-pro2025-07-10T10:55:27-05:002025-08-14T14:53:41-05:00How To Do B-Stance Romanian Deadlifts (RDLs) Like A ProJeremy GottliebThe B-stance Romanian deadlift is a way to make both the Romanian deadlift (RDL) and the single-leg deadlift a little easier to manage, while still giving you a great workout for the glutes and hamstrings.
What Are B-Stance RDLs and What Are Their Benefits?
First, let’s make sure we’re on the same page about what regular oldRomanian deadliftsare. The RDL is very similar to a conventional deadlift, but rather than picking the bar up off the floor, you start from a standing position with your hips locked out, and then bend your hips back as far as you can while keeping a little bend in your knees.
The RDL trains the glutes, hamstrings, and lower back, making it a great exercise for building muscle in those areas, as well as a good supplemental lift for the deadlift itself.Many lifters like to progress from the RDL to a single-leg RDL, where you perform the same basic movement but on one leg. Being able to do a single-leg RDL, or single-leg deadlift, demonstrates great balance and stability, so it’s arguably a good exercise for athletes to work on, but it takes a lot of practice for most people to achieve. It’s also not really a great choice for building muscle in your glutes and hamstrings, because you expend most of your energy trying to stabilize the movement—that is, keep from losing your balance and falling over. Single-leg deadlifts can’t really be loaded heavy, so there’s a diminishing return as far as gaining muscle and strength from them.
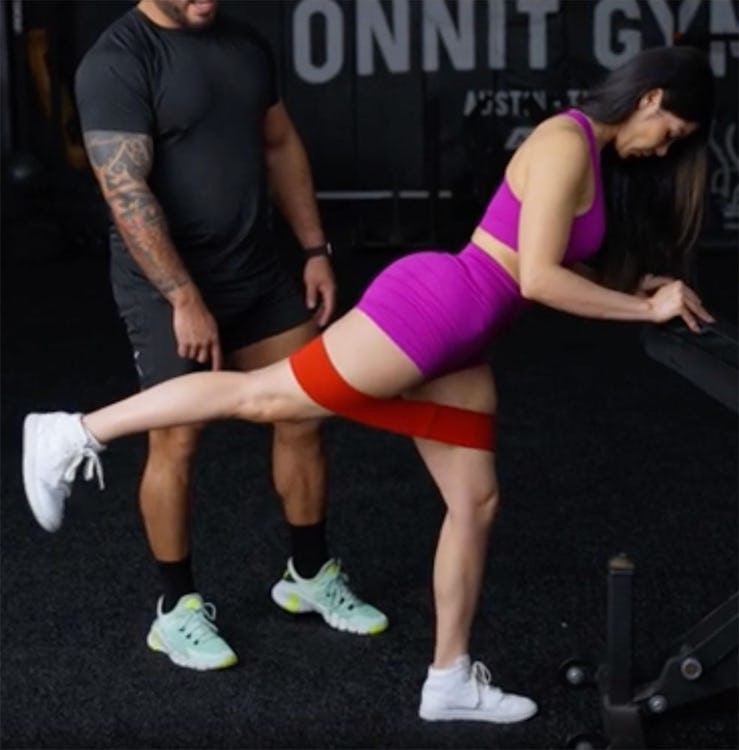
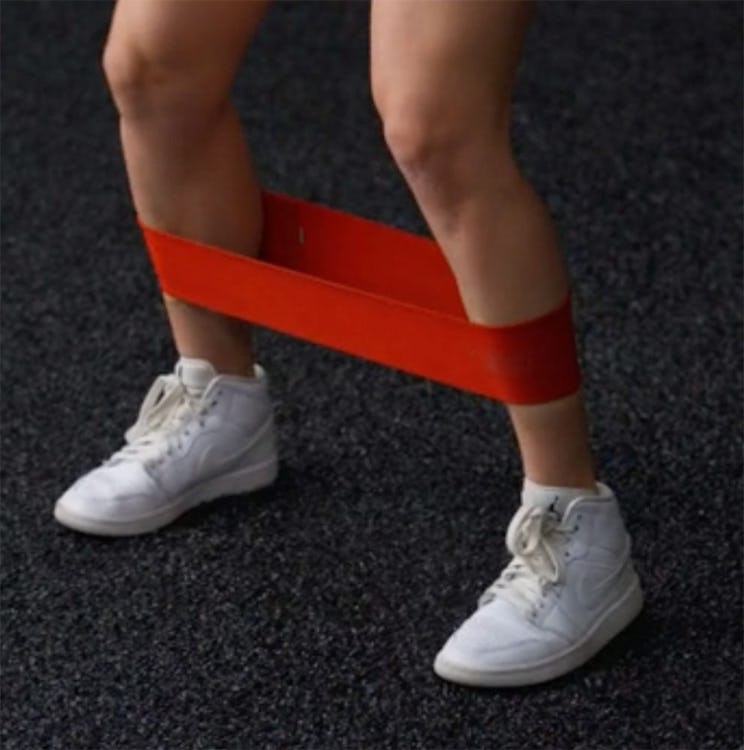
Now here’s where the B-stance RDL comes in.By taking your normal RDL stance and sliding one foot back and using it as a sort of kickstand, you can shift the load to your front leg, making the RDL more of a unilateral movement like the single-leg deadlift, but keeping most of the stability that makes the RDL such an effective muscle and strength exercise.
Therefore the B-stance RDL is a good progression from the bilateral RDL as well as a prerequisite or alternate for single-leg deadlifts.
Also, if you suffer from lower-back pain and find that regular two-legged RDLs are uncomfortable, the B-stance RDL may be a good alternative. You can’t lift as heavy with a B-stance as you can using a normal, two-legged stance, but in this case, that can be a good thing. Using lighter weight will place less strain on your lower back, but it will still be heavy enough to train one leg at a time effectively. The B-stance will also allow you to improve the mobility in your hips, one side at a time, so it may help to relieve the source of your back pain in the first place.
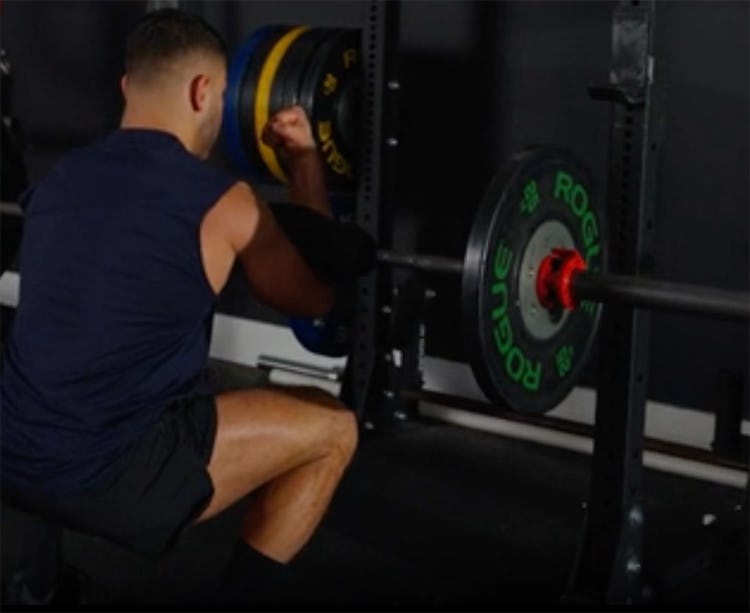
You can perform B-stance RDLs with a barbell, dumbbells,kettlebells, or a trap bar.We like the trap bar because it allows you to keep the weight very close to your center of gravity, which is easier on the lower back,so that’s the version that is depicted here. But the same mechanics apply to a B-stance RDL with any implement.
Step 1.Take the bar off the floor or a rack—if you’re going off the floor, you have to deadlift the bar up and into position, so be sure to do it with a flat back and lift with your legs. Now stand with your feet hip-width apart and soften your knees. From here,slide one foot back so that your toes are even with the heel of the other foot.Some people like to move the foot a little further backward or keep it more forward, but the toe-to-heel alignment seems to work best for most. Experiment and see what feels right to you.
Step 2.Brace yourcore, and bend your hips back as far as you can while keeping a little bend in your knees. You want your front knee to stay soft and just bend as needed to give your hips the greatest range of motion. The knee on your kickstand leg will bend a little more, but don’t try to bend either leg like you would in asquat.
Keep a long spine from your head to your tailbone as you push your hips back.You’ll feel a strong stretch in your glutes and hamstrings on the front leg. You want that stretch, because that means you’re working the muscles, but it shouldn’t be really uncomfortable. You also shouldn’t go to where you feel your lower back is beginning to round forward.
Step 3.As soon as you feel a strong stretch, and you know your hips are as far back as they can go with that stance, extend your hips to stand back up tall. Watch that you don’t hyperextend your back at the top. You want to be standing tall, not leaning back in an effort to push your hips forward even more.
Complete your reps (sets of anywhere from 5–10 reps are generally fine), rest, and repeat on the other leg.
B-stance RDLs will primarily target the gluteus maximus, your main butt muscle. But they will also hit your hamstrings and spinal erectors (the muscles in your lower back). Your core, of course, has to brace your spine throughout the whole movement, so you could argue that any RDL is an ab workout too.
Finally, if you go heavy on B-stance RDLs, they will demand a lot of work from your upper back and grip as well, just in supporting the load.
How Do B-Stance RDLs Compare To Other Romanian Deadlifts?
We already said that B-stance RDLs are easier on the low back than conventional RDLs. They also offer more range of motion than a bilateral RDL, so you can bend your hips back a little further and put a little bit more stretch on your glutes and hamstrings. Of course, the B-stance RDL is also more stable than a true single-leg deadlift, so you can lift more weight and provide a better stimulus for size and strength gains.
With all that said,the B-stance won’t allow you to go as heavy as conventional RDLs,so they’re not an ideal choice for building up your deadlift like regular RDLs are when done as an assistance lift. It’s good to use B-stance RDLs as an alternate exercise for the sake of variety, or if you’ve been experience low-back problems and want to train around them.
How To Stretch Before Doing B-Stance Romanian Deadlifts
The B-stance RDL is really just a hip hinge—you bend your hips back as far as you can while keeping a straight, flat back. For that reason, any hip hinge motion can serve as a warmup for it. A basic bodyweight hip hinge can do the trick.
Step 1.Stand with feet parallel and bend your knees slightly.
Step 2.Now drive your hips back as far as you can while keeping a long spine from your head to your tailbone. When you feel a stretch in your hamstrings, or you can’t push your hips back any further without losing your spine position, come back up to standing. Do 3 sets of 10 reps.
Another warmup move that will stretch out the muscles you’ll use on the B-stance RDL is the reverse lunge.
The B-stance RDL emphasizes the glutes when they’re at their most lengthened position—a deep hip hinge with your butt pushed all the way back. A nice complement to this kind of exercise is the B-stance hip thrust, another unilateral glute exercise that emphasizes the muscles when they’re in a shortened position—that is, they contract hardest when you’re near the end of the hip hinge and about to lock your hips out.Click HERE for a full tutorial on the B-stance hip thrust.
Another alternative exercise is the braced single-leg deadlift, as recommended by Bret Contreras, PhD, a glute-training expert and author of the bookGlute Lab. Here, you hold onto something sturdy for support and perform a single-leg deadlift motion. The braced single-leg deadlift is a little more challenging than using the B-stance, and a little closer to doing a real, unassisted single-leg deadlift, so consider it a progression from the B-stance once you’ve got that down.
Step 1.Set up a bench or other sturdy object so it’s at aboutarm’s length in front of you when your arm is at your side. You will hold onto it for stability. Now stand with your feet close and a light dumbbell in the opposite hand.
Step 2.You’ll start by working the leg that’s closest to the bench. Keeping a slight bend in that knee, push your hips back and extend your other leg behind you as you bend your torso toward the floor. Try to keep your hips square to the floor and maintain a long spine.
Step 3.Extend your hips to stand up tall again.
As you get more comfortable with the movement, you can reduce the support you get from the bench.
For example, start the single-leg deadlift unassisted and then reach out and touch the bench only if you begin to wobble.
]]> https://www.onnit.com/blogs/the-edge/how-to-do-b-stance-hip-thrusts-like-an-expert2025-07-10T10:55:27-05:002025-08-14T14:22:18-05:00How To Do B-Stance Hip Thrusts Like An ExpertJeremy Gottlieb
The hip thrust is one of the most popular exercises you’ll see in a gym, and possibly the best glute-building exercise you can do, but the two-legged version isn’t the only variation on this movement that you should be practicing. Doing the hip thrust on one leg while using the other as a kickstand to provide some balance—aka a B-stance hip thrust—can provide aneven greater challenge for those who feel they’ve mastered the basic thrust,while at the same time serving as an alternative for people who find that the classic thrust bothers their lower back. The B-stance hip thrust, then, is both a progression of and a substitute for the hip thrust, and one that allows you to work one side of your body at a time.
What Are B-Stance Hip Thrusts and What Are Their Benefits?
The B-stance hip thrust is sometimes called a “hip thrust with a kickstand,” or a “staggered-stance hip thrust,” because you use one leg for balance while the other one thrusts. Like the conventional bilateral hip thrust, you lie back on a bench (your body perpendicular to it), and raise your hips up to lockout, but in the B-stance thrust, you push with one foot while the heel of the other one stays grounded for extra support.
You see, most people start out with the regular bilateral hip thrust, where you work both glutes at the same time. Later, they try to progress to the single-leg hip thrust, which has you holding one leg up in the air while you thrust with the other one.The problem is, going from two-legged hip thrusts to single-leg thrusts is too big a leap for most people.It can be very hard to stabilize your hips and avoid twisting to one side when you’re doing true single-leg hip thrusts, and many people find that even their bodyweight alone is too difficult to control for more than a few reps.
That’s where the B-stance hip thrust comes in.It’s a nice intermediate exercise that’s more challenging than the basic two-legged hip thrust, but more stable than the single-leg hip thrust, so you can work one side at a time and build your balance without having to work too hard to keep your body aligned and on the bench.
In addition, because it’s a unilateral exercise, it allows you to isolate one glute at a time, which helps correct any imbalances you have between sides. Also, focusing on one muscle area at a time recruits more muscle in that area, which can help you add muscle size more easily.So, if you want a big, round butt, the single-leg hip thrust is a very good exercise choice.
Lastly, if you have lower-back pain, and you find that two-legged hip thrusts hurt to perform—maybe because you hyperextend your back at the top of the movement—you may find that the B-stance hip thrust is more comfortable to do. Because you’re essentially working one leg at a time, you can’t thrust as hard or as high, so it’s harder to overextend your range of motion. The single-leg hip thrust keeps the force where you want it—in your glutes—and out of your lower back.
The B-stance hip thrust builds off the conventional two-legged thrust. Once you’ve found a comfortable position for bilateral thrusts, it’s an easy transition to B-stance thrusts.
Step 1.Secure a bench against a wall or rack so it doesn’t slide; you can also weight it down with heavy dumbbells.Lie back on the bench, perpendicular to its length, so that the edge of the bench supports your body right under your shoulder blades.
If you’ve tried hip thrusts in the past and felt them too much in your lower back,you can try sliding your body up a little higher so the bench supports your mid-backrather than the bottom of your shoulder blades.
Now extend your hips to get into the top position of the double-leg hip thrust, so your shoulders, hips, and knees are aligned. Adjust your feet so that they’re directly below your knees. Now when you lower your hips down, your stance should be set so that you can thrust with the greatest range of motion and good form.
Feel free to play around with your foot position, angle, and spacing a little more, and do a few practice reps, until you find a setup that’s the most comfortable and lets you feel your glutes working more than any other muscle. This will be your normal bilateral hip thrust setup.
Step 2.Now you’ll transition from the bilateral hip thrust to the B-stance. Extend one leg forward so the heel lines up with the toes on the planted foot. This partially-extended leg is called your kickstand leg. Keep the toes on your kickstand leg elevated so the weight of your leg is resting on that heel.
Step 3.Tuck your chin to your chest, and make fists with each hand, driving the back of yourarmsinto the bench for stability. Tuck your tailbone under, and brace yourcore.Now drive through the foot of your planted leg to extend your hipsuntil they’re locked out and parallel to the floor. Push both knees out a bit as you extend your hips, and keep your ribs pulled down so you don’t bend at the spine.
Your shoulders, hips, and knees should form a straight line in the top position.
According to Bret Contreras, PhD, author ofGlute Laband arguably the world’s foremost expert on glute training, the kickstand leg should only apply about 30% of the forcein your B-stance thrust. Most of the work should be done by the leg that’s closest to your body. Remember, the kickstand leg is only supposed to provide some stability, so make your other leg’s glutes do the majority of the work.
Use your bodyweight alone until you’ve mastered the B-stance hip thrust technique. But when you think you’ve got it down, you can add a barbell to your lap for resistance, just as you do with the normal two-legged hip thrust. However: “I suspect that as you lift more weight,” Contreras writes in his book, “you will inevitably use your extended leg more to counterbalance the weight, which defeats the purpose of trying to load mostly one leg. So, as with the single-leg hip thrust, it’s better to keep the load light.” If you get to the point where B-stance hip thrusts for higher reps (north of, say, 10) don’t challenge you much anymore, it’s probably time to progress to the true single-leg hip thrust (with the non-working leg up in the air), which we explain in the B-Stance Hip Thrust Alternatives section below.
The B-stance hip thrust really works the gluteus maximus, which is your main butt cheek muscle, responsible for extending your hips. But it also trains the gluteus medius, which is on the side of your butt cheek, and the glute minimus, which lies under the glute medius. Both the medius and minimus work to stabilize the pelvis, so they will get trained by any variation of the hip thrust too.
While all variations of the hip thrust are fairly new exercises in thefitnessworld, research on them is mounting, and pointing to positive benefits both in terms of athleticism and glute muscle gains. A 2019trialfound thathip thrusting with a barbell improved subjects’ sprint performance.Meanwhile, in a landmark 2023study, subjects were divided into two groups, with one team training the hip thrust and the other doing the barbell backsquat—no other lower-body work was performed. After nine weeks, glute growth in both groups was roughly the same,indicating that the hip thrust is at least as good a glute exercise as the much beloved, age old, and tried-and-true squat.
Perhaps even more impressive, however, was another 2023studythat had two groups perform a full-body workout. One group did leg presses and stiff-legged deadlifts for their lower body in the session, while the other group did those two movements and then two sets of hip thrusts at the very end of the workout. Both groups saw gains. The non-thrusting group enjoyed a six percent increase in glute growth,but the ones who ended their workouts with thrusting grew their glutes by more than nine percent.
This gives us a little to think about. On the one hand, the subjects who hip thrusted did end up performing more work for their glutes than the other group did, which may account for their extra gains. However, you have to factor in that their hip thrusts were done dead last in the session, after they had trained both upper and lower body and accumulated a lot of fatigue.The body’s ability to recruit muscle fibers is greatly diminished for exercises that are done late in a workout—i.e., exercises done at the end of your workouts will never be as effective as those that are done at the beginning—so this suggests that the hip thrust may have outperformed the other glute exercises in the session (the leg press and stiff-legged dead), regardless of fatigue.
Note that all of the above research was done on the TWO-legged hip thrust, NOT the B-stance exercise,so it’s hard to say how B-stance thrusting compares to backsquats, single-leg squats, leg presses, deadlifts, or anything else. But, until further research emerges, it’s a good bet that any hip thrust variation is going to be a solid choice for building the glutes.
How Do B-Stance Hip Thrusts Compare To Other Hip Thrusts?
The B-stance hip thrust is essentially the middle man between the bilateral thrust and the single-leg hip thrust, helping you progress from the former to the latter. It won’t allow you to train as heavy as the more stable, two-legged thrust will, but the B-stance will help you to better isolate the glutes on one leg at a time,while providing enough stability for you to train hard and safely. It’s also likely safer for the lower back than the bilateral thrust, because it lessens the risk of hyperextending the spine when you lock your hips out.
Warm up and stretch out your glutes and hips prior to a B-stance hip thrust session with these moves, courtesy of Onnit-certified coach Eric Leija (@primal.swoledier). Do 2–4 sets each.
When you think you’ve got the B-stance hip thrust down, you can move up to the single-leg hip thrust, where you raise one leg in the air and work the other one without any support.
Single-leg Hip Thrust
Step 1. Set up as you did for the B-stance hip thrust but raise one leg off the floor entirely and bend that knee, bringing it toward your chest.
Step 2. Push your working foot into the floor and raise your hips until they’re roughly in line with your working knee and your shoulders. Remember to keep your ribs down and core braced.
If you want to isolate the glutes a little bit more, you can do a single-leg hip thrust motion on the floor, without a bench. This is known as a glute bridge. Bridging your hips up from the floor will decrease the range of motion some, but it will ensure that only your glutes do the work to move your hips (as opposed to thehamstrings, which do contribute a little bit to the hip thrust, while the quads kick in a little as well to extend the knee).
Luckily, we have a whole video tutorial on how to do thesingle-leg glute bridgein a separate article.
]]> https://www.onnit.com/blogs/the-edge/how-to-properly-do-glute-ham-raises2025-07-10T10:55:27-05:002025-08-14T14:19:24-05:00How To Properly Do Glute-Ham RaisesJeremy GottliebThe glute-ham raise is probably the most efficienthamstringexercise you can do. The catch? It’s also the most difficult. But if you have a glute-ham bench, this tutorial will help you master the movement in short order (and if you don’t, read on, and we’ll show you how to get the same benefits with other equipment).
Summary
– The glute-ham raise trains thehamstrings‘ two key functions simultaneously.
– Sets of 5–8 reps may be appropriate to start; later, the glute-ham raise can be trained with low-, moderate-, and high-rep ranges.
– The glute-ham raise movement can be approximated with the Nordic hamstring curl, and other variations that don’t require a glute-ham bench.
The glute-ham raise is a posterior-chain exercise. That is, it trains the muscles on the back side of the body that work together in unison. The hamstrings, however, get hit the hardest.The glute-ham raise is unique in that it works the hamstrings’ two functions—bending the knees and extending the hips—in one fluid movement, and through a full range of motion.We’ll explain in detail how to perform it below, but to get a sense of how the glute-ham raise is done, picture starting off with your torso parallel to the floor, and using the back of your legs to lift your entire body up until it’s perpendicular to the floor. (If that sounds hard to do, well¦ it is!)
There are only a handful of exercises that mimic the glute-ham raise movement (we’ll show you how to do some of them below, if you don’t have a glute-ham bench). Without them, you would need to perform multiple different exercises to achieve complete hamstring development. For instance, leg curls to work the knee flexion component, andRomanian deadliftsorkettlebell swingsto train hip extension.So, glute-ham raises maximize efficiency. They also train the hamstrings in a very functional way that’s perfectly suited to faster running and overall lower-body explosiveness.
Think of how your foot strikes the ground during a sprint. Your hamstrings help to pull it underneath and behind your hips, and bend the knee, to propel your body forward. Powerlifters and weightlifters—guys and gals who need strong posterior muscles to lift the heaviest weights—also flock to the glute-ham bench. Glute-ham raises are a powerful assistance exercise for building up your numbers on thesquat, deadlift, and clean.
And that’s why they were originally created.Glute-ham raises were first implemented by weightlifters in the U.S.S.R.sometime in the 20thcentury. Soviet athletes dominated the world stage in many different sports for decades. In the 1970s, when American weightlifter Bud Charniga was studying up on Soviet training methods, hediscovered the glute-ham raise, and brought it to the States. Unable to find a bench that would allow him to perform it,Charniga mocked up his own using apommel horse and a car seat.Specially-designed glute-ham benches have since become staples in serious strength and conditioning facilities, and are used by different kinds of athletes of all levels.
Step 1.Glute-ham benches have a foot plate that is adjustable, and many have adjustable ankle pads as well. The foot plate can slide closer to and further away from the big pad that your hips rest on, and the ankle pads can be elevated or lowered. You’ll have to take a few minutes to experiment with setups until you find one that’s comfortable.
Ultimately, you want the foot plate far enough away from the pad so that, when you climb onto the bench,your knees can hang below the pad.The height of the ankle pads should be set so that your shins are angled slightly upward when your feet touch the plate and your torso is vertical (the top of the movement).
When you slide your feet between the ankle pads, your toes should touch the foot plate. Make sure these pads are secure, as they’re about to support your bodyweight.Try to get your feet to point straight down at hip-width distance, but you may find that you need to turn your toes out a few degreesto perform the exercise. Use your hands on the big pad to push your body up until it’s vertical. Draw your ribs down, take a deep breath into your belly, and tuck your pelvis slightly so it’s perpendicular to your spine. Brace yourcore.
Step 2.From this tall kneeling position, slowly extend your knees to lower your body. When your torso is parallel to the floor, bend your hips slightly so that it dips a few inches below parallel. You want to use as big a range of motion as you can, but without taking tension off your hamstrings. For that reason, don’t bend so much that your head points toward the floor. And whatever you do, don’t let your lower back round. Stay rigid.
Step 3.Extend your hips and drive the balls of your feet into the foot plate, allowing your heels to rise off the plate. Push through the big pad and bend your knees to pull your body back to vertical. This should look similar to how your leg works when it’s running. (You drive off the ball of the foot while the hamstrings are extending the hips and curling the leg.)
You can cut the range of motion a little short, stopping slightly before vertical, if you like.This is a good technique for targeting pure muscle gain, as the tension won’t subside at either end of the range of motion.
The glute-ham raise is relatively simple to perform, but because it’s foreign to most people, it’s liable to pose some problems at first.If you notice your calves cramping up, it’s a sign that you’re setting up with your upper body too far in frontof the pad. This is making your calves work harder than they should to pull you back up. Move the foot plate more rearward, and check to see that your knees are pointing out below the bottom of the pad at the top of the exercise. If your bench doesn’t adjust to the right position for you, fold a towel over the hip pad, or drape a rubber mat over it, to add a little moremassto the pad and position your body further back. An inch or two can make a big difference.
Another common mistake is lowering your body until your torso is perfectly parallel to the floor. This shortens the range of motion a little bit, but it’s also the hardest position in the range, and it puts you at the greatest leverage disadvantage. When you’re just starting out on glute-ham raises, it pays tolower your body a little deeper so your hips flex; then you can use a bit of stretch reflex to come out of the bottom position.This makes the lift safer and will allow you to get more reps.
Finally, avoid hyperextending your spine on the way up. As your hamstringstireout, you’ll have a tendency to want to finish the lift by arching your back hard. This can cause injury, so remember to keep your ribs down and your core tight.
“The glute-ham raise can provide such a large overload directly to the glutes and hammies—without a substantial lower-back strength demand—that it can serve as the big strength move for those muscles for most people,” says Harski.“It can actuallyreplace the deadliftfor a period of time.It is important to train the posterior chain aggressively and often, but to do so while minimizing loading of the spine, specifically the lower vertebrae.” In other words, the glute-ham raise can play a key role in strengthening your lower body without risking injury to the lower back in the way heavydeadliftsand backsquatscan. While it’s a simple bodyweight movement, the glute-ham raise packs a similar punch to big barbell exercises.
Once you’re experienced with it, the glute-ham raise can be trained through several different rep ranges.You may need to use sets of 5–8 reps at first, because the exercise is so challenging,but within a few weeks, you will likely be able to do it for 8–12 reps, treating it like you would most other assistance exercises that are done with moderate weight for moderate reps. If you’re pretty strong on glute-hams, or want them to serve as a substitute for a big barbell lift such as the deadlift, you can add resistance by holding a weight plate to your chest or wrapping a band around the feet of the bench and the back of your neck, allowing you to train in the 5–8 rep range again.
As your own bodyweight becomes easier to manage, you can do glute-ham raises for sets of 20 or more reps, which can serve as a brutal finisher for your leg day.
The glute-ham raise focuses on the hamstrings, but the tension it creates on the back side of the body irradiates all the way up the chain. That means that the glutes get involved as well (as the name of the exercise would imply), along with the spinal erectors, which run from the pelvis all the way up to the neck. The ab muscles also have to work with your erectors to brace your spine, so it doesn’t flop over while you perform the raise. Anddon’t be surprised if you wake up with some calf sorenessthe day after doing glute-ham raises the first time, since the gastrocnemius activates to assist the hamstrings in flexing the knee.
If you really want to nerd out, tell your friends that you’re training your semimembranosus, semitendonosis, andbicepsfemoris, aka, the leg biceps. (These are the three hamstring muscles, from the medial side of the leg to the lateral side.) All three muscles originate on the lower portion of the pelvis and insert below the knee, which gives thema unique ability to bend the knee and extend the hips at the same time.Imagine doing a machine leg curl but without the machine to support your hips. You’d have to keep them from bending while you flexed your knees. In the glute-ham raise, you have to do this against the resistance of your bodyweight—which is far more than what you can load on a leg curl machine. Now you see why glute-hams are such a ruthless move for the hamstrings.
Can I Do the Glute-Ham Raise Without A Machine?
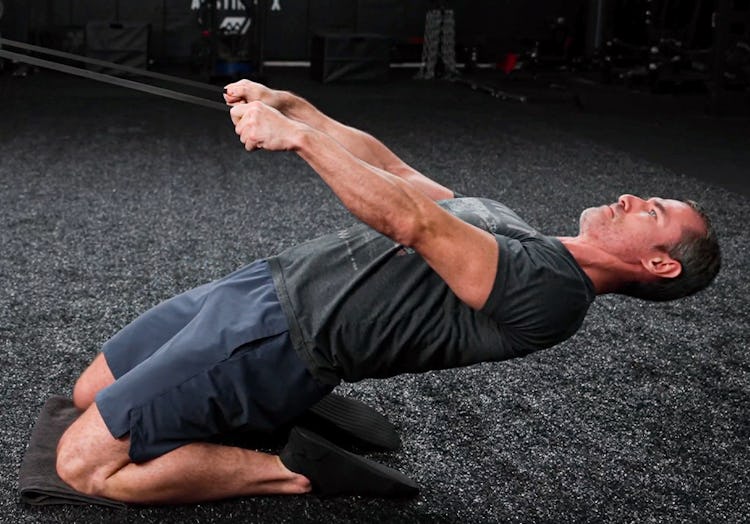
A glute-ham bench is the best option for performing the glute-ham raise movement safely, but if you don’t have access to one, you can mimic it with other equipment. The Nordic hamstring curl, typically done with a barbell or regular utility bench, is a challenging but suitable substitute exercise. That said, it is even HARDER than the glute-ham raise, and definitely not for beginners. However, if you’ve been training a while and are confident in the strength of your hamstrings, give it a go.
Nordic Hamstring Curl
Step 1.Load a barbell on the floor and wrap a pad or towel around it to protect your ankles. Place a pad or mat on the floor to save your knees. Kneel on the pad and secure your ankles under the bar. (You can also use a bench that’s secured to the floor, or the spotter bar in a power rack, or have a partner hold your ankles down).
Step 2.Tuck your pelvis so it’s perpendicular to your spine. Take a deep breath into your belly, and brace your core. Have your hands ready at your sides so that you can catch yourself if you lose control on the descent.Bend your hips back so your torso leans forward a little—maintain this hip position throughout the set.
Step 3.Begin extending your knees, lowering your body toward the floor under control. When you feel you can’t maintain tension in your hamstrings anymore, let your body fall and break your fall with your hands. The range of motion won’t be great, but the extreme tension you create in your hamstrings will still make the exercise effective.
Step 4.Push off the floor and try to perform a glute-ham raise to return to the starting position.
You will probably only be able to manage a few negative reps at first (just the lowering portion of the movement). Build up to where you can perform full reps, and gradually increase your range of motion from there. (That is, aim to use less assistance from your hands over time.)
Harski says you can try using a physioball as well—the big inflatable ball most people use for situps and other ab exercises.
“Place the ball under your thighs andanchoryour feet under a stable bench,” says Harski. Make sure the bench is secured to the ground—you may have to weight its feet down. The movement is done the same as the glute-ham raise and Nordic curl.
Yet another option is to use a Bosu ball, which looks like half a physioball (dome on one side, flat on the other).Kneel on the edge of the inflated dome side and press your feet against a wall, driving primarily through the balls of your feet.Perform the Nordic curl movement, using your hands on the floor to push yourself back up if you can’t make it through the full range motion.
Great GHR Alternatives
(See03:57in the “Perfect Your Glute-Ham Raise” video at the top.)
If you don’t have a glute-ham bench, and you aren’t inclined to build a DIY one, you can still work your hamstrings and glutes hard with exercises that train these muscles in a similar fashion and are doable athome.
Sure, you’ve done hamstring curls, and they’re nowhere near as powerful as the glute-ham raise, but they can be with a small tweak. What we miss in an isolated hamstring curl is the hip extension we get in a glute-ham raise.One easy way to bring both knee flexion and hip extension together is to do a leg curl motion with furniture sliders,which allow you to drive your feet into the floor to raise your hips first, followed by sliding your feet toward your butt for knee flexion.
Sliders can be bought in any hardware store. They’re cheap, effective, easy to store and carry in a gym bag, and have a myriad of uses. The only catch is that you need to be on a smooth waxed floor, turf, or carpet to use them. Rubber flooring can cause too much friction and make the move overly difficult or even impossible.
Step 1.Lie on your back on the floor and place the sliders under your feet. Bend your knees and slide the sliders in close to your butt. Tuck your pelvis slightly so that it’s perpendicular to the floor and take a deep breath into your belly. Brace your core. Drive the back of yourarmsinto the floor at a 45-degree angle to your torso to add stability.
Step 2.Push through your heels to raise your hips up to full extension. Keep your core tight so you avoid arching your lower back.
Step 3.Slowly extend your knees, sliding your feet out in front of you as you lower your hips. Stop just short of where your butt would touch the floor. When your legs are extended, reverse the motion, curling your legs as you bridge your hips again.
One way around the stickiness of sliders is to use aglute-ham rolleror glider. It works the same as sliders but offers a platform to rest your feet on and wheels that roll it, making it usable on any flooring.
With any sliding leg curl variation you do, start by adding reps to progress the challenge. When you can do several sets of 10 or more, you’ll need to add resistance, which you can easily do by adding an elastic exercise band around your ankles. The band will amplify the concentric portion of the exercise (pulling the heels back), and make you work to stabilize yourself on the eccentric (extending your legs).
Step 1.Attach a light band to a sturdy object and wrap the open end around the back of your heels. Lie on your back on the floor and rest your heels on the roller.
Step 2.Perform the movement as you would the sliding curl described above.
Note:There are still more options that will allow you to perform the same sliding/rolling hamstring curl movement. A suspension trainer and a physioball can also be used.
Leg-Banded Ab Rollout
You’re probably familiar with rollouts done on an ab wheel. By adding a band around your feet, you can make a standard rollout into a posterior-chain exercise that nearly replicates the glute-ham raise while you train your core at the same time. The band forces you to maintain hip extension while you flex the lower leg, just as a glute-ham raise does.
Step 1.Anchor a band to a sturdy object and place a towel, mat, or pad on the floor to protect your knees. Kneel on the pad and hook the band around the back of your ankles. Curl your heels toward you to 90 degrees, so that there’s tension on the band, and you feel your hamstrings engage. Hold an ab wheel on the floor directly under your shoulders (or use a barbell loaded with light plates so it can roll, as shown above). Your body should form a straight line from your head to your knees, with your core braced.
Step 2.Roll the wheel forward, extending your hips while maintaining a tight core and alignment between your spine and your pelvis. Maintain the isometric hold in your legs. From the end position, draw the wheel back into the floor and return to the starting position. That’s one rep.
Back Extension and Leg Curl
If you don’t have the equipment to address both knee flexion and hip extension in one solid move, performing each of the movements separately is enough to ensure that you at least don’t skip training one of the hamstrings’ key functions. Though its name is something of a misnomer, the back extension exercise done on a 45-degree back extension bench trains hip extension. Do a few sets followed by leg curls—seated, standing, or prone—and you’re giving the hamstrings the one-two punch they need to grow and strengthen to their potential.
Back Extension
Step 1.Adjust the pad of a back extension bench so that it fits in the crease of your hips when you mount the bench. Get on the bench, and secure your feet under the ankle pads. Tuck your pelvis so it’s perpendicular to your spine, and brace your core. Your body should form a long, straight line.
Step 2.Bend only at the hips to lower your torso toward the floor. Stop before you feel your lower back is about to round forward. Squeeze your glutes as you extend your hips and return to the starting position.
]]> https://www.onnit.com/blogs/the-edge/how-to-do-the-single-leg-glute-bridge-like-a-pro2025-07-10T10:55:27-05:002025-08-14T14:25:06-05:00How To Do The Single-Leg Glute Bridge Like A ProJeremy GottliebThe single-legglute bridgeis a progression of the two-legged glute bridge, where you lie on the floor and raise your hips up to full extension. Because the single-leg bridge works one leg at a time, it’s much more challenging than the basic glute bridge and requires a lot of stability through your hips andcore. This makes it a great move for building functional strength and balance. Running, jumping, and most sports activities require you to stabilize your body and produce force on one leg at a time, and the single-leg glute bridge will train you to do that. It’s also good for improving range of motion in the hips, which can help relieve lower-back pain.
Keep scrolling, and you’ll learn how to perform the single-leg glute bridge correctly, when to use it, and what to do instead if you find it too challenging (or too easy).
What Is The Single-Leg Glute Bridge?
In any glute bridge exercise, you lie on your back on the floor and use your glutes to extend your hips. In the single-leg version, just one leg works at a time while the other is tucked near your chest. Supporting your bodyweight on one leg is very challenging—your hips will have a tendency to tilt, and your lower back may want to take over the movement to compensate for your glutes (if they’re weak).Therefore, the single-leg glute bridge is not a beginner’s movement.If you’re new to glute training, or bridging specifically, you should start with the two-legged version (and we’ll go over it below).
The single-leg glute bridge doesn’t offer as much range of motion as other glute exercises, such as the hip thrust orRomanian deadlift. It works the glutes in a more shortened position, focusing on the lockout of your hips to extension. For this reason, it serves as a nice complement to other glute exercises. It can also bea good option for when you’re traveling, or other times that you don’t have access to heavy weightsor other gym equipment. For most people, their bodyweight alone makes for a challenging workout and will only allow them a handful of reps.
Step 1.Lie on your back on the floor and set up to do a regular, two-legged glute bridge. Place your feet flat on the floor close to your butt so your shins are nearly vertical. Tuck your chin toward your chest. Bend your elbows and make fists with both hands, actively driving yourarmsinto the floor. This will help brace your upper body. At the same time, tighten your core, pulling your ribs down.
Step 2.Push through your feet to raise your hips up to full extension and squeeze your glutes as you come up. It’s important that you don’t hyperextend your lower back at the top of the movement, so keep yourabsbraced (think: “ribs down”) andfocuson pushing your feet hard into the floor rather than trying to drive your hips up as high as possible.
Step 3.Lower your hips back to the floor with control.
Do a few practice reps and think about how it feels.If you feel the exercise more in yourhamstringsthan in your glutes, move your feet in a little bit closer to your butt.If you feel it more in your quads or knees, move your feet further away from you. You may also want to experiment with where your toes point and how wide your stance is. When you find a comfortable position where you feel like you’re balanced and working mostly glutes, you’re ready to do the exercise with a single leg.
Step 4.Raise one leg off the floor and bend that knee 90 degrees. “Your single-leg glute bridge stance should look like your standard glute bridge stance,” says David Otey, CSCS, a trainer, gym consultant, andfitnessbook author (OteyFitness.com). Some people like to keep the non-working leg extended straight from the hip, butOtey says this makes the exercise unnecessarily harder, turning it into more of a balancing actwhen you really just want to focus on glute bridging. So keep the non-working leg bent.
Step 5.Drive through the foot that’s flat on the floor to raise your hips up. Your shoulders, hips, and working knee should all move in alignment. Now control the way back down.
Many coaches suggest pushing through the heel of your foot as you bridge, and sometimes even letting your toes raise off the floor, but Otey recommendsthinking of your foot as a tripod and pushing through the heel, ball, and pinkie toe knuckle.“To develop the glutes, hamstrings, and the rest of the posterior chain muscles in a way that will translate to your other activities,” says Otey, “your body has to learn to push with full foot contact. That gives you the most stability and activation.When you do athletic movements, you can’t sit on your heels, so learn to press through the ground.”
Otey also suggests wearing flat-soled shoes, or no footwear at all, to facilitate stable contact with the floor. “Fluffy shoes like running shoes or other types with a big heel or padding will make it harder,” says Otey.
You’ll immediately notice how much more unstable the single-leg bridge is than the double-leg, so be extra careful to drive with your elbows and keep your core braced.Your hips shouldn’t tilt or twist.
Aim to do as many reps as you can, which may be a lot or only a few. That makes the single-leg glute bridge both a good strength exercise to do if you don’t have weights as well as a good high-rep burnout exercise for the end of a lower-body workout.
What Muscles Do Single-Leg Glute Bridges Work?
The single-leg glute bridge works (surprise!) the glutes, but Otey notes that it engages the glute medius and minimus more than most other glute drills. These muscles act as stabilizers for the pelvis and keep the head of the femur in the hip socket.
Your back extensor muscles and core have to work as well to keep your pelvis level throughout the motion, and your upper back has to engage to prevent your torso from collapsing.
Further down the chain, the hamstrings, calves, and anterior tibialis (the muscle on the front of your shin) can’t help but get involved too.
Difference Between A Single-Leg Glute Bridge and A Regular Glute Bridge?
Again, the regular glute bridge is done with two feet on the floor while the single-leg bridge uses one leg at a time. Since it’s more stable,the regular glute bridge will allow you to add more external load (such as a barbell) when you’re ready to progressit, whereas the single-leg bridge requires more balance and may be challenging enough for you with bodyweight alone. Both exercises train the glutes, but the single-leg glute bridge is a more advanced progression, and the better choice for developing the smaller glute muscles that provide stability for everyday life activities like running and jumping.
“It’s important to do single-leg movements,” says Otey. “It benefits smaller muscle groups that support a limb when it’s working on its own.When you do bilateral [two-legged] exercises, it’s like doing a group project in school: one or two kids do all the workand the others coast. But when you do single-leg stuff, every muscle has to do its job or the movement will fail. If you force the body to use weaker muscles, it will use them, and make them stronger.”
Because of its benefits to balance, Otey says the single-leg glute bridge is good for kids as well as people in their 90s who are trying to stay active.It can also improve range of motion in the hips, which is helpful for relieving or preventing lower-back pain.The more your hips can move, the less the lower back will involve itself in various exercises, and that takes pressure off the spine.
Difference Between a Glute Bridge and a Hip Thrust?
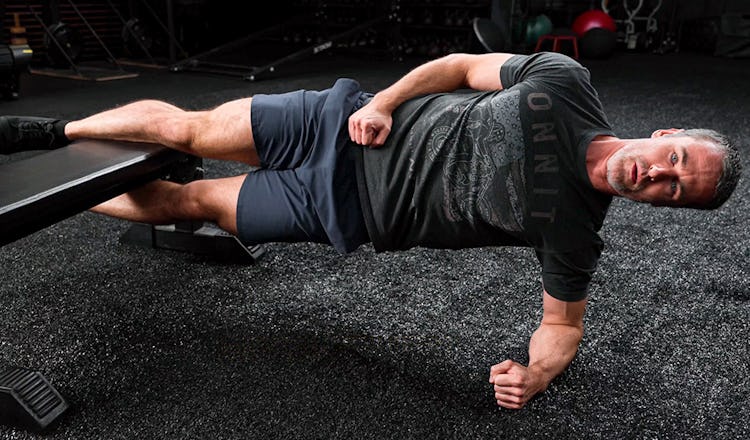
The glute bridge and hip thrust are two distinct exercises that are often confused. Glute bridges are always done with the back on the floor, and that means their range of motion is fairly short.A hip thrust is done with the upper back supported on a bench (shown in the photo above), and that allows you to sink your hips to the floorand then extend them to the height of the bench. This takes the glutes through their full range of motion, so many coaches argue that the hip thrust is a better glute exercise for glute muscle gains than a glute bridge.
However, because the hip thrust’s range of motion is so wide, it does recruit somehamstringand quad muscle as well, and can be done to bias those areas even more depending on how you set it up. For those reasons, some coaches counter that the glute bridge is a better glute exercise, as it isolates the glutes to a greater degree.
The truth is, both the glute bridge and hip thrust should be done for complete, balanced glute development, and that includes their single-leg versions.
Kas Glute Bridge vs. Hip Thrust vs. Single-Leg Glute Bridge
The Kas glute bridge is yet another glute exercise that often gets spoken of interchangeably with hip thrusts and glute bridges, but it’s really a separate exercise entirely. Named for the coach who popularized it, Kassem Hanson, founder ofN1, an online trainingeducationcourse,the Kas bridge is a hip thrust with a shortened range of motion.(If you’ve been paying attention, you know by now that the term “bridge” implies that you do it on the floor, but this is NOT the case with the Kas glute bridge.)
You set up on a bench (usually with a barbell in your lap) and start with your hips locked out;then lower your hips about a third of the way down to the floor (or until your knees start to drift backward), and lock out again.This keeps the tension of the exercise squarely on the glutes, rather than involving the hamstrings and quads, as the basic hip thrust does.
You can perform the same movement with one leg (a single-leg Kas glute bridge), but the single-leg bridge on the floor achieves mainly the same thing.
The single-leg glute bridge is a lot harder than the two-legged glute bridge, so if you find that you can’t bridge up all the way or keep your balance, take it down a notch with a simpler exercise. One option is the B-stance glute bridge, which uses your non-working leg like a kickstand, providing a little more stability but still allowing you to work one side of the hips at a time.
Step 1.Set up as you did for the single-leg glute bridge and slide your non-working leg forward until the heel of that foot is even with the toes of the working foot.
Step 2.Now bridge up as you did for the single-leg glute bridge. The heel of the non-working leg shouldn’t really push into the floor—it’s just there to help your balance. Try to keep most of your weight on your working leg when you bridge.
Another alternative to the single-leg glute bridge that’s a little easier is the glute march. Here, you’ll bridge up with both legs and, keeping your hips elevated, raise one leg at a time like you’re marching your feet. When you master this move, you should be able to do the single-leg glute bridge with no problem.
Bret Contreras, PhD, a coach and world-renowned expert on glute training (@bretcontreras1on Instagram) uses glute marches as his preferred regression of the single-leg glute bridge.In his textbook,Glute Lab, a comprehensive guide to glute training, he says that he often has clients do this movement as a warmup before they attempt the single-leg glute bridge, performing 2 sets of 20 reps (10 on each leg).
A third option is to bridge up with both legs and then raise one leg off the floor and lower your body back down with the other leg. This will help you build control in your hips and set you up for a full-range single-leg glute bridge down the line.
When you feel like you’ve mastered the single-leg glute bridge, Otey recommends you try the single-leg hip thrust, which increases the range of motion by resting your shoulders on a bench.
Step 1.Rest your upper back on a bench with your body perpendicular. The bottom of your shoulder blades should line up with the edge of the bench. Place your feet in front of you and find your comfortable stance. Bend your elbows and dig your arms into the bench for stability, making fists with your hands. Raise one leg off the floor and bend that knee, bringing it toward your chest.
Step 2.Push your working foot into the floor and raise your hips until they’re roughly in line with your working knee and your shoulders.
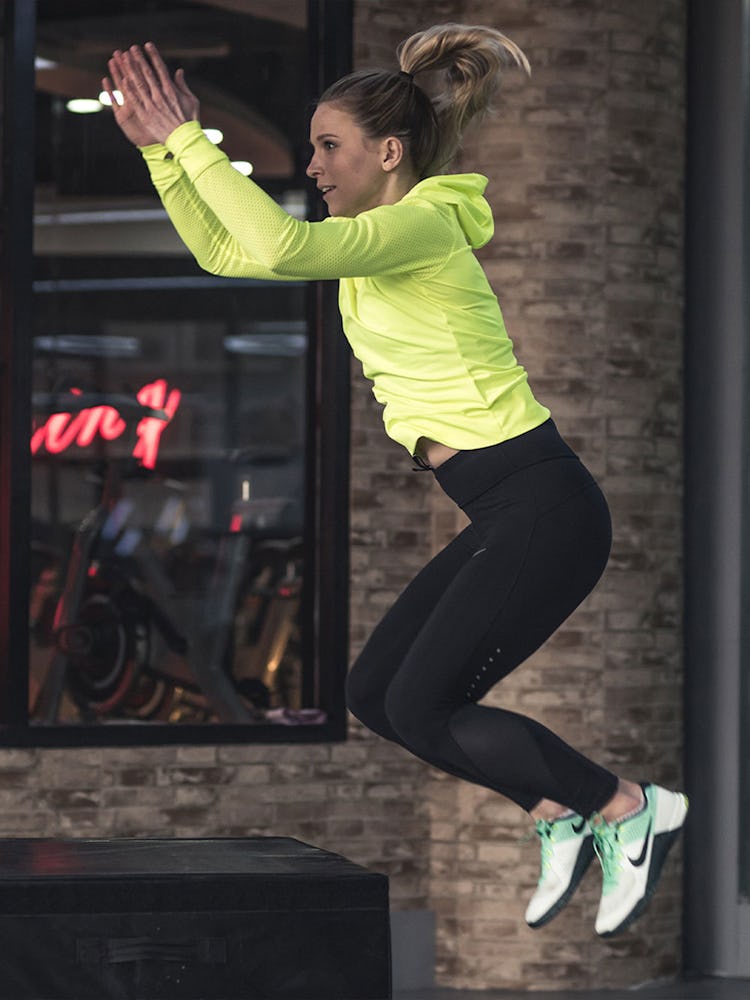
]]> https://www.onnit.com/blogs/the-edge/the-pro-s-guide-to-box-jump-exercises-and-workouts2025-07-10T10:55:26-05:002025-08-15T06:37:19-05:00The Pro’s Guide to Box Jump Exercises and WorkoutsJeremy GottliebThe box jump is an exercise seen frequently among athletes, and even more often in YouTube gym fail compilation videos. It’s a great movement for developing power and a fun way to add a more athletic component to any strength workout, but most people misapply it in their training. There’s no denying that box jumps can spike the heart rate, but they were never intended to be done for conditioning, utilizing high reps and short rest periods. Let’s take a comprehensive walk-through of the box jump exercise, including the proper way to perform it, the training you need to improve it, and how to incorporate it effectively—and safely—to build total-body explosiveness.
What Is A Box Jump?
While the exercise does clearly involve jumping from the floor onto a box, it’s not quite as simple as it seems. Not any box will do, and the object isn’t just to get up on top of the surface by any means necessary.
The box jump is a low-level plyometric exercise.That is, it trains the muscles’ stretch reflex to develop explosive power.You quickly lower your body into a half-squatto stretch the glutes andhamstrings, and then use the resulting release of elastic energy to help power you up in the air. So as not to come down too hard, the box is there to break your fall, but it also teaches you to land like a cat—decelerating your bodymassand absorbing the force of your jump. These skills are highly valuable to athletes who jump and sprint, so the box jump is a staple in many sports training programs.
At the same time, because it’s not particularly complex or dangerous to perform (if done as intended), the box jump can be done by recreational gym rats who want to add a bit of power training to their routines.
The boxes used can vary in height from a few inches to a few feet, and can be constructed of hard wood, rubber, firm padding, and even steel. Whichever kind you have access to, make sure you start with one that’s not too high (more about this below) and offers a stable surface for your feet to land on—and an even base that doesn’t wobble. Some boxes have fairly small foot surfaces, so, in general, the wider or larger the platform you have to jump on to, the better. (You’ll have less chance of missing it!)
How To Do The Box Jump
Before we get into how to execute the jump correctly, let’s go over a few ground rules for safe box jumping. You’ll also want to check out the five progressions for building up to a box jump from Onnit Director ofFitnessEducationShane Heins,beginning at 1:03 in the video above.
Use A Moderate-Sized Box
First of all, be conservative with the height you choose. You should warm up on boxes that are very low to the ground—just a few inches to a foot or so high—and do your work sets with a box that’s only around knee height.Twenty-four to 30 inches high is plenty for all but the most experienced jumpers.Yes, we know you see people jumping onto 50-inch boxes and higher on YouTube and Instagram, but believe it or not, most of them are just trying to impress you, and they aren’t using good form.
The depth you squat to in your takeoff and your landing should be almost the same. That is, you should be landing in approximately a half-squat position, orwhere your knees are bent about 45 degrees.If you land so deep that your knees are practically to your chest and your lower back is rounded, the box is much too high!
Think about it like this: the point is to build athletic power. If you’re a football player exploding off the line of scrimmage, would you start in the bottom of a squat? Do you bend your knees 90 degrees to take a jump shot in basketball? Do sprinters curl up into a ball before they take off down the track at the sound of a starter’s pistol? Of course not. The goal of a box jump isn’t to leap as high as possible—it’s to train the mechanics that let you develop power when it counts.
Stand Far Enough Back
It matters how far away from the box you set up.Stand back a few feet and extend yourarmsso that your fingertips touch the boxwhen you reach forward with both hands. That represents the distance that should exist between you and the box when you’re about to perform your first rep, so make a note of it and stand in that spot when you begin your set. Respecting this space ensures you won’t catch your fingers on the box during your upswing when you propel yourself upward into the air. It’s also a good distance to prevent you from overjumping your target and tipping the box forward when you land.
Swing Your Arms Up
Speaking of upswing, understand how much your arms contribute to your jumping momentum. Your arms should swing down by your sides as you descend into the half-squat—the mechanics are somewhat like compressing a spring—and then swing upward with force as you jump. Many people do the opposite, driving their arms down toward the floor as they extend their hips and legs.While this may make you look like a human rocket ship, it’s utterly pointless in jump training,as it does not transfer forces from the floor and through your body to facilitate height.
Land With Control
You know the old saying, “What goes up must come down,” so we have to talk about how to land. Your landing should be quiet and soft. Coming down like a ton of bricks puts a lot of stress on the joints of the lower body and can cause injury. Also, as mentioned above, one of the benefits of a good box jump is learning to slow the force of your movement down,so try to stick your landings like a gymnast.If you find that you’re landing hard and loudly, guess what? The box is probably too high.
Step Down From The Box
Lastly, don’t jump off the box to return to the floor between reps. STEP down off it. Jumping down is the most common box jump technique mistake, and it’s a dangerous one. There’s no benefit to jumping backward off a box, and even at fairly low heights, it can injure your Achilles tendons. (Yes, advanced athletes sometimes jump backward to dismount the box, but we don’t recommend it for folks reading this article.) Set a smaller box, bench, or step next to the box you’re jumping onto and use it as a staircase to get down (if the box you’re jumping on is too high to comfortably step down from directly).
With all these caveats and details out of the way,here’s a step-by-step guide to performing the box jump movement.
Step 1.Set a box on the floor that’s roughly knee height. It should be high enough to provide some challenge but not so high that you can’t land safely. Twenty-four to 30 inches should do it. Extend your arms straight in front of you and stand at a distance that allows your fingertips to touch the edge of the box.
Step 2.Stand with your feet about hip-width apart. (If you deadlift, your deadlifting stance should be about right.) Quickly dip your hips, bend your knees, and swing your arms back to gather power.
Step 3.As soon as you feel your body drop into a half-squat position, explode upward, extending your hips and knees and throwing your arms up and forward to jump off the floor.
Step 4.Land softly in the middle of the box with both feet at the same time. Step down from the box carefully and take a moment to set up for the next jump.
What Muscles Are Used In A Box Jump?
The box jump is a major compound movement that requires a transfer of energy through the entire body, so you can pretty much point to an anatomy chart at random and land on a muscle that’s involved in the exercise in some way. Of course,the quads, hamstrings, and glutes are the prime movers, creating the hip and knee extension that lifts you off the floor,and your shoulders work to drive the upswing of your arms, which helps to propel you upward.
However, because you don’t load the body like you do in a squat, deadlift, or other resistance exercise, you probably won’t feel sore in these muscles the next day, and you won’t see size gains in them from jumping alone. The box jump doesn’t create a great deal of muscular tension, or maintain that tension for a length of time, so it’s not going to build bigger muscles. Using it in place of a leg exercise for muscle mass is not a good idea.
You may be surprised, however, to find that your deep abdominal and oblique muscles are in fact sore a day or so later. That’s indicative of how involved yourcoreis in transmitting forces to your arms for the takeoff. Remember that the goal of box jumping is power, and the result is a highly trained chain of faster, more explosive muscles that work together as a unit.
Best Box Jumping Exercises
Most of the time, you should practice box jumps with a 24–30-inch high box, using the technique described above.Three to five sets of three to five reps is a good general prescription for power gains,but end each set the moment you feel yourself slowing down or losing control of your landing.
Occasionally, to test yourself, you can use a higher box and attempt bigger jumps that might cause you to land deeper than a half-squat. In this case, you can work up to sets of three, two, or just one all-out jump. But for safety’s sake, do this sparingly, and have a spotter handy in case you stumble on the box.One to three times a week is enough frequency for box jumps.
Please be cautious. Unlike with strength training, where you need to add weight or reps on a semi-regular basis to keep making gains, progressing jump training isn’t so linear. Most athletes don’t need more than a moderate-height box, so don’t think that because you leapt up onto a 24-inch box last week, you need to use a 25-inch one this week.If you get to the point where box jumps feel easy at a certain height, work on jumping higher and landing on the same-size box before you bother to increase the elevation.Then, as explained, you can sporadically test your training by attempting higher boxes.
If you’ve done CrossFit WODs or attended aHIIT(high-intensity interval training) exercise class, you might have been instructed to do box jumps as part of a circuit or conditioning drill, using high reps and short rest periods.We suggest that you don’t train like this with box jumps. Explosive exercises and high repetitions don’t mix. That is, power movements like the box jump must be done for lower reps to prevent your form from breaking down due to fatigue. And you simply can’t generate the same explosiveness on a 10th jump as you can on the first three of a set, so high reps don’t suit the goal. Box jumps should also be done with longer rest periods for this same reason—two minutes or more between sets.
If you want to get anenduranceboost from your training, you can get it with any number of other, safer exercises. That said, if you’re determined to mix power and conditioning in the same session,we have a safe plan to do so below under HIIT Box Jump Workout.
The earlier in your workout that you do box jumps, the more power and height you’ll be capable of getting. But realize that the box jump does cause some impact on your joints. You also shouldn’t do any kind of fast movement without thoroughly warming up your muscles first, and even a great mobility routine done at the start of your workout may not be enough. Therefore,we suggest placing box jumps toward the beginning of your session, so you’re fairly fresh when you do them, but not cold.For instance, you might do them as your second or third exercise, after a few sets ofhamstringand glute work. Leg curls, hip thrusts, or glute-ham raises will pump blood into the posterior chain (the muscles on the back side of the body) and lubricate the hips and knees.
There are other exercises you can do to that sometimes don’t require a box, or even a jump, but will support your box jump training and improve your overall jumping ability. By choosing movements that train the upper body to generate upward force, or that strengthen the posterior chain, you can tighten up the component mechanics that make for gravity-defying leaps.
Step 1.Place a kettlebell on the floor and stand with feet hip-width apart. Get into a half-squat, as if you were winding up for the box jump—you should be able to reach the kettlebell handle from that position. If the weight is too low, elevate it by resting it on a weight plate or mat. Now deadlift the kettlebell so you’re standing tall.
Step 2.Quickly dip your hips and knees as if jumping, lowering the kettlebell to just above the floor (don’t let it smack into the platform you created), and then explode up. Don’t worry about jumping high, justfocuson the power of your explosion. Your feet may rise off the floor, but it’s OK if they don’t. Land softly, reset, and repeat. Do 3 sets of 3–6 reps.
Weighted Stepup
See the video at 1:22
The stepup can help familiarize you with the use of a box while building the glutes, hams, and quads. You can do it with dumbbells,kettlebells, a barbell across the back of the shoulders, or a weighted vest.
Step 1. Hold onto your weight and place your foot on a box or bench. It should be high enough so that your thigh is about parallel to the floor when the foot is resting on it.
Step 2. Drive through your heel to step up onto the bench without letting your rear leg rest on it—let it dangle behind you. Step back down, starting with the trailing leg. Do 3 sets of 8–12 reps.
Push Press
See the video at 1:45
Doable with a barbell, kettlebells, or dumbbells, a push press is just an overhead press that uses the legs for assistance. By dipping the knees, similar to how you move in a jump, and then driving up explosively, you can press more weight overhead, which makes the exercise effective for upper-body strength as well as generating power from the ground up. Push pressing is also a great way to learn to keep your body tight and braced. If any muscles are relaxed, you won’t be able to move the weight effectively.
Step 1.Hold the weight at shoulder level and stand with feet about hip width. Brace your core.
Step 2. Drop into a quarter-squat, initiating the descent by bending your knees. Keep your head, spine, and pelvis in line so your back is flat and your eyes and head are forward. You don’t want to turn this leg drive portion of the lift into a squat, so only bend your knees enough to get some momentum, and don’t hinge your hips too much. Imagine yourself doing the move against a wall and sliding your torso up and down it—you should be that upright.
Step 3. As soon as you’ve dipped, extend your hips and knees explosively to stand up straight, driving through your heels, and simultaneously press the weight straight overhead. You’ll need to push from your shoulders and triceps, but with a strong and quick leg drive, most of the power for the press should be provided by your lower body. Keep your core tight throughout the move so your spine is stable and safe. Lower the weight back to your shoulders, take a moment to reset, and then begin the next rep. Do 3 sets of 5–10 reps.
HIIT Box Jump Workout
We’ve established that box jumps should be used conservatively and for athletic performance, but we can’t deny that they spike the heart rate and involve almost every muscle in the body, so we understand if you’re tempted to use them in a conditioning workout that burns calories and boosts endurance.
A way to do this safely is to perform a low-rep EMOM,meaning that you set a timer and perform a set of jumps every minute on the minute. Find a fairly low box—low enough that you know you won’t have trouble landing on it even if you’re tired—and start the clock. Do three jumps, and then rest for the remainder of that minute. When the timer reaches 1:00, do another set. So let’s say the three jumps takes you 15 seconds to do; you’ll get 45 seconds to recover.
Continue this for 20 minutes. It may seem easy for the first five minutes or so, but those short rest periods will catch up with you. This kind of workout probably won’t do much for speed and power, but it can serve as cardio.
If you’re a recreational gym-goer who mainly trains for a better physique and functional strength, but you’d like to add another athletic component to your workouts, incorporating box jumps before your biggest lift of the day can help to prime your nervous system. This can improve your performance on lower-body compound exercises like the squat and deadlift by supporting the recruitment of your fast-twitch muscle fibers. A few sets of box jumps done prior to a big barbell lift won’t fatigue you for the heavy training, but it may allow you to lift heavier and with better form.
Another option is to combine box jumps with a barbell movement, doing the two back to back. This is called contrast training, and it’s a methodresearchhas shown can maximize power development in athletes.
In a contrast set, you might do deadlifts with 80% of your max for a set of five (you should have at least a rep or two left in you; don’t go to failure), and then take about 30 seconds rest—during which you can walk over to the box. Now do a set of three jumps at a challenging height. Rest three to five minutes, and repeat for three to four total sets. This is stressful training, so it should be your only exercise for the session, and you should only do contrast training for three weeks at a time.
]]> https://www.onnit.com/blogs/the-edge/5-posterior-chain-exercises-for-stability-and-strength2025-07-10T10:55:26-05:002025-08-08T16:34:06-05:005 Posterior Chain Exercises For Stability And StrengthShane Heins Summary
– The posterior chain is the collective term for the muscles on the backside of the body that are the main drivers of explosive power.
– The posterior chain includes the glutes,hamstrings, and lower back, but also muscles of the upper body andcore.
– Due to imbalanced training, the posterior chain is often weak in relation to muscles on the front of the body, especially the quads.
– Targeting the glutes and hamstrings with different exercises for power, strength, and muscle size will develop the posterior chain as a whole and build athleticism, as well as help to prevent injury.
5 Posterior Chain Exercises For Stability And Strength
What you can’t seecanhurt you. Or, it can take your strength, muscle gains, and athletic performance to the next level.
What you can’t see, at least not without contorting in front of the mirror, are all the muscles on the backside of your body. The glutes, hamstrings, spinal erectors (lower back), lats, and a handful of other key movers. Collectively, these are known as the posterior chain.
Developing the pecs,abs, andbiceps—aka, the “beach muscles”—might make you look good (at least from the front), butit’s the muscles on your backside that are most responsible for producing power, helping you dominate in sports and in the gym, and keeping you injury-free.
“On the front of the body are the ’show’ muscles,” says Jim Smith, CPPS, a strength coach and owner of Diesel Strength & Conditioning (Dieselsc.com). “The posterior chain is the ’go’ muscles.”
If you’re currently dedicating more time and intensity to your pecs and abs than your glutes and hams, it’s time to start focusing more on your rearview. This article provides a simple yet thorough guide to exactly why and how to train your posterior chain for better gains, better performance, and a better overall physique.
What is thePosteriorChain?
Some confusion exists as to what exactly constitutes the posterior chain. The glutes, hamstrings, and lower back muscles are the centerpieces, and represent the musculature most trainers are referring to when they use the term posterior chain. But it doesn’t stop there.
“There’s more back there than hamstrings and glutes,” says Jeff Jucha, owner and head coach at West Little Rock CrossFit in Arkansas (westlittlerockcrossfit.com). “Thetraps, lats, and other muscles along the spine are also part of the posterior chain.”
Smith adds a few more muscles to the count, including the adductors (which span from the front of the thigh to the rear), calves, and core musculature (not including the rectus abdominis, your six-pack muscle, which is obviously on your front). But basically, he says, “When you look in the mirror, [the posterior chain is] all the muscles you can’t see.”
The reason it’s called a “chain” is because these muscles all work together to create movement.
“The posterior chain works synergistically to propel the body forward, perform reactive agility, and initiate throwing, jumping, sprinting, acceleration, and deceleration of athletic movements,” says Smith. “The fancy term for how they work together is ’intermuscular coordination.’”
Why is Working Out the Posterior Chain Important?
Jumping, sprinting, and all the foundational gym lifts require posterior chain action.Squats, deadlifts, lunges, and their many variations, naturally use the muscles of the core and lower body, but classic upper-body lifts like rows, presses, and chinups call on the backside muscles too. If you’re bench-pressing properly, your glutes should be clenched and your feet driving into the floor. These actions help stabilize the torso.
The posterior chain is mainly responsible for hip extension (pushing your hips to lockout, which uses the glutes and hamstrings), knee flexion (bending your knees, working the hamstrings, primarily), and plantar flexion (raising up onto your toes, performed by the calves).While the pulling and retracting motions provided by the traps, lats, rear delts, and rhomboids are part of the chain, they get worked in most back and pull day workout routines(see examplesHEREandHERE), so we won’t spend more time on them here. The lower-body posterior chain muscles are more often ignored, so they’re thefocusof this article.
If you’ve been paying attention, you might be wondering about the quads. They’re not part of the posterior chain, but knee extension, initiated by the quadriceps, is obviously important for sports and strength athletes as well; it makes up one-third of the all-important “triple extension” sequence—the simultaneous extension of the hips, knees, and ankles to produce explosiveness. The problem is,lifters commonly overemphasize knee extension in their training.Most gym warriors like to do squats and leg presses (it’s fun to see the legs get a big pump). The posterior chain can also get undertrained simply because the lifter doesn’t see it in the mirror, and so working it is an afterthought. In any case, the result is quads that overpower the glutes and hamstrings, and a posterior chain that’s disproportionately weak. Therefore, most athletes would do well to prioritize the posterior chain and put the quads on the back burner for a while.
“There should be a balance,” says Smith. “Many athletes and lifters become quad-dominant, and begin their squatting patterns by initiating knee flexion first, instead of sitting back into their hips to engage the glutes. When lifters can’t sit back in asquat, the glutes get even weaker, the knees push forward, and that puts even more focus on the quadriceps.” It also shifts more of the load to the lower back, which can lead to injury. “The development of the quads is important for all things, including athletics,” says Smith, “but the hamstrings, glutes, and other posterior chain musculature must also be strengthened to create a balance of forces across the ankles, knees, and hips.”
Imbalanced development due to weak hamstrings, glutes, and other posterior muscles is a recipe for not only diminished strength and athletic performance, but also injury.Lower back and knee pain, just to name a couple common issues, are the debilitating byproducts of neglecting the posterior chain.This is because of the improper squatting Smith described above, as well as a general imbalance that has a domino effect on all movements and exercises.
“A weak posterior chain, especially in relation to the rectus abdominis, quads, and hip flexors, can create an increased potential for injury,” says Brian Strump, DC, a licensed chiropractor, certified strength coach, and owner ofLive Active Charlottein Charlotte, North Carolina. “The risk of low-back pain, hip pain, and knee pain are often greater with increasing imbalances in musculature. The body does best with similar push and pull capability of the muscles and tendons on the joints.”
Further down are five posterior chain-focused exercises to incorporate into your training to improve (or avoid) these issues, and boost your gains and performance.
How To Stretch Your Body Before and After Training
Perform the following exercises from Onnit Durability Coach Natalie Higby (TheDurableAthlete.com) before training the posterior chain. Complete each exercise in sequence. Work for 45 seconds on each move (don’t rush), and then repeat for 3 total rounds.
Sumo Squat
Step 1.Stand with feet outside shoulder width and feet turned out as far as you can. Tuck your tailbone under slightly so that your pelvis is parallel to the floor, and brace your core.
Step 2.Squat down while driving your knees out as much as you can. Keep your shoulders stacked over your hips. Note: don’t hinge at the hips as you would for a back squat movement—keep your body as vertical as possible.
Half Mountain Climber to Full Mountain Climber
Step 1.Get into a child’s pose—sitting back on your heels with botharmsstretched in front of you. From there, come up to all fours, and then raise your right knee up to your chest, and plant your foot on the floor outside your right hand (your hands should be directly under your shoulders now).
Step 2.Extend your spine as much as you can, striving to create a long line from your head to your pelvis. Drive your shoulders back and down (think “proud chest”), and keep your right foot flat.
Step 3.From there, extend your left leg, raising your knee off the floor. Your torso may want to round forward, forcing you to lose your spine position. Fight it, and try to maintain extension.
Step 4.Lower your knee to the floor, return to child’s pose, and repeat the entire sequence on the opposite side.
Lying Sphinx
Step 1.Sit upright with your legs extended and rotated out 30–45 degrees.
Step 2.Twist your torso to the left, placing your hands on the floor outside your left hip and driving your shoulders back and down (“proud chest”). Keep your left leg as straight as you can, but allow your right leg to rotate inward as you turn.
Step 3.Bend your hips, trying to bring your torso closer to the floor. Feel the stretch in your left glutes. Come back up, and then twist to the opposite side and repeat.
After training, try this move from Onnit’s Director ofFitnessEducation, Shane Heins. Hold the position for 30 seconds, and repeat for 1–3 rounds.
Downward Dog
Step 1.Get on all fours, and push through your hands and feet to raise your knees off the floor.
Step 2.From there, push your hips back and high into the air, straightening your legs as much as you can while keeping your head, spine, and hips aligned. Don’t put your heels flat on the floor at the expense of your spine position—focus on length.
Top 5 Posterior Chain Exercises
These moves can be inserted into virtually any lower-body workout. As Smith mentioned, balance is the key—a balance between movements as well as muscles used. There’s no one-size-fits-all description for how to juggle your exercise selection, but a good rule of thumb is to include one of the below movements for every quad-dominant exercise in your program (i.e., back squat,front squat, leg press, leg extension).
If your training has been imbalanced for some time, or you consider your glutes, hamstrings, or lower back to be a major weak point,do twice as many posterior-chain exercises as you do lifts for the quads.For instance, if you want to barbell squat, you might begin the workout with cable pull-throughs and then follow the squat withRomanian deadlifts. (See more on placement of exercises below.) If you follow a body-part split, and find it hard to fit enough posterior chain moves into your leg day, you can add some of them (say, Romanian deadlifts orkettlebell swings) to your back day for some extra pulling—just space it two or more days apart from any leg day you do. Glute/hamstring/lower-back training pairs well with lat and upper back training, as both sets of muscles perform pulling motions and overlap to a degree.
Many will contend that the traditional deadlift is the “king of posterior chain exercises” (as if such a thing existed). It’s a great exercise, and it will absolutely build your posterior chain, but we’re putting the crown on the Romanian deadlift for this list. The conventional deadlift (and, really, the sumo deadlift as well), is very difficult for most people to do with good form. As a result, it’s been the cause of many back injuries. It also takes a lot of drilling to perfect the technique. The Romanian deadlift is more user-friendly, and works nearly all the same muscles (mainly the glutes, hamstrings, and lower back), so we’re giving it the edge here.
The Romanian deadlift (RDL for short) is performed with lighter loads than traditional deadlifts, and doesn’t involve pulling a barbell off the floor. You start at the top, hips locked out, and bend your hips into flexion.That means you’re less likely to round your lower back, regardless of any mobility restrictions you have in your hips.There’s also virtually no strain on the front side of the knee, because the knees remain only slightly flexed throughout the movement.
These features make RDLs a good alternative to traditional deads for those getting up in age, those who have a lot of miles on their joints already, or anyone else that’s concerned about wear and tear on the knees and lower back.
How To Do Romanian Deadlifts
Step 1. Place a barbell on a rack set to hip level. Grasp the bar with your hands at shoulder width, and pull the bar out of the rack. Step back, and set your feet at hip width; hold the bar at arms length against your thighs. Draw your shoulders back and down—think “proud chest,” and keep this upper body tension throughout the lift.
Step 2. Take a deep breath into your belly and brace your core. Begin bending your hips back. Keep your head, spine, and pelvis aligned as you slide the bar down the front of your body—keep it in contact with your legs. Allow your knees to bend slightly as you hip hinge. Continue until you feel a stretch in your hamstrings. On the way back up to standing, squeeze your glutes.
For most people, the bar will end up somewhere between the knees and lower shins in the bottom position.
Exercise Variations
The RDL can also be done with one leg at a time using a barbell, one or more dumbbells, or a barbell in a landmine unit (all of which are discussed in our guide to the single-leg RDLHERE). Single-leg RDLs are a must-do for ensuring balance between the right and left legs; with the standard double-leg version, a stronger side can potentially compensate for the weaker side and further magnify strength imbalances. One good strategy is to alternate between double- and single-leg RDL variations every other time you do RDLs.
Sets/Reps/Load
Perform 3–4 sets of 6–10 reps on heavy days, and anywhere from 12–20 reps on light days.
2) Cable Pull-Through
Like RDLs, cable pull-throughs are a great way to zero-in on the glutes and hamstrings. But that’s not to say they’re just the same exercise with different equipment. Running the cable between your legs and behind your body creates a unique line of pull. On any deadlift variation, the resistance is pulling straight down; but with a pull-through, it’s going backward.
“Pull-throughs are great for teaching the hip hinge,” says Smith—your ability to bend your hips while keeping your head, spine, and pelvis in line—“because the line of pull of the cable drives the athlete’s hips back. The exercise also teaches a powerful lockout of hip extension at the top of the rep, which is important for jumping, deadlifts, and squats.”Another benefit to pull-throughs is that they’re easy on the lower back. You’re not loading it directly as you do in a back squat, deadlift, RDL, or good morning,so you’re not likely to aggravate it. You can just concentrate on extending the hips.
Because it’s something of an isolation move done with a cable instead of free weights, the pull-through may seem like a natural finishing move for a leg workout, but Smith actually prefers to program it early,beforethe big lifts. “Pull-throughs create a neural drive to the glutes, and work well as a primer before a loaded lower-body strength workout with exercises like squats and deadlifts,” he says. In other words, if you start your workout with pull-throughs you may feel your glutes and hams working harder on your other exercises, as well as feel that you have better control over them.
How To Do Cable Pull-Throughs
Step 1.Stand in front of a cable column, facing away from it, with a rope handle attached to the pulley. If possible, set the pulley height to where it’s right below your crotch, which will make for the most direct line of pull. Otherwise, use the low setting.
Step 2.Straddle the cable and grasp the ends of the rope in front of your thighs so that the cable runs between your legs and behind you. Step forward to raise the weight off the stack, far enough so that it won’t touch down at the bottom of the rep. Space your feet shoulder-width part.
Step 3.Push your hips back to slowly your lower torso, keeping your back flat throughout, and your knees slightly bent. Lower until you feel a stretch in the hamstrings.
Step 4.Extend your hips, focusing on contracting your glutes and hamstrings, to return to the standing position.
Exercise Variations
Pull-throughs can also be done with a resistance band. When using a band,anchorit to a sturdy object, and step far enough away from the anchor point to create a good amount of tension. As with the cable version, there should still be tension on the band at the bottom of each rep.
Sets/Reps/Load
Perform 2–3 sets of 12–15 reps using a moderate weight. As mentioned above, you can slot pull-throughs early in a lower-body workout, before compound moves like squats or deadlifts, but they also work well done for high reps to finish out a session.
3) Medicine-Ball Throw for Height
This exercise works similar to ajumpsquat, but don’t let the squat fool you into thinking this is just a dynamic quad move. As Smith puts it, what you have here is a “full-body expression of explosive power, utilizing the major joints of the body and the entire posterior chain working together as a single unit.”
This version of the med-ball throw first teaches you to decelerate. You drop into the squat quickly to generate power, but you put the brakes on fast so you don’t sink too low. Then it builds your ability to change direction on a dime, as you have to come back up out of the squat fast and jump up while launching the ball overhead. The ankles, knees, and hips do this, just as they work in any other triple extension movement.
In other words, with one powerful, lightly loaded move, you’re training your ability to absorb, redirect, and explode, all the way up the backside of your body, from calves to upper traps.
How To Do the Medicine-Ball Throw for Height
Step 1.Pick up a 10- to 20-pound medicine ball and go to an open area (no people or equipment close by), either outdoors, or a room with high ceilings. Stand with feet shoulder-width apart, and hold the bottom portion of the ball at arms’ length in front of you.
Step 2.Keeping your head, spine, and pelvis in a straight line, quickly bend your hips back, and squat about halfway down.
Step 3.Rebound out of the bottom of the squat explosively, extending your hips and knees to propel you upward. As you do, throw the ball straight up in the air as high as possible. The movement should be so powerful that your feet leave the floor by a few inches at the top.
Step 4.Land with soft knees, and keep an eye on the ball to make sure it doesn’t hit you on the way down. Let it fall to the floor (don’t try to catch it), and then pick it up and perform the next rep. Don’t rush between reps—settle yourself and get back into proper position.
Exercise Variations
Medicine-ball throws can be done several different ways. The ball can be thrown out in front of you for distance, or even back behind you. You can also change the exercise by holding the ball in front of your upper chest and performing an overhead pressing movement as you come up from the squat, again releasing at the top and letting the ball fall back to the floor.
Sets/Reps/Load
Perform 2–3 sets of 5–8 reps using a 10-20-pound ball. The purpose of med-ball throws in this context is to develop explosive power; it’s not about building muscle directly or even conditioning. Keep the volume low, the weight light, and recover fully between sets with 2–3-minute rest periods. Do this move early in a lower-body strength session, before loaded squats, deadlifts, and/or lunges.
Kettlebell swings have become a poster child for posterior chain development in the last couple decades, thanks in part to the popularity of CrossFit and kettlebell training. When performed correctly, swings check off several important boxes.
“Not only does the kettlebell swing work your hamstrings and glutes, it also requires explosiveness and coordination from the trunk, core muscles, and shoulders,” says Jucha. “You’ll work the posterior chain, but you’ll also practice the essential hinge movement pattern for explosive power.”
The kettlebell swing is a unique exercise in that it’s effective for developing explosiveness, but it’s also commonly done for high reps to improve conditioning (as in CrossFit WODs). If doing the latter, proper form is paramount for keeping the lower back safe.
How To Do Kettlebell Swings
Step 1: Place a kettlebell on the floor and stand about two feet behind it with feet shoulder-width apart. Draw your shoulder blades together and downward (think: “proud chest”). Draw your ribs down, and tuck your tailbone slightly to make your pelvis level with the floor. Brace your abs.
Step 2: Bend your hips backward to lower your torso and grasp the handle of the kettlebell with both hands, overhand. Keeping a long line from your head to your pelvis, and your shoulder blades pressing downward toward your back pockets, shift your weight to your heels. Bend your knees slightly and lift the kettlebell off the floor and hike it back between your legs.
Step 3: When your wrists make contact with your inner thighs, forcefully contract your hamstrings and glutes and thrust your hips forward, coming into a standing position. The momentum you generate will swing the kettlebell forward and up to about eye level. Allow the kettlebell to swing back between your legs, folding at the hips and bending your knees slightly as the kettlebell swings down and back to begin the next rep.
Do not lift the kettlebell with your upper body, as if performing a front raise shoulder exercise. The swing is an explosive movement and the glutes and hamstrings must perform almost all of the work.
Exercise Variations
Kettlebell swings can be performed holding the weight in only one hand, and they can also be done holding one kettlebell in each hand (but that’s advanced). Swings can be done with a dumbbell in place of a kettlebell (holding it in one or both hands), but a kettlebell generally offers a better grip and is more practical.
Sets/Reps/Load
Kettlebell swings are most often programmed with relatively high rep counts—anywhere from 15 up to 50+ reps per set. That said, if you’re new to the exercise, start at the low end to build good technique without fatigue setting in.
Beginners to the swing (or lifting in general) should do 2–3 sets of 10–15 reps using a light kettlebell (10–15kg, or 22–33 pounds). More experienced lifters can work up to 3–5 sets of 25–50 reps using a heavier kettlebell (up to 24kg/53 pounds, or more for very advanced individuals).
5) Hip Thrust
When you want to target one particular group of muscles, isolation exercises are best. Three of the aforementioned posterior-chain moves—RDLs, pull-throughs, and kettlebell swings—focus on the hip hinge, with the upper body moving freely in space. To better isolate the glutes, the shoulders and upper back can be locked into place with a flat bench while the feet are anchored to the floor.
The hip thrust is an exercise utilized as much by physique athletes wanting to develop their glutes as it is powerlifters looking for a relatively safe way to load up the posterior muscles with heavy weight. As with the pull-through, there’s little stress on the lower back with hip thrusts.
We’d be remiss not to reference Bret Contreras here, aka “The Glute Guy,” and arguably the leading torchbearer of the hip thrust exercise. (He even invented a special piece of equipment,The Hip Thruster, specifically for this movement.) Research performed byContrerasandothershasshown greater muscular activation by the hip extensor muscles (glutes, hamstrings) during the barbell hip thrust compared to other major exerciseslike the front squat and traditional deadlift.
“The hip thrust is incredibly functional,” Contreras states on his websiteBretContreras.com. “Not only does it safeguard people from injury to the knees, hips, and low back, it also transfers quite favorably to performance. Lifters and athletes who employ the hip thrust notice improved gait function at all speeds, increased hip power, stronger squats and deadlifts, increased throwing/striking power, and more. They build glute hypertrophy [muscle growth] incredibly well, and this added glutemassdoes wonders for improving functional fitness.”
How To Do Hip Thrusts
Step 1. Load a barbell on the floor. Lie with your upper back resting on a bench and your legs flat on the floor in front of you. Your torso should make a roughly 45-degree angle with the floor. Roll the bar into the crease of your hips (you may want a pad or towel to cushion it), and hold it firmly on each side. Place your feet flat on the floor, hip-width apart, and turn your toes out slightly.
Step 2. Tuck your tailbone so that your lower back is flat. Take a deep breath into your belly, and brace your abs. Drive through your heels to extend your hips, finishing when your torso and hips are parallel to the floor, and your shins are vertical. Hold the position for a moment.
Exercise Variations
Hip thrusts can (and should) also be done one leg at a time. When doing so, the technique and equipment is the same, only the non-working leg is lifted off the floor in front of you. You will, of course, have to use much less weight.
Single-leg hip thrusts are ideal for promoting balanced development between the right and left sides. Alternate between double-leg and single-leg versions every time you do hip thrusts.
Sets/Reps/Load
Perform 2–4 sets of 12–15 reps. Make sure you use a weight that allows you to reach full hip extension on every rep.
]]> https://www.onnit.com/blogs/the-edge/strengthen-your-hamstrings-with-these-8-exercises-and-4-workouts2025-07-10T10:55:26-05:002025-08-15T06:29:06-05:00Strengthen Your Hamstrings With These 8 Exercises and 4 WorkoutsJeremy Gottlieb
If you’re an athlete, or even just a sports fan, you should know how important it is to do workouts for hamstrings, or to have a hamstring-focused leg day. Here’s why: Picture your favorite player sprinting down the field, dusting the competition. The crowd is on its feet! He’s about to score, and¦
and suddenly he collapses, as if picked off by a sniper at long range, clutching the back of his thigh. The crowd goes quiet. The announcers turn somber. It’s another hamstring tear.
What Are Hamstrings And How To Train Them?
The hamstrings—a collection of three muscles extending from your sit bones to the backs of your knees—are among the most frequently injured muscles in sports. A study on NFL players reported 1,716 hamstring injuries over a 10-year period, which breaks down to roughly five or six injuries per team, per season.The numbers are similar in pro soccer, basketball, and among regular people in recreational sports (1, 2).
If you’re a desk jockey who spends most of his/her day sitting at a computer, you may be even worse off, especially if you’re planning to get in shape or be more active again. A 2017 study of college students found that 82% of the subjects had tight hamstrings due to prolonged sitting—and these were young adults with a mean age of 20.
Finally, if you’re a gym rat who’s long made the mistake of focusing your leg training on the fronts of your thighs—hitting the hammies as an afterthought—you’ve already lit the fuse that can lead to a hamstring blowout. A study in Isokinetics and Exercise Science showed that imbalances in quad and hamstring strength were associated with non-contact leg injuries.
The problem lies in the hamstrings’ design; they’re much more complex than most other muscles. They cross two major joints—the hip and the knee—and shorten at both ends. At the top end, the hamstrings work with your glute muscles to extend your hip (picture the movement of standing up out of a chair). At the lower end—near the back of your knee—the hammies bend your knee joint, pulling your heel up and back. When you use the hamstrings’ two functions at once, such as when you’re sprinting and you drive one leg behind you, they do double duty: the two ends of the muscles pull toward one another, like the ends of a stretched-out exercise band. That’s a lot of tension passing through a single muscle group, and one reason the hamstrings cramp and tear with relative frequency.
The remedy: train both major hamstring functions—hip extension and knee flexion—with good form and appropriate loads. Workouts for hamstrings make these muscles less susceptible to injury, and more capable of producing force and power, so you’ll end up a better lifter and athlete, and less likely to become a statistic.
The 8 Best Hamstring Exercises
A hamstring exercise will require you to either extend your hips or bend your knees—and some of the most effective movements will actually combine both actions, training the glutes as well as the hammies. The following are the best hamstring builders, organized by their primary function.
HIP EXTENSION
In these movements, the hamstrings work with the glutes to push your thigh bones from a flexed position (knee pulled up in front of you) to an extended one (knees moving away from your body). The movement is known as a hinge, and it helps you run faster, jump higher, and maintain a pain-free back. “Most of us can’t get enough hinging,” says Tony Gentilcore, C.S.C.S., owner of Core Fitness in Brookline, MA.
1) Stiff-Legged Deadlift
Target:hamstrings, glutes, adductors
You should feel a deep stretch in the back of your thighs from your butt to your knees
Step 1: Set a barbell on a rack at about hip level (if you’re very mobile, you can start with the bar on the floor). Grasp the bar with a shoulder-width grip and take it off the rack. Step back and plant your feet hip-width apart. Draw your shoulders back together and downward (think: “proud chest”).
Step 2: Take a deep breath, draw your ribs down, and brace your core. Push your hips backward and, maintaining a long spine from your head to your pelvis, lower your body until you feel a stretch in your hamstrings. Allow your knees to bend only slightly.
Step 3: Squeeze your glutes as you extend your hips and come back up.
The stiff-legged deadlift can also be performed with dumbbells/kettlebells.
2) Back Extension
Target:hamstrings, glutes
You should feel tension in the center of the back of your thighs
Step 1:Adjust the pad on the back extension bench so that when you lie on it the top edge lines up with the crease in your hips. Using the handles for support, set up on the bench so your hips rest on the pad and your ankles are braced by the ankle pads and your feet rest against the foot plate about hip-width apart.
Step 2:Turn your toes outward slightly. Interlace your fingers behind your head, spread your elbows wide, and keep them there throughout the movement. Bend at the hips to lower your torso toward the floor, stopping before your lower back rounds. Your head, spine, and pelvis should form a straight line.
Step 3:Take a deep breath into your belly and brace your core. Now squeeze your glutes and hamstrings and extend your hips to raise your torso up until your body forms a straight line from your head to your feet.
If bodyweight alone is too easy for you, add resistance by holding a dumbbell (as shown above).
You should feel a stretch in the back of your thighs as you swing the weight back between your legs.
Step 1:Place a kettlebell on the floor and stand about two feet behind it with feet shoulder-width apart.
Step 2:Draw your shoulder blades together and downward (think: “proud chest”). Draw your ribs down and tuck your tailbone slightly to make your pelvis level with the floor. Brace yourabs.
Step 3:Bend your hips backward to lower your torso and grasp the handle of the kettlebell with both hands, overhand.
Step 4:Keeping a long line from your head to your pelvis, and your shoulder blades pressing downward toward your back pockets, shift your weight to your heels. Bend your knees slightly and lift the kettlebell off the floor and hike it back between your legs.
Step 5:When yourarmsmake contact with your inner thighs, forcefully contract your hamstrings and glutes and thrust your hips forward, coming into a standing position and swinging the kettlebell forward and up to about eye level. Allow the kettlebell to swing back between your legs, folding at the hips and bending your knees slightly as thekettlebell swingsdown and back to begin the next rep.
Do not lift the kettlebell with your upper body, as if performing a front raise shoulder exercise. The swing is an explosive movement and the glutes and hamstrings must perform almost all of the work.
You should feel a deep stretch in the back of your thigh and butt
Step 1:Hold a dumbbell in one hand and stand on the opposite leg with your foot facing straight forward.
Step 2:Bend the knee of the working leg slightly. Keeping a long spine and your core braced, drive your hips backward as far as you can, so that your torso lowers toward the floor. Stop when you feel your hamstrings are fully stretched and you can’t go any lower without losing your lower back position (it should be straight).
Step 3.Squeeze your glutes to come back up. If you have trouble keeping your balance, you can rest the non-working leg on the floor with your heel raised. Place the toes of that foot right behind the heel of your working foot. Your feet should be hip-width apart. This is called aB-stance Romanian deadlift, and it will provide stability so you can better isolate the hamstrings and glutes.
KNEE FLEXION
These moves (virtually all variations of a machine leg curl) minimize the action at the hip joint while dialing it up at the knee. “I prefer knee flexion isolation moves for beginners and those coming off injury,” says Gentilcore. “There’s more external support so it’s easier to perform and less intimidating.” Isolating a muscle can also help you feel its action more precisely—an essential skill for the novice lifter or athlete.
5) Machine Lying Leg Curl
Target:hamstrings
You should feel tension in the center of the back of your thighs
Leg curl exercises require machines, making them moves to include in any hamstring workout at the gym. If you don’t train in a public gym, we’ll show you some approximations you can do at home further down.
Step 1:Adjust the ankle pad of the machine so that when you lie down on the support pad your knees will line up with the leverarm’s axis of rotation. Lie facedown on the machine with the backs of your ankles against the ankle pad. If your machine has a support pad that bends upward, position yourself so that your hip joints rest directly over that point.
Step 2:Firmly grasp the machine’s handgrips, lengthening your spine and contracting your lats (the muscles on the sides of your torso). Set your feet so they are parallel and about six inches apart, and flex them hard at the ankles (bend your feet back so your toes are closer to your shins).
Step 3:Keeping your neck and torso long, your hips pressed down into the bench, and your feet parallel throughout the movement, squeeze your hamstrings and slowly bend your knees, drawing the lever arm as close as possible toward your butt.
Step 4:Hold the contracted position for a one-count, squeezing your hamstrings as hard as possible. Slowly reverse the movement, fully straightening your legs at the knees.
6) Machine Seated Leg Curl
Target:hamstrings
You should feel tension in the center of the back of your thighs
Step 1.Sit in a seated hamstring curl machine and line your knees up with the axis of rotation. Extend your knees and rest your lower legs on the ankle pad just above your ankles. Secure the knee pad at the bottom of your thighs.
Step 2.Hold the handles for stability and bend your knees, driving your heels back behind you until your hamstrings are fully flexed. Slowly extend your legs again under control.
If you can, try to hinge your hips and bend forward a bit and hold this position throughout the exercise (while keeping your back flat). This will help you put a greater stretch on the hamstrings and activate more muscle.
HYBRID HIP EXTENSION/KNEE FLEXION
These moves combine the hamstrings’ two functions, making them somewhat more complex than the exercises in the other categories. “Multifaceted movements are great for athletic populations,” says Gentilcore. “They emulate sport and real life to a high degree.” But that doesn’t mean you should skip the other types of hamstring moves, he says, no matter what your goals. “All three categories serve a purpose, and when trained in concert, will likely lead to the best results and more bulletproof hammies.”
7) Glute-Ham Raise
Target:hamstrings
You should feel tension all throughout the back of your thighs
Step 1:Adjust the foot plate of the glute-ham bench back far enough so that when you lie on it the top edge of the pad will line up with the crease in your hips.
Step 2:Using the handles for support, set up on the bench and place your feet on the foot plate, bracing the backs of your ankles against the ankle pads.
Step 3:Set your feet so they are parallel and about hip-width apart. Once your lower body is locked in place, release the handles and extend your hips until your torso is perpendicular to the floor and your knees are bent 90 degrees. This is your starting position.
Step 4:Draw your ribs down and tuck your tailbone under slightly so your pelvis is level. Brace your core. Now lower your body toward the floor under control until it forms a straight line, from head to feet. Your heels will come off the foot plate, and that’s OK. Drive your toes down hard. If that’s too difficult, you can bend slightly at the hips, or use a stick for support (see the Elite Hamstring Workout below).
Step 5:Push your toes into the foot plate and contract your glutes, hamstrings, and calves to pull your body back up to vertical (again, if you need an easier version, keep the bend in your hips). Pause for a moment, and then slowly begin the next rep.
8) Swiss-Ball Leg Curl
Target:hamstrings and glutes
You should feel tension in the center of the back of your thighs and glutes
Step 1:Lie on your back on the floor with your heels elevated on a medium-sized Swiss ball. Your feet should be about six inches apart and your hands placed beside you on the floor, palms down.
Step 2:Flex your feet, brace your core, and drive your heels into the ball to raise your hips off the floor. Try to keep your neck relaxed, but squeeze your glutes and hamstrings as you bridge up.
Step 3:Bend your knees as in a machine leg curl, rolling the ball toward you. Be sure to keep your core braced so you don’t hyperextend your lower back.
Step 4:Hold the contracted position, squeezing your glutes and hamstrings as hard as possible for a two-count. Then slowly reverse the movement, extending your legs and returning to the starting position.
Best Bodyweight Hamstring Exercises That Can Be Done at Home or On The Road
If you don’t have a gym membership or are limited to only the most basic equipment (and a little imagination), you can get a great hamstring-focused workout with these exercises.
You should feel tension in the center of the back of your thighs and glutes
This lift is a variation on the Swiss-ball leg curl and uses exercise sliders, but furniture sliders from a hardware store work too, and even paper plates can suffice—if you can train on a waxed or hardwood floor. Ideally, you can perform this move on a smooth surface that won’t create too much friction for the sliders.
Step 1:Lie on your back on the floor. Rest your heels on a pair of sliders and place your hands beside you on the floor, palms down. Set your feet parallel and about six inches apart. Now bend your knees, sliding your feet back close to your butt.
Step 2:Tuck your tailbone under slightly, draw your ribs down, and take a deep breath into your belly. Brace your core. Contract your glutes and hamstrings and press your heels into the sliders, elevating your hips and lower back to full extension. In other words, bridge your hips up. Be sure to keep your core braced to prevent hyperextending your lower back. This is your starting position.
Step 3:Slowly extend your legs, sliding your heels away from you until your butt and legs are just above the floor. When they’re straight, bend your knees and curl the sliders back toward your butt.
If that’s too tough, start by performing only the negative portion of the movement, lowering your body slowly from the bridge position. Take five seconds to straighten your legs, and then rest your butt on the floor if you need to when you reset your legs.
You should feel your thighs and butt, especially at the bottom of each rep
Step 1:Stand lunge length in front of a bench, step, or box that’s six to 12 inches high.
Step 2:Step your left foot back and rest the top of your left foot on the bench so that your knee is bent 90 degrees. Your right foot should point straight forward.
Step 3:Hinge your hips back a bit so you feel like you’re leaning forward, but keep your spine straight and tall. Slowly bend your right leg until your left knee is just above the floor. Your front leg should be bent about 90 degrees. Pause, and reverse the movement, squeezing your glutes as you come up.
You can perform the movement with your bodyweight, dumbbells/kettlebells, or a barbell.
You should feel a deep stretch in the back of your thighs from your butt
Sets:2 Reps:8–12
Step 1:Hold a pair of dumbbells at your sides and stand with feet hip-width apart, toes pointing forward. Draw your shoulders back together and downward (think: “proud chest”).
Step 2:Take a deep breath, draw your ribs down, and brace your core. Now push your hips backward and, maintaining a long spine from your head to your pelvis, lower your body until you feel a stretch in your hamstrings. Try to keep your knees nearly straight, but not locked. Your range of motion may not be great, and that’s OK. Go for the stretch, but be safe, and don’t go lower than you feel you have the mobility for. Keep your lower back flat the whole time, and actively pull the weights back to keep them close to your body.
Step 3:Extend your hips and come back up and stand tall.
At first glance, this routine may not seem like enough work, but consider how you should be performing it. Take each set to within one rep of failure—that is, the point at which your form is about to break down. So if you get 8 reps for an exercise and it’s very hard, to the point where you felt yourself slow down, and you don’t think you can get a ninth rep with good form, STOP the set there. Done in this fashion, the Bulgarian splitsquatsare very challenging (even at only one set apiece).
Complete Hamstring Workouts
Find the workout that suits your experience level and goals.
Just starting out on your quest for unbreakable hamstrings? This is step one: three moves that will blitz the muscles from both ends. Take it easy your first few times in this workout. The moves are entry-level—but if you’re not used to working your hamstrings, they can cramp up when you do too much work too soon. Perform this workout twice a week on nonconsecutive days, either in the same workout that you train your quads and calves, or tacked onto an upper-body day.
Been working out for a while? Below is a leg workout that will give your hamstrings—and the rest of your lower body—a going-over that you might need a few days to recover from. Perform it once or twice a week (do not do any other leg training).
Alternate sets of the paired exercises (marked A and B). So in Superset 1, for example, you’ll perform a set of Bulgarian split squats (one leg and then the other), rest 60–90 seconds, and then a set of slider leg curls. Rest 60–90 seconds, return to the first move, and continue alternating the two moves until you’ve completed three or four sets of each exercise. Then perform the exercises in Superset 2 in the same fashion (do exercise 3 as normal straight sets after you’ve finished all sets for 2A and 2B).
Feel like your hammies are lagging behind your quads and want to add a little extra work to your leg program? The two mini-workouts below work well as end-of-workout hamstring finishers that you can do after a full-body workout, cardio session, or an upper-body day. You could also add them in on an off day. As in the intermediate workout, alternate sets of each exercise.
Warm up your hips and hamstrings before any lower-body workout with the following moves, courtesy of Onnit-certified Durability Coach Cristian Plascencia (@cristiangplascencia on Instagram).
Lying L Sit
Step 1:Lie on your back on the floor. Bend your knees and rest your feet close to your butt. Extend your arms by your sides and press your palms into the floor.
Step 2:Tuck your tailbone under slightly so that your pelvis is perpendicular to the floor and your lower back flattens into the floor. Take a deep breath and brace your core.
Step 3:Extend your legs overhead and pull your toes back toward your face. You’ll feel a strong stretch in your hamstrings. Continue to actively pull your toes down and fight to keep your legs straight for 30 seconds. Don’t let your lower back break off the floor. Repeat for 3 total rounds.
Kneeling Half-Mountain Climber Bow Draw
Step 1:Get on all fours with your knees directly under your hips and your hands underneath your shoulders.
Step 2:Step your left foot forward so it lands just outside your left hand. Drive your knee in toward your left arm while pushing your arms apart (left arm toward the left knee, so the two press against each other).
Step 3:Draw your shoulder blades back together and downward. Think: “proud chest.” Tilt your butt up to the ceiling, flattening out your lower back as much as you can, and brace your core. Your body should form a straight line from your head to your tailbone.
Step 4:Begin extending your left knee, pushing your pelvis back toward your right heel. Fight to keep your spine extended and your proud chest position the whole time. Push your foot into the floor so your heel and toes don’t rise up. Finally, bend the knee slowly to come back, and repeat on the opposite side. Perform 5 reps on each side, and repeat for 3 rounds.
Lying Warrior
Step 1:Sit on the floor and spread your legs.
Step 2:Lock out your left leg and twist your torso to the left. Plant your left hand behind your hips and use it to help pull you deeper into the twist. Reach your right arm past your left foot. Allow your right leg to roll inward as it follows you and turn the hip into the ground as much as you can.
Step 3:Plant both your hands on the floor behind your hips and extend your spine, drawing your shoulder blades together and downward—think: “proud chest.”
Step 4:Reverse the movement and repeat on the opposite side. As you repeat for reps, try to twist a little deeper, and even bend forward at the hips and rest on your forearms if you can. Perform 5 reps on each side, and repeat for 3 rounds.
FAQs
How can I target my hamstrings effectively?
Include exercises that flex the knee and extend the hip in your program.Knee flexion exercises—seated leg curls or lying leg curls—are a good idea to start your lower-body workouts,as they pump blood into the legs and prepare them for more complex and riskier exercises that follow, such as squats and deadlifts. Training them first also makes the hamstrings a priority, so you’ll be able to hit them hard with your full effort andfocus, and that will lead to better gains.
Do stiff-legged deadlifts or RDLs later in your workout when you’re fully warmed up. These muscles put the hamstrings under a big stretch, so it’s safer to do them when you’re warm and ready. Perform both exercises for a variety of rep ranges, but sets of 5–10 are good to start. Add weight and reps as you’re able.
Are hamstrings important to train?
The hamstrings perform hip extension and knee flexion, meaning that they draw your leg underneath and behind you and bend the knee. Think about it… it’s exactly the motion you perform when running, bounding, jumping, or doing any other explosive, athletic movement that begins with the lower body. Many people focus on their quads and train squats, leg presses, and leg extensions hard, but that’s only because you can see those muscles in the mirror. The hamstrings are often an afterthought, but you’ll never reach your full potential for strength or athleticism until you bring them up.
Do squats effectively train the hamstrings?
No. As you descend in a squat, the origin point of the hamstring muscles (the hips) gets stretched, but the insertion point (the back of the knees) shortens as the knee bends. As you come up, the reverse happens. What this means is that the hamstrings are never really lengthened under load,so they don’t experience sufficient tension or receive much of a growth stimulus from squatting.Compare the squat to a movement like the stiff-legged deadlift or lying leg curl, where the hamstrings are lengthened fully and then shortened fully against resistance, and you can see that they must work much harder. The squat is a great exercise for the quads and adductors and, depending on how it’s performed, can also recruit the glutes heavily as well, but it does not constitute a hamstring workout on its own.
How can I strengthen my hamstrings at home?
Exercises like the slider leg curl and Swiss-ball leg curl can be done at home and train the hamstrings’ two functions—hip extension and knee flexion—simultaneously. All you need is a pair of furniture sliders or a Swiss ball, and even a set of paper plates can work if you have a smooth, waxed floor to train on. If you have dumbbells, you can do deadlift variations like the RDL and stiff-legged deadlift as well.
How often should I train my hamstrings each week?
Aim to train your hamstrings twice in a seven-day period, or as many as three times if you consider them a major weak point. You can train them on Monday and then again on Friday, Saturday, or Sunday, depending on your split, or train them Monday, Wednesday, and Friday if following a full-body routine. (If you’re doing full-body, limit yourself to one hamstring exercise each session and one to three hard work sets, to allow for recovery).
Will bigger hamstrings make my glutes look bigger?
The hamstrings share a job with the glutes—hip extension—and there aren’t many exercises that work the hams and won’t train the glutes to a degree at the same time, so focusing on your hamstrings may allow you to add some size to your glutes as well. However, because they’re separate muscles, you’ll see better results training them with exercises that are more targeted for each muscle. So, if you want bigger glutes, emphasize glutes in your training.
What exercises specifically target the hamstrings?
Leg curls done both lying down and seated along with stiff-leg deadlifts, slider leg curls, and glute-ham raises are all very good choices.
What are the benefits of strong hamstrings?
Strong hamstrings help you run faster, jump higher, and generally perform more explosively in athletics. They’ll also help you lift heavier weights on deadlifts and other weightlifting exercises.
]]> https://www.onnit.com/blogs/the-edge/how-to-do-the-landmine-squat-hack-squats-goblet-squats-and-more2025-07-10T10:55:25-05:002025-08-15T07:09:27-05:00How To Do The Landmine Squat: Hack Squats, Goblet Squats, and MoreJeremy GottliebYou’ve heard the expression, “Thesquatis the king of all exercises,” and it usually refers to the barbell back squat. While that’s undeniably a great move for the legs, it’s not the only type of squat that will build up the thighs and give you a stronger, more explosive lower body. The landmine squat—where you load a barbell into a landmine unit and lift it like a lever in front of your body—is a very suitable substitute, and there are a few other squat variations that aren’t exactly court jesters either.
Let’s explore how to do the landmine squat for better squat technique, more quad development, and safer, user-friendly squatting in general.
What Is The Landmine Squat And What Are Its Benefits?
The landmine squat is done with the barbell in a landmine unit, which is a metal cylinder that swivels on an axis. A landmine allows you to lift the barbell in various arcing motions rather than straight up and down, letting you perform a number of exercises with a less complex squatting technique that can be easier on your joints.
In the landmine squat, the weight is held in front of your body rather than behind it, so landmine squatting resembles thefront squatas well as the goblet squat that many people do with akettlebell.Therefore, it’s sometimes called a landmine goblet squat.One big advantage of the landmine squat over the kettlebell goblet squat is that it’s more stable, and the barbell allows you to load more weight, so landminesquatsin general can be done heavier and are usually a better choice for building muscle than the goblet squat.
Like the goblet squat,the landmine squat reinforces good squatting mechanics that keep you safe—for example, sitting your hips back and keeping your chest up as you descend.If you have trouble squatting with a barbell on your back—that is, if it bothers your low back or knees, or you just can’t seem to keep form—the landmine squat can be an awesome replacement exercise. Use it to ingrain good squatting mechanics, and then go back to the barbell back squat or front squat. You’ll probably find that your technique is sharper, and you can squat deeper than before.
The landmine squat is pretty easy to perform, making it a great move for beginners, or other people who don’t have much experience squatting with load. You want the bar right up against your chest, and keep your torso as upright as possible as you squat down.
Step 1.Load a barbell into a landmine. If you don’t have a landmine unit, you can wedge the end of the bar into a corner in your gym. It won’t be quite as stable, but it should still work. Set a box or bench on the floor in front of the bar, right next to where the barbell plates will be loaded. Pick up the end of the bar and rest it on the box and load the plates you’ll use.Now you have a platform to lift the bar off, making it easier to get into positionfor the start of the exercise.
Step 2.Squat down in front of the bar and wrap your hands around the end of it. Tuck your elbows to your sides. Keeping your back straight and flat, lift the bar off the box and step away from the box if needed so it’s not in the way of your squat.You should end up standing with the bar right at your chest.(Don’t hold the bar any higher; that will make your shoulders work harder than they have to, and you’ll fatigue your upper body before your legs.)
Adjust your stance so your feet are between hip and shoulder width and your toes are turned out a few degrees. Now you’ll have to play around with your position and see what’s comfortable.You can lean forward so your weight is more on the balls of your feet, or you can stand tall—whatever allows you to squat with the deepest range of motion and good form.
Step 3.Draw your ribs down, take a deep breath into your belly, and brace yourcore. Keeping a long spine from your head to your tailbone, squat as deeply as you can, driving your knees apart so that they line up with your big toes. You should be able to go much lower than you normally could in a back squat without your heels rising off the floor or your lower back rounding.
Step 4.Extend your hips and knees to stand tall again. When you’ve finished your set, rest the weight on the box again.
Like the back squat, you can count on the landmine squat to work the following muscles:
Quadriceps (front thighs)
Glutes (butt)
Rectus abdominis, obliques (core)
Various muscles of the upper back (they act as stabilizers here)
Deltoids (shoulders, again, working to stabilize)
Spinal erectors (lower back)
The landmine squat is a perfect choice for people who want to emphasize quad gains.Because the range of motion is so great at the knee joint (greater than a hip-dominant back squat), your quads will work hard throughout each rep. It’s also ideal if you suffer from lower-back pain during back squats.Your torso stays very vertical on a landmine squat, minimizing shear forces on the lumbar.In other words, landmine squatting lets you train legs heavy and hard without undue stress on the spine.
The landmine can also be used as a substitute for the hack squat—the squat machine you see in most gyms where the weight is held behind the body and your back rests on a pad. The landmine hack squat may allow you to squat even deeper than the regular landmine squat, making it a great tool for emphasizing the quads. That said, it’s a little more awkward to set up and, for most people, will take some getting used to.
Step 1.Set up the barbell in a landmine as you did for the regular landmine squat.You don’t have to use a box to rest the bar on if you’re using light weights that you’re sure you can control,but if you do, make sure that when you squat, the bar will be clear of the platform. Wrap your hands around the bar and lift it up, turn around, and rest the bar on one shoulder.
Step 2.Play around with your foot position until you feel balanced and stable. Your feet should be between hip and shoulder-width apart and a little in front of you, and you should lean your bodyweight backward into the plate on the bar—that’s right, let the barbell support your weight just like a hack squat machine would.In this case, the bar really should be in a landmine unit. A corner alone may not provide the stability to support your body—so be smart and stay safe!
Step 3.Lower your body into the squat, going as deeply as you can without your pelvis tucking under and your lower back rounding. You should be able to get your knees almost fully flexed.
Step 4.Drive through the balls of your feet to stand back up. On your next set, switch the shoulder that the bar rests on so you don’t develop an imbalance.
How to Stretch Before Exercising
Use the following drills from Onnit-certified coach Eric Leija (@primal.swoledier) to warm up your hips and knees for strong squatting.
If you don’t have a landmine or a barbell, you can perform a goblet squat with either a kettlebell or a dumbbell. Like the landmine squat, the goblet squat is an excellent movement for learning and refining good squat technique, as it automatically forces you to squat with your chest up while driving your knees apart and sitting back into your hips.
Step 1. Hold a kettlebell in front of your chest by the sides of its handle. Draw your shoulders back and downward (think: “proud chest”), and tuck your elbows in close to the bell—try to get your forearms as vertical as you can. Stand with your feet between hip- and shoulder-width apart, and turn your toes out a bit—up to 30 degrees if you need to.
Step 2. Tuck your tailbone and draw your ribs down so that your pelvis is parallel to the floor. Take a deep breath into your belly, and brace your core. Actively twist your feet into the floor, but don’t let them move. Think of your legs as screwdrivers, or that you’re standing on grass and trying to twist it up beneath you. You should feel the arches in your feet rise and your glutes tighten, creating tension in the lower body.
Step 3. Keeping a long spine from your head to your pelvis, push your hips back and squat down, as if sitting down into a chair. Squat as low as you can while keeping your head, spine, and pelvis aligned. Push your knees apart as you descend. You should feel most of your weight on your heels to mid-foot area. If you feel your lower back beginning to round, stop there, and come back up. Keep your torso as vertical as possible—you shouldn’t have to lean forward or work extra hard to hold the bell upright. Avoid bending or twisting to either side.
Step 4. Drive through your feet as you extend your hips and knees to come up.
]]> https://www.onnit.com/blogs/the-edge/5-resistance-band-knee-exercises-for-knee-pain2025-07-10T10:55:25-05:002025-08-15T06:30:43-05:005 Resistance Band Knee Exercises for Knee PainJeremy Gottlieb
Do you have a bad knee or knees? You can become your own physical therapist by using these 5 resistance band knee exercises to help reduce knee pain.
These movements are great for alleviating any knee pain due to a torn meniscus or ligament, jumper’s knee, osteoarthritis, tendonitis, or other common knee ailment.
With the use of resistance bands, perform these knee strengthening exercises to improve the strength of the specific muscles of the knee.
Please note that if you are coming off of an injury, they should only be performed if they do not cause or increase pain.
Begin with these basic resistance band knee strengthening exercises. Once these become too easy, you can increase the resistance band tension.
5 Resistance Band Knee Exercises for Knee Pain
Resistance Band Knee Exercise #1: Terminal Knee Extension
The Terminal Knee Extension (TKE) exercise moves the knee through the end stage of the range of motion, or from a partially bent position as opposed to fully bent. Fix a band to a stationary object and the other end around the back of your knee.
From there you step backwards creating tension in the band and letting your knee translate forward. Now, flex your quad hard and drive your heel downward, straightening your leg.
Resistance Band Knee Exercise #2: Stork Stance TKE
erminal knee extension exercises strengthen the quadriceps muscles in your thighs as well as your shin muscles. The Stork Stance TKE variation exemplifies this even more so than the standard TKE.
Set up exactly how you would for the standard TKE, but this time you will perform the exercise with 1 foot off the ground.
Resistance Band Knee Exercise #3: Lying Knee Extension
The Lying Knee Extension is the first of three ground-based resistance band movements in this series. Begin this exercise lying on your back with a resistance band wrapped around your ankle with your knee to your chest.
Slowly extend your knee, until your leg is fully extended, then return to the start. It should mimic the movement of a hamstringcurl.
Resistance Band Knee Exercise #4: Lying Hip Extension
Weak glutes and tight hip flexors cause your pelvis to tilt forward, which may further knee pain. The Lying Hip Extension is an excellent resistance band exercise for increasing the range of motion in the hip flexors, which will reduce knee pain.
Begin this exercise lying on your back with a resistance band wrapped around your ankle with your knee to your chest. Slowly extend your knee until your leg is fully extended, then return to the start.
This is very similar to the lying knee extension, but you are pressing your leg out, not up.
Resistance Band Knee Exercise #5: Lying Glute Extension
The Lying Glute Extension is our primary glute stretch of this resistance band series. Tight glutes can cause tighthamstrings, which can pull against the quads causing knee pain. Begin, by lying faceup on the floor with your left leg bent.
Using a resistance band, pull your left leg as far over your right as your range of motion will allow.
]]> https://www.onnit.com/blogs/the-edge/kettlebell-tree-trunk-leg-workout2025-07-10T10:55:25-05:002025-08-15T06:36:02-05:00Kettlebell Tree Trunk Leg WorkoutJeremy GottliebWe wanted big legs, but as luck would have it, all thesquatracks at Onnit Gym were taken. We don’t have a leg press machine in the gym, so we were about to grab a smoothie, hit the sauna, and call it a day when we ran into Onnit-certified coach Juan Leija (@juannit_247on Instagram).
“What are you guys training today?” he asked.
“Well, we were going to hit legs, but we can’t get a squat rack and we don’t have machines. Oh well, see you next week!”
“Not so fast,” said Leija. “I can take you through a leg workout using only somekettlebellsand your bodyweight. It’ll turn those twigs into tree trunks in no time.”
What could we say? Leija’s quads were blocking the door. And if you’ve seen them, you know why we refer to him as Onnit’s resident redwood.
Defeated but inspired, we downed someAlpha BRAIN®Pre-Workout, gritted our teeth, and followed Leija into the weight room.
See the routine he showed us below to build your quads, hams, and glutes.
Can I Get Big Legs With Kettlebells?
Heavy barbell squatting, leg press machines, and leg extensions may get all the publicity for producing thick, muscular legs, but they’re certainly not the only tools that can do it. If you train with modest equipment at home, a gym that only offers the basics, or a facility that is so crowded after 5 p.m. that you can’t get your hands on anything but a few kettlebells,kettlebelland bodyweight training is your answer.
Leija’s workout starts with thekettlebell swing, but not for sets to infinity as you often see done. The swing is a great exercise forendurance, but it can alsobuild power and strength in the glutes andhamstringswhen performed for low reps.After five heavy sets here, your hips and knees will be plenty juicy for the rear-foot elevated splitsquatsthat follow.
Ask a cross-section of trainers which leg exercise they dread most and we bet these split squats come up near the top of the list more often than not, and for good reason. One leg has to support your whole body—your rear foot is really just there to help you keep balance—and you’ll work through a greater range of motion than you do with back squats. Like the swings, most people do split squats light (if they do them at all), but don’t be afraid to go heavy here.Sets with as much weight as you can handle for five reps will light up your quads, glutes, and adductors—the inner-thigh muscles most people neglect.
From there, you’ll train straight power with the squatjump.Focuson jumping as high as you can and controlling the landing. These burn like normal squats, so you know they’re activating plenty of muscle, but the goal here is explosiveness.Being able to recruit muscle fibers quickly and produce fast contractions translates to stronger lifts with heavier weight,not to mention greater running, jumping, and sports performance in general.
Next up are goblet squats, which teach the squat pattern like nothing else. Holding the kettlebell in front of your chest acts as a counterbalance, allowing you to stay vertical as you descend without fear of losing balance. You’ll most likely be able to sink into a deep squat, getting more out of your quads and glutes, while reinforcing good mechanics. The next time you back squat orfront squatwith a barbell, you’ll have better control of the movement.
Finally, Leija chops your legs down with some walking lunges. You’ll burn out whatever is left in the muscles by performing 100 total reps—and doing whatever it takes to get them. Aim for five sets of 20 reps, 10 sets of 10, sets of 50, 30, and 20, or whatever other configuration you’re capable of, resting as needed in between, but get 100 total.
Only then have you earned the right to a smoothie and sauna.
For a six-week program of kettlebell-only workouts you can do at home, see ourOnnit 6 Kettlebell course.
Kettlebell Tree Trunk Workout Directions
Perform the exercises in the order shown. Do not perform any other leg routine for at least three full days before and after this workout. For the best results, repeat the workout for four to six weeks, adding weight and reps to the exercises wherever possible.
This is your warm up. Jump 3 minutes at an easy pace. You can mix up the type of jump you do (for instance, jump with one leg at a time, alternate legs, or swing the rope backward), or just do two-legged jumps as shown.
Take a few warmup sets to work up to the heaviest kettlebell you can handle for 10 reps, safely. Make sure to keep your lower back flat and extend your hips to drive the kettlebell up (don’t lift with your shoulders).
Step 1: Hold a kettlebell in each hand and stand lunge length in front of a bench, step, or box that’s about 12 inches high.
Step 2: Step your left foot back and rest the top of your left foot on the bench so that your knee is bent 90 degrees. Your right foot should point straight forward.
Step 3: Hinge your hips back a bit so you feel like you’re leaning forward, but keep your spine straight and tall. Slowly bend your right leg until your left knee is just above the floor. Your front leg should be bent about 90 degrees.
You may want to spend some time in the bottom position before you start your set to figure out your best distance from the bench. You should feel like your front foot is forward enough that your heel won’t come off the floor, but not so far that you feel your hamstrings getting stretched in the bottom position.
When you’ve found a good stance, come up to a standing position. Then begin your set. Rest as needed between legs.
Step 1.Stand with feet between hip and shoulder width. Reach yourarmsstraight overhead and get up on the balls of your feet.
Step 2.Drop your heels to the floor as you swing your arms back behind you to gather power.
Step 3.Swing your arms forward and overhead as you jump as high as possible. Land with soft knees and take a moment to reset yourself. Then begin the next rep.
Step 1. Hold a kettlebell in front of your chest by the sides of its handle, or by the bottom of the bell itself. Draw your shoulders back and downward (think: “proud chest”), and tuck your elbows in close to the bell—try to get your forearms as vertical as you can. Stand with your feet between hip and shoulder width, and turn your toes out a bit—up to 30 degrees if you need to.
Step 2. Tuck your tailbone and draw your ribs down so that your pelvis is parallel to the floor. Take a deep breath into your belly, and brace yourcore. Actively twist your feet into the floor, but don’t let them move. Think of your legs as screwdrivers, or that you’re standing on grass and trying to twist it up beneath you. You should feel the arches in your feet rise and your glutes tighten, creating tension in the lower body.
Step 3. Keeping a long spine from your head to your pelvis, push your hips back and squat down, as if sitting down into a chair. Squat as low as you can while keeping your head, spine, and pelvis aligned. Push your knees apart as you descend. You should feel most of your weight on your heels to mid-foot area. If you feel your lower back beginning to round, stop there, and come back up. Keep your torso as vertical as possible—you shouldn’t have to lean forward or work extra hard to hold the bell upright. Avoid bending or twisting to either side.
Step 4. Drive through your feet as you extend your hips and knees to come up.
Step 1. Hold a kettlebell in each hand and take a long step forward. As your foot lands, bend your knee and lower your body until your front thigh is parallel to the floor.
Step 2. Step forward with your rear leg and lunge on that side. Each rep should have you walking forward, and each lunge counts as one rep. Do as many sets as needed to complete 100 total reps (50 each leg).
]]> https://www.onnit.com/blogs/the-edge/what-is-the-sissy-squat-and-why-your-workout-needs-it2025-07-10T10:55:25-05:002025-08-15T06:44:22-05:00What Is The Sissy Squat and Why Your Workout Needs ItJeremy GottliebThe sissy squat is a funny name for an exercise that works your quads through the greatest range of motion possible, and it can help you hit an oft-neglected section of your things. Here’s everything you need to know to perform the sissy squat correctly and get the most out of it.
Key Takeaways
– The sissy squat is theonlysquat exercise that can train the rectus femoris muscle in a lengthened position.
– The sissy squat requires stability and should be learned by holding onto a sturdy object for support.
– Start with2–3 sets of 5–10 reps.
– The sissy squat works the vastus medialis (the “tear-drop muscle” on the inner side of the quad), vastus lateralis (outer quad), vastus intermedius (underneath the other quads), and the rectus femoris.
–Do the sissy squat toward the endof a leg workout when your legs (and knees) are warmed up and full of blood.
What Is The Sissy Squat and What Are Its Benefits?
The sissy squat is a hell of a leg exercise if you can just get past its funny name. From a standing position, you bend your knees as deeply as you can while keeping your hips locked out. This will cause you to rise up onto the balls of your feet, so, one might argue that the sissy squat makes you look like a ballet dancer, or someone doinga goofy exercise that a meathead might consider a little effeminate—hence the “sissy” name. But the fact is, sissysquatswere a favorite of hardcore bodybuilders for decades, and have recently come back into style thanks to social media.
While sissy squats look strange,they really isolate your quads like no other movement, particularly the rectus femoris muscle.Here’s a quick anatomy lesson: Your other quad muscles only work to extend the knee, but your rectus femoris straightens the knee as well as raises your leg in front of you.
Other squatting movements cause you to bend your hips as you bend your knees, so the rectus femoris never really gets trained in a lengthened position. But when you do sissy squats, you keep your hips straight, and that puts a stretch on the rectus femoris,delivering a stimulus it can’t get fromfront squats, back squats, leg presses, and so on.
This is especially good news because research is mounting that shows muscles may get a better growth stimulus when they’re trained in lengthened positions. In other words, when they’re stretched a bit. Two trials (1,2) specifically indicated that exercises thattrained muscles at longer muscle lengths led to greater muscle gains versus exercises that worked the areas at shorter muscle lengths,though the reasons why are still in dispute.
The sissy squat can be performed without any support, but most people are going to need to hold onto something in order to keep their balance, and that’s how we recommend you learn it.
Step 1.Hold onto the support beam of a power rack or any other sturdy object and stand with your feet between hip and shoulder-width apart. Turn your toes out between 10 and 30 degrees.
Step 2.Brace yourabsas if you were about to take a punch to the stomach, and squeeze your glutes. Now begin to slowly bend your knees while leaning your torso back.Allow your heels to come off the floor so you’re balancing on the balls of your feet.Keeping your hips locked out, go as low as you can without discomfort or losing control of the movement. Ideally, you’ll get down to where your knees are fully flexed, with yourhamstringstouching your calves.
Step 3.Extend your knees to come back up to standing. Be sure to keep your hips straight as you do so.
“The sissy squat works the quads with only minimal assistance from the glutes,” saysJonny Catanzano, an IFBB pro bodybuilder and trainer (@jonnyelgato_ifbbpro),“so it’s a great movement for isolating the quads and strengthening them in an extreme range of motion that really couldn’t be trained any other way.” Specifically, the sissy squat works the vastus medialis (the “tear-drop muscle” on the inner side of the quad), vastus lateralis (outer quad), vastus intermedius (underneath the other quads), and, of course, the rectus femoris, which you’ll remember we said bends the hip as well as extends the knee (it starts below your hip flexors and runs down the middle of your quads).
How Do Sissy Squats Vary From Other Squats?
As we said above, the sissy squat is theonly exercise that can work the rectus femoris muscle in a lengthened position, which may prove extra beneficial for muscle growth.Other types of squats require you to bend at the hips as well as the knee, but the sissy squat has you keep your hips straight. The result is a movement that stretches out the rectus femoris while putting all the quad muscles under tension.
“Sissy squats take your quads through a full range of motion and into a very big stretch,” says Catanzano, “so make sure you’re very warmed up before you do them.” Here are three exercises he recommends to warm up and stretch out before you do a leg workout that features sissy squats.
Step 1.Hold onto an inclined bench or other sturdy surface and raise one knee up in front of you. Now move your knee away from your body, trying to get to 90 degrees or as far as you can, but don’t allow your hips to turn in that direction—keep them facing forward.
Step 2.Turn your thigh bone in its socket, so you raise your foot up while you point your knee downward as far as you can. Then kick your leg straight back behind you, feeling your glute engage. Touch your foot back to the floor.
Step 3.Reverse the movement, raising your leg behind you, and then bringing the knee around to the front again. That’s one rep.Do 2–3 sets of 5 repson each leg to start, working up to 3 sets of 8 reps.
To increase the challenge, place an object on the floor so you have something to raise your leg over and hover above.
Step 1.Set up as you did for the hip CARS and raise your knee in front of you. From there, extend your knee fully as if you were kicking.
Step 2.Keep the knee extended as you lower your leg back down. “Try not to bend over as you’re raising the leg, or use momentum to complete the reps,” says Catanzano.Do 3 sets of 5 reps on each leg.
The sissy squat is a challenging exercise and can be very awkward when you’re first trying it out. Some people may also find that it bothers their knees. Therefore, you may want to try a couple of other exercises that are a little more user-friendly, but target the quads in a similar way.
This movement reduces the sissy squat’s range of motion, and allows you to use the floor for extra stability.
Step 1.Place a medicine ball or other object on the floor—you’ll use it to gauge your range of motion. Attach an exercise band to a rack or other sturdy object in front of you (a pullup bar that’s screwed into place works fine too).
Step 2.Get on your knees (you may need to lay a towel down on the floor for comfort) and roll the ball into place about a foot behind you. Grasp the band with both hands. Extend your hips and brace yourcore—hold this position throughout the exercise.
Step 3.Allow your body to fall back slowly, driving your legs into the floor to resist it, until your back touches the ball. (The band will help control your descent so you don’t crash backward.) You should feel a deep stretch in your quads. Use the band to help you extend your knees to come back up.
“As you get stronger and more mobile on these,” says Catanzano, “slide the ball back a bit further,” until you don’t need the ball and you can touch your hamstrings to your calves. You can also progress the exercise by changing to a lighter band that will provide less assistance.
“This move teaches you how to effectively lock out your hips,” says Catanzano. “When you try to learn that on a regular sissy squat, it can be difficult. This is a great way to ease your way into doing a standing sissy squat, especially if you have problems with mobility.”
Step 1.Attach two exercise bands to a sturdy object, like a power rack’s support beam. They should be pretty thick bands, an inch or an inch and a half wide, as they’ll need to be able to support your bodyweight. (We like the selection offered atelitefts.com.) Wrap one band around the bottom of the rack and place a foot through each loop. Slide the band up so it hugs the top of each calf, just below the knee. Now wrap the other band around the rack at roughly shoulder level and grasp an end in each hand.
Step 2.Lean back, using the band in your hands for assistance and the one at your knees for support. Squat as low as you can while keeping your hips extended.
Do 2 sets of 8 reps.As you improve, you can progress to 3–4 sets of 8–12 reps.
Do the sissy squat later in your leg day when you’re very warmed up and have a lot of blood in the quads. Start with2–3 sets of lower reps—5 or whatever you can manage—and gradually increase reps as you get stronger.When you find you’re able to do more than 10 reps, you can experiment with holding a dumbbell on your chest for extra resistance, or wearing a weighted vest. You can also try the sissy squat unassisted—that is, do it without holding onto something—which will challenge your ability to keep your balance as well as strengthen your quads.
]]> https://www.onnit.com/blogs/the-edge/how-to-jump-higher-5-exercises-to-improve-your-vertical2025-07-10T10:55:23-05:002025-08-08T17:28:46-05:00How To Jump Higher: 5 Exercises To Improve Your VerticalShane HeinsAn impressive verticaljumpis the ultimate standard of lower-body power and explosiveness—an attribute that pays as many dividends in high-impact sports like basketball, football, and soccer as it gets you wide-eyed looks in the gym. Increase your hops, and chances are you’ll also be able to run faster, lift more weight, and maybe even throw down a dunk at your next pickup basketball game.
But if you think your standard gym rat training sessions are going to lift you to new heights, you’re mistaken. To jump like an elite athlete, you need to train like one, starting with the five exercises we’ll outline here.
How To Jump Higher: 5 Exercises To Improve Your Vertical
This list of movements was compiled by a pair of trainers who know a thing or two about making athletes more explosive: Jason Benguche, former assistant strength and conditioning coach for the Carolina Panthers and Director of Performance for Jet Movement Labs (@movement_mogulon Instagram), has worked one-on-one with NFL quarterback Cam Newton. And Firdose Khan (@dose_9), head trainer at Nine Innovations athlete training facility in Houston, has worked with such athletes as former NBA MVP Derrick Rose and NFLers Arian Foster, Braxton Miller, and Brian Cushing.
Follow their advice, as demonstrated in the video above by the talented Hannah Eden (@hannaheden_fitness), a distinguished coach in her own right, and you’ll be jumping out of the gym in no time.
Muscles Used for Jumping
A jump is the result of triple extension: the simultaneous and explosive extension of the hips, knees, and ankles. Whether you’re watching an Olympic weightlifter perform a clean, a sprinter take off down the track, or a basketball player go up for a dunk, triple extension is the driver. Below are the muscles that make it possible.
–Glutes(gluteus maximus, gluteus medius), for hip extension
–Quadriceps(vastus lateralis, intermedius, and medialis; rectus femoris), for knee extension
–Hamstrings(bicepsfemoris, semimembranosis, semitendonosis), for hip extension, knee flexion, and absorbing landings
–Calves(gastrocnemius, soleus), for ankle extension (plantarflexion)
–Abdominals andcore(transverse abdominis, rectus abdominis, internal and external obliques, multifidi, erector spinae), for trunk stability
How To Test Your Vertical
Before we explain how to build your jump, let’s make sure you know how to jump properly in the first place and can get a baseline measurement for it. See00:25in the video above for Eden’s demonstration and a walk-through of all the steps.
How To Jump
Step 1.Stand with your feet directly under your hips. If they’re wider than that, you won’t be able to translate as much power from your legs directly into the ground. Drive your knees outward without moving your feet, so you feel tension in your hips. This will turn the hips on for better jumping power.
Step 2.Quickly dip your hips and knees, throwing yourarmsbehind you to gather momentum. Picture a half-squatposition or slightly shallower—your hips must be behind your knees. The hip action in a jump is the same as the hinge pattern you perform with your hips during a deadlift or clean—bend them back while keeping a long spine.
Step 3.Jump as high as you can while flinging your arms forward and overhead. When you leave your feet, only reach up with onearm; you’ll be able to reach a higher point this way versus reaching with both arms. Land softly with a slight knee bend, being careful not to let your knees cave inward. Drive them outward as you did when preparing to jump in the first place.
How To Measure Your Jump
At the competitive level (i.e., the NFL and NBA combines), vertical leap is measured using a “jump tester”—a tripod with a series of thin plastic sticks one inch apart. If you have access to this equipment, it’s your best bet for getting an accurate measurement. A cheaper, more feasible option is to do your jump next to a wall and mark the highest point you touch with a piece of chalk.
Whichever equipment you use, the first thing you’ll need to do is measure your reach standing flat-footed on the floor with one arm fully extended straight overhead. (You can measure your reach up against a wall for the chalk option.) Then, when you mark the highest point you touched, you’ll subtract your reach from that number. For example, if your reach is 90 inches and you touched 115 inches up on the wall with your chalk, your vertical leap is 25 inches.
After warming up, make anywhere from3 to 5 jump attempts.
Most official vertical jump tests do NOT permit any steps to be taken leading into the jump. No running start or even a power step allowed. Stand on both feet in one spot and jump from that spot.
How To Stretch Before A Jump Workout
Before we get into the exercises that will build your jump height, warm up with these moves from Onnit’s Director ofFitnessEducation, Shane Heins (@shaneheins). They will help to improve mobility in your hips as well as durability in your knees and ankles, improving performance and reducing the risk of injury.
Jump Higher with These 5 Exercises
1) Depth Jump
(See01:26in the 5 Exercises To Improve Your Vertical video)
The defining characteristic of the depth jump is that the jump is preceded with the strong eccentric (negative) muscle action caused by dropping down from a raised surface, as opposed to a standard box jump where you start on the floor. This makes the depth jump a true plyometric movement, where the muscles are stretched suddenly (by the impact of the landing), producing a powerful shortening of the muscle fibers.
“The depth jump utilizes the stretch-shortening cycle to improve CNS activation and rate of firing,” says Benguche. “The shock of rapidly absorbing, and then producing, force trains the body to respond with greater levels of reactive force to improve the elastic components of the lower body.”
Step 1.Stand on a plyo box that is 10–30 inches high (start with a lower one if you’re brand new to depth jumps). Your body should be fully upright and your feet hip-width apart, hands at your sides.
Step 2.Step off the box, leading with one foot and then following with the other, to drop yourself down to the floor. You’re not hopping or jumping off the box; your body should simply fall to the floor.
Step 3.Land squarely on the floor on both feet (again, around hip-width apart) and immediately jump as high as you can, straight up in the air. It’s important that you spend as little time as possible with your feet on the floor before the jump—it should be a split-second reaction. Don’t lower down into a squat before leaving your feet. Just let your hips and knees dip naturally, then extend them explosively to launch upward. Drive your arms straight up as you do so.
Step 4.Land back down on the floor with soft knees, settle yourself, then step back onto the box and repeat the sequence for reps. Don’t be in a rush between reps; the objective of this exercise is explosive power, not conditioning.
Technique Tip:Be mindful of your body position as you land on the floor and go into the explosive jump. Your hips should be over your heels, and your weight over the center of your feet. You want to jump straight up (vertical), not out in front of you.
How to Use the Depth Jump
Timing:Do depth jumps early in your workout, after you’ve warmed up thoroughly and before lower-body strength exercises likesquats.
Sets/Reps:Benguche recommends keeping the total volume of reps very low on depth jumps:2–4 sets of 2–5 reps.
“No additional load is necessary,” he says. “However, the height of the box for the depth jump can be progressed over time to increase the challenge and stimulus.”
Regression
In the absence of a plyo box, depth jumps can be performed using a standard weight bench. Since benches are lower to the ground than many boxes, they’re a good option for those new to the exercise.
Progression
Athletes often do depth jumps with two plyo boxes: one to step off of and another to jump onto. Essentially, it’s a depth jump into a box jump. When doing this variation, make sure to leave enough room between the boxes to allow you to land and jump safely (3–5 feet between boxes should work). To advance within this progression, increase the height of the second box gradually as you develop more strength and power.
Adding resistance to jumping exercises (versus using bodyweight only) can help increase strength and power. And it doesn’t take much weight to get the job done—a 10-pound med ball will suffice.
With this exercise, you’re going for maximum distance instead of height, but the benefits will carry over to your ability to jump vertically. “The med-ball broad jump is great for developing hip explosion, due to the power aspect that comes from loading the hips with the hinge-type motion,” says Khan.
Step 1.Stand a few feet back from a wall holding a medicine ball (about 10 pounds) in both hands. You should have plenty of floor space in front of you to jump. Start with the ball overhead, arms extended, and your feet hip-to-shoulder-width apart.
Step 2.Lower your arms toward the floor and bend at the hips and knees to create elastic energy for the jump. (This is technically the eccentric, or negative, phase of the exercise.)
Step 3.Without hesitating, explode out of the “hole,” pressing through the balls of your feet and throwing your arms out ahead of you. Toss the ball into the wall and jump as far out in front of you as possible.
Step 4. Land with bent knees, through your heels, and absorb the eccentric force by going into a squat if necessary. (This finishing squat is not a crucial part of the exercise—just a safe way to land.) Catch the ball as it rebounds if you can, or, if the wall is further away, let the ball fall. Then pick it up and repeat for reps.
Technique Tip:When doing a broad (long) jump for maximum distance, you want to get some height, but not too much. Aim for your trajectory to be under 45 degrees.
How to Use the Medicine-Ball Broad Jump
Timing:Do medicine-ball broad jumps early in your workout, before heavy lower-body strength movements. Khan prescribes glute activation work with his athletes before jumping exercises, such as hip bridges or lateral band walks, to help the glutes “wake up” and fire harder.
Sets/Reps:Khan recommends3 sets of 5 reps,using a 10-pound medicine ball.
Regression
Those new to explosive jump training should start with no added resistance. In this case, simply do the standing broad jump without the med ball.
Progression
Khan often adds an extra layer of resistance to the med-ball broad jump with his athletes: a heavy-duty elastic band attached to the back of the waist with a belt and anchored to a solid structure behind the athlete at floor level. As the athlete jumps and travels through the air, the resistance from the band increases as it stretches.
Strength begets power, which leads to a better vertical, and there’s no better exercise for increasing lower-body strength than the classic barbell back squat.
“The squatting pattern is one of the best ways to train the body for improved strength and power,” says Benguche. “Quads, hamstrings, and glutes will be the primary drivers of the squat, and all have high importance for helping improve the vertical jump.”
Step 1.Set up in a squat rack and grasp the bar with your hands as far apart as is comfortable. Step under the rack and squeeze your shoulder blades together and down, wedging yourself under the bar so that it rests on yourtrapsor the back of your shoulders.
Step 2.Nudge the bar out of the rack and step back, setting your feet at shoulder width, with your toes turned slightly outward. Without letting your feet actually move, try to screw both legs into the floor, as if you were standing on grass and wanted to twist it up—you’ll feel your glutes tighten and the arches in your feet rise. Take a deep breath into your belly and brace your core, pulling your ribs down so your torso forms a solid column.
Step 3.Keep your weight over your mid foot and your eyes facing forward. Bend your hips back and spread your knees apart as you lower your body down. Go as low as you can, while keeping your head, spine, and pelvis aligned.
Step 4:Push through your feet to come back up, extending your hips and knees.
Technique Tip:Keep your heels on the floor while squatting. The bar should remain over your mid foot (not the balls of your feet) throughout both the positive and negative portions of the lift. If your heels come off the floor, it means the weight has shifted too far forward.
How to Use the Back Squat
Timing:For maximum strength gains, do back squats as either the first or second strength exercise in your workout.
Sets/Reps:For general strength and lower-body development, Benguche recommends3–6 sets of 3–8 repswith moderate loading—70%–85% of your one-rep max (1RM). For developing more speed and power, he recommends lighter loads (55%–70% of 1RM) for3–6 sets of 2–5 reps.Squats performed with light weights but done so explosively that your feet leave the floor when you come up are called jump squats (see “Progressions” below).
Regression
Scaling the back squat for beginner-level athletes generally entails sticking to lighter loads (even bodyweight only to start) while learning proper technique. Goblet squats with akettlebellor dumbbell can be used to practice form, but keep in mind that goblets are an anterior (front-loaded) variation and won’t directly mimic the mechanics of the back squat.
Progression
As you gain experience, multiple barbell squat variations should be rotated into your program. Jump squats in particular will help you develop more explosive strength that translates directly to a vertical jump.
In the jump squat, you lower your body only until your thighs are parallel to the floor (you don’t go for maximum depth, as in the conventional back squat). As you come back up, do so explosively so that your feet leave the floor at the top—three to six inches is high enough. Land softly with a slight knee bend, reset, and repeat for reps.
This isn’t just some light-duty assistance exercise. The rear-foot elevated split squat (aka, Bulgarian split squat) is a legitimate movement for increasing pure glute and quad strength, which will in turn enhance power and vertical jumping performance. Even if you’re a two-foot jumper, focusing on one leg at a time like you do here will ensure that your dominant side isn’t compensating for your weaker leg during the movement.
The exercise is also a great option for those with lower-back issues, as the rear-foot elevated position requires a more upright torso than a standard squat. This prevents shearing forces on the lumbar spine, which are a common cause of injury in the classic back squat.
Step 1.Hold a dumbbell in each hand and stand lunge-length in front of a bench that’s 18–24 inches high. Reach back with one leg and rest the top of that foot on the bench.
Step 2.Take a deep breath, brace your core, and lower your body as far as you can, or until your rear knee is just above the floor (you should feel a stretch in the hip of the trailing leg). Keep your front heel grounded—don’t allow it to rise off the floor. Complete your reps on one side and then repeat on the other immediately.
Technique Tip:Determining how far out in front of you to place your front foot may require some trial and error. At the bottom of the motion, your front knee should be somewhere above your heel to mid foot. If your knee is behind your heel, your foot is too far forward; if it’s out over your toes, step out further. One trick to find the right distance is to start in the bottom position and adjust your stance from there.
How to Use the Rear-Foot Elevated Split Squat
Timing:Perform split squats as one of the first two exercises in the strength portion of your workout. If done for low volume with no added resistance, it can also be done as part of a warmup prior to explosive jumps (see below for the isometric hold variation).
Sets/Reps: 3–4 sets of 5–8 reps,using a moderate weight. Because balance will be an issue with the staggered stance and rear foot elevated, you’ll have to go lighter than you would doing a standard split squat or lunge.
One training method Khan utilizes is a 30-second isometric hold in the bottom position of the split squat, followed by 5 reps; this is typically done with no added resistance, pumping the arms in a running motion on each rep. “The time hold createsenduranceand strength in the quads and glutes,” says Khan.
Regression
The rear-foot elevated split squat can be a difficult exercise from a balance standpoint. The first time you try it, use no added resistance (bodyweight only) to practice the technique. If you’re unable to keep your balance, perform a standard split squat with your back foot on the floor (not elevated).
Progression
Holding the resistance in a higher position can increase the difficultly of the exercise and call on more core engagement. Examples of this include holding a kettlebell or dumbbell with both hands in the “goblet” position below your chin, or doing the movement with a barbell across your shoulders (the most advanced version).
A variation on the basickettlebell swing, the hike swing gets you used to exploding from a dead-stop position, so you learn to generate force quickly out of nowhere.
Step 1.Place a kettlebell on the floor and stand behind it with feet shoulder-width apart. Soften your knees.
Step 2.Hinge your hips back until you feel a stretch in your hamstrings. Your head, spine, and pelvis should form a long, straight line.
Step 3.Grasp the kettlebell and try to snap the handle in half. This should cause your shoulder blades to drive downward and your lats to tighten.
Step 4.Hike the kettlebell back between your legs until you feel your forearms contact your inner thighs.
Step 5.As soon as you feel your forearms touch your thighs, extend your hips explosively, as if you were standing up quickly and tall. Squeeze your glutes as you come up. Allow the power to raise the kettlebell up in front of you to shoulder level.
Step 6.Control the kettlebell on the way down and park it back on the floor. That’s one rep.
Technique Tip:This is an explosive lift, where the objective is to get the kettlebell moving upward as fast as possible. That said, keep the exercise safe, particularly for the lower back, by staying tight in the core and having your hips low coming off the floor—do lift the kettlebell with a rounded lower back, and avoid hyperextending your back at the top of each rep (i.e. don’t lean back).
How To Use the Kettlebell Hike Swing
Timing:Do hike swings early in your workout, before lower-body strength exercises.
Sets/Reps: 4 sets of 3–5 reps.
Regression
If starting and stopping each rep feels awkward, just work on the regular kettlebell swing instead, going for fluid reps (and higher reps, like 10 or more). If you’re not familiar with this move, we’ve got theultimate guide to the kettlebell swing.
Progression
When you’ve got your explosive hip hinge mechanics down, a squat clean exercise can be a good next step. See ourguide to the squat clean.
How to Dunk a Basketball
Once you’ve boosted your lower-body strength and power via the aforementioned five movements, it’s time to carry that newfound explosiveness over to the court—because if your goal is to jump higher, chances are dunking a basketball is high on your list of things you’d like to do with that skill.
These expert tips will help you with the finer points of dunking. Combine them with a respectable vertical leap, and you’ll be throwing one down soon enough.
7 Tips for Parlaying Better Hops into Monster Jams
1) Wear the Right Shoes
Remember the Spike Lee (as Mars Blackmon) 1989 Nike commercial? (Yeah, we’re old too.) In reference to Michael Jordan’s epic hops, Lee exclaims, “It’s gotta be the shoes.” The line was a tad hyperbole, but it is worth putting some thought into your footwear.
A pair of relatively new basketball shoes (i.e. not Chuck Taylors) is a good choice for dunking, especially if you have unstable ankles; basketball shoes offer good lateral support, as opposed to running shoes, which can easily lead to a turned ankle.
“It doesn’t matter too much as long as they’re not sandals or boots, but I would say the lighter the shoe the better,” says Bobby Jones, a former NBA player and all-Pac-10 standout in college at the University of Washington, who currently plays professionally in Italy. (Visit Jones atBobbyRayJonesJr.com.)
Tyler Harris, a professional basketball player for the Sendai 89ers in Japan and brother of NBAer Tobias Harris, has one pair of shoes in particular he prefers to dunk in: “Kobe [Bryant] low-top Nikes are one of the best shoes to wear for dunking,” he says.
2) Warm Up Properly
Dunking (or attempting to dunk) is a high-impact, highly intense activity that deserves a sufficient warm-up prior to a throw-down session. Just as you would for a lifting workout, start your warmup with a few minutes of low-intensity cardio, then progress to more dynamic movements—dynamic stretching/mobility drills as well as jumping. Before attempting your first dunk, take a couple dry runs with no ball where you’re touching or grabbing the rim at the top.
“Warming up is very important for preventing injuries,” says Harris. “I would recommend warming up and stretching for at least 30 minutes before any basketball game or just practicing dunking the basketball.”
Harris recommends warmup and stretching drills (both dynamic and static) such as: jumping and touching the rim; high knees; ladder drills; lateral defensive slides, seated and standinghamstring stretches; seated straddle stretch; and Achilles stretches. Hold each stretch 15 seconds.
3) Decide If You’re a One-Foot or Two-Foot Jumper
Should you go off of one foot or two feet when dunking? That depends on what you’re more comfortable with as well as your athletic ability and coordination.
Jumping off one foot means you’ll be taking a running start and launching a few feet in front of the rim (since your momentum will carry you forward as well as up). When going off two feet, you won’t take a running start—more like a few hard steps and a power dribble. You’ll take off right in front of the rim and go straight vertical.
“When most people first start trying to dunk, it’s usually off one leg,” says Jones. “You’re banking on your speed, so this means you want to have a running start to gain momentum. If you want to dunk off two, that requires more athletic ability, more coordination, and using the power dribble to gain momentum. If you have a nice set of calves and a big butt, this might be the way to go.”
4) Dunk One-Handed, if Possible
It takes a higher vertical leap to get both hands up to the rim versus just one (and don’t forget, you’ll be holding a basketball as well), so if you’re cutting it close, try for a one-handed jam. Being able to palm the ball will obviously help, but it’s not totally necessary; just make sure you keep the ball in both hands until you leave the floor so you don’t lose it.
“Dunking with one hand is definitely easier than two,” says Jones. “It’s one less thing to worry about, so you canfocusbetter on the task at hand.” When the time comes that you’re dunking easily, then you can start dunking with two hands for more authority.
5) Approach the Rim from the Baseline
When your goal is simply to throw one down, you want to be as focused as possible on your target: the rim. Because of this, Jones recommends coming in from the side (along the baseline) instead of straight on.
“Starting from the mid baseline or corner to dunk, I think, gives your mind an easier target and is less distracting,” he says. “That way, you can just focus on getting as high as you can, sort of like doing the long jump. When you’re trying to dunk straight on, you visually see the entire basket and might get distracted, scared, and lose focus.”
6) Take Plenty of Rest Between Dunks
Giving yourself the best chance to throw one down requires you to be as fresh and explosive as possible. You want full rest between dunking attempts—just as you would when maxing out on a big lift like a squat, deadlift, or bench press. After each dunk attempt, take at least a minute or two to rest and recover.
7) When Performance Diminishes, Call it a Day
In any power and strength activity, there comes a point of diminishing results. This is why powerlifters typically don’t do more than three heavy sets or one-rep max (1RM) attempts for any lift in a given session.
Dunking isn’t much different. You’ll likely find yourself getting slightly higher with each attempt at first, but before long, fatigue will set in and your vertical leap will decrease. At this point, it’s a good idea to end the session, rather than try to push through and force yourself to jump higher. It’s an indication that your nervous system has mustered all the energy it has to help you jump, and you need to let it rest. Give your legs a couple days’ off, then come back again and try.
]]> https://www.onnit.com/blogs/the-edge/tuck-jumps-how-to-do-them-why-your-workout-needs-them2025-07-10T10:55:23-05:002025-08-12T00:15:00-05:00Tuck Jumps: How To Do Them & Why Your Workout Needs ThemShane Heins Summary
– The tuckjumpbuilds lower-body power and coordination
– It works all the major lower-body muscles and thecore.
– Tuck jumps should not be used for conditioning, due to safety concerns. (Don’t do them for high reps as part of a circuit workout.)
– To prepare your body for tuck jumps, work on landing safely.
There’s a famous photo of Bruce Lee jumping in the air with dumbbells in each hand and his knees tucked to his chest. His body is so neatly folded it almost looks like he’s crouching on the ground. The photo perfectly illustrates The Dragon’s mystique: a man who made incredible displays of power and athleticism seem simple and effortless.
In case you haven’t deduced as much already, Lee was doing a tuck jump in that pic, and the move was one of many he used in a workout regimen that was ahead of its time. If you hope to capture some of his explosiveness, this guide to tuck jumps will help you master an exercise that put spring in the step of one of the greatest martial artists of all time.
What Is The Tuck Jump?
The tuck jump is a vertical jump in which you raise your knees to your chest as you rise into the air. Interestingly, unlike other vertical jumps, the tuck jump is not purely a triple-extension movement. That is, vertical jumps, along with Olympic weightlifting exercises such as the clean, have the hips, knees, and ankles all extending simultaneously to generate explosive movement. While the tuck jump begins like a vertical jump, the knee tuck causes hip-, knee-, and ankle-flexion, which contributes greatly to its effectiveness. Tuck jumps are primarily done by athletes to develop power and coordination.
Like all jumps, tuck jumps are a full-body exercise that work a lot of big muscles, so you often see them used in exercise classes and circuit workouts for the sake of raising the heart rate,but we don’t suggest that you perform them for that purpose.The tuck jump is a high-impact exercise—even more so than most other jumps, due to the height and the tucking of the knees—and performing it with anything less than perfect form is dangerous. So is jumping into tuck jumps too soon (no pun intended), failing to build up to them gradually.
For those reasons, we recommend starting with lower-intensity jump exercises for a while to condition your joints for the impact of tuck jumps, and ultimately using the tuck jump for its original intention—to develop explosive power. (See “Alternatives To The Tuck Jump” below.)
“The majority of people who do tuck jumps aren’t ready for them yet,” says Sam Pogue, CPPS, FRCms, VP of Brand atTrueCoach, and a performance coach to athletes, including World Series champion pitcher Jake Arrieta. But we’ll show you how to prep your body the best way possible to fast-track your hops.
What Muscles Does The Tuck Jump Use?
The tuck jump works all the muscles of the lower body and the core. Here’s a breakdown of how they contribute to the movement.
Glutes andhamstrings.Both muscle groups have an eccentric contraction (that is, they tense while lengthening) as you lower your hips toward the floor during the jump’s countermovement—think: coiling the spring. Then, when you explode upward, the glutes and hamstrings shorten rapidly to drive the hips forward, creating the power that propels the jump.
Quads.Like the glutes and hamstrings, they contract eccentrically on the way down and then concentrically to extend the knees as you jump. When you’re in the air, the rectus femoris quad muscle works again, along with the hip flexor muscles, to pull your knees up toward your chest.
Calves.The calves extend the ankles, assisting the glutes, hamstrings, and quads in getting your feet up off the floor.
Core.Theabsand lower back must brace the spine as you lower into the jumping position, as well as when you tuck the knees and land back on the floor.
All of the above muscles also work as shock absorbers, reducing the force that acts on the joints upon landing.
While tuck jumps work many muscles, don’t make the mistake of thinking that they’re a great way to “tone” your legs. Jumps work primarily fast-twitch muscle fibers to provide explosive movement, but the volume you’ll train them for isn’t enough to build serious leg muscle, and no muscle group stays under tension long enough to induce the metabolic stress that’s associated with muscle gains.Jumps are done to translate the strength you build with more traditional lower-body exercises (squats, deadlifts, lunges, etc.) into powerful movementsyou can make on an athletic field, such as running, jumping, and cutting.
Benefits of the Tuck Jump
Tuck jumps are mainly used to increase bilateral power output. That is, to train your ability to move explosively on two feet. “Jumps are also really good for developing coordination,” says Pogue, “increasing your understanding of where your body is in space.” Because the tuck jump has the added hip and knee flexion at the end, its coordination demands are higher than a typical vertical jump. “It’s akin to the long jump,” says Pogue, the track and field event where you kick your legs out in front of you to get as much distance as possible.If you can tuck jump proficiently, it’s pretty much a given that you’ll be able to run fast, jump high, and turn on a dime when needed during sports play.
Nevertheless, you’ll notice that athletes get tested on their vertical jump height, not their tuck jump performance. “The tuck jump isn’t as applicable to sports as a vertical jump,” says Pogue, “but it’s a good jump to practice if you want to maximize athleticism.”
Pogue, himself a former baseball player, liked to use tuck jumps during games, because of their effect on the central nervous system.Explosive, reactive movements make the mind more alert and focused, so you can use tuck jumps to “wake you up” before you need to do something that’s explosive,fast, or requires maximum attention. “Baseball can be slow sometimes,” says Pogue, “so I used to use tuck jumps to recharge if I’d been standing around for a while.” Doing one or two reps before you step up to bat could make the difference between a strike and a base hit.
As tuck jumps place so much stress on the hips, knees, and ankles, they’re sometimes used in clinical settings to help identify an athlete’s risk of injury, particularly to the knee. Astudypublished inAthletic Therapy Todayconcluded that tuck jumps may be a useful assessment tool in gauging neuromuscular control, and risk of ACL injury among female athletes.
How To Stretch Before Doing A Tuck Jump
Use the following warmup drills from Onnit Durability Coach Cristian Plascencia (@cristian_thedurableathleteon Instagram) before performing tuck jumps in a workout.
How To Do A Tuck Jump
Step 1.Stand with your feet between hip and shoulder-width apart and soften your knees.
Step 2.Bend your hips and knees to lower your body into a quarter-squat. You’ll end up in the universal athletic stance (picture a lineman in football)—hips and knees bent, chest lined up with your toes, looking forward, and ready to explode. Your torso should be about 45 degrees to the floor with your lower back in its natural arch. Swing yourarmsback as you bend your hips back so that they run parallel to your spine.
All of the above must happen quickly and in one movement. Think of it as coiling a spring as you dip your hips down and back before you reverse the movement to explode upward.
Step 3.Immediately rise up, extending your hips, knees, and ankles (come up onto your toes) and swinging your arms forward and up to jump as high as you can into the air. As you rise, pull your knees upward with you, tucking them under your chest. Your thighs should end up parallel to the floor. Try to stay tall as you tuck—don’t actively crunch yourself into a ball.
Step 4.Extend your knees on the descent and use your toes to buffer your feet as you land. “Land like a ninja,” says Pogue, bending your hips and knees as needed to absorb the force of the ground, although you should end in the same athletic position that you started the jump.
Take a moment to reset your feet before you begin the next jump, and begin it from a tall standing position again. You can also begin each successive jump immediately, rebounding out of your landing, but we don’t recommend this unless you’re an experienced jumper, andwe definitely don’t like it as a means to get cardio.“Doing multiple reps like that can get really sloppy,” says Pogue. As you fatigue, your form will break down, and that’s when people get hurt. “If you want to get your heart rate up,” says Pogue, “there are other ways to do it without risking a blowout of your ACL.”When you can do 2–3 sets of 1–3 reps with good landings, you can attempt doing the tuck jump with continuous reps(no reset).
Don’t think you have to jump to the moon to demonstrate your explosiveness. If you can jump to where your feet are at the level your hips would be while standing, Pogue says you’re getting some pretty good air. As for loading the jump with dumbbells, a la Bruce Lee, it isn’t necessary, and it increases your risk of a bad landing.
When Should I Do The Tuck Jump?
For maximum power development, do tuck jumps when you’re fresh, at the beginning of a workout (but after you’ve warmed up thoroughly). They’re a great way to kick off lower-body sessions, so try them before squats or deadlifts, or any running/sprinting you do. As stated above, you can also do them during downtime from sports activities, for the sake of keeping your energy up.
Alternatives To The Tuck Jump
As you might have guessed, if you don’t land the tuck jump properly, you’re going to land hard, and that can wreak havoc on your ankles, knees, and hips. Pogue recommends building up to tuck jumps by first mastering the depth jump and box jump, in which you practice proper landings and absorbing the impact.
Depth Jump Prerequisite
Start with the most basic version of the depth jump, which has you rising onto your toes and then dropping your heels. It may not look like much, but it will go a long way toward conditioning your joints for a hard landing, especially if you haven’t jumped since you were a kid.
Step 1.Stand with feet hip to shoulder-width apart and raise your arms overhead.
Step 2.Raise your heels up, balancing on the balls of your feet.
Step 3.Now, in one motion, drop your heels and drive your arms down behind you, landing in a quarter-squat/athletic position. Stick the landing so that your ankles and knees have a moment to fully absorb the force.
Perform 3 sets of 3 reps, 1–2 times per week.Pay attention to how you land (it may help to have a friend watch you, or set your phone up to film your sets). You should be able to land without your knees caving inward, feet rotating out, or losing your spine position. Do not move on to any other jumping exercises until these problems are corrected.
Depth Jump
When you feel you’re doing the prerequisite exercise smoothly, and you’re sure it’s not aggravating your knees or ankles, move on to the classic depth jump and box jump below. (Note that it may take a few weeks to feel comfortable with the depth jump prerequisite; don’t rush it.)
Step 1.Place a box or step that’s about 12 inches high on the floor. Stand on the box with feet between hip and shoulder width.
Step 2.Step off the box with one foot and let yourself drop to the floor, landing with both feet in the quarter-squat/athletic position with arms driving behind you and parallel to the spine. Stick the landing, and step back up on the box to repeat for reps.
Perform 3 sets of 3 reps, 1–2 times per week.Again, be aware of any changes in your shin position (they must be vertical upon landing) and be sure that you’re landing with feet forward and flat on the ground. When you feel comfortable doing the depth jump from a 12-inch box, increase the box height to 24 inches. When you can perform depth jumps safely from a 24-inch box, you should be ready to do tuck jumps.
Box Jump
While you work on the depth jump, practice the box jump too (in the same session or in another workout that week). The box jump develops power similar to the tuck jump, but is safer and less demanding.
Step 1.From a standing position, bend one knee and raise it in front of you until your thigh is parallel to the floor. Notice where your foot is—the height of the box you use should be below that level. Place an appropriate-sized box on the floor and stand a foot or so behind it.
Step 2.Bend your hips and knees as described in all the jump variations above, lowering into the athletic position, and then jump up onto the box, controlling your landing.
Perform 3 sets of 3–5 reps.Gradually increase the height of the box over time.
In addition to lower-level jumping movements like those above, lower-body strength lifts such as squats andRomanian deadliftswill help enormously to prepare your body for tuck jumps. Pogue recommends doing thesingle-legversion of these exercises too, as most landings won’t happen on perfectly even feet.
]]> https://www.onnit.com/blogs/the-edge/how-to-do-the-single-leg-romanian-deadlift-like-a-pro2025-07-10T10:55:22-05:002025-08-15T07:47:00-05:00How To Do The Single-Leg Romanian Deadlift Like A ProJeremy GottliebSmart trainers will tell you that there is no “must-do” exercise. For as much hype as squats and bench presses get, there are many other movements you can perform that will net you virtually the same results as these classic lifts. However, should you propose to remove the single-leg Romanian deadlift (RDL) from a trainer’s program, you may start an argument that sends barbells flying, as the single-leg RDL is seen as a staple in functional strength training—and there’s really no substitute for it.
How To Do The Single-Leg Romanian Deadlift Like A Pro
Consider this your guide to an exercise that’s truly irreplaceable for muscle, mobility, and overallfitness.
What Is The Single-Leg Romanian Deadlift?
You probably know what a deadlift is already. There’s a barbell on the floor, and you bend down to pick it up. A Romanian deadlift is a variation where you start at the finish position of the classic deadlift (standing tall, hips locked out), and then bend your hips back, allowing your knees to bend until you feel yourhamstringsstretch. The single-leg Romanian deadlift is simply the unilateral version of that movement.
Like these other deadlifts, the single-leg RDL is a hinge movement—the main training effect occurs from the bending and extending of the hips.The single-leg RDL can be done with a barbell, one or two dumbbells/kettlebells, asteel mace,sandbag, or virtually any other training implement you like. You stand on one leg, hold a load in one (or both) hands, and bend your hips back while keeping a long spine. The movement trains the whole back side of the body (called the posterior chain) while developing balance and improving mobility in the hips.
Due to its versatility, the single-leg Romanian deadlift can be used everywhere in a workout program from the warmup to the finisher.
Single-Leg Romanian Deadlift Benefits vs. A Normal Deadlift
Old-fashioned, two-footed deadlifts train the hell out of the glutes and hamstrings and build overall muscle strength, size, and power. While the single-leg Romanian deadlift can’t be loaded as heavy due to the less stable position it puts you in, it offers a lot of other advantages that the classic deadlift doesn’t, or at least serves them up with a lower risk of injury. “I like it best for developing pelvic control while the legs are separate and moving independently of each other,” says Jim “Smitty” Smith, co-founder of the C.P.P.S. certification and owner ofDiesel Strength & Conditioning. “This mimics running, sprinting, carrying odd objects, and crawling patterns, which we all should be able to do.”
Balance and coordination
Standing on one leg activates muscles from the hip down to the foot in order to keep you from falling. On higher-rep sets,you may even find that the bottoms of your feet burn from single-leg RDL’s,as you struggle to maintain balance. Not only are you training stability on one leg, which is especially important for playing sports that have you running and jumping, you’re also training a hip hinge at the same time. Learning to flex and extend your hips powerfully, one leg at a time, will translate directly into faster running, higher jumping, and quicker changes of direction.
Stronger posterior chain
The single-leg RDL works all the same muscles as any other deadlift variant, so you know you’re getting a great workout for your glutes, hamstrings, lats, and spinal erectors (just to name a few). But you’ll also train them through a greater range of motion than you do on bilateral deadlifts. The arc of the movement on the single-leg lift allows your hips to bend further, activating more of the hamstrings. So what you sacrifice in load, you make up for with range, and that makes the single-leg RDL a fine choice for a bulk-building program.
Increased mobility
Because you can move into greater ranges of motion, the single-leg RDL is a great movement for improving the mobility of your hips and stretching out your hamstrings.Trainers often prescribe bodyweight single-leg RDLs in a warmup routine to loosen the hips and hammies before doing squatsor conventional deadlifts. It’s also a great move to do on your off days as part of a mobility routine that helps you recover from workouts. If you practice yoga, you’ll notice that standing-split poses like warrior 3 are basically bodyweight single-legRomanian deadlifts.
Improved posture and body mechanics
Like yoga, the single-leg RDL can improve the way you move and carry your body. Learning to hinge properly is essential for working out safely. If you can’t hinge, your lower back will take on the brunt of any load you’re lifting, and that leads to injuries. Poor hingeing during a heavy bilateral deadlift can hurt you badly. Look around your gym at the people who deadlift with a round back¦ they’re ticking time bombs.
In contrast, if you don’t hinge correctly during a single-leg Romanian deadlift, you know it right away. You’ll feel it in your back and you’ll lose balance. So the single-leg RDL is a great teaching tool. It also forces you to draw your shoulders back into what we call a “proud chest” position. This reinforces good posture that makes all your lifts more efficient and safe (and makes you look stronger and healthy too).
When you stand on one leg, your body immediately senses that it’s out of whack. If you start bending at the hips so that your torso moves toward the floor, it’s going to have a tendency to twist toward the side that isn’t supported with a leg underneath it. Your core muscles have to kick in hard to prevent that rotation from occurring, sothe single-leg RDL is very much a core exercisein addition to a leg and back movement.
When you develop the stability to resist rotation when it’s not wanted, you’ve taken a giant step toward preventing lower-back injuries.
Restored muscle balance
Many people avoid unilateral training because it’s challenging (and not as soothing to the ego, since you can’t go as heavy as when you lift with botharmsor legs at the same time). As a result, they develop muscle and strength imbalances, i.e., the stronger limb takes over for the weaker limb. This is particularly common in the lower body, where you might see the hips shift to one side on asquator deadlift movement, or you’re able to do 10 lunges on one leg but can only muster eight good reps on the other.
The single-leg RDL helps to expose these imbalances and correct them, so that both sides of the body get to (at least nearly) equal strength.
What Muscles Are Used in the Single-Leg Romanian Deadlift?
The short answer is “most of them.” But to be more specific, we’ll list the main ones you’ll feel here:
How Do You Stretch Before Doing A Single-Leg Romanian Deadlift?
One of the great features of the single-leg RDL is that it serves as a warmup all by itself. You can use it to prepare your lower body for a heavy workout and stretch out your hamstrings at the same time. If using it in your warmup, Smitty recommends performing 2–3 sets of 5–10 reps per leg using only your bodyweight, or very light dumbbells.
How To Perform The Single-Leg Romanian Deadlift
Step 1.Hold a dumbbell orkettlebellin your right hand and stand on your left leg. Draw your shoulder blades down and together (think “proud chest”), and tuck your tailbone under slightly so that your pelvis is parallel to the floor.
Step 2.Reach your leftarmout to your side and make a fist—this will help you keep your balance. Take a deep breath into your belly and brace your core, pulling your ribs down and locking them in place.
Step 3.Begin bending your hips backward so that your torso moves toward the floor.Focusyour eyes on the floor so you don’t hyperextend your neck. Keep your head, spine, and pelvis aligned as you move, and allow your left knee to bend as needed. Your right leg will naturally extend behind you—squeeze the glutes on that side as it does.
Step 4.Try to keep your hips level with the floor, but it’s OK if your right toes rotate outward a little. Maintain your proud chest position—the weight will try to pull your shoulders forward, so fight to keep them locked back and down. Bend as far as you can without losing your alignment. You should feel a stretch in the hamstrings of the working leg.
Step 5.Squeeze your glutes as you come back up, extending your hips to lockout. You can touch your right foot down for a moment if you need to regain your balance, and then begin the next rep. Perform an equal number of reps on each side.
Form mistakes to watch for:
Twisting the hips to one side as you bend them back.Think about pulling yourself down with your hip flexors (the muscles on the front of your hip that raise your leg up) so that your hips bend as a hinge does. Your hips and shoulders must be pointing straight in front of you throughout the exercise.
Rounding your lower back.This is an absolute no-no. Keep a long spine at all times with core braced.
“Don’t come up on your toes or rock back on your heels,”says Smitty. Doing so may indicate tightness in your hips, so if you can’t perform the lift flat-footed, try an easier version (see Single-Leg Romanian Deadlift Alternatives below).
Twisting your torso to reach the weight to the floor.Your shoulders must stay level and in line with your hips.
Expert tip:
“The weight of your body should load into the center of your planted foot,” says Smitty. To do this properly, your foot needs to be arched so that it can provide the maximum amount of stability. Before you begin your set, try to “screw” your foot into the floor. Twist it down as if it were a screw and the floor were wood—don’t let your foot rotate or roll over, but make it feel tense and deeply rooted into the floor.
“Grip the ground with your toes,” says Smitty. The arch in your foot should rise. If you need help feeling what it’s like to have your arch turn on, keep your heel on the ground and raise your toes up as high as you can. “When you put your toes back down, try to pull them toward your heel.” Your foot should arch hard and you’ll feel stable.
How To Use The Single-Leg Romanian Deadlift In Your Workouts
As mentioned above, the single-leg RDL fits in well as part of your warmup routine. You can also use it as a main lift in a strength workout. Say you’re doing a full-body session comprising push, pull, squat, and hinge movements (one exercise for each movement pattern). You could choose the single-leg Romanian deadlift as your hinge exercise. If you want to load it heavy, you might go for reps of 5–8. If you want to train it in higher rep-ranges, you could do reps of 12–20. Be careful doing high reps, though.Lower-rep sets are better for learning an exercise, as the set will end before you’re very fatigued and about to break form.As you get more experienced and conditioned, you can perform higher reps to push your muscleenduranceandcardiovascularcapacity.
Of course, the single-leg RDL is most often used as an assistance exercise to support performance on the barbell squat and deadlift, so it works well when done second, third, or fourth in a leg workout for moderate sets of moderate reps. “I’ll usually have clients do single-leg RDLs as part of their assistance work for 3–4 sets of 8–12 reps per leg,” says Smitty. The move is typically performed as shown in the video above, with one dumbbell, but it can be done with two (if you want to make it less of a balancing act) or with a barbell (if you want to load it as heavy as possible). For an extreme balance challenge, you can hold the dumbbell on the same side as the leg you’re standing on, but we don’t suggest you start off learning the exercise that way.
Another option is to use a barbell but treat it like a dumbbell, by gripping the sleeve of the bar (where you load plates) and sliding the other end into a landmine unit. This will allow you to load the exercise heavy with less challenge to your balance (see below).
A trap bar can also be used with the single-leg RDL. This can spare your lower back some stress versus the barbell version because the weight is held at your sides. As the load is closer to your center of gravity, you won’t have to lean your torso as far forward as you would doing a straight-bar RDL, and you won’t have the same shear forces acting on your spine. As a trade-off, however, you won’t get quite the same activation of the posterior chain muscles.
See the single-leg Romanian deadlift in action inthese workouts.
Single-Leg Romanian Deadlift Alternatives
At the top of this article, we said that the single-leg RDL was irreplaceable. But that doesn’t mean it can’t be modified—regressed or advanced depending on your goals and level of expertise.If you’re having trouble with the balance component, try staggered-stance RDLsfor a while (aka kickstand RDLs). In this case, you simply keep the foot of the non-working leg on the floor as you perform the hip hinge movement. You’ll get a great stretch in your butt and hamstrings, and most of the benefits of unilateral training, but without having to worry about tipping over. To gently progress to doing the move one-legged, you can hold on to the support beam of a power rack, or even a foam roller that’s held vertically and balanced on one end.
To add more load to the movement, you can wrap a band around your hips and attach the other loop end to a power rack/sturdy object. “As you come up from the bottom position, the band’s resistance will overload the hip extension portion of the exercise,” says Smitty. Of course, conventional bilateral RDLs are a natural progression, as are good mornings, which are essentially the same movement but with the barbell held on the back of your shoulders for an additional posterior-chain challenge. Back extensions done on a 45- or 90-degree bench will work most of the same muscles as well, and are gentler on the lower back than the RDL or good morning.
Smitty is a proud supporter of theShawn Perine Memorial Fund, which benefits environmental and animal charities, as well as after-school programs for children.
]]> https://www.onnit.com/blogs/the-edge/the-best-adductor-stretches-to-break-your-squat-pr2025-07-10T10:55:21-05:002025-08-15T09:06:07-05:00The Best Adductor Stretches to Break Your Squat PRJeremy Gottlieb
How many times have you seen someone warm up for asquatworkout with a set of 10 with the bar. This epidemic plagues most gyms around the country.
By performing simple hip flexor stretches, in particular the frog stretch, you will be able to increase your range of motion, thereby maximizing your squat numbers.
When using resistance bands for hip flexor stretches, the Frog Stretch trumps them all. The Frog Stretch is a staple hip flexor stretch at Diesel Strength and Conditioning for an upcoming squat workout, or for general pain alleviation in the low back.
Using Resistance Bands for Hip Flexor Stretches
To perform the Frog Stretch get in quadruped position, meaning you will be on your hands and knees. Before you do any movement, make sure you neutralize your spine.
When talking about a neutral spine, we are referring to your position. To keep a neutral spine, maintain a flat back from the top of your head all the way to your tailbone.
The Frog Stretch is a stretch where you vary the width between your knees and abductors depending upon hip mobility. Once you have established this, start rocking back and forth into your squat position.
This movement is a rehearsal of the squat movement pattern, reinforces a neutral spine while you move into a flexion pattern. Make sure you vary the width of your knees as your hips start to open up.
Once you are comfortable in this pattern, you can add a resistance band to increase the stretch tension. Place the resistance band around your back, then around each knee.
After the band is in place, rock back into your original position and begin the Frog Stretch again. The resistance band adds a little traction on your low back, and helps you move your knees into a wider position.
Mixing up your movements in the frog stretch allows you to find your tight spots, giving your body the maximum hip flexor stretch possible.
]]> https://www.onnit.com/blogs/the-edge/the-ultimate-leg-day-workout-for-your-home-gym2025-07-10T10:55:19-05:002025-08-15T07:32:47-05:00The Ultimate Leg Day Workout For Your Home GymJeremy GottliebThere are many things we can learn from bodybuilders. One is that, if you want to cover yourself in baby oil and walk around in your underwear in public, there’s an audience for it. Another is that you don’t absolutely need to lift heavy weights in order to build bigger, stronger muscles. And yet a third lesson is that the way you sequence your exercises can go a long way toward preventing injury and maximizing muscle growth, especially when you’re working with minimal equipment.
The two routines that follow, courtesy of New York City transformation coach Jeb Stuart Johnston (visit him atfoodonthemind.com), take a bodybuilding approach to leg training, but that doesn’t mean squatting with weight that can bend a barbell. In fact, it doesn’t even mean going to a gym.You can do both workouts in your home.One demands only a band and a light dumbbell orkettlebell, and the other requires no weights all.
How do you get an effective leg blast like that? Let Johnston walk you through it.
A Killer Leg Workout for Bands and Dumbbells
“The first workout starts you off getting a good pump in yourhamstrings,” says Johnston. You’ll do leg curls just as you would on a machine, but with a band instead (we like the short light one available atelitefts.net). These are nearly as easy to set up as the machine version, but they offer even more tension at the top of the movement, where your hams are at their strongest. When your hamstrings are warmed up and full of blood, your knees and hips will be also, and that sets you up for safer squatting when you hit your quads.
For yoursquatmovement, Johnston opts for the Spanish squat, in which you wrap a band around the back of your knees while the other end is attached to a sturdy object. The tension of the band helps to keep you upright, so that you can squat vertically and deeply, keeping the stress squarely on your quad muscles and off your knees.If you have a history of knee pain, or you’re over 40 and a little banged up, you may want to make this squat a staplein your leg training from now on. It’s a game-changer.
“After that, we stretch the quads out and fill them with blood,” says Johnston, referring to the walking lunges that come next. Lastly, you’ll do good mornings to finish off the glutes and hamstrings. If you’ve had bad experiences with this movement in the past because you did it with a barbell on your back, fear not.This version requires only a band, and is much easier on your lumbar spine.You’ll really be able tofocuson the hinge movement, stretching your glutes and hams at the bottom, and squeezing them to stand up straight. Bonus points: “As an optional finisher for those masochists out there, you can end withkettlebell swings,” says Johnston. This will get your heart rate up and burn some calories while you drive more blood into the posterior chain muscles.
Directions:Perform the exercises in the order shown. Complete 3 sets of 10–20 reps for each (except where otherwise noted), resting 45–90 seconds between sets. Aim to perform more reps, or one additional set for each exercise, every time you repeat the workout.
1 Banded Leg Curl
Step 1.Attach an elastic loop exercise band to a sturdy object and step into the open loop. Turn around and lie on the floor, chest down, with the band around your ankles. Extend your legs. Make sure you’re far enough away from the attachment point to put tension on the band.
Step 2.Tuck your pelvis so it’s perpendicular to the floor, draw your ribs down, and brace yourcore. Your body should form a long line from your head to your hips, with your weight supported on your forearms and knees. Take a deep breath into your belly, expanding your rib cage and shoulder blades.
Step 3.Contract your hamstrings and bend your knees to draw your heels toward your butt, until your lower legs are perpendicular to the floor. Squeeze your hamstrings at the top, holding the position a moment. Slowly extend your knees again.
2 Spanish Squat
Step 1.Stand in the loop of the band you just used for the leg curl, hooking it around the back of your knees, and face the attachment point. Step back to put tension on the band. Draw your ribs down and tuck your pelvis under so that it’s perpendicular to your spine. Stand with your feet between hip and shoulder-width apart, and your toes turned slightly outward.
Step 2.Slowly lower your body into a squat, maintaining a long line from your head to your hips as you descend. Drive your knees outward and sit back. Go down as far as you can without losing your alignment, allowing the band to support your body as you descend. If you can’t go to where your thighs are at least parallel to the floor, elevate your heels and inch or so by standing on blocks or weight plates.
3 Walking Lunge
Step 1.From a standing position, take a big step forward with one leg and lower your body until your rear knee nearly touches the floor and your front thigh is parallel to the floor. Keep your torso upright.
Step 2.Come up from the lunge while stepping forward with the rear leg to perform another lunge. Continue lungeing forward for as many reps as possible.
4 Banded Good Morning
Step 1.Loop the exercise band around the back of your neck and stand on the free loop with feet shoulder-width apart. Steady the band with your hands, and align your head, spine, and pelvis, as described above. Take a deep breath into your belly.
Step 2.Bend your hips back, shifting your weight to your heels, and allow your knees to bend as needed. Continue until you feel a strong stretch in your hamstrings. Maintain your head, spine, and pelvis alignment. Squeeze your glutes as you come back up and lock out your hips.
5 Kettlebell/Dumbbell Swing (Optional)
Reps:100 total
Step 1.Place the kettlebell (or a dumbbell) on the floor and stand behind it with feet between hip and shoulder-width apart. Keeping your head, spine, and pelvis aligned, bend your hips back so you can reach down and grasp the kettlebell handle with both hands. Draw your shoulder blades together and down—think “proud chest.” Take a deep breath into your belly and brace your core. Focus your eyes on a s spot on the floor a few feet in front of you.
Step 2.Extend your hips to lift the weight off the floor, and then hike it back between your legs. When you feel a stretch in your hamstrings, squeeze your glutes and reverse the momentum to explosively extend your hips and swing the kettlebell up to eye level. Control the descent and allow the weight to swing between your legs again to feed into the next rep.
Perform 100 total reps in the fewest number of sets possible. Rest as needed between sets.
The Ideal Lower-Body Workout Without Weights
In the second workout option, which is bodyweight only, you’ll focus on training density. That is, doing a lot of work in a short time, and aiming to do even more work in that same period in subsequent workouts. Without equipment to tax your leg muscles, you’ll have to keep the pace fast and the reps high, so a brisk circuit is used here. “If you’re accustomed to training with heavy slag iron,” says Johnston, doing shorter sets and taking longer rests, “this will be tough. However, this workout will have your legs pumped so full of blood they will feel like they’re popping.” And that means they’re going to grow.
Directions:Perform the exercises as a circuit, completing one set of each in turn. For each move, you’ll perform reps for 40 seconds, and then rest 20 seconds, and then go on to the next exercise. Rest 3 minutes at the end of the circuit, and then repeat for 3 total rounds of the circuit. Track your reps and try to perform more in the same amount of time every time you repeat the workout.
1 Close-Stance Heel-Elevated Squat
Step 1.Place weight plates or blocks on the floor, and rest your heels on them with feet hip-width apart.
Step 2. Without letting your feet actually move, try to screw both legs into the floor as if you were standing on grass and wanted to twist it up—you’ll feel your glutes tighten and the arches in your feet rise. Take a deep breath into your belly and bend your hips back. Bend your knees and lower your body down. Push your knees out as you descend. Go as low as you can while keeping your head, spine, and pelvis aligned, and then extend your hips and knees to return to standing.
2 Sliding Leg Curl
Step 1.Lie on your back on the floor, and place furniture sliders or similar plastic discs under your heels (if you have access to a waxed floor, towels can work as well). Position your feet right behind your butt with your knees bent. Tuck your pelvis under, take a deep breath into your belly, and brace your core. Drive your heels into the floor to raise your hips to full extension.
Step 2.Slowly extend your legs until you feel you’re about to lose tension in your hamstrings, and then bend your legs, sliding your heels back toward you.
3 Alternating Reverse Lunge
Step 1.From a standing position, step back with one leg and lower your body until your rear knee nearly touches the floor and your front thigh is parallel to the floor.
Step 2.Step back up to the starting position, and repeat on the opposite leg.
4 Frog Pump
Step 1.Lie on your back on the floor and bend your knees 90 degrees. Bring the soles of your feet together, and rest your ankles on the floor. Drive the backs of yourarmsinto the floor at about 45 degrees to your torso. Tuck your pelvis slightly so that it’s perpendicular to the floor, and brace your core.
Step 2. Drive your knees outward as you push through the outer edges of your feet to raise your hips off the floor. Rise until your glutes are fully contracted.
5 Alternating Jumping Lunge
Step 1.Lower your body into a lunge positon with your rear knee just above the floor and your front thigh parallel to the floor. Explode upward, jumping and switching your legs in mid air.
Step 2.Land with the opposite leg in front and control your body position into another deep lunge. Use the rebound effect to begin the next rep.
]]> https://www.onnit.com/blogs/the-edge/the-best-bodyweight-leg-exercises-workouts-for-strength2025-07-10T10:55:17-05:002025-08-15T09:09:22-05:00The Best Bodyweight Leg Exercises & Workouts for StrengthJeremy GottliebMany people have trouble pairing the idea of getting stronger with bodyweight training alone because, well, only lifting weights equals muscle and strength, right? Bodyweight is for beginners, and people who don’t have access to a gym¦
Well, not quite. Your average gymnast or wrestler does the majority of their training with bodyweight; ditto for the guys in your local park who do pullups and pushups by the hundreds. And have you ever seen a speed-cyclist’s legs? These athletes may not load up onsquats, deadlifts, and leg presses, but no one’s questioning their strength and musclemass. The fact is, done correctly, bodyweight training can be quite challenging, even humbling, and give you more than enough stimulus to grow muscle and gain power.
The following is a guide to getting bigger, stronger legs by lifting your bodyweight—and nothing else.
Can You Build Leg Muscles and Strength Without Weights?
The science is pretty clear now that themain driver of muscle growth is mechanical tension—the tension your muscle fibers experience when you take a set of an exercise to failure, or close to failure, and your rep speed slows down involuntarily.In other words, it doesn’t matter whether you’re lifting weights or using your own bodyweight for resistance, or whether you’re doing high reps or low reps. As long as you train hard enough that your muscles start to fatigue and your reps slow down near the end of your set, they’re going to experience enough tension to deliver a stimulus that allows you to gain muscle and strength.
Notice that the operative term is “tension,” not load. Lifting weights is a pretty easy way to measure, control, and progress the amount of tension you apply—for example, you know how much you’re lifting when you grab 40-pound dumbbells, and you know that when you can use the 45s, you’ve gotten stronger. But the weight of your body can create mechanical tension too. You just have to be a little more creative in how you use it. The exercises we recommend here will hit your legs in a number of ways you’re probably not at all used to, making your body feel as heavy as a loaded barbell.
When you do bodyweight exercises,you often have the opportunity to use a greater range of motion than when you lift weights,because there is no barbell or dumbbells to accommodate. This is beneficial if you’re limited in your mobility, as performing lengthened-range exercises will improve your ability to get into those deeper positions. Improved mobility, in turn, promotes joint health and athleticism.
The Most Effective Bodyweight Leg Exercises
You don’t need any weights to do the exercises that follow. Some basic equipment such as a bench, exercise mat, furniture sliders, and an elastic resistance band will help you perform them in some cases, so it’s good to have access to a home gym or garage that provides some options, but you don’t need barbells, dumbbells, or machines.
The slider leg curl works the hamstrings’ two functions at the same time. That is, extending the hips and flexing the knees, similar to a glute-ham raise (an excellentbodyweight hamstring exercise we’ve already written about, but one that requires a special bench that isn’t available in most gyms). All you need is a pair of furniture sliders, or, if you’re training on a smooth, waxed floor, some towels or even paper plates can work too.
Step 1. Lie on your back on the floor, and place the sliders under your heels. Position your feet right behind your butt with your knees bent. Tuck your pelvis under, take a deep breath into your belly, and brace yourcore. Drive your heels into the floor to raise your hips to full extension.
Step 2. From there, slowly extend your legs until you feel you’re about to lose tension in your hamstrings, and then slide your heels back toward you as if doing a normal leg curl. Keep your hips extended the whole time, but be careful not to hyperextend your lower back.
Aim for2 sets of 6–12 reps.If that feels easy, you can hook some elastic exercise bands around your heels for extra resistance.
Almost all quad exercises involve hip flexion too. That means you fold at the hip when you do them, as in asquat, lunge, and even a leg extension. The bodyweight leg extension is unique in thatthe hips remain extended the whole time.This forces the quads into a deep stretch when you bend your knees, making them work from a lengthened position. This is an unusual range to train the quads, and makes for a nice complement to more conventional quad exercises.
Step 1.Attach an elastic exercise band to a sturdy object at about the height your head would be if you were kneeling on the floor. (The band isn’t a must have, but it will help you get more range of motion on the exercise.) Place a mat or towel on the floor and kneel on it with your shoelaces down and knees about shoulder-width apart. Grasp the free end of the band, and hold it with yourarmsextended in front of you. Scoot back until there’s light tension on the band.
Step 2.Extend your hips so you’re standing tall, and tuck your pelvis under slightly so it’s perpendicular to your spine. Squeeze your glutes and brace your core.
Step 3.Slowly allow your body to drift backward (your butt moves toward your heels), keeping your hips extended and driving your feet into the ground so that your quads control the descent. You’ll feel a strong stretch in your thighs.
Step 4.When you feel you can no longer control the movement backward, use your quads to extend your knees and come back to the starting position. Use the band to help you pull yourself back.
Try for2 sets of 5–10 reps,but you may only be able to manage a few reps with these at first. Do them with control and progress gradually. As you get stronger, you can eventually ditch the band and use your bodyweight alone, unassisted.
The main way people train the adductor muscles directly is with the seated adductor machine, but the Copenhagen plank allows the body to remain in a straight line, stacking the shoulders and hips over the knees just as they appear when you’re standing and moving. Since it’s also a variation of the side plank, you’ll get some core work from it too.
Step 1.Lie on one side, and place your top leg on a box or bench. The knee of the top leg should be bent enough so that your entire shin can apply pressure to the surface of the box. The bottom leg can be straight or slightly bent. Plant your bottom elbow and forearm on the floor, and brace your core.
Step 2.Drive your top shin down into the box to raise your body off the floor, and try to close the space between your two legs, sandwiching the platform you’re working on. Your body should form a nearly straight line in the top position.
Aim for 2 sets of 10–12 reps each leg,moving with a slow, controlled tempo. If performing reps is too difficult, simply get into the top position andhold it fora 15 to 30-second isometric. That’s one set.
A true one-legged, full-depth, single-leg squat (known as a pistol squat) is very challenging and is not doable for most people without a lot of practice. Here’s a way you can work up to a pistol, doing a similar movement that challenges balance, stability, and ankle mobility while also working the quads and glutes hard.
Step 1. Set a box or some mats on the floor so that, when you stand on them, you’ll be a few inches above the floor. You can build this height up over time. Stand on the surface with one leg and raise your other leg out to the side a bit so it’s out of the way.
Step 2.Hinge your hips back so your torso bends forward and lower your body until the heel on your free leg gently taps the floor. Try to keep your working knee in line with your hip. Extend your hips and knee to come back up to standing.
This exercise is more of a mobility move than heavy duty strength training, but it will burn like fire and strengthen the outer hip muscles and glutes. Lateral leg raises work your lower body in the frontal plane—i.e., moving side to side—which is a neglected movement pattern and very important for athletes. You can use it as part of your warmup on a leg day, or do it as a finisher.
Step 1.Hold on to a sturdy object for balance and stand with your feet hip-width apart.
Step 2.Raise one leg out to your side as high as you can without bending the knee or twisting your hips. Hold the top for a second, and then control the descent.
Perform2–3 sets of 8–12 reps.
As you get more comfortable with the movement, progress to performing straight-legged hip circles, raising your leg in front of you, then out to the side, and finally behind you.
How to Stretch and Prepare For a Bodyweight Leg Workout
Stretching and mobility work are paramount for getting the most out of your athletic potential and avoiding injury. Done before your lower-body workout, the following three drills can warm and limber up your hips, hamstrings, knees, and quads.
Step 1.Stand with your feet shoulder-width apart, and turn your toes out about 20 degrees. Keep your head, spine, and pelvis in a long straight line as you squat down and wedge your elbows between your knees, using your arms to gently pry your knees apart even more. As you push the knees out, try to extend your torso to get as tall and upright as possible.
Step 2.Plant your hands down on the floor inside your knees, and twist your torso to the right, reaching one hand straight overhead. Turn your head as well so you’re watching your hand. It’s OK if your heel comes off the floor as you twist, but try to keep it down. Return your hand to the floor, and repeat on the opposite side.
Step 3.Stand back up from the bottom of your squat position, keeping your heels on the floor. That’s one rep.Perform 2 sets of 3–5 reps.
Step 1.Stand tall, and take a step forward, raising one knee to your chest as high as you can. As the knee rises, grab hold of your shin with both hands and pull it into your chest for a deep glute and inner-thigh stretch. Avoid slouching or bending forward as you do. Try to keep the support leg straight as well.
Step 2.Release the leg, plant your foot, and repeat on the opposite leg.
It’s OK to come up onto the ball of your foot with each step. Do2 sets of 8–10 strides.
Step 1.Stand tall, and take a big lunge step forward. Place your hands on the floor to the inside of your lead leg, and lower your trailing knee to the floor.
Step 2.Tuck your pelvis under slightly, and push your hips forward until you feel a deep stretch—it’s OK to let your knee move in front of your toes.
Step 3.Twist your torso away from your lead leg and raise yourarmoverhead. Turn your head and follow it with your eyes. Be sure to raise the arm above you, not behind, so you create a straight vertical line between your planted arm and your raised arm.
Step 4.Return your hand to the floor, and then step forward with the rear leg to stand tall again. Repeat the lunge and twist on that leg.
Perform2 sets of 5–6 strideson each side.
Sample Bodyweight Leg Workout Plan
Here’s a balanced leg routine that makes the most of the exercises listed above.
DIRECTIONS
Perform the exercises in sequence, completing all sets for one move before going on to the next. Remember to take each set close to failure. You should only stop at the point where you don’t think you could do another rep with good form.
(See07:07in the Best Bodyweight Leg Exercises video at the top.)
]]> https://www.onnit.com/blogs/the-edge/how-to-do-the-stiff-leg-deadlift-with-a-barbell-or-dumbbells2025-07-10T10:55:16-05:002025-08-15T09:13:10-05:00How To Do The Stiff-Leg Deadlift With A Barbell Or DumbbellsJeremy GottliebThe stiff-leg deadlift is similar to a conventional deadlift and aRomanian deadlift, but it’s performed with the goal of better isolating thehamstrings. The form, however, can be tricky, and many people tend to botch it. Master the stiff-leg deadlift and you’ll bring up your hamstrings fast, whether you’re a physique competitor, or an athlete looking to strengthen your posterior muscles for more power and explosiveness.
Key Takeaways
1. The stiff-leg deadlift can be done with a barbell or dumbbellsand it targets the hamstrings, with some benefit to the glutes, lower back, and adductors.
2. You should lower the weight slowly and ease into the stretch.Stiff-leg deadlifts put a lot of tension on your hamstrings, so warm up thoroughly and do them late in your workout.
3. Keep your knees slightly bent and try to maintain that anglethroughout the lift. Your legs don’t have to be rigidly straight, but they shouldn’t bend so much that you turn the lift into a Romanian deadlift orsquat.
4. The difference between the stiff-leg deadlift and RDL is the degree of knee bend.One focuses on the hamstrings and the other on the glutes.
What Is A Stiff-Leg Deadlift and What Are Its Benefits?
The stiff-leg deadlift, aka stiff-legged deadlift, or straight-leg deadlift, is a variant of the conventional barbell deadlift done with the intention oftargeting the hamstringsas much as possible, with some added benefit to the spinal erectors of the lower back and the adductors (inner thighs).Some people start it from the floor, but we think it’s better in most cases to start standing, with the bar atarm’s length in front of you, and bend your hips back, lowering the bar while keeping your legs nearly straight (or stiff). Then you come back up to standing.
If you do it right, you’ll feel a tremendous stretch in your hamstrings. The stiff-leg deadlift isolates the hamstrings’ hip extension function—that is, your ability to push your hips forward and stand tall—as opposed to their other function, which is bending the knee. If you combine stiff-leg deadlifts with any leg curl variation, you’ve got a completehamstringworkout in just two exercises. (To learn about other deadlifts you can do at home with one or morekettlebells, see ourguide to kettlebell deadlifts.)
Step 1.Deadlift the barbell so you’re in a standing position, or, if you have a power rack, start with the bar on the rack at about thigh height. Starting the exercise from standing is safer than pulling straight off the floor with stiff knees, and using a power rack will save you energy getting into position. Grasp the bar with hands shoulder-width apart, and stand with the barbell at arm’s length and your feet hip-width apart.
Step 2.Take a deep breath into your belly and brace yourcore. Now unlock your hips and tilt your pelvis back—think about pointing your tailbone up into the air.
Step 3.Unlock your knees so there’s a slight bend in them. Think “soft knees.” Now, keeping a long spine from your head to your tailbone, push your hips back as far as you can, as if trying to touch your butt to the wall behind you. As your hips bend, try to keep your knees in the same position.
They’ll want to bend as your hips go further back, and it’s OK to let them move a little bit, but try to keep the same knee angle you started with. If you do it right, you’ll feel a very deep stretch in your hamstrings as your hips move.
Step 4.When your hips are as far back as they can go and your hamstrings are as stretched as you can stand, extend your hips to come back to standing tall.
Tips:
–As your hips go back,focuson keeping your chest up.If someone were standing in front of you, they should be able to see the logo on your shirt. This will help you to keep your lower back flat the whole time. NEVER let it round forward while holding a weight in front of you.
–As you bend your hips, feel your weight shift to your heels.If you feel your weight centered over your feet, or in your toes, you’re not moving your hips properly.
–Take at least two seconds to lower your torsoand feel the stretch in your hamstrings. Again, it’s a BIG stretch, so give your body time to ease into it. Bouncing your reps can lead to injury.
–Don’t go any lower than your hips will allow.As soon as you feel they’re pushed all the way back, and your hamstrings are stretched, come back up. Going any lower than that will probably result in your lower back rounding forward, and that will increase injury risk as well as take the emphasis off the hamstrings.
–Keep your lats active, pulling the bar close to your body.It doesn’t have to stay in contact with your legs the whole time as with a conventional deadlift, but the bar should move in a straight line up and down. Relaxing your back would cause the bar to drift in front of you, and that can make you lose your balance.
–Note that if you have particularly tight hamstrings, your range of motion may be small(maybe around knee height), and that’s OK. Don’t stretch beyond where you can control the movement just for the sake of getting more range. As you get stronger and more practiced with the movement, your range of motion will increase.
If you don’t have a barbell, or you want to increase your range of motion slightly, you can perform stiff-leg deadlifts with dumbbells orkettlebells. The movement is the same, butthe dumbbells will allow you to position the load at your sides rather than in front of your body,and you may find that that allows you to feel the exercise more in your hamstrings and takes pressure off your lower back.
Step 1.Stand with the weights at your sides and your feet hip-width apart. Brace your core.
Step 2.Unlock your hips and your knees, and drive your hips straight back. Keep your knees stiff. When you feel the stretch in your hamstrings, come back up.
The stiff-leg deadlift primarilyworks the hamstrings, but it will also train the spinal erectors, as they have to work isometrically to stabilize your lower back. Because you’re performing a hip extension, your glutes will get in on the job too. Finally, your adductors—the muscles that run down your inner thighs—also contribute to the movement.
Pro Tips: How To Avoid Common Mistakes When Deadlifting
You’ll see some people in the gym and online doing stiff-leg deadlifts purely as a back exercise—sometimes intentionally, and sometimes not. They’ll bend at the waist instead of the hips, completely rounding their lower back. Or, in an effort to increase the range of motion, they’ll round their back toward the bottom of each rep. In either case, it’s usually a bad idea, as it can lead to a back injury.
The stiff-leg deadlift is meant to be done almost entirely by the hips. Once you can’t move them back anymore, extend your hips to come back up. Your body should form a straight line from your head down to your tailbone throughout the whole movement.
Mistake #2: Locking The Knees
Your goal should be to keep your knees from bending, but that doesn’t mean lock them out entirely. Locking your knees can cause too much tension in your hamstrings and lead to injury. Think “soft knees,” and let them bend just enough so that you get the best range of motion out of your hamstrings without losing tension in them.
Mistake #3: Bending The Knees Too Much
If you bend your knees the entire time you bend your hips, you’re going to turn the stiff-leg deadlift into a Romanian deadlift, conventional deadlift, or a squat. If at any time you feel your quads tensing up, you know you’ve bent your knees too much. Think about it like this, if your knee angle is totally straight, your knees would be 180 degrees, and if they were bent halfway, they’d be 90 degrees, so aim for roughly 160 degrees of knee bend.
Stiff Leg Deadlift Vs. Conventional Deadlift: Key Differences
A conventional deadlift starts with the bar on the floor, and it allows you to bend your knees more so that your quads and glutes can contribute more to the movement. This makes the conventional deadlift a great overall strength exercise for the lower body.
In the stiff-leg deadlift, the goal is to take the quads and glutes out of the equation as much as possible to better isolate the hamstrings. To do this, you have to keep the knees nearly straight and focus on bending only at the hips.
For these reasons, the conventional deadlift is used more by powerlifters and weightlifters looking to strengthen the lower body as much as possible, while the stiff-leg deadlift is more popular among bodybuilders and other physique or figure athletes who are trying to develop each individual muscle group to its best potential.
The stiff-leg deadlift looks similar to another deadlift variant that starts from the standing position: the Romanian deadlift. Some coaches argue the two movements are really the same, but we see some subtle differences. In aRomanian deadlift, your knees are free to bend so that you can push your hips back as far as possible.That shifts the emphasis from the hamstrings to the glutes, and it allows you to use heavier loads.You’ll see powerlifters and weightlifters usingRomanian deadliftsoften to strengthen their glutes for biggersquats, deadlifts, andcleans, while the stiff-leg deadlift is usually the better option for bodybuilders and other physique/figure competitors chasing hamstring gains.
Look at the two pictures below, which show the bottom position of each lift, and the difference should be pretty clear. The first one is the stiff-leg deadlift, and the second is the RDL.
Straight-Leg Deadlift Variations
You can train the basic stiff-leg deadlift with a little more isolation and range of motion if you do it one leg at a time. Check out this article for a wholeguide to single-leg deadlifting.
Straight-Leg Deadlift Alternatives
If you want another option that’s a little easier on both the hamstrings and the lower back than the single-leg deadlift, check out ourguide to the B-stance Romanian deadlift.
The stiff-leg deadlift is NOT an exercise that you want tojumpinto cold. With all the stretch it puts on the hamstrings, you need to warm up thoroughly beforehand. Here are two moves that will warm up your hamstrings and open your hips before you get into stiff-leg deadlifts.
Bodyweight Hip Hinge
Step 1. Stand with feet parallel and bend your knees slightly.
Step 2. Now drive your hips back as far as you can while keeping a long spine from your head to your tailbone. When you feel a stretch in your hamstrings, or you can’t push your hips back any further without losing your spine position, come back up to standing. REPS?
Hip Flexor Stretch
Step 1. Kneel on the floor with one knee. Both hips and knees should be bent 90 degrees. Now tuck your tailbone under so your pelvis is level with the floor. Brace your core.
Step 2. Shift your weight forward, moving your front knee past your toe, until you feel a stretch in the front of the hip on the back leg. Keep your hips and shoulders facing forward. Your front foot must also stay flat on the floor. Hold for 30 seconds. REP?
It’s best to do stiff-leg deadlifts at the end of your leg days, preferably after you’ve done leg curls or another hamstring and/or glute exercise. Because the exercise puts your hamstrings under such an intense stretch, you don’t want to rush into them when you’re cold and not comfortable doing a full range of motion.
If you’re someone who wants to slap some more meat on their hamstrings, the stiff-leg deadlift should be a cornerstone of your leg workouts. Also, if you’re a sprinter, other kind of track athlete, or anyone else who runs a lot in their sport, the stiff-leg deadlift will help youbuild strong hamstrings, which are key for fast, explosive running. Finally, if you compete in strength sports, like weightlifting or powerlifting, the stiff-leg deadlift will help strengthen the muscles you need to pick up big weights.
]]> https://www.onnit.com/blogs/the-edge/good-mornings-the-exercise-your-workout-needs2025-07-10T10:55:16-05:002025-08-15T09:16:23-05:00Good Mornings: The Exercise Your Workout NeedsJeremy GottliebSome exercises have such funny names you have to wonder if that’s what they’re really called, or if a trainer made those names up just to mess with you (or make his/her workout sound fancy and exotic). We’re talking about moves like the Turkish getup, Bulgarian splitsquat, skull crusher, and, of course, the good morning. Many people won’t immediately recognize those first three by name, but nearly everyone interested in bigger, stronger muscles (especially the glutes) knows the good morning—and some wish the introduction had never been made.
The good morning has been popular in bodybuilding and powerlifting circles forever, as it’s a tremendous exercise for the glutes,hamstrings, and lower back, and has the potential to add pounds to your squat and deadlift max. It can teach you to hinge at the hips and fire the muscles of your posterior in unison for better running, jumping, and overall explosiveness.But if you don’t respect it, you can end up with a back injury that plagues you for life—and that’s exactly what happened to the legendary Bruce Lee when he tried the good morning.
Here’s the ultimate guide to mastering this age-old lower-body builder for maximum safety and effectiveness.
What Are Good Mornings?
First, you need to understand what a hip hinge is. As LA trainer Ben Bruno (@benbrunotrainingon Instagram) likes to explain it,a hinge is basically the movement you make when you have a boner in the morning and you have to pee:keeping a long spine, you bend your hips back, lowering your torso toward the floor. (For ladies reading this who may prefer a different, but no less crude analogy, imagine mooning a crowd.) That’s a hip hinge, and it’s a basic movement pattern we should all know how to do properly. Any time you pick something up from the floor, whether it’s a baby or a barbell, you’re hinging at the hips. The hip hinge is also necessary for jumping and other explosive movements, such as a power clean, and a football player couldn’t get into a three-point stance without one.
The good morning is a hip hinge in which external load is carried across the back of the shoulders.You hold a bar on your back and bend your hips as far as you can while keeping your head, spine, and pelvis aligned. (Alternatively, a band can be used, wrapped around the back of your neck and under your feet.) Legend has it thatthe good morning got its name because it looks like a stretch you’d perform as soon as you get out of bed.Imagine doing it without load, while yawning, and witharmsreaching overhead, and you can kind of see why the name stuck.
Apart from where you hold the weight you’re lifting, a good morning really isn’t that different from other hip hinge movements like theRomanian deadliftor hip thrust. Holding the weight so far from your center of gravity makes the exercise less stable than these other examples, so you can’t go as heavy, and you have to be even more aware of your spine position throughout the lift. But on the plus side, the good morning seems to have more carryover to the back squat because its mechanics are so similar. It’s also a good alternative to the conventional deadlift,as it’s less stressful to the body as a whole, takes grip strength out of the equation, and allows you to perform more training volume. (You might only be able to handle one or two deadlift workouts per week without running into problems with recovery, but you could do several sets of good mornings throughout the week safely.)
What Muscles Do Good Mornings Work?
The good morning activates your body’s biggest muscles. To perform the hinge, the glutes and hamstrings have to work through a long range of motion. Stabilizing that motion are the back muscles—ranging from the rhomboids, teres major and minor, and lats, down to the spinal erectors—thecore, including the quadratus lumborum, the deepest abdominal muscle and essential for good posture, and your calves.
Good mornings also have a way of training you to breathe and brace your core properly, says Kelly Starrett, DPT, creator ofThe Ready Stateand author ofBecoming a Supple LeopardandWaterman 2.0.This can have much farther-reaching benefits than just giving you muscles you can see in the mirror.To prevent the weight from pulling your torso to the floor, you have to create stability by activating your diaphragmand taking air deep into your abdomen. (More on this under How To Correctly Perform a Good Morning below.) “This allows you to access the pelvic floor,” says Starrett, the muscles that control the bowels and bladder. Strengthening this area helps prevent medical problems like incontinence and pelvic floor prolapse. Yes, that means good mornings can play a role in keeping your guts where they belong—inside your body.
Are Good Mornings Effective?
Just about every sport requires the ability to hip hinge, so good mornings are a useful exercise for athletes of every stripe. However, muscle-seekers and heavy lifters rely on them most.
They’re a favorite of bodybuilders who want to put more size on their glutes and hamstrings, and powerlifters who are striving to build their squat and deadlift. The good morning is particularly good for squatters, writes Bret Contreras, PhD, CSCS,*D, in his bookGlute Lab, a guide to glute exercises.“The good morning helps reduce the risk of injury in a squat-gone-wrong situation, when the hips shoot up out of the bottom position,which is a common occurrence when squatting with maximal loads. Because the good morning mimics this exact movement pattern, the rationale is that the lifter strengthens the muscles used to carry out the movement, which might help prevent injuries if or when the fault occurs.”
Some Olympic weightlifters also use good mornings as an assistance lift for the clean and jerk and snatch.Barbell complexes, a form of conditioning circuit that’s grown out of weightlifting training, often feature the good morning.To do a complex, you perform several barbell exercises that feed into one another, all without putting the bar down. A complex could begin with five reps of the hang snatch, and then, since the bar finishes in an overhead position, go to an overhead squat for five reps. From there, the lifter can lower and press the weight behind the neck (five reps), and then lower it back to shoulder level, where he/she can finish the complex with five reps of good mornings. Used this way, one could argue that the good morning is an effective exercise for fat loss and cardio.
Finally, the good morning stretches the glutes and hamstrings at their end ranges of motion, making ithighly valuable for improving hip flexion mobility.This is important for being able to squat, lunge, and crouch low, and access the full strength and power potential of these muscles.
“Good mornings might have started in modern weight rooms,” says Starrett, “but we see a similar pattern in practices like yoga’s sun salutation. People figured out a long time ago that you need to be able to hinge, extend the spine, and keep your hips, pelvis, and lumbar spine coordinated, organized, and stable. The good morning is a great expression of this notion.”
How To Stretch Before Doing Good Mornings
Perform the following mobility drills to prepare your body for the good morning. Do 5–10 reps for each.
Mountain Climber
Cat Cow
Mobile Table
How to Correctly Perform a Good Morning
If you’re new to the good morning, practice it with a PVC pipe, dowel, or broomstick before you use a barbell (yes, you can do this at home, if you like). The reason for this is twofold: the light weight of the stick will allow you to learn the mechanics of the movement with minimal injury risk, and its shape will provide you immediate tactile feedback on your form.
Position the stick vertically down your back (reach onearmbehind your head and one behind your back to secure it), and try to maintain three points of contact with it throughout the exercise.The back of your head, your upper back, and butt should touch the stick at all times.When you can keep the stick against those three points, you know you’re keeping your head, spine, and pelvis aligned and neutral, which is critical for performing the good morning safely.
When you think you’ve got it down, move on to an empty barbell, and then load the bar gradually from there.
Step 1.Place a barbell in a power rack and grasp it with hands shoulder-width apart. Step under the bar and position it along the back of your shoulders. Draw your shoulders down and back (think: “proud chest”). Nudge the bar out of the rack, and step back, setting your feet hip-width apart. You can point your toes straight ahead, or turn them out slightly, to the 11 and 1 o’clock positions.
Step 2.Draw your ribs down, as if pulling them into your hips. Take a deep breath into your belly, trying to expand it 360 degrees. Now brace your core. You should feel very stable throughout your torso.Twist your feet into the floor so that you feel tension in your hips and the arches in your feet rise—keep this tension throughout the set.Focusyour eyes on the floor a few feet in front of you.
Step 3.Soften your knees, and begin bending your hips back, lowering your torso toward the floor while keeping your head, spine, and pelvis in a straight line. Your lower back should be neutral—not excessively arched, and certainly not rounded over. Think about pulling your butt and hips straight backward. Continue hinging your hips until you feel a strong stretch in your hamstrings, or you think you can’t go any further without losing your stable spine position. Allow your knees to bend naturally.
Step 4.Squeeze your glutes as you reverse the motion and extend your hips to stand tall again.
As you get familiar with the movement, you can experiment with variations in your stance and grip.For an even greater glute andhamstringhit, you can perform good mornings with a wider stance,greater knee bend, and more toe flare. This better mimics the way most people squat, so it can have greater carryover to that exercise. You can also hold the bar higher up on your back—on yourtrapsrather than the rear deltoids. Done with a narrower stance and less knee bend (as shown above), this version can help build your deadlift (assuming you deadlift with a conventional stance).
“If someone hasn’t done good mornings before, or we identify some technique errors, we regress back to a PVC pipe and see if they can perform 10 reps,” says Starrett. “Then we test again to make sure they’re breathing comfortably throughout the exercise. The next step is typically a regular 45-pound barbell, although some people find it easier to hold a light dumbbell behind their head as they hinge. This isn’t really about equipment or the muscles used—it’s about establishing sustainable motor patterns and testing their integrity.”
How To Fit Good Mornings Into Your Workout
As mentioned above, good mornings work well as an assistance exercise for the back squat and conventional deadlift. You can perform them after you do one of those main lifts, or on a separate day elsewhere in your training week. InGlute Lab, Contreras recommendsusing 2–3 sets of 8–12 reps as a starting point.
Starrett says that he personally puts light good mornings at the start of a hip hinge-focused session, progressing from there tokettlebell swingsor deadlifts. “The good morning can help groove the hip hinge pattern,” he says, “and also illustrates areas that are still sore from previous sessions and might need some mobility work after you’re done.” Starrett cautions that you don’t need to go very heavy on good mornings to see results, no matter where you choose to place them. “A couple sets of 10 with a light weight will still challenge you.” And whatever weight you use, work up to it slowly.
How to Prevent Good Mornings Causing Back Injuries
While the good morning is a safe exercise when done properly, many lifters have injured their lower backs performing it—including martial arts icon Bruce Lee. While reports vary, it seems that The Dragon was working out sometime in 1969, and skipped or rushed his warmup.Lee performed a good morning with around 135 pounds (approximately his bodyweight), and injured a sacral nerve.(No, he wasn’t kicked in the back by Wong Jack Man, as the movieDragon: The Bruce Lee storyposited.) After a long layoff, he was able to train again, but supposedly battled back pain for the rest of his life.
If Lee—a man who looked like he was built from coiled steel springs—can hurt himself doing good mornings, you can too. So take every precaution.
When people hurt their backs on the good morning, deadlift, or any other hip hinge, it’s often assumed that the spine went into unwanted flexion (you rounded your lower back), but Starrett states that improperly executed extension is more often to blame.That is, coming up out of the bottom of the movement too fast, or with too much of an arch.
“Go lighter and slower than your instinct tells you,” says Starrett. “Also, make sure you’re not going down too far—imagine reaching into a crib but not picking up your baby.”
If you have a history of lower back pain, the good morning may not be for you, at least until you’re sure the injury has healed.You can work on back extensions,Romanian deadlifts, andsingle-leg Romanian deadliftsin the meantime,and get a very similar training effect.
Another common mistake is to let your weight shift over your toes, says Starrett, “which, if overdone, can compromise your mechanics. Instead, make sure you apply pressure evenly throughout your feet for the duration of the movement, particularly when you start to hip hinge. This seems like a small thing, but will have a big impact on your lumbo-pelvic organization, and how well you’re able to maintain force production.”
]]> https://www.onnit.com/blogs/the-edge/bodyweight-glute-exercises-stretches-to-build-a-bigger-butt2025-07-10T10:55:16-05:002025-08-15T09:21:22-05:00Bodyweight Glute Exercises & Stretches To Build A Bigger ButtJeremy GottliebAbigger, firmer, rounder, and fuller-looking butt doesn’t always come from barbellsquatsand deadlifts alone. You can develop your glutes training at home—whether you’re a man or a woman—with just your bodyweight and an exercise band. Use these bodyweight glute exercises and stretches to get the gains you want.
Key Takeaways
1. The glutes are the most important muscles for full-body power,and a strong set will make you more athletic.
2. Warm up for a bodyweight glute workout by stretchingyour hip flexors and performing lateral band walks.
3. The hip thrust is a powerful glute-max exercise.Be careful not to hyperextend your lower back as you lock out your hips.
4. Kickbacks can work the glute max or the glute medius,the muscle on the side of your posterior.
5. The hip thrust andglute bridgeare similar exercisesthat both work the glute max, but the bridge uses a shorter range of motion while offering more isolation.
The following bodyweight glute exercises come highly recommended by Juan Leija, an Onnit-certified coach and co-founder of Onnit Gym in Austin, TX(@juannit247).
Step 1.Lie against a bench perpendicularly, so your shoulder blades are supported on the edge. Place your feet on the floor so that they’re in line with your hips. Your hips and knees should be bent about 90 degrees. Tuck your tailbone slightly so that your pelvis is perpendicular to your spine, and brace yourcorelike you were about to get punched in the gut. Tuck your chin to your chest and drive your elbows into the bench for extra stability.
Step 2.Drive through your heels to raise your hips until they’re locked out. Be careful not to go so high that your lower back arches—stop when your hips and torso are level with the floor.
If 8–12 reps isn’t challenging enough with your bodyweight alone, you can increase the rep number to as high as 25. “Four sets of 25, or 100 total reps, would give you a killer glute workout,” says Leija. Another way to make the hip thrust more challenging with bodyweight alone is to do it one leg at a time.See our guide to theB-stance hip thrust.
The hip thrust, popularized by Bret Contreras, author ofGlute Lab, works hip extension, the glutes’ primary function. While its mechanics are similar to that of asquator deadlift, the hip thrust better isolates the glutes (although the quads andhamstringsare still involved to a degree).
Step 1.Place a circular resistance band just above your knees and lie on the floor with your hips and knees bent about 90 degrees. Place your feet in line with the hips or slightly wider so there’s tension on the band. Tuck your tailbone under and brace your core.
Step 2.Drive your legs apart to put more tension on the band. Now extend your hips to lockout as you did in the hip thrust.
The banded glute bridge trains two of the glutes’ functions simultaneously: moving the legs out to the sides and hip extension. “Be careful with your foot position,” says Leija. “The advantage of a glute bridge is the way it isolates the glutes. If your feet are placed too far forward, you’ll bring more of the hamstrings into it. If your heels are too far back toward you, you’ll use more quads,” and that defeats the purpose.
As with the hip thrust, if 12–15 reps doesn’t fatigue your glutes, take the reps up as high as 25. You can also do the glute bridge without a band and using one leg at a time, as we explain in our article guide tothe single-leg glute bridge.
Step 1.Loop a circular resistance band around your feet and slide it to just above your knees. Stagger your stance so one leg is in front of the other. Grasp onto a bench or other sturdy object for balance, and bend your hips back about 30 degrees while keeping a long spine. Bend your front knee slightly. Brace your core.
Step 2.Kick your rear leg straight back until your glute is fully contracted, and control it on the way down. Keep tension on the band at all times.
The kickback trains the glutes in hip extension just as the hip thrust does, but one side at a time. This allows you to get a little extra range of motion for more muscle recruitment.You can also aim your leg 30–45 degrees from your side as you kick back to put more emphasis on the glute mediusmuscle (the side of the butt cheek).
Step 1.Stand with feet outside shoulder width and your toes turned out about 30 degrees.
Step 2.Bend your hips back and squat as low as you can without your pelvis tucking under. Drive your knees out as you descend, and keep your torso as upright as possible (people should be able to see the logo on your T-shirt).
Step 3.Come back up about three quarters, and lower your body back down. Finish by coming back up to standing. That’s one rep.
“The glutes lose tension toward the top of a squat,” says Leija, “so spending more time in the bottom half of the movement keeps the glutes working where they work hardest.”
Warming up your hips on the front and sides will help reduce the risk of injury in your workout and may help you to feel your glutes better when you train them. Research has shown that being able to mentally connect to the muscles you’re working during an exercise may help to promote muscle recruitment and boost the results you see.
Step 1.Kneel on the floor with one knee. Both hips and knees should be bent 90 degrees. Now tuck your tailbone under so your pelvis is level with the floor. Brace your core.
Step 2.Shift your weight forward, moving your front knee past your toe, until you feel a stretch in the front of the hip on the back leg. Keep your hips and shoulders facing forward. Your front foot must also stay flat on the floor. Rock your weight back to the starting position and repeat for2–3 sets of 5–10 reps on each side.
“Avoid leaning back and arching your back,” says Leija. “Keep your core engaged. Otherwise you’ll get the range of motion from your back and not your hip, which is the goal.”
Step 1.Loop a circular exercise band around your feet and pull it up to the thickest part of your calves—but if you feel more glute activation with it at your ankles or knees, try it there instead. Place your feet hip-width apart or wider, so that you put some tension on the band and feel your glutes starting to work.
Step 2.Hinge your hips back and bend your knees so you’re in an athletic stance—think: ready to catch a ball, tackle an opponent, orjumpup in the air. Take a small step to your right, keeping your foot facing straight forward (don’t let your toes turn outward).
Step 3.Step your trailing foot in toward your lead foot so you’re back in a hip-width stance. Keep walking in that direction, keeping tension on the band the whole time. (If your feet come too close together, the band will go slack and your glutes will get to rest).Walk 5–10 yards each direction—that’s one set.Do 3 sets total.
Many people use the terms “bridge” and “hip thrust” interchangeably when discussing glute training, but this isn’t accurate. Leija points out that while a hip thrust is intended to target the glutes very directly, it also works the hamstrings and quads to a certain degree, mainly because the range of motion is large. The glute bridge, on the other hand, uses a short range of motion (your back is on the floor, so you don’t have as far to extend your hips versus when you’re supported on the bench).As a result, the bridge won’t challenge all your glute muscle fibers, but it takes the hamstrings and quads out almost completely, better isolating the glute fibers it does hit. So the glute bridge is, arguably, a better option for mucle gain/physique transformation.Meanwhile, “the hip thrust is better for training hip explosion,” says Leija, making it the smarter choice for athletic applications (i.e., if you’re an athlete, you should probably spend more time thrusting than bridging).
Ultimately, both are solid exercises and build muscle and strength in the glutes, so use them in combination.
The glutes are the most powerful muscles in your whole body. They’re also the biggest (the glutes are dense, so they may not look as broad as your quads or lats, but if you could flatten them out on the floor you’d see they’re huge). In day- to-day life, the glutes allow you to stand up, walk upstairs, and pull things up off the floor, so strengthening them is key for keeping quality of life as you get older. If you’re an athlete, “strong glutes help you run faster, jump higher, and lift more weight,” says Leija.
Since you’re reading this article, you’re probably also aware that the glutes are very aesthetic, sexy muscles, and that training them is one of the biggest trends infitness. Unless you descend from the same gene pool as Jennifer Lopez or Kim Kardashian, the only way you’ll be able to get a rear that looks half as fine will be to build it with exercise—hence the reason we put this article together.
Master another great glute-building exercise with theB-stance RDL.
]]> https://www.onnit.com/blogs/the-edge/how-to-do-the-zercher-squat-like-a-pro2025-07-10T10:55:16-05:002025-08-15T09:10:20-05:00How To Do The Zercher Squat Like A ProJeremy GottliebThe Zerchersquatcan offer a low back-friendly alternative to backsquatsthat also prepares you for sports like strongman competition or MMA. Here’s how to do it right and incorporate it into your routine.
The Zercher squat gets its funny name from a strongman named Ed Zercher. The rumor is that Zercher didn’t have a squat rack in his gym, so, rather than squat with a bar on his back, he had to place the barbell on the floor and then bend down and hook hisarmsunder it to lift the bar into position at his belly. Today, many lifters do Zercher squats using a squat rack, but they perform the same basic movement, holding the bar in front of their body, in the bend of their elbows.
A Zercher squat is very similar to akettlebellgoblet squat or a barbellfront squat, in thatit allows you to squat with a very upright torso, and therefore squat very deep.Because the weight is loaded on the front of your body, yourcoreand upper back have to work really hard to stabilize you. The Zercher squat is much easier on the lower back than a back squat is, so it’s a good alternative if you’re dealing with an injury. In a back squat, your torso inevitably will bend a little toward the floor, and that places shear forces on the spine. If you have back problems already, this can make things worse. The Zercher squat allows you to keep your joints stacked, minimizing stress on the low back.
You could also argue that Zercher squats are agood choice for wrestlers and other combat athletes who have to pick people up from time to time, as they mimic that movement.They’re also applicable to strongman competitors who have to perform events like the Conan’s Wheel, or stone carries, as they more closely resemble those movements than other types of squats.
Of course, if you don’t have a squat rack but you want to do barbell squats at home, you can do what Zercher did and get the bar up to your chest from the floor—that is,IFyou have the mobility to pick the bar up safely.
The safest way to perform a Zercher squat is to take the bar out of a squat rack.
Step 1.Set the bar in the rack at about stomach height. Now hook your arms underneath it so that the bar rests in the bend of your elbows. This can be very uncomfortable, so it’s a good idea to wear a long-sleeve sweatshirt when you do these, or wrap a towel around the bar to cushion your arms.
Step 2.Scoop the bar out of the rack, step back, and stand with your feet between hip and shoulder width, just as you would for a normal back or front squat. Turn your toes out about 30 degrees. Make sure your arms are close to the center of the bar, so it’s balanced.You can cup one hand over the other, or have your forearms parallel to each other with your hands in fists—whichever is more comfortable.In either case, your arms should look like they’re in the top position of a curl. Yourbicepsare fully shortened, but they aren’t really working against the resistance of the bar. You’re just using your arms as hooks to hold the bar in place. You shouldn’t feel your shoulders working. If you do, your elbows are probably too high.
Step 3.Take a deep breath into your belly and brace your core. Keeping your torso very tall and straight, squat as deeply as you can without losing the arch in your lower back (in other words, don’t let your pelvis tuck under). Think of the movement as being like a goblet or front squat. Push your knees apart as you descend so that your elbows fit between them.
Step 4.After you’ve descended to your safest squat depth, come back up and stand tall.
If you don’t have a squat rack, you can deadlift the bar off the floor and into your lap, and then hook your arms underneath the bar and stand upto get into position. Note that this approach will require a lot ofhip mobilityso that you don’t round your lower back, so it’s not appropriate for most people. However, if you’re sure you can do it safely, make sure you use a very light weight at first.
In strongman competition, the Zercher squat and similar exercises (such as Zercher carries, or the Conan’s Wheel) are typically done with an axel rather than a conventional barbell. Axel bars are available in some gyms, and their diameter is much thicker than that of a standard barbell. If you have access to one, the axel bar is a good choice for Zercher exercises, asit not only better mimics how you would do them in strongman but also offers the biceps and elbows some relief.The thickness of an axel spreads the load across your elbows, so it doesn’t bite into them the way a narrower bar does.
The Zercher squat works the same muscles that virtually every other squat works, including the quads, glutes, and adductors.Because the weight is loaded in front of you, it’s going to be even more demanding on yourabsand obliques—your core muscles—than a back squat would be.Your upper back will also have to work really hard to keep the bar from falling. Yes, your biceps will help out as well just keeping the bar in place, but it’s an exaggeration to say that they really get trained by Zercher squats. If you want to get bigger, stronger arms, you’re better off doing curls!
The Zercher squat is very similar to a front squat. You’re just holding the bar in a different place, but it will work the same muscles and feel similar.If you have trouble doing Olympic-stylefront squatsbecause they bother your wrists, the Zercher squat could be a good alternative.The Zercher squat is also easier on your lower back and shoulders than a back squat would be, but because you have to rely on your arms to hold the bar in front of you, you’re not in as strong of a position doing Zercher squats as you would be doing either the front or back squat.You will be limited by your core and back strength, as well as your arms’ ability to hold the weight.Therefore, you won’t be able to train Zercher squats as heavy as those other lifts.
How To Stretch Before Doing Squats
Try out these warmup and mobility moves from Onnit’s Director ofFitnessEducation, Shane Heins, before attempting a Zercher squat workout.
Again, because the Zercher squat is so similar to front squats and goblet squats, try those movements if you want to get the feel of Zercher squats but don’t feel up to actually doing them just yet.
Step 1. Grasp the bar with hands shoulder-width apart and point your elbows forward so that you can position the bar over the tips of your fingers (palms face up). As long as you keep your elbows pointing forward, you will be able to balance the bar.
Another way to do it is to cross your arms in front of you, holding the bar on the front of your shoulders (left hand in front of right shoulder, right hand in front of left). To do the classic front squat with the bar on your fingertips, you need a reasonable amount of flexibility through your shoulders and wrists to position the barbell correctly. If you don’t have it, the cross-arm version may be the better option for you at the moment.
Step 2. Lift the bar out of the rack and step back, setting your feet between hip- and shoulder-width apart. Turn your toes out slightly. Pull your ribs down and take a deep breath into your belly and brace your core. Your head, spine, and pelvis should form a long line—your pelvis should also be perpendicular to your spine, and not tilted toward the floor.Focusyour eyes on a point straight in front of you.
Step 3. Squat as low as you can while keeping alignment and maintaining your upright torso position. Remember to point your elbows forward, and raise them up if you feel them slipping downward. Ideally, you’ll be able to descend to where the crease of your hips is below the top of your thighs.
Step 4. Extend your hips and knees to return to standing, pushing through the middle of your feet and squeezing your glutes.
Step 1. Hold a kettlebell in front of your chest by the sides of its handle. Draw your shoulders back and downward (think: “proud chest”), and tuck your elbows in close to the bell—try to get your forearms as vertical as you can. Stand with your feet between hip- and shoulder-width apart, and turn your toes out a bit—up to 30 degrees if you need to.
Step 2. Tuck your tailbone and draw your ribs down so that your pelvis is parallel to the floor. Take a deep breath into your belly, and brace your core.
Step 3. Keeping a long spine from your head to your pelvis, push your hips back and squat down, as if sitting down into a chair. Squat as low as you can while keeping your head, spine, and pelvis aligned. Push your knees apart as you descend. You should feel most of your weight on your heels to mid-foot area. If you feel your lower back beginning to round, stop there, and come back up. Keep your torso as vertical as possible—you shouldn’t have to lean forward or work extra hard to hold the bell upright. Avoid bending or twisting to either side.
Step 4. Drive through your feet as you extend your hips and knees to come up.
The Zercher squat can be a good alternative to front squats, especially if you want to train more like a strongman or prepare your body for heavy carrying of any kind. It’s also a good substitute for back squats if you’re having lower-back issues. Understand, however, that you won’t be able to train as heavy with the Zercher squat as with other squat variations, and that can be detrimental if you want to build maximum strength or leg muscle. With that said,Zerchers have been around 100 years or more for good reason: they build very functional, real-world strength throughout your whole body.
Do them toward the beginning of your leg or full-body workout when you’re at your freshest. Since the Zercher squat has you squatting so upright, it’s going to let you squat very deep, and thatplaces most of the emphasis on your quads.Be sure to balance it out with other exercises that work thehamstringsand glutes just as hard. Two to three sets of 5–10 reps is good to start, progressing the weight and rep numbers over time.
Try another front-loaded squat that saves the low back and strengthens the quads:the landmine squat.
]]> https://www.onnit.com/blogs/the-edge/3-si-joint-stretches-exercises-to-relieve-pain2025-07-10T10:55:15-05:002025-08-15T09:25:17-05:003 SI Joint Stretches & Exercises To Relieve PainJeremy GottliebYour lower back pain may stem from dysfunction in one or more of your sacroiliac (SI) joints. Fortunately, we rounded up some stretches and exercises that can bring fast relief.
The SI joints connect the bony part of the lower spine that’s just above the tailbone (called the sacrum) with the top of the pelvis (the ilium). They work to support the weight of the upper body when you’re standing and walking. Unlike the hip and shoulders, the SI joints aren’t designed to move very much, and pain can result when we force them to move more than they should. The most common causes of SI joint pain are limb-length discrepancies (one leg is longer than the other), abnormal walking patterns, scoliosis, and carrying a child while pregnant, but strain from heavy lifting can be a culprit too.
“With regard to working out, specifically, we tend to overdo movement in the sagittal plane,” says Layne Palm, DC, a chiropractor in Austin, TX, and a nationally-ranked Olympic weightlifter (@laynepalmdc). In other words,we favor exercises that have our limbs and torso moving forward and back, such as deadlifts, bench presses, and running.“Over time, this can overload the SI joints and cause compression that leads to irritation.” For the sake of avoiding future SI joint pain, Palm recommends performing more exercises that work the body in the frontal and transverse planes—that is, moving side to side and in rotation, respectively. Strengthening the body’s different movement capacities will take pressure off the SI joints.
Why Stretch Your Sacroiliac (SI) Joint & What Does It Do?
When suffering from SI joint pain, many people’s first instinct is to try to stretch the joint. Because they feel tightness in the area, they think stretching will release it. Palm cautions against doing this, as stretching an unstable joint can only exacerbate the problem (furthermore, it’s impractical to stretch the SI joint, specifically).The right move, he says, is to stretch the musculature that acts on the SI joint.These muscles include the hip flexors (the muscles that raise your leg in front of you), glutes, lats, and spinal erectors (the ones that hold your spine upright, and stand out on your lower back). “Stretching these muscles will often release the tension that is causing extra compression and uneven pressure on the SI joints,” says Palm.
Step 1.Get into a lunge position on the floor. Your front leg should be bent 90 degrees with your foot flat on the floor; your back leg should also be bent 90 with the top of your foot on the floor. You can hold onto a bench or other sturdy object (such as a foam roller, shown here), to help you keep your balance.
Step 2.Tuck your tailbone under so your pelvis is parallel to the floor. Pull your ribs down, and brace yourcore.
Step 3.Shift your weight forward so you feel a stretch in the front of the hip on the downed leg.
The hip flexor muscles run from the lumbar spine down to the front of the hip, and when they get tight (usually from too much time spent sitting), they pull the pelvis forward, compressing the SI joints on the back of the pelvis.Palm recommends holding this stretch for 90 seconds on each side,two to three times per day—or more, if you spend a lot of your day sitting.
Step 1.Sit on the edge of a bench and cross one leg over the other. Keeping a tall spine, gently hug your knee to your chest until you feel a stretch in the outside edge of your glutes. At the same time, turn your torso into the stretch.
Some people may find that their glutes are too tight to do the aforementioned stretch, and it’s uncomfortable as a result. In that case, start with the easier figure-four stretch:simply cross your leg over so your ankle rests just above your knee, and push down on your top knee lightly.
In the case of both stretches, hold them 60 seconds on each side, and repeat them for the same number of hours that you spend sitting at a desk. That means that if you work for eight hours at a desk in front of a computer, perform the stretch eight times a day—preferably at the top of every hour (set an alarm so you remember!).
Step 1.Turn your palm over so your thumb is pointing down and grasp the end of an inclined bench, or other high surface. Step back with the same side’s leg, round your torso forward, and tuck your pelvis under. You should feel a deep stretch in the lat muscle on that side.
The lats act on the pelvis, and they can pull the low back into excessive extension if they’re tight. Keeping them mobile will help to relieve as well as prevent SI troubles. Breathe slowly and deeply, and hold the stretch for 10 deep breaths on both sides. Repeat the stretch up to three times per day.
Note that if you have SI joint pain on one side only, stretching the opposite side’s lat will target it most directly, because the lat fibers run obliquely. If that’s the case, stretch the tighter lat with an additional five breaths.
This one doesn’t exactly strengthen the joint, but by applying a little resistance to your legs, you can help to re-center the joint and make it feel better.
Step 1.Lie on your back on the floor and bend your hips and knees 90 degrees. Place one hand on the top of that same side’s knee and the other hand on the opposite side of the other knee so you’re in position to push on one leg and pull on the other.
Step 2.Begin driving one knee up toward your chest while extending the other one away from you, but use your hands to push and pull accordingly so that you resist any movement. In other words,your legs should be trying to move but your hands will hold them in place.Hold the tension for 5 seconds, and then switch hand positions and repeat in the opposite direction. Repeat for 10 reps each side.
Step 3.Place a foam roller or other light but firm object between your knees and rest your feet on the floor. Squeeze your knees together for 5 seconds and thenrelax. That’s one rep. Repeat for 10 reps.
This move strengthens the core and trains it to brace your pelvis while your legs are moving.
Step 1.Lie on your back and bring your hips and knees to 90 degrees. Flatten your lower back into the floor.
Step 2.Keeping your lower back flat and your core braced, reach your right hand back and overhead while you extend your left leg out straight. Only go as far as you can keeping your lower back position. Alternate sides. Perform 10 reps (a reach on each side equals one rep).
If that’s too difficult, eliminate the moving limbs and just hold your lower back against the floor withabsbraced for 10 seconds. Repeat for 10 reps. Do 2–3 sets total for either variation, resting up to 90 seconds in between.
Building stability in your hips with frontal plane movements will help fortify the SI joints.
Step 1.Hold onto a foam roller or other sturdy object for balance, and raise one leg out to your side as high as you can without twisting your hips. Do 20–30 reps on each side, and repeat for 2–3 sets, resting up to 90 seconds between each. As you get stronger, you can add resistance by looping an exercise band around your ankles or your legs just above the knee.
Sleeping on your stomach or side may cause your affected SI joint to move out of alignment for several hours, and that can exacerbate the pain.Palm recommends sleeping on your back, but with a pillow or two underneath your kneesto elevate your legs a bit (a long body pillow is perfect). That will reduce the amount of extension in your lower back, and keep your SI joint in a more neutral position.
What Exercises Or Activities Should I Avoid If I Have SI Pain?
No matter what kind of injury you’re dealing with, “It’s important that you don’t let pain make you sedentary,” says Palm. “Motion is lotion for our joints.” In other words, continuing to move and exercise as much as you can without directly aggravating your injury is the best way to speed healing, as you’ll encourageblood flowto the area and keep it from getting any weaker.
“Specifically, with the SI joint,” says Palm, “we want to limit any movements that put the back into hyperextension—an excessive lower back curvature.”Cobra poses, back bridges, upward facing dog (yoga), and other exercises that make your back take on a big arch should be avoided.You also may have to avoid exercises where you hinge the hips, such as deadlift variations orkettlebell swings, because they will put stress on the SI joint while it’s healing.
With all that said, injuries tend to be very specific to the movements you do, and while one type of hinge may cause you pain, a slightly different variant may feel totally normal. “I always suggest that my patients go by feel in these situations,” says Palm.
Another strategy to work around pain is to decrease your range of motion on some exercises.You may find that deadlifts from a rack, box, or mats—which reduces your range of motion—can keep you out of painful ranges while still letting you perform the basic movement pattern you want to train. In this case, Palm suggests performing the exercise with maximum control, deadlifting the weight to lockout and then slowing lowering the load—take up to five seconds to go down.
“Reduce the load, reduce the range of motion, but still continue to train,” says Palm.
Some physical therapists recommend belts that can be worn around the hips to brace and support the SI joint (they’re available on Amazon.com). Palm says this isn’t a bad idea if you’re freshly injured, as these belts can reduce pain, but it isn’t a long-term solution, unlike the stretches and exercises he gave you above. “SI joint belts are fine in the short-term, but you don’t want to rely on them.” Doing your rehab and being patient is the best way to come back from SI joint injury.
Is your shoulder bothering you too? Check out our guide to rehabbingshoulder impingement
]]> https://www.onnit.com/blogs/the-edge/the-best-quad-stretches-exercises-to-fit-into-your-workout2025-07-10T10:55:14-05:002025-08-15T09:36:07-05:00The Best Quad Stretches & Exercises To Fit Into Your WorkoutJeremy GottliebSummary
– The quad muscles include the vastus medialis, vastus intermedius, vastus lateralis, and rectus femoris. They extend the knee.
– Injury typically occurs when we take our bodies through ranges of motion and movement patterns that they’re not used to.
– Improving hip and knee mobility can help prevent injury to the joints and quad muscles.
– To prevent knee injury, try to keep your shins vertical during any lower-body training you do.
The Best Quad Stretches & Exercises To Fit Into Your Workout
The quads are some of the biggest muscles in the body, and whether you want to build them up further to avoid hearing taunts like “hey, chicken legs,” or so you can run faster,jumphigher, and lift heavier, the quad muscles need to be prepared for anything. We rounded up some mobility drills you’ve probably never tried to help you improve performance and reduce your risk of injury.
What Muscles Make Up Your Quads?
The quadriceps femoris (the quads’ formal name) consists of four different muscles—hence the “quad” name. These are the vastus medialis, vastus intermedius, vastus lateralis, and rectus femoris. The three vastus muscles originate on the femur (thigh) bone, while the rectus femoris originates at the pelvis. All four muscles come together at the kneecap and attach to the shinbone.The quadriceps muscles work to extend the knee.
The vastus medialis is located on the innermost side of the thigh. Bodybuilders call it the “teardrop” muscle when it’s well developed, as the shape it makes going into the knee looks like a droplet of water. The vastus intermedius isn’t visible from the outside, as it lies beneath the rectus femoris muscle, which runs down the center of the thigh. The vastus lateralis extends down the outer side of the thigh.
Why Should You Stretch Your Quadriceps Before Exercising?
The quads connect at the hip and the knee, and while that makes them crucial for producing lower-body strength and explosiveness, it also opens them up to injury at both junctions.“We tend to hurt ourselves in positions or movement patterns that we don’t train or use very often,”says Cristian Plascencia, a mobility coach in Austin, TX (@cristian_thedurableathleteon Instagram). “So you want to get used to exposing your body to end ranges and planes of motion that it’s not used to.” If you never stretch your quads, but one day decide to run some sprints—or you play softball and you find yourself running for home plate—your quad muscles won’t be prepared for the sudden pulling that occurs when fast running creates extreme hip extension. That puts you at greater risk of straining or tearing a muscle.
Plascencia recommends drills that stretch your quads in the end ranges of hip extension and knee flexion before you do any running, jumping, or lower-body strength training. Not only will they help train your quads to move more safely during athletic activities, but they’ll double as a warmup that gets your body ready to move heavy weight on hard exercises like thesquat, deadlift, or lunge, and all their variations.
The drills that follow are examples of dynamic stretches—exercises that take muscles through their range of motion actively, as opposed to statically. Static stretching, on the other hand, is when you put a muscle into a stretched position and hold it for time (toe touches, for example). Both types of stretching have their place, but dynamic stretches have been shown to be more effective when done before activity.They don’t inhibit muscle strength, and may even improve your nervous system’s ability to recruit your muscles.Astudyin theJournal of Strength and Conditioning Researchexamined the effect of different stretching protocols on quad muscle power. While none of the stretching reduced power, dynamic stretches led to the greatest increases in power during subsequent testing.
Anotherstudyfound that dynamic stretching before training improved power significantly over not stretching at all.
Quad Stretches to Fit Into Your Workout
Plascencia offers the following dynamic stretches to add to your warmup.
Half-Kneeling Pelvic Tuck
Step 1.Kneel on one knee, resting it on a pad or towel. The knee should be directly under your hip; press your toes firmly into the floor. Tuck your pelvis so that it’s parallel to the floor, and straighten your torso. Draw your shoulders back and down (think: “proud chest”).
Step 2.Bend your hips back while keeping a long spine from your head to your pelvis. Hold for 5 seconds.
Step 3.Drive your knee into the pad as you tuck your pelvis again, and extend your hips to bring your torso back upright. Squeeze your glutes as you extend the hips.
That’s one rep. Perform 3 sets of 5 reps on each side.
Half-Kneeling King Dancer
Step 1.Begin the movement as you did for the half-kneeling pelvic tuck above. Rest on one knee, bend your hips back, and squeeze your glutes as you extend the hips again.
Step 2.Turn your torso toward the back knee and bend your hips as you curl your back leg up. Grasp the top of your foot with your hand.
Step 3.Tuck the pelvis as you extend your hips again while holding onto the back foot. You should feel a strong stretch in the front of the thigh and hip.
That’s one rep. Perform 3 sets of 5 reps on each side.
Shinbox Tripod Extension
Step 1.Sit on the floor with your feet in front of you and knees bent 90 degrees. Rotate your hips and knees to the right until your knees are flat on the floor, your left knee beneath your right foot.
Step 2.Pull your left foot close to your butt so the top of the foot is on the floor. Press your right hand into the floor and pull your ribs down, bracing yourcore.
Step 3.Extend your hips, pressing your knees into the ground while you squeeze your glutes. Extend your leftarmoverhead as you come up. Hold the top for one second. Be sure to keep your core tight so that your lower back doesn’t hyperextend.
That’s one rep. Perform 3 sets of 5 reps on each side.
How To Stretch A Quad With A Bad Knee
Plascencia says most people are good at moving forward and backward, but injury often occurs when rotational forces are put on the knee—turning, cutting, or when your knee travels laterally or medially during an exercise. “We don’t think of the knee joint as being able to rotate internally and externally,” says Plascencia, “but it does have degrees of rotation. Moving it through those ranges prepares it to take on load when it’s forced into rotation during activity.”
You can use the egg beater drill (see below) if you’re currently nursing a knee injury.It doesn’t require your knee to support any weight, and it will train the hip and knee joints to rotate internally and externally.The mountain climber with hip twist can be used later to prevent further knee problems, as it targets the leg’s lateral line of fascia—the webbing of connective tissue that links the muscles together. “If you can get greater mobility in that lateral line,” says Plascencia, “you can distribute force more equally down the leg and through the knee. It’s telling your IT band, obliques, and all the other tissues that cross the lower leg and hips that you can use this new range when you’re running, landing, or squatting, and that will take pressure off the quad tendon.”
Egg Beater
Step 1.Hold one end of a foam roller or other sturdy object for support. Stand on one leg (the same side as the roller) and raise your opposite leg off the floor, bringing your knee up to hip level.
Step 2.Keeping your thigh level with the floor, extend your knee, kicking the leg straight out.
Step 3.Bend the knee again as you rotate your lower leg away from the midline of your body, moving it purely from the hip.
Step 4.Rotate your leg toward midline, and then extend your knee again. The entire movement should look like you’re beating an egg and your leg is the whisk. That’s one rep.
Perform 3 sets of 5 reps in each direction on each side.
Mountain Climber Hip Twist
Step 1.Get on all fours on the floor with your hands under your shoulders and knees beneath your hips. Extend your knees so that you come up into the top of a pushup—your body should form a straight line from your head to your heels.
Step 2.Drive your left leg forward until your foot is outside your left hand. From there, slide your left foot back and twist your body slowly so that your right hip bends toward the floor. Drive your right leg into the floor to lengthen the leg and stretch the hip as you bring it to the floor.
Step 3.Pivot onto your left toes as you raise your hips up and back to the pushup position. Bring your left foot up to your hand again, and then switch sides.
That’s one rep. Perform 3 sets of 5 reps on each side.
Tips When Working Your Quads
“You can’t train muscles that act on the knee [like the quads] without paying attention to the ones that act on the hip and ankle,” says Plascencia. Improving your mobility in these areas, even if it’s just with some basic hip flexor stretches and ankle openers, will help your legs move more efficiently, again taking the pressure off the quads and knees.
Furthermore, avoid knee valgus when you train.That is, don’t let your knees cave in or bow out on any movement.Whether you’re jumping, squatting, or lunging, good technique means having your shins perpendicular to the floor so you avoid putting excess strain on the knee joints.
Lastly, Plascencia advises doing more exercises that use different planes of motion—moving laterally or with rotation, as opposed to just forward and back. Not only will this help to improve your movement skills to avoid injury, it will change the way your muscles are recruited, bringing up weak areas and boosting your muscle gains.“Instead of doing standard lunges andsquatsall the time,” says Plascencia, “do a curtsy or stepover lunge,”[see below for the stepover lunge] or try a squat holding onekettlebellin front of your chest so you have to fight to keep your balance. “If you do four or five leg exercises in a training week, have at least one or two work different planes of motion.”
Stepover Lunge
Step 1.Hold a kettlebell or dumbbell in each hand and step forward with one leg, turning your hips so that your knee points about 90 degrees from your body. You will land with your lead foot perpendicular to your rear one.
Step 2.Lower your body as far as you can—ideally to where your rear knee is just above the floor—while keeping your torso upright. Step back to the starting position and repeat on the opposite leg.
]]> https://www.onnit.com/blogs/the-edge/a-pro-s-guide-to-dumbbell-leg-exercises-and-workouts2025-07-08T17:51:15-05:002025-08-15T08:55:07-05:00A Pro’s Guide To Dumbbell Leg Exercises and WorkoutsJeremy Gottlieb Summary
– Dumbbells provide several advantages, including freedom of motion, the ability to correct strength imbalances, safety, and stability.
– Some of the best dumbbell exercises include the pausedsquatjump, Bulgarian split squat, step-over lunge,Romanian deadlift, single-leg kickstand wall RDL, lateral lunge with reach, front-foot elevated split squat, and goblet squat.
– Dumbbells can be used to add muscle size, strength, power, and mobility to the legs.
A Pro’s Guide To Dumbbell Leg Exercises and Workouts
There aren’t too many things from 700 B.C. that are still in style, but dumbbells are an exception. The use of dumbbells, specifically for leg training, dates back to at least ancient Greece. Records show that athletes swung stone implements while they practiced jumping drills, using the extra weight to add momentum to their leaps. Later, the term “dumbbell” was coined in the 1700s in England, and then migrated to the U.S. where, it appears,the Founding Fathers started clanging and banging.In letters to his son, Benjamin Franklin wrote, “I live temperately, drink no wine, and use daily the exercise of the dumbbell.” (He claimed to have performed a workout consisting of 40 swings.)
Hundreds of years later, dumbbells are still accessible, versatile, relatively easy to use, and highly effective for helping you build muscle, strength, and athleticism.If they were good enough for Spartan warriors and the guy on the $100 bill,they’re good enough for you and me.
I like dumbbells for all kinds of training—especially lower-body work—and if they’re all you’ve got due to your gym being closed or out of your budget, you’d better learn how to make the most of them. Here, I’ll share my favorite dumbbell leg exercises, and give you a workout that ties them all together to build muscular, strong legs that are also capable of explosive speed and agility.
What Are the Benefits of Working Out My Legs with Dumbbells?
Dumbbells offer many advantages over barbells, machines, and other implements for training the legs. Here are some key benefits.
Greater Freedom of Motion
When you use a barbell, the weight is fixed in one position. That can be a problem if you have injuries, or lack flexibility. Dumbbells allow you to adjust where the weight is in relation to your body, and that can let you customize your exercises to perform them more safely.
TakeRomanian deadlifts, for example. Using a barbell, the weight moves down the front of your body to your shins as you bend your hips back.The load is displaced in front of you, and that puts a lot of stress on your lower back.With dumbbells, you have the freedom to hold the load further back, closer to your sides and your center of gravity. This keeps more of the stress on thehamstringswhere you want it, and less on the low back.
Correction of Strength Imbalances
When you use barbells and machines, it’s difficult to recognize strength imbalances between sides. The strong limb will compensate for the weaker one, and you won’t notice which leg is lagging behind the other. Over time, failing to correct this imbalance can lead to injury.
Dumbbells lend themselves well to unilateral training—working one limb at a time.Lunges, splitsquats, and single-leg RDL’s are all more practical and user-friendly to do with dumbbellsversus other equipment, and they make you aware of your restrictions, both in terms of range of motion and strength. Training one leg at a time, you’ll see which side needs more work, and you can begin to even things out.Unilateral training also allows you to work with greater ranges of motion(you can typically go further down on a single-leg RDL or squat than you can on the two-legged versions), and it’s more in line with how we move in real life—balancing, landing, and pushing off from one leg at a time rather than both together. Get strong unilaterally, and you’ll almost certainly be stronger when you use both legs at once.
Increased Stability
It’s hard to balance on one leg, so unilateral dumbbell training builds more stability than training bilaterally. This alone can go a long way toward helping you break through muscle and strength plateaus.
When your joints lack stability, your brain recognizes it, and won’t allow you to produce the maximum amount of force that you’re capable of. Essentially, it puts the breaks on to prevent you from hurting yourself. In that sense, dumbbell training plays a big role in unlocking your potential to grow from all the training you do.
Greater Safety
With any exercise tool you use, you have to be aware of your body andfocuson proper form when you train. But dumbbells are inherently safer than barbells. A) They offer greater freedom of motion (explained above). B) They don’t allow you to train as heavy, and C) they’re easy to let go of if you get in trouble.Hang around a gym long enough and you’re bound to see somebody get stuck at the bottom of a barbell back squatand need to be helped up. But if you can’t complete a rep with dumbbells, you can bail out by simply dropping the weights to the floor. For anyone training at home alone, dumbbells are a must.
Joint-Friendy Training
Whether it’s back squats, deadlifts, or their many variations, barbell leg exercises tend to put a lot of compression and shear forces on your spine. If your form isn’t pristine, the risk of injury goes up dramatically, and many people have mobility and stability limitations that prevent them from doing these lifts safely.
Dumbbell leg exercisesdon’t load the spine directly.Furthermore, because they’re conducive to safer training, you’ll feel more confident pushing yourself further without fear of your form breaking down. This can mean more intense workouts and faster gains.
What Leg Exercises Can I Do With Dumbbells?
Now I’ll introduce you to eight of my favorite dumbbell leg exercises (Onnit only asked me for five, but I couldn’t help myself!). Together, they cover the gamut of training goals. Some are for straight-up legmass, and others help to build explosiveness and athleticism. Many of them will really stretch your hamstrings, hips, and adductors, too, expanding your mobility so you can achieve greater ranges of motion in all your lower-body movements and activate more muscle.
This one is great for developing explosive power and the ability to decelerate your body after a jump or sprint. I use it often with the basketball players I train.
Step 1.Hold a dumbbell in each hand and stand with feet about hip-width apart. Keep yourarmslocked out and think about squeezing oranges in your armpits to keep the lats under tension.
Step 2.Retract your neck so your head isn’t sticking out in front of your body (think: “packed chin”). Your head, spine, and pelvis should form a long, straight line. Brace yourcore.
Step 3.Squat down until your knees are bent about 90 degrees (think: “half squat,” not a full squat). The dumbbells should be just outside your legs but not touching them.
Step 4.Pause a second at the bottom, and then explode upward. Apply as much force to the ground as possible, and imagine trying to touch your head to the ceiling.
Step 5.Land like a ninja—with soft knees, and as quietly as you can. Push your hips back as you touch down to help you decelerate. Think about it like this: if you were landing in a puddle, how would you do it so as not to make a huge splash?
Make sure you pause between reps to reset yourself as needed.
#2. Dumbbell Bulgarian Split Squat
One of my favorite lower-body exercises, the split squat builds strength, muscle, and stability that transfers over to athletic movements. It also supports gains on big barbell lifts like the deadlift and squat.
Step 1.Stand lunge-length in front of a single-leg squat stand (shown here) or bench. Hold dumbbells at your sides and rest the top of your back foot on the bench. Your back leg should be bent about 90 degrees (use this leg as little as possible throughout the exercise; you should feel almost no tension in it). Keep your arms locked out and think about squeezing oranges in your armpits to keep the lats under tension.
Step 2.Retract your neck so your head isn’t sticking out in front of your body (think: “packed chin”). Your head, spine, and pelvis should form a long, straight line. Brace your core.
Step 3.Hinge your hips back so your torso is angled forward, and lower your body until your rear knee is just above the floor. As you descend, your spine and shin should run parallel to each other.
Step 4.Think about pushing the floor away from you and feeling your whole foot contact it as you come back up to the starting position. Be careful not to fully lock out your front knee—it should be slightly bent at the top of each rep. Complete your reps on that side, and then switch sides and repeat.
#3. Dumbbell Step-Over Lunge
Looking for a “functional” exercise? How about one that works deceleration, acceleration, coordination and just about every muscle in the lower body?The step-over lunge is one of the most challenging lunge variations you can do,but once you’ve got it down, you’ll see huge results.
Step 1.Hold a dumbbell in each hand and stand with feet about hip-width apart. Keep your arms locked out and think about squeezing oranges in your armpits to keep the lats under tension.
Step 2.Retract your neck so your head isn’t sticking out in front of your body (think: “packed chin”). Your head, spine, and pelvis should form a long, straight line. Brace your core.
Step 3.Step backward with a slight hinge/lean in your hips so that you load your glutes. Control your descent, and softly touch the floor with your back knee.
Step 4.Drive through the floor with your front foot and step forward out of the lunge. Try not to put your foot down to rebalance yourself—just step straight into a forward lunge. Complete your reps on that side, and then switch sides and repeat.
Note: It’s OK if your knee travels in front of your toesat the end-range of a lunge. It’s not only safe, it’s actually healthy for the ankles, knees, and hips to develop stability in that range of motion.
#4. Dumbbell Romanian Deadlift
The RDL is the best way to teach a true hip-hinge movement, which is used in all sports and multiple daily activities.Starting the lift from the top rather than the bottom makes it safer,and the dumbbells help you keep the weight closer to your center of gravity than the barbell alternative.
Step 1.Hold a dumbbell in each hand at your sides and stand with feet about hip-width apart. Keep your arms locked out and think about squeezing oranges in your armpits to keep the lats under tension. Draw your shoulders back and down (think: “proud chest”).
Step 2.Retract your neck so your head isn’t sticking out in front of your body (think: “packed chin”). Your head, spine, and pelvis should form a long, straight line. Brace your core.
Step 3.Push your hips back like you’re trying to shut a car door behind you with your butt. Bend your knees slightly, and think about pulling yourself down with your hip flexors (the muscles on the front of your hips that raise your legs up) as you lower your torso. As you go down, allow the dumbbells to move slightly forward and around to the front of your thighs.
Go down until the dumbbells reach mid-shin level, or you feel a strong stretch in your hamstrings, and pause at the bottom. Your eyes should be looking about three feet in front of your toes.If you find yourself looking down at your feet or at the wall in front of you, your neck is out of alignment.
Be sure to keep your long-spine position. Don’t round your back.
Step 4.Extend your hips to come back up, and squeeze your glutes at the top of the rep.
#5. Dumbbell Single-Leg Kickstand Wall RDL
This is an incredible exercise for teaching great hinge form while putting the hip in abduction and internal rotation—skills that keep the hips healthy and athletic while also activating lots of glute muscle.
Step 1.Stand in front of a wall, facing away, and hold a dumbbell in your left hand. Bend the left knee, and push that foot back into the wall. Get a soft bend of the knee on the other leg. Draw your shoulder blades back and down, pack your chin, and get a long spine from your head to your pelvis.
Step 2.Bend your hips back while twisting your torso toward the right leg so that the dumbbell lines up in front of it. Think about getting your belly button to point at the outside of the knee. Go down until the dumbbell is at mid-shin level, or you feel a strong stretch in your hamstrings. Keep the left knee pulled in as you perform the RDL—don’t let it drift outward.
Be sure to maintain your long-spine position. Don’t round your back.
Step 3.Push the floor away as you come back up, and extend your hips fully. Complete your reps on that side, and then switch sides and repeat.
#6. Dumbbell Lateral Lunge with Reach
Most muscle-building exercises are done in the sagittal plane, where the movement occurs forward and back. Lateral lunges break you out of that groove, utilizing the frontal plane, which is so prominent in sports play.Fighters, football players, soccer players, and so on have to be able to move side to sidewithout pulling a muscle or tripping over their feet. This move prepares them for it.
Step 1.Hold a dumbbell in your right hand and stand with feet about hip-width apart. Keep your arms locked out and think about squeezing an orange in your armpit to keep the lats under tension.
Step 2.Retract your neck so your head isn’t sticking out in front of your body (think: “packed chin”). Your head, spine, and pelvis should form a long, straight line. Brace your core.
Step 3.Lunge to your left side, making sure your left foot stays on the same plane as the right one.(Tip: do the exercise on turf, or some other area that has a line painted on itso you get some feedback. Placing a long exercise band on the floor can also work.) Make sure you step far enough so that you feel a stretch on the locked-out leg.
Step 4.Sit back into your hip (it’s a hinge/deadlift movement more than a squat), and make sure your knee aligns with your big toe on the left leg. If this is a problem, imagine pushing a $100 bill into the floor with the inside of your foot. As you lower into the lunge, twist your torso so you can nearly touch the dumbbell to your foot.
Step 5.Push off the lunging leg and come back to the starting position in one fluid motion. Complete your reps on that side, and then switch sides and repeat.
#7. Dumbbell Front-Foot Elevated Split Squat
I love this move for teaching a vertical squat pattern, where your hips and torso move straight down as opposed to more of a hip-hinge motion. This reduces shear forces on the spine.Most of my clients say their hips and low back feel great after doing these,even though their legs are on fire.
Step 1.Hold a dumbbell in your left hand and stand with your left foot on a weight plate or other platform that elevates it about two inches above the floor. Extend your right leg behind you. Keep your leftarmlocked out and think about squeezing an orange in your armpit to keep the lat under tension.
Step 2.Retract your neck so your head isn’t sticking out in front of your body (think: “packed chin”). Your head, spine, and pelvis should form a long, straight line. Brace your core.
Step 3.Rotate the hip of the rear leg forward so it’s square with the other hip, and begin sitting back into the hip that’s over the plate. Your rear thigh and knee must stay aligned with your right foot, so don’t let the knee turn inward when you rotate the hip.
Step 4.Actively drive your front foot into the plate, making sure your heel stays down, as you slowly lower your body until your rear knee is just above the floor. Stay as vertical as possible—think of your body like a canister. Your front knee will travel forward and you should aim to touch your hamstrings to your calf.
Step 5.Push off the front foot to raise your body back up. Think “elevator, not escalator,” so you push the plate away while staying vertical and not rising back on an angle. Rise until your rear leg is straight—your front leg should be well short of lockout.
#8. Dumbbell Goblet Squat
If you have trouble dialing in your squat form, the goblet squat is a great way to re-train yourself. It teaches you to stay upright and sink into your hips, andoften leads to near-perfect squat mechanics right away.The goblet squat not only works your lower body, but requires a lot of strength and stability from your core and upper body as well. It’s great for reinforcing good posture when done correctly.
Step 1.Hold a dumbbell under your chin vertically, with both hands on the end of one bell. Stand with feet between hip and shoulder-width apart and turn your toes out about 30 degrees. Think about squeezing oranges in your armpits to keep the lats under tension. Draw your shoulders back and down (think: “proud chest”).
Step 2.Retract your neck so your head isn’t sticking out in front of your body (think: “packed chin”). Your head, spine, and pelvis should form a long, straight line. Brace your core.
Step 3.Drive your knees forward and pull yourself down into the squat using the hip flexors (the muscles on the front of the hips that raise your legs up).Stay as vertical as you can with your upper body, and go as deep as you can while keeping alignment from your head to your pelvis—your lower back should be neutral at the bottom (not rounded over or hyperextended). Your elbows should be able to touch the medial side of your knees in the bottom position.
Step 4.Push the floor away as you rise back up to stand tall.
Note:Onall of the aboveexercises, it can help to think about keeping your ribs down. This means to avoid any hyperextension of your lower back that would cause your ribs to flare. If you focus on pulling the ribs down toward the pelvis, you’ll brace your core properly and create a neutral spine position. This promotes safety, and will ensure your legs work to the maximum.
What Muscles Will I Be Targeting?
The above exercises combined target every muscle group in the lower body (and a great many muscles in the upper body too, which provide stability), as well as the core. I’ll break down the major muscle groups targeted in each lift.
Dumbbell paused squat jump:glutes, quads, calves
Dumbbell Bulgarian split squat:glutes, quads, hamstrings, adductors
Dumbbell step-over lunge:quads, glutes, adductors
Dumbbell Romanian deadlift (RDL):hamstrings, glutes, spinal erectors, core
An effective warmup should begin with some soft tissue work using a foam roller, lacrosse ball, or other tool that applies some pressure to the muscles to help them loosen up.Roll out your hips, hamstrings, quads, and any other areas of the lower body that may feel particularly tight.After that, try these three combination mobility drills that will open up your hips and knees while raising your core temperature. The goal with these is to further improve your ability to achieve the positions that the exercises in the workout require, so don’t skip them!
If one drill makes you feel tighter than another, spend more time on that one and focus on owning the positions.When you get to an uncomfortable point in the range of motion, take some deep breaths(long exhale, long inhale)—this will help loosen you up as well as help you to stabilize in the position.
Set a timer for 6–12 minutes, depending on how much time you can devote to your warmup, and go through the exercises as outlined until the time is up.It may end up being two rounds of each move, or five; just keep moving. If you’re extra tight/stiff, I recommend putting the timer on for 10 or more minutes.
1. Single-Leg Downward Dog to Spiderman Lunge with Quad Stretch
Reps:3–5 (each side)
Step 1.Get into pushup position with your hands directly under your shoulders and your body in a straight line from head to toe.
Step 2.Raise your right leg off the floor as you push your body backward and raise your hips into the air. Keep your left leg as straight as possible and your heel flat on the floor. Drive your arms into the floor so that your palms stay flat.
Step 3.Step your right leg forward and plant it next to your right arm. Take a moment to extend your spine and hips so that you realign yourself—your body should form a straight line from your head to the heel of your left foot.
Step 4.Lower the left knee to the floor and bend that leg as you reach back with your left hand to grasp the ankle. Gently pull your heel closer to your butt so you feel a stretch in your quads. Shift your weight forward to intensify the stretch.
Step 5.Let your foot go, and return to pushup position. Repeat on the opposite side.
2. Squat to Stand with Walkout to Downward Dog + Single-Arm Reach
Reps:3–5
Step 1.Stand with feet shoulder-width apart and toes turned out about 30 degrees.
Step 2.Bend over and grasp your toes. Squat down as low as you can, extending your spine as you do so that you end up in the bottom of a squat with your elbows inside your knees and a long spine. You can wiggle your hips around a bit to help you get comfortable in the bottom position.
Step 3.Walk your hands forward until you’re in a pushup position, and push your hips back and into the air.
Step 4.Twist your torso to the right and grasp the outside of your right knee with your left hand. Twist the other direction and grasp the opposite knee.
Step 5.Reverse the entire movement: Return to pushup position, walk yourself back to the bottom of the squat, and then stand up with your hips while grasping your toes.
3. Thai Sit with Shinbox Switch
Reps:5 (each side)
Step 1.Sit on the floor with both knees bent. Your left leg should be in front of you and your right leg pointing behind. Keep a tall spine, and try to get both your sit bones flat on the floor.
Step 2.Extend your hips to come up on your knees. Extend your arms straight in front of you, and slowly lower your butt back to the floor.
Step 3.Rotate your right leg outward and your left leg inward so that you turn your body and achieve the same sitting position in the opposite direction. Rise up to your knees, and lower back down. Use your hands for balance as needed, but don’t use them for momentum to help you rise up.
How To Choose The Right Dumbbell Weight
On any dumbbell exercise, you’ll need to work up to the right weight gradually by doing what coaches call “ramp up” sets. Choose a very light weight to start,maybe 50% of the heaviest load you think you can handle for your work sets,and perform around 5 reps. Increase the weight by small increments (10–20 pounds) until you reach a load that you’re sure you can use—with good form—for the number of reps that the workout calls for. Take as many ramp up sets as you need, and don’t take any of the ramp up sets to failure—they’re just an extension of your warmup.
Be conservative with the weight you select for your first main work set—you can always increase the weight on your next set if the first one feels too light.
Note that the dumbbell paused squat jump is a power exercise and needs to be done as explosively as possible.Going too heavy will slow you down and thus defeat the purpose. Use your bodyweight alone for your first ramp up set. You won’t need much weight for the work sets.
Complete Dumbbell Leg Workout
This workout includes all the aforementioned exercises to give you a routine that builds athleticism, strength, and muscle size. You can run the program for four to six weeks, adding a work set to a few of the exercises as you see fit in the second or third week (add sets to the remaining exercises in the weeks that follow).You should also aim to increase the number of reps you perform and the loads you use over time.But don’t attempt to make any exercise harder until you’re sure you’ve got the form down properly.
Rest as needed between sets and between exercises. The squat jump will require more rest so you can restore maximum speed and power—maybe 2 minutes—while you may only need a minute or so break between sets of the lateral lunge.
Notice that you have a choice of moves you can do for exercises 2 and 3.You can opt for the Bulgarian split squat and Romanian deadlift if you want more of a muscle-building stimulus, or you can choose the step-over lunge and kickstand wall RDL if you want to prepare your body for better performance in soccer, football, basketball etc.
1. Dumbbell Paused Squat Jump
Sets:3–4 Reps:6–8
2. Dumbbell Bulgarian Split Squat, OR Dumbbell Step-Over Lunge
Sets:3–4 Reps:8 (each side)
3. Dumbbell Romanian Deadlift, OR Dumbbell Single-Leg Kickstand Wall RDL

 You can perform B-stance RDLs with a barbell, dumbbells,
 B-stance RDLs will primarily target the gluteus maximus, your main butt muscle. But they will also hit your hamstrings and spinal erectors (the muscles in your lower back). Your core, of course, has to brace your spine throughout the whole movement, so you could argue that any RDL is an ab workout too.

 The glute-ham raise focuses on the hamstrings, but the tension it creates on the back side of the body irradiates all the way up the chain. That means that the glutes get involved as well (as the name of the exercise would imply), along with the spinal erectors, which run from the pelvis all the way up to the neck. The ab muscles also have to work with your erectors to brace your spine, so it doesn’t flop over while you perform the raise. And