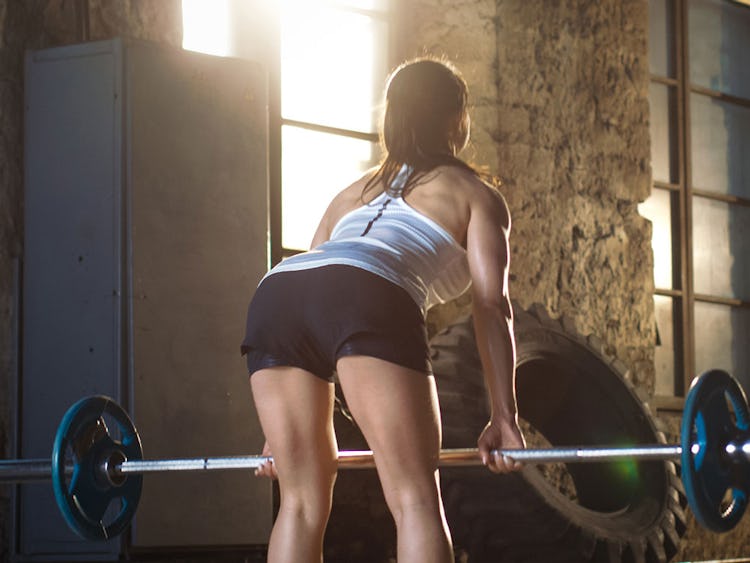
https://www.onnit.com/blogs/the-edge.atomOnnit - The Edge2025-07-15T17:22:41-05:00Onnithttps://www.onnit.com/blogs/the-edge/the-best-kettlebell-deadlift-exercises-for-your-workout2025-07-15T17:22:41-05:002025-08-20T14:27:34-05:00The Best Kettlebell Deadlift Exercises For Your WorkoutJeremy GottliebThe deadlift is a foundational movement pattern that builds your glutes,hamstrings, lower back, and all-around hip extension strength. Deadlifting is beneficial to anyone who plays sports, or who just wants to be strong and slow down the aging process. Though most famously done with a barbell, deadlifting with one or morekettlebellsis a more than adequate substitute that offers several other benefits as well.
Here, we present some of the most common and effectivekettlebell deadliftvariations.
What Is The Kettlebell Deadlift and What Are The Benefits of Doing Them?
“The deadlift itself is a hinge movement,” says Shane Heins, Onnit’s Director ofFitnessEducation. “You fold at the hips to pick objects up from down below.” If that motion looks familiar to you, it should—you probably do it every day, from picking up your gym bag to lifting your little brother/sister, or son/daughter, into the car seat.The point is, few exercises prepare you for the sport of life like the deadlift does.
That’s not to say it can’t prepare you for actual sports too. The deadlift trains the muscles that extend the hips—the glutes and hamstrings—which are the source of speed and power for virtually all explosive movements (yes, the quads get some work too, extending the knees in concert with the hips). Deadlifting also involves the upper and lower back, as well as the forearm and gripping muscles, so deadlifts of any kind are really full-body exercises.
When you swap out a barbell for a kettlebell, things get even more interesting. Deadlifting with a barbell is hell on your grip, butthe challenge increases with a kettlebell, both because the diameter of the handle is thicker and the weight’s center of gravity is lower.That makes the kettlebell much harder to control, upping the strength requirement from both your hands and yourcore. Another point: the shape and length of a barbell makes it only suitable for lifting right in front of you, with your palms facing your body. A kettlebell, however, can be positioned between your legs, to the outside of one leg, or at varying heights depending on your goals. You can also grip it with your hands at a 45-degree angle or palms facing in, so the kettlebell is a bit more versatile.
Heins argues that the kettlebell is “much more closely related to the types of objects you’ll deadlift, and how you’ll deadlift them, in your day-to-day life.”
The single-leg kettlebell deadlift works the glutes, hamstrings, and lower back one side at a time, which allows you to train them through a greater range of motion than you could with conventional two-legged deadlifts. We recently posted a thorougharticle tutorial on the single-leg deadliftand all its glory, so check that out separately.
Prolonged bouts of sitting cause the hamstrings to shorten, reducing their flexibility. The Romanian deadlift helps to stretch them back out again, while also working the glutes through a full range of motion. Doing an RDL with a kettlebell is a good way to prepare your body for more dynamic hip hinge movements like thekettlebell swing, as it strengthens the same muscles and works you through the same range, but without the momentum that puts the lower back at some risk.
Step 1.Set a kettlebell on the floor just in front of you. Place your feet hip-distance apart. Draw your shoulders back and down (think “proud chest”), pull your ribs down, and brace your core. Unlock your knees.
Step 2.Keeping a long spine from your head to your tailbone, drive your hips back as far as you can so your torso folds over. Let the movement come from your hips (do NOT round your lower back). Stop when you run out of range—your shoulders should end up above hip level. Grasp the kettlebell with both hands.
Step 3.Keeping your proud chest position, drive through your heels as you extend your hips and knees to stand up tall. Now you’re in position to BEGIN your reps.
Step 4.Bend your hips back as you did above to lower the weight to just above the floor—don’t let it rest on the ground. You may need to stand on some mats or other elevated surface to do so. The goal should be to keep constant tension on your muscles, and stopping the weight on the floor allows them a momentary rest.
If your hamstrings are tight, you may have an easier time doing the sumo deadlift than the RDL. The sumo requires less of a hip hinge, but it also lets you work with heavier weights, and it gets the adductors (inner-thigh muscles) in on the action to a greater degree than other deadlifts.
Step 1.Stand with your feet wider than shoulder width, and turn your toes out 45 degrees. Actively drive your knees outward. Assume a proud chest position.
Step 2.Hinge your hips back while keeping a long spine, and grasp the kettlebell with both hands.
Step 3.Drive through your feet to extend your hips to stand tall. Think about pulling through the crown of your head.
Lifting a kettlebell on one side of the body alone “starts to tap into that corset of core musculature from the hips to the shoulders,” says Heins, “while also challenging your grip.” Most of life and sport activities load the body asymmetrically, so it pays to train this way.
Step 1.Set the kettlebell to the side of one leg with the handle turned vertical (so you can pick up the bell as if it were a suitcase). Place your feet at hip width, get a proud chest, and draw your ribs down. Brace your core.
Step 2.Hinge your hips first and then bend your knees just enough to reach the kettlebell. Maintain a long spine as you do this. (Think about the logo on your T-shirt—it should be visible to anyone standing in front of you.)
Step 3.Drive your feet through the floor and extend your hips to stand tall. Lift the weight evenly. Because you’re loading your body unevenly, it will be difficult to keep your shoulders square and your torso straight, but avoid any twisting or bending.
Be sure to perform the exercise for an even number of reps on both sides.
Deadlifting two kettlebells at once really forces you to brace your core and coordinate an unstable movement. It’s tough on your grip, and allows you to lift heavier than most other kettlebell deadlift variations, increasing the muscle-building potential.
Step 1.Place two kettlebells on the floor and stand with them between your legs, feet a little wider than your hips. Draw your shoulders back and put a soft bend in your knees.
Step 2.Hinge your hips to reach the kettlebells. Be sure to really push your hips back, bending your knees only as needed to grasp the bells.
Step 3.Drive your feet through the floor and stand tall. As you return the kettlebells to the floor, think about sitting your hips back rather than just bending forward.
Stretching Before Deadlifting
Perform the following mobility routine from Onnit-certified coach Eric Leija (@primal.swoledier) before you take on any of the deadlifts listed here. It will stretch out your hips, glutes, and hamstrings for the work to come, and raise your core temperature for safer training.
“It’s easy to fall into the trap of ’I see the movement being done this way and this is the only way I can ever do it,’” says Heins of the deadlifts we outlined above. But he wants to remind you that the beauty of kettlebells is their versatility—you can use them in a variety of ways that help you accomplish exactly what you want with your training at whatever level you find yourself.
For instance, if you want to improve mobility in your hips and hamstrings, Heins says you can perform the double kettlebell deadlift with a single leg.If you want to go really heavy on your double deadlift, do it with a sumo stance. Want to build rock-solid balance and stability? Do the suitcase deadlift single-leg style.And if you find that you don’t have the mobility to perform a deadlift safely, do it from an elevated surface (such as a box or mats) to cut down on the range of motion. “I’d rather see you cut range than get hurt trying to force a range you don’t have yet,” says Heins.
So get creative and play with these variations to find what suits you best. As long as you observe the basic form pointers—flat back, proud chest, moving at the hips instead of the low back—you’ll have an almost infinite number of kettlebell deadlifts to work on.
How To Incorporate These Exercises Into Your Workouts
Deadlifts generally let you go pretty heavy, so Heins says they work well when serving as the main strength exercise in your workout. After you’ve warmed up and done any plyometric (explosive) or high-skill exercises, such as jumps or cleans, a double-kettlebell deadlift or sumo deadlift is a great movement to strengthen the lower body. Do sets of 3–5 reps if you have access to really heavy kettlebells, while 8–12 reps is fine for moderate ones.
“You can also use deadlifts for circuits for conditioning,” says Heins, or muscularendurance.“The kettlebell lets you notch back the weight you’re working with so you can do the deadlift for higher reps and with shorter rest periods,”something that isn’t so practical when using a barbell and plates.Romanian deadliftsare a good choice in this case, as are double-kettlebell sumo deadlifts done with lighter bells. Heins says that the latter is a good way tofocuson opening up range of motion in the hips and adductors.
Yet another use for deadlifts is for simulating more athletic and real-world movements, like lifting uneven loads. You can place suitcase and single-leg deadlifts pretty much anywhere in your workout to train your ability to stabilize your body as well as even out muscle imbalances between sides. “These don’t need to be high repetition or heavy,” says Heins. “Work with a weight that allows you to hold structural integrity and perform reps with the utmost beauty.”
]]> https://www.onnit.com/blogs/the-edge/kettlebell-goblet-squat-how-to-do-it-get-ripped2025-07-15T17:19:23-05:002025-08-15T09:52:19-05:00Kettlebell Goblet Squat: How To Do It & Get RippedJeremy GottliebAs the movieDodgeballtaught us, “If you can dodge a wrench, you can dodge a ball!” To some extent, the same logic can apply to squatting: if you can do akettlebellgobletsquat, you can do ANY kind of squat (or at least you’ll be able to learn much faster). The kettlebell goblet squat teaches sound movement mechanics for squatting, allowing you to work your legs without excess stress on your lower back or knees. It’s a foundational movement for anyone who likes to train withkettlebells, or who ultimately wants to train heavy backsquats,front squats, power cleans, or a range of other more advanced movements.
Key Takeaways
–The kettlebell goblet squat is often used to teach good squat technique,as it helps you to keep an upright torso and sit back with your hips.
– The goblet squat trains thecoreand upper back in addition to the lower body.
– If you have trouble doing the kettlebell goblet squat,a landmine squat could be a more effective alternative.Adding a curl at the bottom of the movement, or doing it as more of a lunge pattern at a 45-degree angle may help too.
We’ll start by showing you how to execute the kettlebell goblet squat with great form, tell you all the muscles it works and how, and then provide some alternative exercises you can use to become a sound and strong squatter.
Step 1. Hold a kettlebell in front of your chest by the sides of its handle. Draw your shoulders back and downward (think: “proud chest”), and tuck your elbows in close to the bell—try to get your forearms as vertical as you can. Stand with your feet between hip- and shoulder-width apart, and turn your toes out a bit—up to 30 degrees if you need to.
Step 2.Tuck your tailbone and draw your ribs down so that your pelvis is parallel to the floor. Take a deep breath into your belly, and brace your core. Actively twist your feet into the floor, but don’t let them move. Think of your legs as screwdrivers, or that you’re standing on grass and trying to twist it up beneath you.You should feel the arches in your feet rise and your glutes tighten,creating tension in the lower body.
Step 3.Keeping a long spine from your head to your pelvis, push your hips back and squat down, as if sitting down into a chair. Squat as low as you can while keeping your head, spine, and pelvis aligned. Push your knees apart as you descend. You should feel most of your weight on your heels to mid-foot area.If you feel your lower back beginning to round, stop there, and come back up.Keep your torso as vertical as possible—you shouldn’t have to lean forward or work extra hard to hold the bell upright. Avoid bending or twisting to either side.
Step 4.Drive through your feet as you extend your hips and knees to come up.
First and foremost, the goblet squat is an excellent teaching tool for learning the classic squatting movement pattern correctly. When most people begin squatting, whether with their bodyweight or a barbell on their back, they have trouble sitting back on the descent and activating the muscles of their hips. They tend to lean forward excessively to maintain balance, and that can lead to a range of problems: squatting too shallow, rounding the lower back, letting the knees collapse inward, allowing the heels to rise off the floor, etc.
In the goblet squat, you hold a load in front of your body, and it acts as a counterbalance. As a result, you’ll feel more comfortable opening your hips and sitting back with them—you don’t feel like you’re going to fall backward when you begin the descent, becausethe weight of the kettlebellis gently pulling you forward.This allows you to squat deeply with an upright torso, and that makes it possible to activate the greatest amount of muscle throughout your legs,while minimizing shear forces on the spine. As you descend, your elbows naturally travel inside your knees, which is a reminder to push your knees out to make room for the elbows. Doing so helps your knees to align with your toes, and that prevents the knee pain so often associated with knees that collapse inward.
Positioning the kettlebell in front of the torso makes your core brace your spine more or less automatically, so you can argue that the goblet squat builds strongabsas well. Furthermore, holding the weight in front of the chest asks a lot of the shoulder and upper back muscles, and fighting to maintain good shoulder alignment strengthens your posture. This can pay big dividends if you go on to train more challenging types of squats, such as the back squat andfront squat. It can also help make you stronger at presses and pullups/rows too.
Due to the vertical torso position,the goblet squat is much easier on the lower back than a back squat is.If you recently injured your low back doing back squats, or just can’t get the hang of them, the goblet squat is a great squat variation to regress to in order to clean up your form. In this regard, it has a lot in common with the front squat, and goblet squats are often used to build up to training front squats. With the lighter loads used, however, the goblet squat is more user-friendly and easier to master.
Because the goblet squat is relatively easy to master, it works well incircuits and other fast-paced workouts that train the whole body.You can pick up a kettlebell, knock out a set, and move on to the next thing. Only the most advanced athletes or lifters could be as efficient with back squats and other barbell variations, so it’s no wonder why the goblet squat is popular in exercise classes and forhome-gym training.
The kettlebell goblet squat is really a full-body exercise, but it’s treated mainly as a lower-body lift. Here are the muscles it recruits, from the top down.
While the goblet squat does work a lot of muscle, it’s not a great choice for someone looking to make big muscle gains—at least not long-term. It will certainly help to improve your squat technique and strengthen your back, legs, and core, but as you progress your loading on the goblet squat,you will reach a point where your upper body can’t support the weight anymore,while your legs still feel strong. At this stage, it’s wise to advance to front squats or back squats, which will let you go heavy enough to ensure that your quads gets trained to the fullest.
However, that isn’t to say that goblet squats can’t be done with heavy weight, especially if kettlebells or dumbbells are all you have to train with. Some lifters have done reps with well over 100 pounds, which makes for an impressive test of overall body strength. But the difficulty and awkwardness of getting such heavy weight into position makes moving on to a different type of squat a more practical progression.
How To Stretch Before Doing The Kettlebell Goblet Squat
The kettlebell goblet squat is as beginner-friendly a squat as there is, but it still requires mobility in some key muscle groups to perform correctly. You can loosen up your ankles, hips, and quads beforehand with these drills from Shane Heins, Onnit’s Director ofFitnessEducation. Perform one round of each movement below in sequence. Do reps of each move for 30 seconds, and then repeat for 3 total rounds.
Ankle Roll On Edges of Feet
Step 1.Stand with feet about shoulder-width apart and place your hands on your knees. Begin circling your knees outward (left knee counter-clockwise; right knee clockwise) while rolling on the outer edges of your feet. Raise your heels as your knees come forward, and move slowly and smoothly.
Step 2.Perform your reps in one direction, and then repeat in the opposite direction. If you have trouble keeping your balance, hold onto a sturdy object for support.
Bent-KneeHip Circle
Step 1.Hold onto a sturdy object for support. Tuck your tailbone under and draw your ribs down, so that your pelvis is level with the floor, and brace your core. Raise one leg in the air in front of you with your knee bent. Allow a soft bend in the leg that’s supporting you.
Step 2.Rotate your leg 90 degrees out to your side, and then begin turning your toes toward the floor as you draw the leg behind your body. Return your foot to the floor. That’s one hip circle.
Step 3.After 30 seconds, switch legs.
Kneeling Hip Extension
Step 1.Kneel on the floor in a tall position—shoulders and hips stacked over your knees. Your toes can be pointed into the floor. Place your hands on your ribs and pelvis and draw your ribs down so that the two areas pull closer together. Your pelvis should be level with the floor. Brace your core, and squeeze your glutes.
Step 2.Keeping a long spine, begin leaning back slowly, so that you feel tension in your quads. Go as low as you can control, and then extend your knees to kneel tall again. Over time, work to lower yourself a little further.
If you have a tough time maintaining an upright torso while you squat, or your squat lacks depth, try the 45-degree goblet squat, which uses more of a lunge pattern to stretch out your hips and train a tall posture.
45-Degree Goblet Squat
Step 1.Hold the kettlebell in the goblet squat position and place one leg 45 degrees out and behind you, as if stepping back into a deep lunge.
Step 2.Squat, driving your front knee over the center of your foot and lowering your body as far as you can. Complete your reps and repeat on the opposite side. Aim for 3 sets of 5 on each leg. Then test out your goblet squat and see if it feels better.
Kettlebell Goblet Squat With Curl
This movement helps you get more comfortable in the bottom position of the squat. At the bottom, you extend yourarmsin front of you and then curl the weight back up. No, it won’t build yourbiceps, but it will get you more time in that deep squat position so you canfocuson keeping your torso upright, your knees out, and your pelvis neutral.
Step 1.Set up as you did to perform the regular kettlebell goblet squat.
Step 2.Squat down. When you’re as low as you can safely go, hold the position. Extend your elbows, lowering the weight until it’s just above the floor.
Step 3.Curl the kettlebell back up to your chest, and come back up out of the squat. That’s one rep. Do 3 sets of 5 reps.
If you don’t have a kettlebell, a barbell and plates will allow you to get a similar effect to the goblet squat, and offer some other advantages as well.
While the goblet squat is ideal for beginners, some people will find that they still have trouble keeping their torso upright while performing it. In this case, using a barbell in a landmine unit can be a great solution. With a landmine squat, the load is held in front of the body the same as it is with a goblet squat, but the bar is anchored to the ground and travels on an arc. This all but guarantees that you’ll stay tall while you squat, because if you bend too far forward, the bar will poke you in the chest.
Step 1.Load one end of a barbell into the cylinder of a landmine. (If you don’t have a landmine, the corner of a room can suffice; just protect the walls with a towel.) Hold the opposite end of the bar with both hands and stand in your squat stance. Twist your feet into the floor to create tension in the lower body as described in the goblet squat directions above.
Step 2.Lower into the squat as deeply as you can, and then extend your hips and knees to come back up.
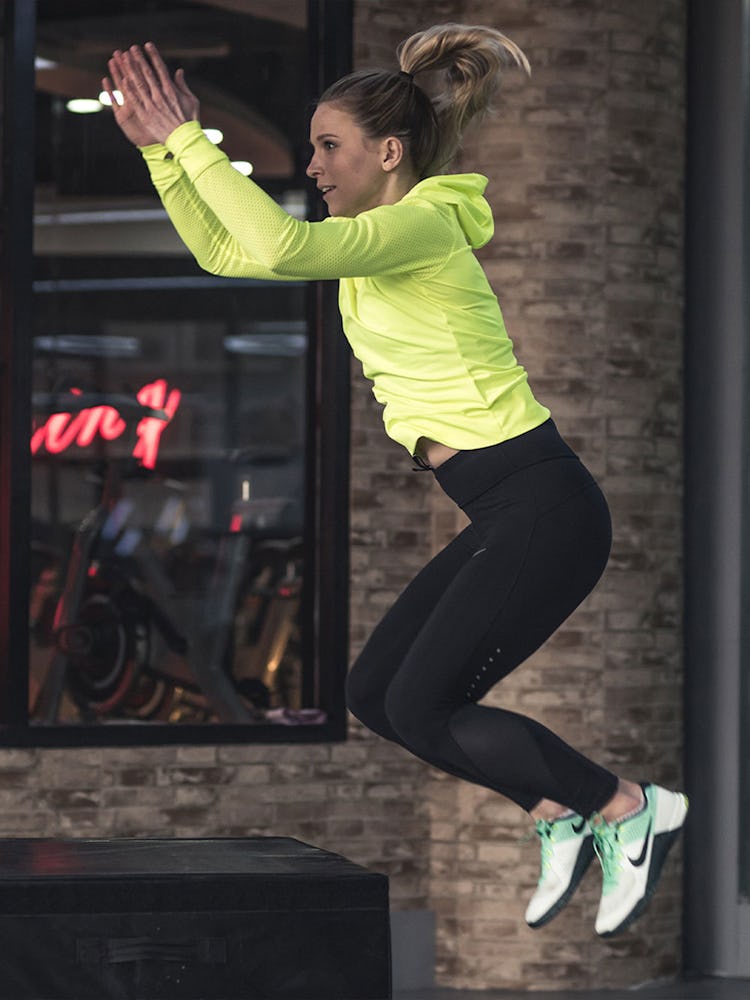
]]> https://www.onnit.com/blogs/the-edge/a-pro-s-kettlebell-leg-workout-with-the-single-leg-deadlift2025-07-15T17:13:38-05:002025-08-15T09:51:31-05:00A Pro’s Kettlebell Leg Workout With The Single-Leg DeadliftJeremy GottliebIn one of life’s funny ironic twists, you’ve got two legs, but you spend most of your time using one or the other. When you think about it, running is done with one leg at a time. So is most jumping and bounding, as well as turning and cutting. Even walking to your mailbox requires alternating legs to stabilize the body and exert force. For these reasons, you absolutely MUST train unilaterally—one leg at a time. And one of the best exercises to choose is the single-leg deadlift done with akettlebell.
“Kettlebells are easier to manage than barbells and plates,” says Shane Heins, Onnit’s Director ofFitnessEducation. If you don’t have access to a gym, or you need to train in hotel rooms due to frequent travel, the kettlebell is the more practical option than conventional free weights. Furthermore,you don’t need a wide array of poundages to get a good workout for any body part.One 16-kilo kettlebell can make for a pretty grueling routine.
The shape and design of the kettlebell allows you to move it in ways that can’t be done with other implements. This means you can train your legs while holding the weight aloft, in front of you, while rotating, and otherwise moving in multiple planes in order to get a unique training effect that prepares you for the movements you’ll make in everyday life and sports.The offset load, however, is what made kettlebells famous. “The bell’s center of gravity is set at a distance from its handle,” says Heins,meaning that you’ll have to work much harder to control the weight than you would with a dumbbell. That raises the stakes on every exercise you do, increasing the benefit to your stability and overall body control.
“Just because we have a greater sense of evenness when standing on two legs doesn’t mean both sides are doing their part evenly,” says Heins. Everyone has strength imbalances between sides, and while you’ll probably never smooth them out completely, it’s worth it to at least try to minimize the discrepancy.The single-leg deadlift strengthens the glutes,hamstrings, and adductors in each leg in turn, while improving your balance and body control on one leg.Single-leg training also lets you work through a greater range of motion, and that helps with mobility. All of these things are important for preventing injury, as lopsided strength and mobility between limbs can set you up for accidents. You’ll also find that when each leg works better on its own, the two will come together to produce more force on your bilateral exercises, such as conventional deadlifts and backsquats.
Here’s how to perform the single-leg kettlebell deadlift with good form.
Step 1.Hold a kettlebell with both hands atarm‘s length in front of you. Retract and depress your shoulders—think: “proud chest.” Now stand with feet hip-width apart and pick your left foot up off the floor an inch or two (just high enough so it doesn’t scrape the floor when you begin your reps).
Step 2.Soften your right knee so there’s a slight bend, and begin pushing your hips straight back as if to touch a wall behind you. This motion is called a hip hinge, and it’s the same type of movement you’d perform in any deadlift variation.
Step 3.Push your left leg back and straighten it as you hinge at the hips, and try to keep the leg moving in a straight line, as if you were aiming to touch a target that was directly behind you. If you have trouble balancing, you can gently tap your left foot to the floor as you go, but try to keep it elevated. The left leg will serve as a sort of kickstand that supports you while you train the right leg.
Keep a long spine from your head to your tailbone as you bend your hips—don’t let your back round forward. Stop when you feel a good stretch in your right glutes and hamstrings.
Step 4.Extend your hips to come back up to standing tall, touch your foot down to reset, and repeat for reps. Afterward, switch legs and do your reps on the left leg.
Heins says to grip the floor with your foot as much as possible. (If possible, do the exercise in socks or bare feet so you can make better use of your toes).“Your weight should shift to your heel as you hinge,” says Heins. “Push your foot into the floor, and that will create stability up the chain.”Also, avoid twisting your hips and shoulders to either side. Strive to keep both square to the floor at all times.
If you’re fairly new to lifting or don’t have a lot of single-leg work under your belt, your biggest challenge may be keeping your balance. In this case, try what Heins calls the sliding single-leg deadlift, where you’ll rely more on the kickstand leg to provide stability.
Step 1.Set up as you did for the single-leg deadlift but keep the toes of your left foot on the floor and raise your heel.
Step 2.Now bend your hips back and slide your left foot gently along the floor. Maintain contact with the floor throughout the set so you keep balance.
If even the sliding single-leg deadlift feels like a high-wire act, regress the movement one step further to the staggered-stance deadlift (also called a B-stance deadlift). All you have to do is split your legs and hinge the hips. The staggered stance takes a lot of balance out of the equation but still allows you to emphasize one leg over the other, so you get the benefits of unilateral training.
Step 1.Stand with your left foot a bit behind the right one so your left toes are in line with your right heel.
Step 2.Perform your hip hinge as normal, using the left leg only to maintain balance.
Yet another option is to hold the kettlebell at your chest rather than at arm’s length. By keeping the weight closer to your body, you’ll have better control of it and canfocusalmost exclusively on the deadlift motion itself. “The chest-held single-leg deadlift is a good way to instigate sitting back deeper into your hinge,” says Heins.
Step 1.You know the drill… Do any of the single-leg deadlift movements described above but with the bottom of the kettlebell held tight to your sternum and your chest proud.
Here’s a workout that incorporates the single-leg deadlift with other movements that build strong, balanced, and muscular legs.
DIRECTIONS
Perform the exercises as a circuit, completing one set of each in sequence without rest in between. Afterward, rest 2 minutes, and repeat the circuit for 3–5 total rounds.
1. Single-Leg Deadlift (Any Variation of the Above)
Step 1.Get on your knees and hold a light kettlebell at chest level. Flatten the top of your feet into the floor. (You may want to put a towel or mat under you to protect your knees.)
Step 2.Keeping your hips locked out, SLOWLY bend your knees, allowing yourself to fall backward under control until you feel a big stretch in your quads. Stop before you lose control of the movement, and extend your knees to come back up.
Not only is this a challenging exercise, but it can be hard on your knees and quads if you’re not warmed up, so ease into this slowly after you’ve done a thorough warmup (see the video below!).
Step 1.Hold the kettlebell in your right hand at shoulder level and stand with feet hip-distance apart.
Step 2.Drive your right foot into the floor while you raise your left knee up as high as you can. Lower it, and repeat on the other leg. After 10 reps, switch the kettlebell to your left hand.
Step 1.Stand with feet shoulder-width apart and turn your toes out as far as you can. Hold the kettlebell with both hands in front of your chest.
Step 2.Squat as deeply as you can, pushing your knees out as you descend. Keep your chest facing forward and maintain a long spine from your head to your tailbone—don’t let your pelvis tuck under (stop short of where it does).
Step 3.Extend your hips and knees to stand up tall again and then turn your body to your left, raise your right leg in front of you, and rest it against your left leg in a figure-four position. Depending on your mobility, you can rest the leg above the knee or against your shin—either is fine.
Release the right leg, return to the modified sumo stance, squat, and repeat the figure-four on the other side.
How To Stretch Your Legs Before Working Out
Perform the following mobility routine from Onnit-certified coach Eric Leija (@primal.swoledier) before you take on the workout above. It will stretch out your hips, glutes, and hamstrings for the work to come, and raise yourcoretemperature for safer training.
How Often Should You Train Your legs?
(See12:28in the Single-Leg Kettlebell Deadlift video)
You can perform the workout outlined above three days per week on non-consecutive days. Heins says you could do it Monday, Wednesday, and Friday, and perform your upper-body work on Tuesday, Thursday, and Saturday.
]]> https://www.onnit.com/blogs/the-edge/3-killer-chest-back-workouts-for-building-muscle2025-07-15T17:08:39-05:002025-08-15T09:50:46-05:003 Killer Chest & Back Workouts For Building MuscleJeremy GottliebIn an effort to be more time-efficient, some athletes like to train two or more muscle groups in a single workout. One of the most popular examples is a session that combineschest and backtraining. The pecs and lats/upper back pair about as well as a protein shake and a cold shower after a tough workout, offering a strategy to train nearly the entire upper body in short order.
We consulted a pro bodybuilder/strength coach to bring you the definitive guide to chest and back workouts—including three sample routines you can try. Whether you have aspirations of competing in a physique contest, you train at home with minimal equipment, or you’re just trying to make the most of a limited amount of workout time, you’re about to find the plan for building up your chest and back that’s right for you.
Can You Train Your Back and Chest Together?
“Chest and back make a great pairing because they’re antagonistic,” says Jonny Catanzano, an IFBB pro bodybuilder and owner of Tailored Health Coaching(@tailoredhealthcoachingon Instagram), “which means that while one is working, the other is resting.” This gives you the opportunity to speed your workout along by alternating sets for each muscle group with little or no time in between them, since there’s almost no fatigue that carries over from one to the other.
Imagine training only chest or only back by itself. You pick an exercise, do a set, rest, do another set, rest, and so on until your sets are complete, and then you go on to another exercise. There’s nothing wrong with this approach, but if you rest for two minutes or longer between sets (as thelatest researchsuggests you should, if you want to maximize muscle gains), your workout time can easily extend to an hour or more—and you’ll have only worked one muscle area.
On the other hand,if you alternate sets of chest and back exercises, you can train both muscle groups at a much brisker pace.Your chest will recover while you work your back, and vice versa, so it’s possible to use shorter rest periods between each set and get your workout done in much less than an hour’s time—without rushing either muscle group’s recovery.
Astudyin theJournal of Strength and Conditioning Researchhad subjects perform three traditional sets of rows followed by three sets of the bench press, and, in another session, do the same routine again but with the back and chest exercises paired off and alternated. Researchers found that, when the lifters went back and forth between the two exercises in the second workout,they didn’t have to reduce the weights they were using as much from set to set.They were able to lift more total weight compared to when they did straight sets in the first workout—probably because each muscle got more rest before it was worked again.
Chest and back pairings are also great if your goal is fat loss. “You’ll burn more calories in a session training two big muscle groups together,” says Catanzano. “You’ll get your heart rate up higher than training one area at a time, and higher still if you decide to superset exercises.” That is, perform a set for chest and then one for back without any rest in between.
Furthermore,merging your chest and back training into one ensures that you’ll balance the work you do for each area.Many people (guys, mostly) will train chest voraciously, and then treat their back workouts as an add-on, doing only a handful of sets of lat pulldowns or rows. But if you plan to train both regions in a single session, you can easily keep track of the sets you do for one and match them with sets of the other.
If you’re interested in building strength, chest and back workouts will help you understand andfocuson the relationship between a big back and a big bench press. “A stronger back lets you press more,” says Catanzano. “The lats help stabilize your torso when the bar is at your chest,” which is why many powerlifters do chinups or rows between sets of bench presses.
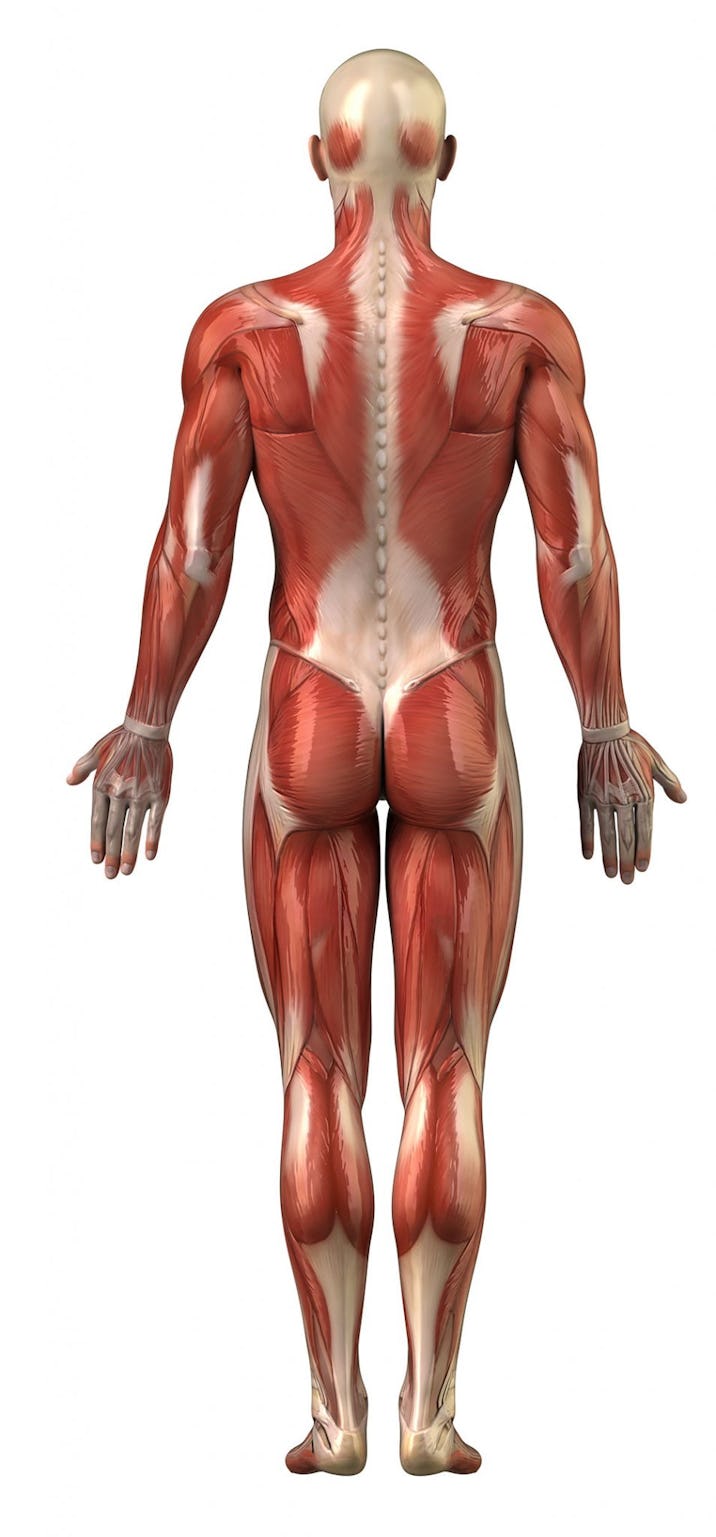
What Muscles Are Used?
Generally, when you’re talking about training chest and back together, you’re referring to the pectoralis major and minor (pecs), latissimus dorsi (lats), and upper back—comprising the rhomboids, trapezius, and teres major. The lower back—specifically, the spinal erectors—can certainly be trained as well, but many lifters prefer to work it on a lower-body day, as the lower back contributes automatically tosquatand deadlift variations.
The deltoid muscles of the shoulders can’t help but get involved as well when you do any pushing and pulling, and the triceps assist on pressing exercises while thebicepsand forearm/grip muscles work on your back movements.
Here’s a quick and very general anatomy course on where each of the chest and back muscles are located and what they do. (This isn’t a complete list, but these are the primary muscles you’ll target in a chest and back workout.)
Pectoralis major
This muscle has three heads and thus three different actions. The clavicular head, which runs from the collar bone to the humerus,raises thearmup and across to the other side of the body.The sternal head starts on the breastbone and reaches across to the humerus, so its fibers work tobring the arm around the front of the body.The costal head goes from the cartilage of the ribs and the external oblique muscle to the humerus, allowing the arm topull downward from overhead.
Pectoralis minor
Lying underneath the pec major, the pec minor begins on the third to fifth ribs and attaches to the scapula (shoulder blade).It draws the tip of the shoulder downward, protracts the shoulder blade, and raises the ribsduring inhalation.
Latissimus dorsi
The lat originates on the thoracic spine, lumbar spine, lower ribs, and iliac crest of the pelvis and connects to the humerus, just below the shoulder joint.It extends the shoulders, draws thearmsto the sides,and helps with inhalation.
Rhomboid
A rhombus-shaped muscle (hence the name), the rhomboid runs from the cervical and thoracic spine to the scapula. Itelevates and retracts the shoulder blade.
Trapezius
Like the pecs, thetrapscan work in three different directions. They start at the bottom of the back of the skull and the spine and reach over to the shoulder blade and collarbone in order toraise the scapula, retract it, and depress it.
Teres major
This is a small back muscle that assists the bigger ones. Originating on the back of the scapula, it inserts on the front of the humerus, and works torotate the arm toward the body and draw it behindthe body.
How Do You Set Up A Chest and Back Workout?
The way you combine chest and back exercises in a session is highly dependent on what you want to achieve. During his bodybuilding prime, Arnold Schwarzenegger liked to superset chest and back moves with little or no rest between them. For instance, do a set of incline presses followed immediately by a set of seated cable rows, rest a minute or two, and repeat. As we explained above, this a solid plan for speeding up your workouts and burning more fat, but it sets a pace that may be too intense for many people.
Research suggests thatlonger rest periods help you train with more challenging weights, thereby stimulating more muscle growth,so you could alternate chest and back moves with plenty of time between them—say, 90 seconds to two minutes downtime between your press and row—if muscle gain is your main priority.
There’s also no rule stating that you have to toggle between chest and back exercises. You could do all your chest moves first and then go on to back, or the other way around. “This may be better for less experienced trainees,” says Catanzano. “You won’t gas too early in the workout like you might if you were supersetting.” It’s also a good option if you want to zero in on one area at a time, giving your full attention to each one in turn, but without having to break them into two different workouts.
Finishing off one body part before you do the other may be wise if you see it as a weak point. Most people’s backs are underdeveloped, so doing all your back training when you’re fresh will let you work it with the greatest possible effort and focus.“If you have shoulder problems,” says Catanzano, “you might want to put back first,because it will warm up your shoulders and make your pressing feel smoother when you get to chest.” Yes, doing chest second may mean sacrificing some weight on your chest exercises due to fatigue, but if you’re dealing with cranky shoulders or other pressing-related injuries, learning to stimulate the muscles with lighter weight may be just what the doctor ordered.
How Many Chest Exercises and Back Exercises Should I Do?
The short answer to this question is roughly three to five moves for each muscle group per workout. For example, a typical old-school chest and back session might look like this:
1A Bench press
1B Bent-over row
2A Incline dumbbell press
2B Seated cable row
3A Dip
3B Chinup
(The exercise pairings can be alternated with rest in between sets, or superset without rest.)
But the right number of exercises for you depends on several factors. If you only have 30 minutes or less to train, you may have to cap your workout at two exercises per body part. On the other hand, if you plan on doing shoulder and arm work on a second upper-body day in the week, and therefore won’t be working chest and back again for another week, you may want to do more chest and back exercises to get enough volume in.
Volume is a major consideration when planning out any training program. A bodybuilder looking to fully stimulate every muscle will need to hit the chest and back from all angles, and that means more exercises and more sets. Whereas a busy professional who only wants to maintain strength and some athleticism can get by with much less work.
If you want the best muscle gains possible, research suggests you need a volume of 10–20 hard sets per muscle group, per week, to do the job.“I’d recommend a minimum of 10 sets,” says Catanzano, “and closer to 20 sets for weaker body parts.” All of these sets should be taken to within one to three reps of failure, he says—the point at which your reps slow down and you’re about to break form due to fatigue. As long as you keep these volume parameters in mind, the way you set up your workouts is really up to you.
Let the number of exercises you choose suit the volume of work you’re shooting for. For instance, if you’re aiming to do 10 sets for chest and back in a week, that could break down to five sets for each in two different workouts. This is a moderate and very doable amount of work for most people, and won’t put you at risk for overtraining. See below.
Chest & Back, Day I
1A Incline press, 3 sets
1B Chest-supported row, 3 sets
2A Cable fly, 2 sets
2B Straight-arm pulldown, 2 sets
Chest & Back, Day II
1A Dumbbell bench press, 3 sets
1B Inverted row, 3 sets
2A Dip, 2 sets
2B One-arm dumbbell row, 2 sets
You could finish each session with some shoulder and/or arm work for a complete upper-body workout, or leave the gym after chest and back alone if that’s all you have time for, or you plan to work those other muscles on a different day.
If back is a weak point, you should emphasize it with more volume. In this case, you could do 10 sets for it on Monday, and then another six sets on Friday for 16 total sets that week.
Chest & Back, Monday
1. Machine row, 3 sets
2. One-arm lat-pulldown, 3 sets
3. Seated cable row, 2 sets
4. Chinup, 2 sets
5. Dumbbell bench press, 3 sets
6. Feet-elevated pushup, 2 sets
Chest & Back, Friday
1. One-arm dumbbell row, 2 sets
2. Wide-grip lat pulldown, 2 sets
3. Dumbbell shrug, 2 sets
4. Machine press, 2 sets
5. Cable fly, 3 sets
Chest & Back Workout Tips
Catanzano offers some of the following pointers to help you get the most out of your training.
If muscle size is your main goal, the amount of weight you’re lifting isn’t as important as taking your sets near to failure and using exercises that best recruit the target muscles. Catanzano says the barbell bench press is overrated for pec gains.Let the majority of your chest training come from dumbbell, machine, andcable work,which is easier on the joints and can allow you to work the muscles through greater ranges of motion and with better isolation. The same goes for back training.
If you’re over 40, or trying to work around injuries, the way you sequence your exercises is extra important. Rather than starting with your heaviest lifts, begin sessions with dumbbell or machine work and put moves like the bench press and bent-over row later in the workout when you’re fully warmed up and mobile. “You could do a dumbbell row and dumbbell bench press first,” Catanzano says, “and then go into bent-over rows and barbell bench. Or, you could do flys before bench presses, and chest-supported rows before bent-over rows or rack pulls.” Your joints will thank you.
If strength is a big priority for you, however, and you’re sure your body can handle it, you can sequence your workouts the opposite way. Do your heavy work like bench presses first, when you can give them your best effort, and then move on to lighter dumbbell and bodyweight work afterward.
Cycling your rep ranges can help you avoid plateaus and hit big PR’s on your exercises. Catanzano likes to use three-week cycles, performing sets of 12–15 reps the first week, 8–12 the second, and 6–8 the third. Then he repeats the process. “You need to hit all rep ranges to maximize gains,” he says.
How To Stretch Before Doing Chest & Back
Prepare your chest and back muscles for a workout by first reducing the tension in them with some light rolling on a ball or foam roller—sometimes called a “smash.” This will help you access greater ranges of motion in your exercises; it also drives blood into the muscles to warm them up.
Chest Smash
Place the ball or roller against your pec muscles, right under your collarbone between your shoulder and breastbone. Allow your body to rest on the ball just enough to apply moderate pressure to the muscle—it shouldn’t hurt. Roll an inch or so in each direction, lingering over any positions where you feel the most tenderness, until they release. You can also extend your arm, reaching it overhead with palm facing up, and then taking it down to your hip while rotating your wrist as shown, to increase the stretch on the muscles in different ranges. Perform the smash for about a minute on each side.
Lat Smash
Place the ball or roller under your shoulder and into the meaty muscle on the side of your back (your lat). Lie on your side and apply gentle pressure to the muscle as your reach your arm overhead and out in front of you, rotating your wrist as shown. Perform the smash for about a minute on each side.
After you’ve rolled, perform the following mobility drills to further activate the muscles you’ll train. Do 2–3 sets of 5–10 reps for each exercise. Rolling and mobility drills are courtesy of of Cristian Plascencia and Natalie Higby, owners of The Durable Athlete (@durable.athleteon Instagram).
Cat-Cow
Step 1.Get on all fours with your hands under your shoulders and knees under your hips. Brace yourcore.
Step 2.Press into the floor, spreading your shoulder blades apart as you round your mid back toward the ceiling. Make sure only your mid back moves—the lower back should be neutral and braced.
Step 3.Pinch your shoulder blades together again as you extend your spine back to neutral.
Sky Reach To Arm Thread
Step 1. Get on all fours with your hands under your shoulders and your knees directly beneath your hips. Brace your core.
Step 2. Draw your right arm up and across your chest as you twist your right shoulder toward the ceiling and reach overhead. Be careful to keep your hips facing the floor.
Step 3. Reverse the motion, reaching your arm across your body and behind the support arm. Twist as far as you can, ideally until the back of your right shoulder touches the floor. Complete your reps on that side, and then switch sides and repeat.
Banded Shoulder Circles
Step 1. Stand holding an elastic exercise band (or dowel) with both hands outside shoulder width. Draw your ribs down, tuck your pelvis so it’s parallel to the floor, and brace your core.
Step 2. Keeping your arms straight, raise the band over and behind your head as far as you can. Reverse the motion to bring the band back in front of you.
The Best Chest & Back Workouts
Catanzano wrote up the following workouts, each with a different user in mind. One is ideal for the lifter who has access to a well-stocked gym, complete with free weights and machines. The second one is for the guy or gal training in a bare-bones home gym—a barbell, dumbbells, bands, and your bodyweight are all that’s needed. Lastly, there’s a workout for targeting common physique weak points—the upper chest and lower lats.
Choose the one that suits you best for now, and bookmark this article to refer back to the others. You may need them in the future!
Directions
For each of the workouts, follow the rep prescriptions below for every exercise. They will change weekly. Repeat the workouts for 6–8 weeks.
Week 1:perform 12–15 reps for each exercise.
Week 2:8–12 reps.
Week 3:6–8 reps.
Week 4:Repeat cycle.
Begin with 2–3 working sets for each lift (sets that aren’t warmups), and add volume over time. You can build up to 4–5 sets for some of the exercises, and consider having an additional chest and back day in the week to further increase the volume. If you consider either chest or back a weak point, aim to eventually perform 15–20 sets for it per week.
Remember that when chest and back exercises appear back to back, you can pair them off and alternate sets of each, with or without rest between them.
Step 1. Set up with the bar just over your eyes. Make sure that your feet are flat on the floor and your shoulders, back, and butt maintain contact with the bench. Arch your back, drawing your shoulder blades back and down. Grasp the bar with hands just outside shoulder-width apart (you may have to slide them an inch or two in either direction), so that when you lower the bar to your chest, your elbows make a 90-degree angle.
Step 2. Unrack the bar and hold it over your chest. Lower the weight to your chest, tucking your elbows about 45 degrees to your sides. After touching your chest, press the bar back to the starting position.
2. Incline Dumbbell Press
Step 1. Set an adjustable bench to a 30–45-degree angle, grasp a pair of dumbbells, and lie back on the bench, making sure your entire back is in contact with it—do not arch your back so that it causes your lower back to rise off the pad.Start with the dumbbells just outside your shoulders, elbows bent, and your forearms/wrists angled slightly (a V-shape).
Step 2. Keeping your elbows pointing at about 45 degrees, press the dumbbells straight up. Lower the dumbbells back down under control, until they’re just above and outside your shoulders.
3. Clavicular-Head Fly
Step 1.Attach single-grip handles (D handles) to two facing pulleys at a cable station set at shoulder height. Grasp the handles with hands angled 45 degrees and palms facing each other. Step forward so that your arms are extended at your sides, and there is tension on the cables.
Step 2.Keeping a slight bend in your elbows, bring your arms together in a wide arcing motion. Lower the weight under control until you feel a stretch in your chest.
4. Machine Low Row
Many gyms have a Hammer Strength low row machine, as shown here, but if yours doesn’t, try to mimic the exercise on a similar row machine, or set up an incline bench at a cable station.
Step 1.Adjust the seat of the machine so that, when you sit on it, the middle of your chest rests against the pad. Sit at the machine, brace your core, and bend at the hips—while keeping a long spine—until your chest is against the pad. Don’t let it come off the pad at any point during the exercise. Grasp the handles with a neutral grip (palms facing each other). Place your feet on the floor, and make sure your knees are out of the path of your arms when you row.
Step 2.Draw your shoulder blades down and together as you row the handles past your ribs. Be careful not to shrug your shoulders, and keep your chin tucked (don’t let your neck stretch forward).
5. Mid-Back Cable Row
Step 1.Set an adjustable bench to a 45-degree angle, and place the bench in front of a cable station with two side-by-side pulleys. Set the pulleys on the lowest level, and attach a single-grip handle (D-handle) to them. Rest your chest against the bench and grasp the handles with arms extended. Make sure you’re far enough away from the machine to feel a stretch on your back. Arch your back and brace your core.
Step 2.Drawn your shoulder blades back and down as you row the handles to the outsides of your chest, flaring your elbows about 60 degrees. Lower the weight with control.
6. Block Pull
Step 1.Rest the bar on blocks or mats so that it sits just below knee level. Stand with your feet hip-width apart. Bend your hips back to reach down and grasp the bar, hands just outside your knees. Take a deep breath into your belly and brace your core. Pull your shoulders back and down—think about trying to bend the bar around your legs like a pretzel; this will help you activate the right muscles. You can use straps, as shown, to support your grip.
Step 2.Keeping your head, spine, and hips aligned, drive your heels into the floor and pull the bar up along your shins until you’re standing with hips fully extended and the bar is in front of your thighs. Lower back to the floor under control.
At-Home Chest & Back Workout
1. Landmine Suitcase Row
Step 1.Load a barbell into a landmine unit, or wedge one end into a corner. Load the other end of the bar with weight, and stand behind the plates, both feet on one side of the bar. Keeping a long spine with your core braced, bend your hips back to reach down and grasp the bar. Your torso should be about 45 degrees.
Step 2.Draw your shoulder blade back and down as you row the bar the bar, stopping when your elbow reaches the middle of your torso. Lower back down under control. Complete your reps, and then repeat on the opposite side.
2. Incline Dumbbell Press w/ Neutral Grip
Step 1.Set an adjustable bench to a 30- to 45-degree angle and lie back against it with a dumbbell in each hand at shoulder level. Turn your palms so that they face each other, and your elbows are tucked at about 45 degrees to your sides.
Step 2.Press the weights overhead to lockout, and lower them with control.
3. Chest-Supported Dumbbell Row
Step 1.Set an adjustable bench to about a 60-degree angle and lie down with your chest against it. Your spine should be long and your core braced. Grasp dumbbells with your arms extended, and allow your shoulder blades to spread apart while the weights hang at arm’s length.
Step 2.Row the dumbells to your sides, drawing your shoulder blades back and down. Lower under control.
4. One-Arm Band Press
Step 1.Attach a band to a sturdyanchorpoint at shoulder level behind you, and grasp the free end in one hand. Hold the band at chest level with your arm angled about 45 degrees from your torso. Step away from the anchor point to put tension on the band.
Step 2.Press the band in front of you to face level. Lower under control. Complete your reps, and then repeat on the opposite side.
5. Low-Lat Row w/ Band
Step 1.Attach a band to a sturdy anchor point overhead, and set up an adjustable bench behind it at a roughly 60-degree angle. Grasp the band in one hand and brace yourself on the bench with the opposite hand and knee. The working arm should be angled 120–150 degrees from your torso (i.e., if your arm hanging at your side is at zero degrees, and your arm extended in front of your chest is 90 degrees, the exercise should be done with your arm 30–60 degrees above that).
Step 2.Row the band down to your hip, stopping when your elbow is in line with your torso. Control the motion as you extend your arm again. Complete your reps, and then repeat on the opposite side.
6. Incline Dumbbell Fly
Step 1.Set an adjustable bench to a 30- to 45-degree angle and lie back against it with a dumbbell in each hand at shoulder level. Turn your palms so that they face each other, and your elbows are tucked at about 45 degrees to your sides. Press the weights overhead.
Step 2.Keeping a slight bend in your elbows, lower your arms slowly in a wide arcing motion until you feel a stretch in your pecs. Bring your arms back up in an arc until they’re overhead again.
7. One-Arm Dumbbell Row
Step 1.Place one knee on a flat bench and brace yourself with the hand on the same side. Your spine should be long and your core braced. Grasp a dumbbell at arm’s length.
Step 2.Draw your shoulder blade back and downward as you row the weight to your side with your elbow flared out about 45 degrees. Lower the weight under control. Complete your reps, and then repeat on the opposite side.
8. Deficit Pushup
Step 1.Place blocks or mats on the floor, or pile some weight plates as shown, so you create an elevated surface for your hands to rest on. Get into pushup position. Your body should form a straight line, with your pelvis slightly tucked so that it’s perpendicular to the floor. Brace your core.
Step 2.Lower your body between the blocks or plates until you feel a deep stretch in your chest, but don’t lose your pelvic position. Press back up.
9. T-Bar Row
Step 1.Load a barbell into a landmine unit, or wedge one end into a corner. Load the other end of the bar with weight, and stand behind the plates, feet straddling the bar. Grasp a V-grip handle (as used with cable stations) and, keeping a long spine with your core braced, bend your hips back to reach and hook the handle onto the bar. Allow your knees to bend. Grasp the handle with both hands, palms facing each other. Maintain your long spine and tight core as you pick the bar off the floor.
Step 2.Draw your shoulder blades back and down as you row the bar the bar, stopping when your elbows reach the middle of your torso. Lower back down under control.
Upper-Chest & Lower-Lat Workout
If you’ve been training a while, you’ve surely noticed that some of your muscle groups aren’t developing as well as others. When it comes to the chest and back, the upper portion of the pecs and lower section of the lats are commonly the weakest areas. Filling out the upper pecs will make your chest look bigger overall, and developing the lower lats will make your back appear wider (which makes your waist look smaller by default).
While you can’t isolate these areas completely, you can bias them with certain exercises and technique tweaks. Catanzano says thatany row done with a neutral (palms facing in) grip and bringing the elbows tight to the side of the body—and stopping when the elbows are in line with the torso—will emphasize the lats over the upper back. To zero in on the lower-lat fibers (sometimes called the iliac lats, because they originate on the iliac crest of the pelvis), you need to perform pulling motions with your arm over and a little in front of your head (120–150 degrees of shoulder flexion), and driving your elbow toward your hip.
To attack the upper chest, you need to isolate the clavicular pec fibers as much as possible. The arm path to do this is similar to the one that trains the lower lats, but, of course, the resistance comes from the opposite direction. Incline presses and flys are the typical exercise choices, but make sure you perform them with a neutral grip and elbows tucked, so that your arms travel the same direction that the clavicular fibers run.
1. Incline Dumbbell Press
Step 1. Set an adjustable bench to a 30–45-degree angle, grasp a pair of dumbbells, and lie back on the bench, making sure your entire back is in contact with it—do not arch your back so that it causes your lower back to rise off the pad.Start with the dumbbells just outside your shoulders, elbows bent, and your forearms/wrists angled slightly (a V-shape).
Step 2. Keeping your elbows pointing at about 45 degrees, press the dumbbells straight up. Lower the dumbbells back down under control, until they’re just above and outside your shoulders.
2. Chest-Supported Low-Lat Row
Step 1.Rest your chest on an elevated bench, high enough so that your arms can hang straight down while your body is parallel to the floor. Keep a long spine and your core braced. Grasp a dumbbell in each hand.
Step 2.Draw your shoulder blades down and back as you row the weights to your sides.
3. Clavicular-Head Pec Fly
Step 1.Attach single-grip handles (D handles) to two facing pulleys at a cable station set at shoulder height. Grasp the handles with hands angled 45 degrees and palm facing each other. Step forward so that your arms are extended at your sides, and there is tension on the cables.
Step 2.Keeping a slight bend in your elbows, bring your arms together in a wide arcing motion. Lower the weight under control until you feel a stretch in your chest.
4. Incline Low-Lat Pulldown
Step 1.Set an adjustable bench at about a 60-degree angle in front of a cable station. Attach a bar to the pulley at the highest setting, and then attach single-grip handles to the bar so that you can grasp them with palms facing in. Lie with your chest against the bench and your arms extended overhead. Keep a long spine, and your core braced. There should be tension on the cable to start.
Step 2.Draw your shoulder blades back and together as you row the handles, stopping when your elbows are at your sides. Lower the weight under control.
5. Close-Grip Incline Press
Step 1. Set an adjustable bench to a 30–45-degree angle and lie back on it. The bar should be just over your eyes. Make sure that your feet are flat on the floor and your shoulders, back, and butt maintain contact with the bench. Arch your back, drawing your shoulder blades back and down. Grasp the bar with hands about shoulder-width apart.
Step 2. Unrack the bar and hold it over your chest. Lower the weight to your chest, tucking your elbows about 45 degrees to your sides. The bar should touch the upper portion of your chest, just under the collarbone. Press the bar back to the starting position.
6. Rack Pull
Step 1.Set the bar on blocks or the spotter bars of a power rack, as shown, so that it sits just above knee level. Set up as you did for the block pull above—long spine, shoulders packed down and positioned directly over the bar, and core braced. Actively pull the bar tightly into your body, and maintain this tension throughout the rep. You can use straps, as shown, to support your grip.
Step 2.Extend your hips to lockout, standing up tall, and then lower the bar back under control.
]]> https://www.onnit.com/blogs/the-edge/climbing-the-hill-the-ultimate-calisthenics-workout-transformation2025-07-15T16:45:21-05:002025-08-15T09:50:06-05:00Climbing the Hill: The Ultimate Calisthenics Workout TransformationJeremy GottliebAll my workouts involve one thing:calisthenics, orbodyweight exercises. I do all my workouts on parallel bars, pullup bars, or on the ground.
I used to be into heavy powerlifting, but recently moved to a purelybodyweight trainingregimen.
I noticed a big change in both my physique and strength.
I actually felt a difference in my body; doing my unique exercises opened up a totally new door.
I noticed I was using muscles that I had never even used before.
Believe it or not, all my workouts involve calisthenics circuit routines now. In a circuit, you move from one exercise to the next with little or no rest between moves.
Circuit training doesn’t allow your heart to rest or slow down. It keeps it up consistently throughout your workout allowing you to burn more calories and build conditioning.
I do hundreds of different calisthenics circuits and I never touch the weights. I’ve lost 37 pounds of fat in six months doing my exercises. I went from 202 pounds to a lean 165 pounds.
I get at least 50 messages a day just on my transformation and how I did it.
The best part is, anyone can do it themselves with hard work and dedication.
I’m going to share four of my circuit workouts with you. One is for beginners and can be done at home. Two are for intermediate and advanced exercisers, and one is only for extreme athletes.
Find the workout that’s best for you and, if you stick to it, you will see results in less than two months.
How Long Should You Train For In a Calisthenics Workout?
The At-Home (beginner level), Intermediate, and Extreme Athlete routines shown here should all take 30 minutes or less to complete. The Advanced workout may take as long as 45 minutes. In general, you can save time by trying to move at a brisk pace between exercises and circuits, but give yourself enough rest time so that you can complete your exercises safely and with good form. You can work on reducing rest periods as your conditioning improves over time. Have a timer handy to track the length of your sets and your rest periods; you’ll need one for the Advanced and Extreme Athlete workouts.
How Long Should You Recover After A Calisthenics Workout?
Each of these workouts can be performed up to four times per week on non-consecutive days. Three to four workouts per week is enough. For example, Monday, Wednesday, Friday, and Sunday. You can also combine them, performing the At-Home workout one day, the Intermediate on another, and the Advanced (if you dare!) on a third day. If you feel extra sore or run down on a day you had planned to train, take another day’s rest before your next workout (or perform light exercise or aerobic activity, such as walking/jogging, cycling, yoga, mobility work, etc.).
Calisthenics Vs. Weight Training
The term calisthenics refers to training that uses primarily bodyweight exercises to develop strength,endurance, mobility, and coordination. It’s the kind of exercise that gymnasts and martial artists have done for eons using their own body weight, and while it develops musclemasstoo, that’s more of a byproduct. You can expect to get very strong relative to your bodyweight when you do calisthenics training, and master your control of your body in various positions and movements. I.e., you’ll become stable and athletic.
Weight training uses external loads—free weights, cables, machines—to strengthen the body, and while it can develop the same qualities that calisthenics can, it’s better-suited for those who want to build maximum muscle mass, power, and absolute strength. This makes it a potentially better choice for athletes in sports like football, baseball, and track and field. A gymnast will usually be able to do more pullups and pushups than a bodybuilder or powerlifter, but the one who lifts heavy weights can probably move more overall load and will look bigger and stronger. Neither kind of training is superior to the other— both have their advantages, depending on your goals.
For the best, most well-rounded results, include both calisthenics, cardio and weight training in your regimen. You can alternate the styles, spending a few weeks working on one and then switch to another, or you can combine them in the same workout. For instance, you can start with weight training exercises to peak your power and strength, and then finish your routine with bodyweight training that works more on endurance and movement skills.
How To Stretch For A Calisthenics Circuit Workout
Follow the video below for a routine to warm up your entire body before the calisthenics workouts offered here. For more tips on mobility and stretching, follow Onnit-certified Durability Coach Brian Butz (aka@themobilemammothon Instagram).
Lunge out to your left side and lower your body until your left leg is bent about 90 degrees and your trailing leg is straight. Hold for a moment, and then reverse the motion, twisting your body to get into a lunge position on the right leg, facing that direction.
Plant your left hand on the floor and twist your torso to the right, reaching your right hand overhead.
Get on all fours and extend your right leg to the side. Use your hands to gently push your hips back so your feel a stretch on the inner side of your right thigh. Allow your foot to roll backward and point upward.
Push your hips forward again and twist your torso to the right, reaching your rightarmoverhead. Complete your reps and then repeat on the opposite side.
Get on all fours, and then step your left foot forward, planting your foot outside your left hand. Try to straighten your back so that it’s flat from your head to your pelvis.Relax, and reach back to grasp the top of your right foot.
Gently pull it forward so you feel a stretch on your right thigh and hip. At the same time, extend your back and use your left hand to push on your left knee so you end up in a tall kneeling position.
Hold the stretch for a moment, and then let your right foot go. Repeat the movement on the opposite side. Avoid hyperextending your lower back when you pull on your foot.
Sit on the floor with your left leg bent in front of you and your right leg bent behind you. Press your hands into the floor and push your chest up and out. Now rotate your right leg up off the floor as you rotate your left leg up and to the right, so your body turns and you end up in the same starting position but with your legs opposite. From there, extend your hips so you rise to a tall kneeling position.
Lower your hips back to the floor, plant your hands, and repeat the movement to the other side.
At-Home Calisthenics Circuit Workout
Here’s abodyweight workoutthat’s appropriate whether you’re a total beginner to training or you have a little experience with lifting weights but you want to get back to basics with calisthenics training. You can do this routine at home if you have a pullup bar, and it may help to have an elastic exercise band as well, which can help to unload some of your bodyweight and make exercises like chinups and dips easier.
Perform the exercises as a circuit, completing one set for each in sequence. Rest 60 seconds between exercises, and repeat the circuit for 3 total rounds. Except where otherwise noted, do as many reps as possible for each exercise, but stop one short of failure—that means when you feel your form is about to break down. For example, if you’re doing chinups and you get to the eighth rep and feel like you’re slowing down and won’t get a ninth rep with good form, stop the set there.
Use a shoulder-width grip and turn your palms to face you. If you can’t get at least 5 reps on your own, attach an elastic exercise band around the bar and stand in the open loop to unload some of your bodyweight.
Lower your body until your upperarmsare parallel to the floor. If you can’t get at least 5 reps on your own, attach an elastic exercise band to the dip bars and stand (or kneel) in the open loop to unload some of your bodyweight. If you don’t have dip bars, you can use the backs of two chairs.
Stand with feet between hip and shoulder-width and quickly lower your body until your thighs are parallel to the floor. Explode upward as high as you can. Land softly, and reset yourself before you begin the next rep.
Place your hands just outside shoulder width and lower your body until your chest is about an inch above the floor. Keep your body in a straight line with yourcorebraced. Your lower back shouldn’t arch and your elbows should point 45 degrees from your torso.
Stand with feet shoulder width and squat down to place your hands on the floor. Now shoot your legs behind you fast so you end up in the top position of a pushup. Jump your legs back up so they land between your hands and then stand up quickly.
If you have a jump rope, jump for 30 seconds, landing on the balls of your feet. Any type of jump is OK, or mix a few together.
Intermediate Calisthenics Circuit Workout
This workout is good for people with a year or more of strength training or bodyweight-only training under their belt. You can do it at home, but you’ll need a pullup bar and some space to run, so a public park or a gym may be more appropriate.
Perform the exercises as a circuit, completing one set for each in sequence. Rest 60 seconds between exercises, and repeat the circuit for 3 total rounds. Except where otherwise noted, do as many reps as possible for each exercise, but stop one short of failure—that means when you feel your form is about to break down. For example, if you’re doing jumpsquats, you might get to rep 10 and feel like you’re slowing down. If you’re pretty sure you won’t be able to get the 11th rep at the same speed or with a safe landing, stop the set there.
Set the handles of a suspension trainer around shin level and rest your feet on a bench behind you. Suspend yourself over the handles in a pushup position and then lower your body until your chest is just above your hands. Keep your body in a straight line with your core braced.
Set the handles of a suspension trainer low enough so that when you hang from them with arms extended, your body is angled 45 degrees to the floor, or lower. (If you’re strong enough, rest your feet on a bench for an added challenge.) Keep your body in a straight line and brace your core as you pull yourself up.
Stand with feet between hip and shoulder-width and quickly lower your body until your thighs are parallel to the floor. Explode upward as high as you can. Land softly, and reset yourself before you begin the next rep.
Stand with your feet between hip and shoulder width, and squat down to place your hands on the floor in front of you. Jump your legs back into the top of a pushup position, then reverse the motion to come back up to standing.
Flatten your lower back into the floor and brace yourabs. Extend your legs overhead and then lower them as far as you can before you feel your lower back is about to buckle up from the floor. Begin raising and lowering both legs, alternately, a few inches (as if you were kicking your legs while swimming).
Run as fast as you can maintain for 30 seconds. Other options are to run up a hill, or run in place.
Advanced Calisthenics Circuit Routine
If you’ve been training for a few years and feel pretty strong on bodyweight exercises, give this advanced routine a shot.
Perform the exercises as a circuit, completing one set for each movement in sequence. Set a timer and perform each exercise for 30 seconds. Try to limit your rest between exercises. Do 1–3 total rounds.
Get into a deep squat position and plant your hands on the floor. Tip your body forward and rest your knees on your elbows. Extend your back and hips so that your bodyweight is supported on your hands, and hold the position.
2. Jump Squat with Rotation
Reps:Jump in the 3 directions shown for 30 seconds
Lower your body into a squat quickly and then explode upward as high as you can. Swing your arms back as you go down, and throw them forward as you jump. Land softly, driving your knees outward. Hop 90 degrees to your right side, and repeat the jump. Hop back to face forward again, jump, and then rotate to face your left side, and jump again. Continue in this manner, jumping in the three different directions. Don’t let your knees cave inward on your landings, and make each jump as vertical as possible.
Get into pushup position and drive your hips backward as you extend your arms overhead. You’ll end up in a downward dog pose. Now lower your chest toward the floor in an arcing motion, finishing the pushup with your chest facing forward and your hips just above the floor (an upward dog pose). Keep your core braced so that your ribs don’t flare, and avoid shrugging your shoulders. Keep your shoulder blades together and pulled downward as you move toward the floor, and spread them apart as you push up.
Get into a deep squat and roll backward onto your shoulders. Roll forward again and go into the bottom of a deep lunge with your back knee pointing 90 degrees to the side. The heel of your front foot should stay flat on the floor. Repeat on the other side.
Shift your weight to your left leg so you feel like you’re sitting into your left glute. Now raise your right knee up and outward, planting your right foot on the floor at a 90 degree angle—both heels should be in line. Lower your body into a squat, keeping a long spine from your head to your pelvis. Alternate sides each rep.
Lie on your back and extend your arms and legs to form an X shape. Flatten your lower back into the floor. Perform a crunch, drawing your knees to your chest along with your arms.
Get into pushup position and turn your palms around so that your fingers point behind you. Hold your body in a straight line with your core braced and squeeze your shoulder blades together so that only your torso moves closer to the floor. Spread your shoulders apart to raise it back up while you hold your body in position.
Get into a lunge position—rear knee just above the floor and front knee bent 90 degrees. Jump and switch legs in mid air, landing with the opposite leg forward. Drive the arm that’s opposite the front leg forward on every rep.
Grasp the bar with hands outside shoulder width. Raise your legs up straight in front of you as you pull your body up until your chin is over the bar.
Extreme Athlete Calisthenics Circuit Routine
This workout is for very strong individuals who feel they’ve mastered their bodyweight on the basic exercises. It will challenge you with different movements you’ve probably never tried before, many of which are borrowed from the routines of gymnasts andMMA fighters.
Perform the exercises as a circuit, completing one set for each movement in sequence. Perform each exercise for the amount of time shown, and rest 30 seconds between exercises. Do 3 total rounds of the circuit, resting as little as possible between rounds.
Hang from a pullup bar with hands at shoulder width and raise your knees to your chest. Roll your body backward until your shins face the ceiling, and then reverse the motion.
Lie on your back on the floor and place a block or other light object between your knees. Squeeze your legs to keep it in place. Grasp a heavy or sturdy object with both hands behind your head. Keeping your legs straight, flatten your lower back into the floor and raise your legs up until your hips are off the floor.
Hang from a pullup bar with hands shoulder width. Tuck your knees to your chest and roll your body back so your torso is nearly parallel to the floor. Hold the position.
Get into pushup position and turn your palms around so that your fingers point behind you. Hold your body in a straight line with your core braced, and raise one leg off the floor. Maintain this position as you perform two pushups. Switch the leg that’s raised and repeat. Continue until the time is up.
Get into pushup position in front of a wall and walk your feet up the wall until your torso is nearly vertical. Brace your core so your ribs are pulled down and your torso is a solid column. Hold the position, then walk your feet down the wall slowly to return to the floor.
6. Mammoth March
Reps:Do 1 rep of each lunge, then squat, and repeat on the opposite leg. Continue for 30 seconds.
Step forward with your right leg and lower your body into a lunge position. Step back and all the way behind you to do a reverse lunge. Then step out to your right side for a lateral lunge, come back, and step behind you to the opposite direction for a dragon lunge. Step back until your feet are parallel, squat, and repeat the lunges on the opposite side. Squat again, and repeat the entire sequence until time runs out.
]]> https://www.onnit.com/blogs/the-edge/full-body-kettlebell-workout-for-beginners2025-07-10T10:55:28-05:002025-08-14T14:53:18-05:00Full-Body Kettlebell Workout For BeginnersJeremy GottliebIt’s easy to look atkettlebellmasters such asPrimal SwoledierEric Leija and get inspired. A well-ordered kettlebell flow can be as beautiful and sophisticated as a ballet (or, if you prefer, a choreographed fight scene in a blockbuster action movie). But it’s important to realize that no one starts there—not even an Eric Leija. To get good atkettlebells, and build all the muscle, power, and athleticism that comes with them, you have to master the basics.
Fortunately, it won’t take long if you start with the workout provided here by Onnit Coach John Wolf. It requires only one kettlebell, and works the entire body. You’ll get all the major benefits of much flashier kettlebell routines, but in a workout that leaves less room for error (or injury), so you can improve quickly and graduate from beginner to the next level faster.
Key Takeaways
1. Kettlebell training breaks down to mastering the press, row,squat, hinge, and rotation.
2. If you can’t overhead press safely and effectively, try pressing from the floor.
3. Use of a single kettlebell can help you build strength, muscle, and athleticism, as well as save you workout time.Kettlebell training also helps you develop the body controlto keep good form on virtually any other type of strength training you choose to do, so it provides a great foundation.
4. You can adjust workout parametersaccording to the type of kettlebell you have (light or heavy).
Full-Body Kettlebell Workout For Beginners
Becoming a kettlebell master starts with owning fivebasic movement patterns. You have to be able to press, row, hinge at the hips, squat, and rotate your body—as well as resist unwanted rotation—while keeping your body in good alignment so that your movements are efficient, effective, and safe. The workout provided here includes the simplest examples of all of these movement patterns, but don’t think that means “easy.” The strongest kettlebell lifters in the world—including John Wolf himself—still do these exact exercises frequently, so treat them with respect.
Note that we’re not having you do the fullkettlebell swing—even though we’re well aware that it’s one of the most popularkettlebell exercises, and often found in beginner routines. Rather, we’ve modified it to a version that is more user-friendly, but still challenging, and will allow someone of any experience level to train safely and with optimal form.The chest-loaded swing gives you more control over the kettlebell while strengthening your upper back, setting you up to do the full swing with better techniquein the near future.
Along the same lines, the halo and figure-eight leg pass may not feel like serious strength training, but they serve a very important purpose. Both will help get your body familiar with rotational movements, so that when you attempt cleans, snatches and other exercises that feature more twists and turns down the road, they don’t feel totally foreign to you.
In short, our beginner’s workout is designed to improve your familiarity with the kettlebell while building strength andendurance. It covers the prerequisites you need in order to eventually perform fancier moves like fullkettlebell swings, cleans, snatches, and the kind of rotational movements that ultimately lead to impressive exercise sequences like kettlebell flows.
Best of all, you only need one kettlebell to do the workout.An eight kilogram bell is enoughfor most women, and a 16kg is good for men.
DIRECTIONS
Perform the exercises as a circuit, completing one set of each move in sequence without rest in between. When you’ve completed the entire circuit, rest 1–2 minutes, and then repeat the circuit for 3 total rounds. You can repeat the workout for up to three sessions per week, resting at least a day between sessions. For example, you could do the workout Monday, Wednesday, and Friday.
Try to improve some aspect of your performance every time you repeat the workout. This could mean tightening up your form, adding a rep or two to a set of one or more of the exercises, or cutting down on your rest periods.
Step 1. Hold the kettlebell by its horns and drive your shoulder blades together and downward so your chest is open (think “proud chest”). Tuck your elbows in so your forearms are as vertical as possible. Stand with feet a bit wider than hip-width apart, and your toes turned out slightly. Take a deep breath into your belly, and twist your feet into the floor (imagine screwing them down without shifting their position).
Step 2. Now squat, keeping your spine long and your torso upright. Go as low as you can without your tailbone tucking under your butt.
Step 3. Exhale as you extend your hips and knees to stand up tall again.
Step 1. Place the kettlebell on the floor and take a staggered stance with your left foot in front and planted just outside the weight. The toes on both feet should face straight forward. Dig the ball of your right foot into the floor behind you, and bend at the hips so your torso is angled about 45 degrees to the floor. Rest your left elbow on your thigh for support, and reach for the kettlebell with your right hand. Take a deep breath into your belly, and brace yourcore.
Step 2. Exhale as you row the kettlebell to your hip. Draw your shoulder blade back and down as you pull, and avoid twisting your torso—keep your shoulders square to the floor.
Step 3. Lower the weight under control. Complete all your reps on that side, and then repeat on the other side.
Step 1. Stand tall, holding the kettlebell in one hand at shoulder level. Root your feet into the floor as if you were preparing for someone to push you. Draw your shoulder blades down and back—think, “proud chest”— pull your ribs down, and brace your core. Take a deep breath into your belly.
Step 2. Exhale as you press the weight overhead with your forearm vertical. Your elbow will naturally move away from your side and the press will feel like an “around the world” motion—that’s OK. Note that your chin should be pulled back so that weight has no trouble clearing it.
Step 3. To lower the kettlebell, pull it back down into position—as if you were performing a pullup. Complete all your reps on that side, and then repeat on the other side.
Step 1. Stand with feet between hip and shoulder width, and root your feet. Hold the kettlebell by its horns, pulling the bottom of the bell into your lower sternum. Draw your shoulder blades together and down (“proud chest”), and cast your eyes on a spot on the floor approximately 15 feet in front of you. Take a deep breath into your belly, and brace your core.
Step 2. Tilt your tailbone upward slightly (so your pelvis tips forward a bit). Keeping a long spine, bend your hips straight back, as if you were trying to touch your butt to the wall behind you. Allow your knees to bend as needed.
Step 3. When you feel a stretch in your hamstrings, exhale, and extend your hips and squeeze your glutes, tucking your tailbone under as you lock out your hips.
Step 1. Stand with feet between hip and shoulder-width, and hold the kettlebell by its horns upside down—the bell’s bottom should face up. Screw your feet into the floor, get into your proud-chest position, lick your ribs down, and brace your core. Take a deep breath into your belly.
Step 2: Exhale as you begin moving the kettlebell around your head, being careful to maintain your posture and not bend your torso in any direction. Move slowly to avoid whacking yourself in the head. Make a full circle, and then repeat in the opposite direction. Continue alternating directions on each rep.
Step 1. Set up as you did for the shoulder halo but hold the kettlebell by the handle at arm’s length in one hand and make circles around your hips, passing the bell to the other hand and then back again. Perform eight reps in one direction, and then repeat in the opposite direction.
Step 1. Place the kettlebell on the floor, and stand behind it with feet between hip and shoulder width. Keeping a long spine, bend your hips back, allowing your knees to bend as needed until you can grasp the kettlebell with one hand. Get a proud chest, and take a deep breath into your belly.
Step 2. Extend your hips just enough to lift the weight off the floor, and pass it back between your legs to the opposite hand. Move the bell around your leg to the front of your body and back through your legs again to pass it back to the other hand. Continue passing the kettlebell back and forth in a figure-eight motion. Be sure to keep your knees bent so that you’re low to the floor and keeping tension on your quads the whole time.
Beginners to kettlebell training, as well as those with shoulder mobility challenges or shoulder injuries, may have difficulty performing the one-arm strict overhead press. If you find that you can’t fully lock out your elbow without hyperextending your back and flaring your ribs, or you simply can’t extend your elbow much past 90 degrees, count yourself in this group. But that’s OK, says Wolf. “Don’t get fixated on achieving a full overhead lockout right away. Just going to where your elbow is bent 90 degrees and holding it isometrically is a ton of work for most people.”
In other words, one alternative to the one-arm kettlebell press shown above is to simply press the weight up to a 90-degree elbow bend and hold it two to three seconds. That’s one rep. Over time, you’ll get stronger in that range of motion, and you’ll be able to lock out your elbow while keeping the rest of your body in check (that is, maintain all the other form points described above).
Another option is to regress the movement to a floor press—lie down on the floor and press the weight from your chest (think of it as a bench press with a shortened range of motion). The floor provides the stability your shoulder and core need, so you canfocuspurely on pressing. It’s a safer alternative to overhead pressing that will strengthen your upper-body muscles while you work on the shoulder mobility/stability and core strength you need to get back to the classic overhead press.
Step 1. Lie on your back on the floor with a kettlebell in one hand. Bend your knees and plant your feet; flatten your lower back into the floor, brace your core, and squeeze your glutes. Position your working arm 45 degrees to your side, bend the elbow 90 degrees, and drive your elbow into the floor to create stability. Use your free arm to help you lift the kettlebell overhead so your set starts at the top of the movement.
Step 2. Lower your arm until your triceps touch the floor, but not the elbow (don’t let your elbow crash down). Pause a moment under tension, and then press the kettlebell back overhead.
If you’re not sure exactly what training with kettlebells can do for you, here’s a rundown of the selling points.
Good Form
Kettlebell training builds muscle and strength like any other type of resistance training, but it’s especially good for developing body awareness and good movement skills at the same time, and that will transfer over to any other kind of training or athletic activity you’re interested in.
The reason why lies in the kettlebell’s design. The center of gravity (the bell itself) is displaced six to eight inches away from the handle you grip, and that makes it harder to control than a dumbbell, barbell, and most other conventional training implements. Almost any exercise you do, then, is going to require you to keep stricter form in order to perform it correctly, and your body will have to activate more overall muscle to get it done.
Imagine a kettlebell overhead press. Because the weight hangs at a distance from the handle, it will tempt your arm to drift backward as you press. You have to concentrate on controlling your shoulder to the max in order to press the weight straight up, and that not only builds bigger, stronger shoulders, but also makes you better at the skill of shoulder pressing.
Most kettlebell exercises expose your weaknesses right away. If you feel your lower back hyperextending and your ribs flaring while you press, you know you have to work on keeping your core tight, and you may need extra shoulder and T-spine mobility training as well. Many people will do barbell back squats and allow their chests to fall forward, their knees to cave inward, and their heels to come off the floor. But when you do a goblet squat with a kettlebell, it’s easy to see and feel a correct rep versus a sloppy one.
Core and Grip Strength
The kettlebell’s offset loading also ensures that virtually any exercise you do will be a core exercise, as your core keeps your whole body from getting pulled out of alignment. Meanwhile, the kettlebell’s handle is slicker and less accommodating than a dumbbell’s, meaning that your grip/forearm muscles will have to clamp down harder—so kettlebells are great for building an iron handshake and the ability to hold on tight.
Improved Athleticism
There are virtually no isolation exercises that you can perform with a kettlebell (such as bicepscurls, leg extensions, etc.). Most movements you’ll do train nearly the whole body at once, and that teaches it to work as a unit—the way it does when you’re playing a sport. Furthermore, kettlebells lend themselves to explosive movements like swings and cleans, which develop power (particularly in the hips, which are key for jumping and running). Kettlebells also give you the opportunity to train in multiple movement planes—sometimes all at once—preparing you for the exact mechanics and sudden changes of direction you use in all kinds of sports. You can string exercises together, as in a kettlebell flow, to practice being explosive and strong in all directions—a feature you certainly don’t get with barbells and dumbbells.
Research is beginning to catch up with kettlebell coaches, confirming what they’ve known for years. A review of five studies in Physical Therapy Reviews suggests that kettlebell training is safe and effective for boosting functional strength and power, and may improve postural control as well. Another study from the Journal of Strength and Conditioning Research showed that a kettlebell workout burned more calories than a sprint cycling session, making it the more desirable and sustainable cardio option for many people.
Finally, an American Council on Exercise study put a group of fit people with strength-training experience on an eight-week kettlebell program. Not only did they gain strength (including a 70% jump in core strength), but they also improved aerobic capacity—by 13.8%—and dynamic balance. Lead researcher John Porcari, PhD, summarized the findings as follows: “You don’t really do resistance training expecting to get an aerobic capacity benefit¦ But with kettlebells, you’re able to get a wide variety of benefits with one pretty intense workout.”
Efficient Training
Whereas you may need several pairs of dumbbells to get afull-body workout, you can do the job with only one or two weight increments when you use kettlebells, and the workout we offer here requires only one kettlebell on its own. “There’s a huge library of exercises that you can access with one weight,” says John Wolf. “I’ve always said that if you have one kettlebell in the corner of your room, you basically have a gym.”
What Muscles Do Kettlebells Work?
One of the reasons kettlebell training is so effective is that it works everything. You don’t need to think about whether you’ve done enough work for one muscle or another, because in a well-balanced kettlebell workout, you’re sure to cover them all. As discussed earlier, kettlebell training is particularly demanding of the core and the grip, so you can be sure yourabsand forearm muscles will get stimulated no matter what exercises you perform.
Any full-body kettlebell workout should include some squatting, hip-hinging, pressing, rowing and rotational movements (you’ll find them all in the workout we offer below). That means that you’ll train every major muscle group in the body, but, to be more specific, we’ll break down what those movement patterns train one at a time.
Note that the list below covers only the major contributing muscles. Understand that there is also a lot of overlap between movements. For instance, hinge exercises work many of the same muscles as squatting exercises and even pressing movements, so to avoid repeating ourselves, we list the muscles that are primary targets for each movement pattern only.
– Chest (particularly upper chest, or, the clavicular head)
– Triceps
Rowing
– Shoulders (rear deltoid)
– Upper back (trapezius, rhomboids, lats, teres major)
– Biceps
– Forearms (brachioradialis, wrist flexors)
Rotation
– Core (obliques)
How To Stretch Before A Full-Body Kettlebell Workout
Many people believe they need to stretch before a workout in order to perform it safely, but this is only partly true. You’ll get a more effective warmup by performing a few mobility drills—a combination of stretching and more dynamic movements. Mobility work prepares your joints for the ranges of motion you’ll use on your exerciseswhile also raising your core temperature and driving blood into the muscles you’ll be working.For any full-body kettlebell routine, you’ll want to focus specifically on preparing the shoulders, T-spine, and hips, which the following moves cover.
Perform the drills as a circuit, completing 3–5 reps of each in sequence, and then repeat for up to 3 rounds total.
1. Straight-Leg Hip Circle
Step 1. Hold onto a sturdy object for support, and raise one leg up in the air 90 degrees. Keep the knee as straight as you can.
Step 2. Keeping your shoulders facing forward, draw your leg outward and away from you to the side. When you feel you’re running out of range, begin turning your foot over to face the floor. Exhale as you do so.
Step 3.When you’ve made a complete circle with your leg, return your foot to the floor, and then repeat in the opposite direction. That’s one rep. Complete all your reps on that side, and then switch legs.
Step 1. Stand tall and inhale deeply as you draw your elbows as far back as possible with palms facing up.
Step 2. Exhale fully as you push your palms away from you, and rotate them so your fingers point up. Spread your shoulder blades apart as you do so, rounding your upper back. That’s one rep.
3. Hip-Opening Mountain Climber
Step 1. Get into a pushup position with hands directly beneath your shoulders and legs extended behind you, feet shoulder-width apart. Tuck your tailbone and brace your core—your head, spine, and pelvis should form a straight line. Draw your shoulder blades back together and downward. Think: “proud chest,” and “long spine.” Take a deep breath.
Step 2. Exhale your breath and, keeping your core braced, raise your right leg to the outside of your right arm, landing with your foot flat and the knee pointed straight ahead. Try to maintain your spine and pelvis alignment as you do this. It’s OK if you can’t do it perfectly now, but be aware of how you’re moving so you can correct it. When your leg is in position, pull it inward while driving your right arm out so it touches the outside of your arm firmly.
Step 3. Allow your hips to sink a bit and adjust so you re-establish your proud chest and long spine position. Hold for 3–5 seconds.
Step 4. Return your right leg back to the original pushup position, and repeat on the opposite leg. That’s one rep of each.
4. Sky Reach To Arm Thread
Step 1. Get on all fours with your hands under your shoulders and your knees directly beneath your hips. Brace your core.
Step 2. Inhale as you draw your right arm up and across your chest, twisting your right shoulder toward the ceiling and reaching overhead. Be careful to keep your hips facing the floor.
Step 3. Exhale as you reverse the motion, reaching your arm across your body and behind the support arm. Twist as far as you can, ideally until the back of your right shoulder touches the floor. That’s one rep. Complete your reps on that side, and then switch sides.
5. Arm Screw
Step 1. Stand tall and reach yourarmsout to your sides. Inhale as you lift your right shoulder toward your ear, and turn the front of your right shoulder toward your chest as you rotate your arm inward. This will cause your torso to twist to the left.
Step 2. Continue rotating your right arm, twisting it like you’re wringing out a sponge until your right palm is facing upward (or as close as you can get it). Exhale. At the same time, reach your left arm out, palm facing up. Allow your torso to bend to the left as you reach.
Step 3. Return to the starting position and repeat on the other side. That’s one rep.
Next Level Single-Kettlebell, Full-Body Workout
Here’s another workout you can do with a single piece of iron, courtesy of Juan Leija, an Onnit Coach and former Director of Fitness Programming at Onnit (@juannit_247 on Instagram). It’s a good next step after you’ve mastered the routine above. This workoutnot only offers strength training but also includes a warmup, and, at the end, a conditioning circuit to burn fat and build endurance. See the video above where Leija walks friend, two-time Highland Games champ, and Onnit Pro Athlete Matt Vincent (@matthewpvincent on Instagram) through the routine, and scroll down to see the program in writing.
Perform two sets of the single-kettlebell halo, followed by two sets of the Turkish getup.
Single-Kettlebell Halo
Sets: 2 Reps: 5–10 (each direction)
Hold the kettlebell by the horns (the sides of the handle) and begin circling it around your head. Make one complete revolution, and then switch directions. Each circle is one rep. Keep your ribs down and your pelvis level with the floor. Brace your core.
Turkish Getup
Sets: 2 Reps 2 (each side)
Step 1. Lie on your back and hold the kettlebell over your chest with your left hand. Bend your left knee and plant that foot. Extend your right arm out at 45 degrees and push your hand into the floor for stability.
Step 2. Roll your torso up off the floor, using your right arm for support. Keep the kettlebell overhead and pointing to the ceiling. Drive your left foot into the floor to bridge your hips up, and swing your right leg under you to rest on your right knee.
Step 3. Windshield wiper the right lower leg so it’s in line with the left leg, and you’re resting in the bottom of a lunge.
Step 4. Stand up tall, with the weight still raised overhead.
Step 5. Reverse the steps to return to the floor. Complete 2 reps on that side and then 2 on the other. That’s one set.
Remember, if your kettlebell is extra heavy, you don’t have to use it for the Turkish getup. Just your bodyweight is enough to get warmed up.
Doing some explosive exercises before you lift heavy will help to warm up your central nervous system, allowing you to better activate the muscle fibers you need to get the most out of your strength work. It will also help to wake you up, increasing alertness if you’re feeling a little groggy or distracted.
Perform two rounds of the kettlebell swing and speed pushup back to back. That is, do a set of the swings and then the pushups. Rest a minute, and repeat once more.
Step 1. Place your hands at shoulder width and your feet close together. Brace your core.
Step 2. As you lower your body, tuck your elbows about 45 degrees to your sides so that your head and arms form an arrow shape. Go until your chest is about an inch above the floor, and then press up explosively. Perform the reps as fast as possible.
Do all the reps for one side of your body, rest, and then work the other side. Repeat for two total sets on each side. Rest 1–2 minutes between all sets (unless you have to modify the intensity as described above).
Complete all the sets for one exercise before you go on to the next one.
Step 1. Clean the kettlebell up to the rack position and stand with feet about shoulder-width apart with toes turned out slightly.
Step 2. Imagine screwing your feet into the floor by turning them outward, but don’t move them out of position. You want to feel the muscles in your hips and glutes turn on. Now squat as deeply as you can while keeping your torso upright—stop before you feel your tailbone tuck under. Your knees should track over your big toes. Be sure to brace your core to avoid bending toward the side that’s holding the weight.
Step 3. Extend your hips and knees to stand up tall.
3. Kettlebell Push Press
Sets: 2 (each side) Reps: 5 (each side)
Step 1. Hold the weight at shoulder level and stand with feet about hip width. Brace your core.
Step 2. Drop into a quarter-squat, initiating the descent by bending your knees. Keep your head, spine, and pelvis in line so your back is flat and your eyes and head are forward. You don’t want to turn this leg drive portion of the lift into a squat, so only bend your knees enough to get some momentum, and don’t hinge your hips too much. Imagine yourself doing the move against a wall and sliding your torso up and down it—you should be that upright.
Step 3. As soon as you’ve dipped, extend your hips and knees explosively to stand up straight, driving through your heels, and simultaneously press the weight straight overhead. You’ll need to push from your shoulders and triceps, but with a strong and quick leg drive, most of the power for the press should be provided by your lower body. Keep your core tight throughout the move so your spine is stable and safe.
Now you’ll put all three of the strength exercises together into a circuit. Perform a clean, then drop into a squat, come back up, and, using the momentum from your legs, press the kettlebell overhead. That’s one rep. Perform 3 reps on each side and then rest a minute. Repeat for 2 total rounds.
What To Do If Your Weight Is Too Light
Vincent demonstrates the routine using a 24-kilogram kettlebell. If the weight you have access to feels light (say, a 12-kilo bell if you’re a man, or a four-kilo if you’re a woman), here are some ways to make it feel heavier and more challenging.
– Perform your reps with slower negatives, taking 3–5 seconds to lower the weight.
– Rest a little less time between sets. So, instead of resting up to two minutes as prescribed, rest 30–60 seconds.
What To Do If Your Weight Is Too Heavy
On the other hand, if the weight you have is 24 kilos or greater, or just feels too heavy for the moves we’re asking you to do, here are some ways to reduce the intensity to get through the workout.
– Just use your bodyweight. As Leija points out in the video, you can do the Turkish getups with bodyweight alone. This also applies to the kettlebell halo (you can just perform the motion with your arms) and the single-rack squat.
– Reduce the rep range. If 5 reps is too many on the clean and push press, aim for 3. If eight is too hard for single-rack squats, do 5–6. Over time, build your reps up, or add another round to the exercises that you had to cut reps from.
]]> https://www.onnit.com/blogs/the-edge/the-kettlebell-around-the-world-exercise-explained2025-07-10T10:55:28-05:002025-08-20T14:32:35-05:00The Kettlebell Around The World Exercise ExplainedJeremy GottliebAt first glance, thekettlebellaround the world exercise might seem simple, and maybe even goofy: you pass a kettlebell around your body in a circular motion. Heck, you say, a child could do that. But when you try it, you’ll see that it works muscles you never thought of in ways you never have, and it’s a necessary stepping stone to flashier, more sophisticated training like kettlebell flows and complexes.
Here’s a complete guide to the kettlebell around the world, from how to master to the movement to the whole world of movement it can unlock for you.
What Is The Kettlebell Around The World?
The kettlebell around the world, also called a hip halo by some coaches, has you moving a kettlebell around your body in a circular pattern, switching from one hand to the next. You’re allowed to use momentum so that the kettlebell flows smoothly through the transitions, but you have to control it—the weight can’t touch any part of your body (aside from your hands).
Step 1.Stand very tall holding a light kettlebell (about 4–7 kilos/8–16 pounds) in one hand.Hold the bell at the far edge of the handle so you leave space for the other hand to grasp it easily.Retract your neck and tuck your chin, draw your shoulders back so your chest is proud, and tuck your tailbone under slightly so that your pelvis is level with the floor. You should feel like your posture is perfect. Now brace yourcoreand hold this position throughout the exercise.
Step 2.Set the kettlebell in motion around your body (either direction, clockwise or counter-clockwise, is fine). When the kettlebell is directly in front of your body, switch it over to the other hand, and when it comes around directly behind your body, switch back. Move fast enough that you get some momentum going, but don’t try to rush it—set a steady rhythm.
Keep yourarmsstraight the whole time.“Allowing bend in the elbows will cause your arms to get tired,” says Shane Heins, Onnit’s Director ofFitnessEducation.
It’s important to maintain your posture and balance throughout the movement. As you get more experienced and graduate to biggerkettlebells, this will become more challenging, sofocuson staying tall and braced from the very beginning.Heins suggests placing a small box or other object between your feetand squeezing it in order to train you to keep your thighs tense—this will help you maintain stability.
You can perform the around the world for reps or time (for example, 30 seconds straight), but make sure you work it in both directions. So if you do 5 reps clockwise, immediately follow up with 5 reps counter-clockwise, so you build balanced strength.
Around The World Kettlebell Benefits
That circular motion accomplishes much more than meets the eye, and you’ll feel it all as soon as you start doing the movement (correctly, that is). Controlling the kettlebell’s path and momentum while keeping good posture trains the core and a bunch of other stabilizer muscles hard. (What else is going to keep you from bending or twisting as the weight travels away from your center of gravity?) Your wrist and forearm muscles have to clench the handle to prevent the weight from slipping away, so the around the world works your grip strength too.
On top of that, the centrifugal force you generate with the around the world creates a pulling effect thattractions out the shoulders, elbows and wrists.This really feels great, especially if you have years of heavy, joint-compressive lifting under your belt, and can arguably help to prevent injury and speed recovery from other strength-training workouts. Decompressive weight training, Heins says, is often overlooked and very valuable: controlling a weight as it pulls on your joints strengthens them, just as lifting a weight that compresses your joints does.
If you have athletic ambitions, or just want to get good at more advanced kettlebell training, the around the world should be a staple in your programs, asit works eye-hand coordination and balance.Over time, you’ll develop a better sense of where the kettlebell is in space around you, and you’ll be able to make the hand offs quicker and more smoothly.
Sophisticated kettlebell routines require you to change direction quickly and express strength in all the different planes of motion. Kettlebell flows, where you transition from one exercise to another, such as a clean to asquatand then rotational press, are an example of this.The kettlebell around the world lays the groundwork for this level of skill, helping you get comfortable with moving a weight 360 degreesaround your body. You’ll have a hard time getting the hang of cleans, snatches, and twisting motions without mastering the around the world as a pre-req.
What Muscles Do Kettlebell Around The Worlds Use?
To list them all would take more words than we have the patience to write (and, presumably, more than you’d have the patience to read), but take our word that the deltoids, core (rectus abdominis, olbiques, transversus abdominis), wrist flexors and extensors, spinal erectors, quads, glutes, and various muscles in the hips on down will be engaged in every revolution of the around the world.
What Weight Kettlebell Should I Use?
When you’re starting out with the around the world, go light to get the form down. A 3–7 kilogram bell (8–16 pounds) is perfect. Once you’ve mastered the technique, you can still get a lot out of light weight, but you’re also welcome to increase the load if you want to make the exercise more of a core and grip workout. A 24–28 kilo bell (53–62 pounds) will be very challenging.
The around the world can serve many different functions and fit into your workouts in several ways. You can use a light bell in your warmup to jumpstart your core and hips, activating those muscles for better firing during the heavier or more explosive training to come. You can also add the around the world to a mix of other exercises for a battery that zeroes in on the core—do this at the end of a session for some extra work, or on an “off” day.The around the world can also be done between sets of kettlebell or conventional strength exercises for some active recovery.Think: you’re giving your muscles and nervous system a rest, but you’re still doing a little work to burn more calories, keep your heart rate up and build some conditioning, and stay warm. Heins particularly likes the around the world between sets of overhead pressing, as it will decompress your shoulders and elbows, and single-leg work.
Light around the worlds should be done for3 sets of 20 reps, or 30 seconds in each direction,while a heavier bell can be used for 5 sets of 4–6 reps each direction.
How To Stretch Before Exercising?
Use the following mobility sequence from Heins (demonstrated in the video below) to prepare your hips for the around the world, or any other lower-body focused workout you have planned. Perform the movements as a circuit, completing one set for each in sequence and then repeating for 2–3 total rounds.
1. Kneeling Hip Flexor Stretch,12 reps per side
2. Standing Knee Circle,5 reps each direction, each leg
3. Spit-Stance Hip Coil(no weight), 12 reps each side
4. Ankle Spring Primer,5 reps each side
BONUS:Thai Chi Knee Twist,60 seconds each direction
Kettlebell Exercise Alternatives
You’ll be able to better see how the around the world translates to fancier kettlebell movements and sports when you move on to its progressions. As soon as you have the basic around the world down, try one of these variants.
Around The World With Hand Catch
(See01:56in the Kettlebell Around the World video)
This move takes the rotation from your hips up to your shoulders, making it a great exercise for full-body power.It mimics the mechanics of throwing a punch or a shotput,training you to coil through your core and stabilize your body with your hips.
Step 1.Perform the around the world as normal to get some momentum. Then, when you’re ready, bend your workingarmto lift the kettlebell up to your opposite shoulder.
Step 2.Catch the bell with your free hand, bracing your core so you absorb the force. If you’re using a bigger kettlebell, you may have to allow your torso to rotate a bit in order to slow the kettlebell down on the catch—that’s OK, as this is how you move in real life. Now redirect the force by gently pushing the kettlebell back down and circling your body in the opposite direction.
Once you’ve got the hang of that, you can alternate catches on each rep. That is, circle your body clockwise and catch with the right hand, and then immediately circle counter-clockwise and catch with the left.
If you watched the video on how to warm up above, you recognize this exercise already. Here, it’s done with the kettlebell for strength and power (where as, done unloaded, it’s just a really great mobility drill). The step-back hip coil progression keeps the movement of the around the world at your hips but really allows you to practice transferring power between legs.It looks like a speed skater pushing off from one leg on the ice, loading up for a puck pass in hockey, or any number of other movementsthat require lower-body power.
Step 1.Perform the around the world as normal. Let’s say you’re moving counter-clockwise with the kettlebell in your right hand. As you transition the bell to your left hand, step back with your right leg and create a long line from your leg through your spine to the top of your head as you bend slightly at the hips (you can keep your heel elevated and only touch down with the ball of your foot). This will help you decelerate the kettlebell. Make sure your lower back stays neutral and does not round forward as you bend at the hips.
Step 2.Step forward again as you reverse the direction of the kettlebell and repeat on the other side. As with the around the world with hand catch, you can take your time doing a few revolutions with the bell before you coil on the other side.
Heins notes that the step-back hip coil works your hip in internal rotation, which is an oft-neglected movement pattern andvery important for overall hip and lower-back health.An inability to move your hip well internally can cause the lower back to take over some movements, and that can lead to pain, so the step-back hip coil doubles as a prehab exercise.
]]> https://www.onnit.com/blogs/the-edge/the-dumbbell-push-press-how-to-do-it-get-ripped2025-07-10T10:55:28-05:002025-08-14T13:00:46-05:00The Dumbbell Push Press: How To Do It & Get RippedJeremy GottliebExercises that get you the most “bang for your buck,” as trainers like to say, are those that are efficient—working lots of muscles at once to net you big results for a relatively small time investment. Thesquat, deadlift, bench press, and other barbell lifts are usually cited as examples, but the dumbbell push press can rank up there too. For starters, it’s much easier to master. It’s also safer, gentler on the joints, and offers benefits for conditioning as well. We’ll go so far as to say that the dumbbell push press exercise ought to be in every lifter’s repertoire, from beginners to advanced athletes. Here’s how to do it right to build muscle and get ripped.
Key Takeaways
1. The dumbbell push press is efficient,working multiple muscle groups at once, including the deltoids, triceps, trapezius, forearms,core, quads, glutes, andhamstrings.
2. Incorporating the dumbbell push press can improve strength, power, muscle size,and conditioning for allfitnesslevels.
3. The dumbbell push press can be done for low repsfor strength and power or high reps for muscle-building and conditioning.
How To Do A Dumbbell Push Press
Step 1.Hold a pair of dumbbells at your shoulders with one end of each dumbbell resting on your shoulders. Your palms will face one another, and the handles of the dumbbells should be parallel to the floor. Stand with feet about hip width and brace your core.
Step 2.Drop into a quarter-squat, initiating the descent by bending your knees and flexing your hips back slightly. Keep your head, spine, and pelvis in line so your back is flat and your eyes and head are forward. You don’t want to turn this leg drive portion of the lift into a squat, so only bend your knees enough to get some momentum, and don’t hinge your hips too much. Imagine yourself doing the move against a wall and sliding your torso up and down it—you should be that upright.
Step 3.As soon as you’ve dipped, extend your hips and knees explosively to stand up straight, driving through your heels, and simultaneously press the weights straight overhead. You’ll need to push from your shoulders and triceps, but with a strong and quick leg drive, most of the power for the press should be provided by your lower body. Keep your core tight throughout the move so your spine is stable and safe. Lower the weights back to your shoulders and drop your hips to immediately move into the next rep.
Benefits Of A Dumbbell Push Press
There are two major benefits to doing the dumbbell push press:
Increased upper- and lower-body strength and power
Improved conditioning
Ancillary benefits includeimproved core stability, and a strength and power carryover effect to Olympic weightlifting. In other words, if you perform snatches and clean and jerks in your workouts, and you add push presses into your routine as an assistance exercise, you’ll probably see benefits.
The dumbbell push press can’t be loaded as heavy as the barbell version of the exercise, but the challenge to your stability is greater, as you have to control two dumbbells moving overhead at the same time. And because yourarmsare free to move,rather than being fixed to a barbell and whatever path it may take when you lift it, your joints find the range of motion that’s best for them.In other words, the dumbbell push press is a safer, joint-friendlier push press.
James “Smitty” Smith, a strength coach and co-founder of the Certified Physical Preparation Specialist certification (and owner ofDiesel Strength & Conditioning), says the exact gains you’ll see from the push press depend heavily on your “training age”—the number of years you’ve been lifting.
“For beginners using very light weight, there’s a great conditioning benefit,” Smith says. When you’re new to lifting, you don’t have the strength to train very heavy. (The weight may feel heavy to you as a newbie, but 25-pound dumbbells, for example, won’t cause the same kind of overall fatigue and muscle damage that the 60-pounders a more experienced lifter can use will.) Therefore, at this stage in your development,you’ll get more out of the push press doing it for high repsso that you challenge yourenduranceand conditioning. Smith notes that, “as you use leg drive to get them overhead, the dumbbells feel weightless during that drive phase.” Your shoulders aren’t really doing much work, so the push press won’t blow them up, but banging out lots of reps that work muscle from your legs on up will burn lots of calories and make your heart race.
On the other hand, more advanced lifters who can handle beastly weights can build even more strength and power with the push press, as well as gain conditioning. “That leg drive enables them to use heavier weights than if they were doing a strict overhead press without momentum,” Smith explains.And when you’re lifting, say, 60-pound dumbbells, you’ll be training heavy enough to feel your shoulders pushing that load, regardless of the help they get from your legs.“But your rack position is going to affect how much you can get out of the exercise.”
The rack position refers to the starting position of the push press, where the dumbbells are held at the shoulders while standing tall. This is the same basic starting position used for regular overhead presses,front squats, and many other moves that are derived from Olympic weightlifting (which the push press is), although there are a few variations of it.The best rack position for push pressing is the one explained above in the “How To” portion of this article:palms facing each other with the dumbbells parallel to the floor, and one end of each dumbbell resting on your shoulders.
A second rack position is dumbbells at shoulder level but with the palms facing forward. Most guys simply default to this without knowing any better because it’s how most guys would execute a strict overhead dumbbell press.Push pressing with palms facing forward isn’t necessarily wrong, but by using the same exact hand position as you’d be forced to use during a barbell push press, you’re losing the best benefitsof doing this exercise with dumbbells—shoulder safety and range of motion. The first rack position with palms facing each other is much easier on the shoulders, because it allows the humerus bones to move more freely through the shoulder joints. There’s more risk of impingement over time with palms-forward pressing—especially for guys who already have tight shoulders, or who carry a lot of upper-bodymass. When the dumbbells are held with a neutral grip, it’s also much easier to get them to rest on your shoulders, giving you a little extra distance to press for greater muscle activation.
Palms-forward can also be “a much weaker postion,” according to Smith, due to the fact that a lot of guys are so tight they can’t get the weights to rest on their shoulders, and instead have to work to control the weights in space throughout the exercise (i.e., held slightly in front of the shoulders). This not only fatigues the shoulders much faster, but oftentimes causes the weights to sway back and forth as you do reps, banging into the shoulders and making it harder for you to keep position or press safely.
Still a third rack position exists:holding a single dumbbell, T-boned against the shoulder while the lifter leans away from the weight(see below). This position is often used by strongmen when the competition event is pressing a circus dumbbell or other odd-shaped weight overhead. With this rack position, you press one side at a time, using more of the upper body.
How Do I Use The Push Press In My Workout?
If your goal is to build power for athletics or to improve your ability to do other Olympic lifts, Smith says to place the dumbbell push press first thing in your workout, right after your warmup and before any other strength training sets. With all your muscles fresh and primed, you’ll get the best gains in power by placing it there. See “What Muscles Does A Push Press Work?” below for a better understanding of how the dumbbell push press works to build power.
A classic set and rep range for building power would be a relatively higher number of sets, say 6 to 7,with a relatively low number of reps, such as 2 to 4.
If your goal is more geared toward conditioning, or you’re a relatively inexperienced lifter, you can place the dumbbell push press toward the end of your workout, after your strength training sets. For this purpose, you could do3 sets of 15–25 reps, and you might want to use it as part of a dumbbell circuitwhere you perform other exercises that can flow together with the push press, such as a bent-over row,Romanian deadlift, anddumbbell clean.
The push press can also be used as a way to cheat out a few extra reps on strict overhead presses. Toward the end of a set, when you feel you can’t do any more regular presses with good form, you can switch to push presses and eke out a few more reps, thoroughly frying your shoulders. The push press can work at the beginning of a set, too. If you’re coming back from a shoulder injury, and you want to do overhead presses but reduce the strain on your shoulders in the bottom position, you can get the weight moving by doing a push press on the first rep.In other words, the first rep won’t begin from a dead stop on your shoulders, which puts a lot of stress on your shoulder joints. As you lower that first rep to completion and begin the next rep, the stretch reflex will kick in—your delts feel like they’re being stretched, potentially into a dangerous position, and so they’ll contract harder to help you lift the weight. Your joints won’t have to “shoulder” as much of the load.
What Muscles Does A Dumbbell Push Press Work?
The push press exercise is, very simply,a standing overhead press done with momentum from the lower body.Holding the dumbbells at your shoulders, you quickly dip and then extend your hips and knees to get the weights moving upward, and then you lock out your elbows with a pressing motion. Because it’s pretty much a full-body effort, the dumbbell push press incorporates several major muscles in the upper and lower body. They are:
Glutes.Your butt muscles are the prime movers during the quarter-squat portion of the exercise. They help flex the hips during the descent and then explosively extend the hips to generate the power that propels the dumbbells overhead.
Hamstrings.They bend the knees in a controlled manner as you dip, and work synergistically with the glutes to extend the hips on the way up.
Quads.The thigh muscles stabilize the knees as you squat and work to extend them when you come up.
Core.The rectus abdominis, obliques, and spinal erectors all work to stabilize the spine and keep it in a safe, neutral position. The heavier the load, the more your core musculature will be recruited.
Deltoids.The prime mover when driving the weights overhead, the delts are responsible for flexion and rotation of the shoulder joint. If you’re push pressing lighter weights with a powerful leg drive, their role is secondary to that of the leg muscles in this exercise, but still vital. When doing heavy push presses, their role increases.
Trapezius.The muscle that makes your neck look yoked stabilizes theupper back and shoulders. It’s also responsible for stopping you from slumping out of good posture during the lift, rounding your shoulders forward.
Triceps.The tris work with the deltoids to extend the arms overhead, locking out your elbows.
Forearms.Any time you’re holding a barbell or dumbbell—or just squeezing your fists hard—the forearms are working. In this case, the wrist flexors and extensors stabilize the wrists throughout the exercise.
How To Stretch Before The Dumbbell Push Press
Onnit Durability Coach Natalie Plascencia (@natalie.higby on Instagram), offers these two mobility drills to increase range of motion and stability in your shoulders and upper back before you perform the push press.
Alternatives To The Dumbbell Push Press
Three exercises that can produce a similar training effect to the dumbbell push press are:
Med-Ball Chest Pass
Throwing a ball for height mimics the push press. In CrossFit parlance, this is known as a “wall ball shot.” Like the dumbbell push press, it’s a pressing motion and it involves leg drive—but from a much lower position. The implement used, however, leads to some key differences. First, the med ball must be held at the chest, meaning your arms are working hard throughout the exercise to support the ball (it’s not resting on your shoulders like dumbbells do in a push press). Second, the ball is released at the top of the move and thrown for maximum height. Some additional work is required as well, as you either have to catch and stabilize the ball as it falls, or gather it up after it hits the ground.
Pentagon-Bar Push Press
This five-sided bar with rotating handles (picture the front half of a trap bar) plugs into a landmine unit and does for overhead moves what the trap/hex bar did for deadlifts and shrugs. The load is perfectly balanced around you, and somewhat stabilized by the base of the landmine unit. The video below will show you how to do a strict overhead press with the Pentagon bar. Just add leg drive to do a Pentagon bar push press
Like the dumbbell push press done with light weight, most of the power for this move is provided by the lower body. When done right, the shoulder acts in a stabilizing capacity—not to press the weight overhead. Just be careful: technique is key and mastery is required to gain maximum benefit and to stay safe.
]]> https://www.onnit.com/blogs/the-edge/5-killer-back-and-bicep-workouts-for-building-muscle2025-07-10T10:55:28-05:002025-08-14T13:52:22-05:005 Killer Back and Bicep Workouts For Building MuscleJeremy GottliebBack andbicepspair together well. Learn how to set up the perfect workout; plus, 5 workouts to build more muscle in the back and bi’s.
Key Takeaways
1. Back exercises recruit the biceps for assistance,so it makes sense to train them together, giving each muscle more time to recover before training it again (as opposed to training biceps a day or two after back).
2. Each workout should have no more than four back exercises and two biceps movements.
3. Do 2–3 sets per exercise, performing 8–25 reps for back exercisesand 10–50reps for biceps.
5 Killer Back andBicepWorkouts For Building Muscle
There’s no hard and fast rule stating that back and biceps need to be trained together, but, anecdotal bro science aside, there is some logic to combining these two muscle groups that allow you to pull real hard.
Our guide to training the back and biceps together will teach you how to create maximally efficient upper-body workouts that build a thick back and bulgingarms.
First, take a look at the workouts we’ve designed for you. Then we’ll explain the methods behind the madness afterward.
Select whichever workout(s) accommodates your individualfitnesslevel and/or equipment setup. The workouts are meant to provide a basic template; you can insert whichever exercises you want into the template as long as you follow the guidelines (see our exercise lists under The Best Back and Biceps Exercises below).
Do only one back-and-biceps workout per week. However, advanced trainees should be able to handle additional back training during the week.
Grasp a dumbbell in one hand and rest your opposite hand and knee on a bench for support. Keep a long spine from your head to your pelvis and square your shoulders to the floor.
Row the dumbbell to your hip, drawing your shoulder back and downward as you pull. Your elbow should not rise higher than your back. Lower your arm under control. Complete your reps on one side and then repeat on the other immediately.
Sit at a pulldown station, and secure your knees under the pads. Grasp the bar with your hands outside shoulder width and your palms facing away. Drive your shoulder blades down and together as you pull the bar to your collarbone, and control its path back up.
Stand holding a dumbbell in each hand by your side, palms facing in. Without moving your upper arms, curl the weights up until your biceps are fully contracted.
5. Preacher Curl (Pump)
Sets: 1 Reps: 25–30
[See the video at 2:45]
Sit at a preacher bench or use a preacher machine. You can do the exercise with both arms, or one arm at a time, as shown. Rest your triceps on the pad so that your elbows are near the bottom of the pad and curl the weight strictly. As you extend your elbows, stop short of straightening your arms completely.
See the directions above. Use a weight that allows you to perform all the reps and a few more, but do only the prescribed number.
2. Suspension-Trainer Bodyweight Row (Perform)
Sets: 3 Reps: 8
[See the video at 3:30]
Grasp the handles of a suspension trainer with palms down and hang suspended with your legs extended in front of you. Brace yourcoreand pull your body up until your back is fully contracted. Rotate your wrists so that your palms face up in the top position. To make the exercise easier, increase the height of the handles so your body is more vertical. To make it harder, lower the handles so you’re closer to parallel to the floor.
3. Machine Low Row (Pump)
Sets: 3 Reps: 25
[See the video at 4:01]
Attach a V-grip handle, or two individual grip handles, to the pulley of a seated cable row station. Keeping your lower back flat, reach forward and grasp the handle, allowing your shoulder blades to be stretched. Row the handle to your sternum, squeezing your shoulder blades together and downward. Lower the weight with control.
4. Cable Hammer Curl (Prime/Pump)
Sets: 3 Reps: 20
[See the video at 4:18]
Attach a rope handle to the low pulley of a cable station and grasp an end in each hand. Step back so there is tension on the cable and bend your knees slightly. Keeping your upper arms in line with your sides, curl the rope until your biceps are fully contracted, pausing for a moment at the top.
5. Dumbbell Curl (Pump)
Sets: 2 Reps: 30
[See the video at 4:40]
Stand with feet hip-width apart, holding dumbbells at your sides with palms facing forward. Keeping your upper arms at your sides, curl the weights up and hold at the top for a moment.
Attach a band to a sturdy object and grasp the other end with both hands, palms facing each other. Step back to put tension on the band, and get into an athletic stance with hips and knees bent. Row the band to your sternum and hold for a moment.
2. Bentover Row (Perform)
Sets: 3 Reps: 8–10
[See the video at 5:24]
Place a barbell on a rack set to hip level. Grasp the bar with hands shoulder width, and pull the bar out of the rack. (If you’re more experienced, and have a strong lower back, you can also deadlift the bar off the floor to start.) Step back, and set your feet hip-width apart, holding the bar at arm’s length against your thighs.
Take a deep breath, and bend your hips back—keeping your head, spine, and pelvis aligned. Bend until your torso is nearly parallel to the floor. Draw your shoulder blades back and down as you pull the bar up to your belly button.
3. Chinup (Perform)
Sets: 3 Reps: 8
[See the video at 5:54]
Hang from a chinup bar with hands shoulder-width apart and palms facing you. Draw your shoulder blades down and together as you pull yourself up until your chin is over the bar. If that’s too easy, add weight with a belt as shown.
4. Lat Pulldown (Pump)
Sets: 3 Reps: 25
[See the video at 6:11]
See the directions above.
5. Dumbbell Hammer Curl (Prime/Pump)
Sets: 3 Reps: 15–20
[See the video at 6:30]
See the directions above.
6. Barbell Curl (Pump) OR Dumbbell Curl
Sets: 3 Reps: 25–30
Stand with feet hip-width apart holding a barbell or dumbbells at arm’s length with palms facing up. Keeping your upper arms at your sides, curl the bar until your biceps are fully contracted.
[See the video at 6:46 for a demonstration of the dumbbell curl.]
Perform as you did the chinup, described above, but with hands outside shoulder width and palms facing away from you.
3. Meadows Row (Perform)
Sets: 3 Reps: 10
[See the video at 8:09]
Set up a barbell in a landmine unit, or wedge one end into a corner. Stand perpendicular to the bar and stagger your stance, bending down to reach the bar with your lower back flat—head, spine, and pelvis should be aligned. Grasp the bar overhand and row it to your side. You should feel a stretch in your lat in the down position.
Perform hammer curls as described above, but holding an elastic exercise band.
5. Suspension Trainer Curl (Pump)
Sets: 2 Reps: 20–30
[See the video at 11:43]
Set up as you would to do the suspended bodyweight row described above, but curl the handles to your shoulders. Keep your shoulder blades drawn back together and downward throughout the exercise. Brace your core as well.
How To Stretch Before Doing Back and Bis
Warm up for a back and biceps workout by following these mobility drills from Onnit-certified Durability Coach Cristian Plascencia (@cristian_thedurableathlete on Instagram).
Why Work Your Back and Biceps Together?
“When you think about back training, the secondary or tertiary mover in any sort of row, pulldown, or pullup is going to be the biceps,” says John Rusin, P.T., D.P.T., C.S.C.S., owner ofDrJohnRusin.com. So, for the sake of efficiency, “it makes sense to hit the biceps a little more directly in conjunction with their corresponding compound lifts,” (i.e. back movements that involve more than one joint; as opposed to biceps exercises where only the elbow flexes).
Generally, back and biceps workouts begin with rowing or pulldown exercises to hit the bigger back muscles when you’re fresh.Starting the workout with biceps curls would fatigue your arms to the point where they may not be able to assist you like they shouldon your back movements, so the logical approach is to save bicep exercises until after you’ve trained your back.
One of the most popular andtime-honored workout splitsin all of muscledom is the push-pull split, where you train muscles that push one day and those that pull the next. For instance, you could dochest, shoulders, triceps, quads, and calves on Monday, and then work back, biceps, glutes,hamstrings, and rear deltoids on Tuesday. This kind of schedule makes it easy to keep all your training in balance, and ensures that you don’t neglect any muscle groups.
Of course, you don’t have to train your whole body each day. You could do upper-body pushing one day and upper-body pulling—aka back and biceps—the next, and then a leg day later in the week. A back and biceps session fits easily into all variations of the push-pull split.
Back and Biceps Anatomy
The major muscles involved when training back and biceps include:
Back*
–Latissimus dorsi(aka, the “lats”).These are the big sheets of muscle that extend down the sides of your back and let you pull your arms downward and backward.
–Teres major.A small muscle below the shoulder that assists with drawing your arms down and back.
–Rhomboids.Upper back muscles that elevate, retract, and rotate the shoulder blades downward.
–Middle and lower trapezius (“traps”).These guys retract and depress the shoulder blades.
Biceps
–Biceps brachii: Your main biceps muscle, it twists (supinates) the wrist outward and flexes the elbow.
–Brachialis: This one lies between your biceps and triceps on the outer side of your arm. It flexes the elbow.
*When discussing “back training” in strength and conditioning circles, experts are usually referring to the upper back. The lower back—meaning the erector spinae muscles—are considered part of the core musculature, and are also involved heavily in leg exercises, such as deadlift andsquatvariations. You can certainly include lower-back exercises in your back and biceps workouts if you choose to, but be sure to factor in the stress that your other workouts may be putting on the area, and be careful not to overwork it.
The Best Back And Bicep Exercises
Back and biceps exercises can be broken up into different categories. There are three types of back exercises, and five types of biceps exercises.
Back
1. Horizontal pulls (rows).To understand how the back exercise categories work, picture your body in a standing position. If you pull something toward your midsection, you’re moving it along a horizontal plane. Any exercise done along that plane is a type of row—be it a seated cable row, face pull, one-arm dumbbell row, etc. Even when you change the position of your torso, such as by bending your hips back to angle it so your torso is parallel to the floor (as in abent-over barbell row), you’re still pulling toward your body as if it were erect, and the exercise is still classified as a horizontal pull.
“Rows should make up the majority of your training volume for back,”says Rusin. “When rowing with dumbbells or handles, you can rotate the hands to achieve a more externally rotated position at the top of the pull [thumbs pointing away from you]. You can’t do that with pulldowns and pullups; with those, the shoulder has to internally rotate, and we’re already doing enough of that in everyday life through driving, texting, and typing. Our training should be trying to get us out of that, which is why I prescribe a ton more volume on horizontal pulls versus vertical.”
Target muscles:Rows effectively train all the major back muscles—lats, teres major, rhomboids, and trapezius. Developing the latter two in particular makes for a thicker, meatier back.
Exercise variations:Barbell bent-over row, one-arm dumbbell row, bodyweight row (with a suspension trainer or a barbell set up in a power rack or Smith machine), seated cable low row, T-bar row,landmine row, Meadows row, trap-bar row, chest-supported row, machine row (plate-loaded, selectorized, Smith machine), Pendlay row.
2. Vertical pulls (pullups/chinups, lat pulldowns)
Vertical pulling is a little simpler to picture than horizontal pulling. Movements that have you pull yourself upward in a straight line, or pull a bar down to meet you, are known as vertical pull exercises, and include the many pullup and lat pulldown variations.
Target muscles:Lat pulldowns and pullups emphasize the upper lats and teres major, adding width to the upper back.
Exercise variations:Wide-grip lat pulldown, neutral-grip lat pulldown, reverse-grip lat pulldown, wide-grip pullup, neutral-grip pullup, chinup, assisted pullup or chinup (using a machine or bands).
3. Isolation exercises(straight-arm pulldowns and pullovers).
While horizontal and vertical pulls are always compound lifts and involve the biceps as a secondary mover, exercises like the straight-arm pulldown and pullover, on the other hand, virtually remove biceps muscle involvement by keeping the elbows in a fixed position throughout. This allows you to zero in on the lats and various upper back muscles more directly, forcing them to do the work unassisted. “You’ll need to use lighter weight with these exercises,” says Rusin, “but the mind-muscle connection tends to be higher with these isolation movements.” That is, your ability tofocusyour mind on the muscles you want to train will be easier, and that improves their potential to grow.
Target muscles:Straight-arm pulldowns and pullovers emphasize the lats and teres major, with very little involvement from the biceps.
Exercise variations:Straight-arm pulldown(rope or bar attachment), one-arm straight-arm pulldown, dumbbell pullover, barbell pullover, cable pullover, dumbbell pullback.
Biceps
Because the elbow is a simple hinge joint, there’s really only one movement you can do for direct biceps training: the curl. However, curls can be manipulated through both hand and shoulder position to target the biceps (and their surrounding assisting muscles) very differently. Hence, there are five types of curls.
1. Supinated-grip curls (standard curls).In a typical barbell, dumbbell, or machine curl, the forearms are in a supinated position, with the palms facing forward at the bottom.
Target muscles:Supinated curls place the brunt of the load on the biceps brachii (the main arm muscles when you flex your elbow).
2. Neutral-grip curls (hammer curls).When you turn your wrists so that your palms face in toward your body, you’re doing a hammer curl (or some variation).
Target muscles:The brachialis muscle, which lies beneath the biceps brachii, becomes more involved in the movement, as does the brachioradialis, the meaty muscle that runs along the thumb-side of your upper forearm. However, the biceps are still the prime mover.
3. Pronated-grip curls (reverse curls).The opposite of a supinated grip, pronated curls flip your grip so that the palms face toward you in the down position and downward to the floor at the top of the lift.
Target muscles: Pronated/reverse curls hit the brachialis and brachioradialis to a greater extent than both supinated and neutral-grip curls.
4. Shoulder flexion (preacher curls).When doing curls using a preacher bench, the upper arms are locked into a position of slight shoulder flexion. Your elbows are held in front of your body.
Target muscles: The flexed shoulder position helps you better isolate the biceps, and helps establish a stronger mind-muscle connection (probably because you can watch your biceps as you train them!).
5. Shoulder extension (incline curls).In contrast to the preacher curl, you can get a greater stretch on the biceps by keeping the upper arms behind the torso (shoulder extension) throughout the curling movement. The most common way to do this is by lying back on an incline bench so that the upper arms are perpendicular to the floor throughout the movement.
Target muscles:Performing a curl while the biceps are in a stretched position puts slightly more emphasis on the long head of the biceps, the outermost portion of the muscle that provides most of the muscle’s peak when you flex it.
How Many Back Exercises And Biceps Exercises Should I Do?
Although the back and biceps work together on virtually all compound upper-body pulling movements, the amount of work the two muscle groups can tolerate is vastly different. Rusin recommends anywhere from four to six exercises total for back and biceps in a given workout, using roughly a two-to-one ratio of back to biceps exercises.At the high end, this would mean four back exercises and two isolated biceps movements in a session.
“The back can be trained multiple days a week,” says Rusin. Since its muscles support your posture all day long, they’re very durable, and can recover from quite a workload. “But the biceps can’t take the same amount of training volume and frequency as the back. People often think about doing back and biceps workouts with a one-to-one ratio of exercises—doing one biceps exercise for every back exercise—but that doesn’t line up for long-term success in terms of health and results.”
Yes, the biceps are relatively small muscles, and smaller ones generally recover faster than big muscles.But the biceps act on the elbows and shoulders—two joint complexes you really don’t want to risk overworking,especially when you’re alreadytraining chest, triceps, and shoulders elsewhere in your week.
According to Rusin, “Most people simply can’t tolerate more than one day a week of dedicated biceps training in terms of shoulder and elbow health and recoverability—even the bodybuilders I work with.”
How Many Sets and Reps Should I Do for Back and Biceps?
A good rule of thumb, especially if you’re on the high end of the exercise count, is 2 to 3 working sets per exercise. A working set means not a warmup—you’re using a challenging load and going to failure, or close to it (within one or two reps of failure).
In many cases, you won’t hit the aforementioned two-to-one ratio of back to biceps exercises perfectly; for example, you may do 3 back exercises and 2 for biceps. In these instances, aim for a two-to-one ratio of total sets (in this example, 6 total sets for back and 3 for biceps).
Rusin prescribes 8 to 25 reps for back exercises(with 45–75 seconds rest between sets).For biceps, you can do 10 reps all the way up to 50(20–45 seconds rest between them).
Rusin says you can tweak your back training to emphasize strength or maximum muscle growth (low reps for strength; moderate to extremely high reps for growth), but with biceps, there’s no need to train for strength. The elbows aren’t designed to curl ever-increasing loads, so you’ll get more out of them (and keep them healthy) by training them for hypertrophy (max muscle gain) via going for a big pump. “That’s what the biceps respond best to,” says Rusin.
How Should I Set Up A Back and Biceps Workout?
Just as important as the exercises you choose for your workout is the order you do them in. Rusin follows a simple protocol that delivers results in size and strength and minimizes the risk for injury. He calls the system the three P’s: Prime, Perform, and Pump.
1) Prime.You want to start your workout with an exercise that primes the central nervous system, essentially waking up the muscles you’re trying to train so that you can best recruit them throughout the workout. This should be a lift that you can really feel the target muscles working on. It may be an isolation lift or a compound one, but it should be done with fairly light weight so you can focus on form and making a mind-muscle connection. Done right, the priming exercise will help flush blood into the muscles and reduce your risk for injury.
For the back, straight-arm pulldowns, are a good choice.You could also go with a machine or chest-supported row (something where the body is supported and the movement is somewhat isolated).For the biceps, Rusin recommends hammer curls.Reps for both primer exercises should be in the range of 12–25.
“I always do neutral-grip curls to hit the underlying brachialis before fully lengthening out the biceps with supinated curls,” says Rusin. “So, for example, I wouldn’t do preacher curls before hammers.” Training the muscles in a stretched position when they aren’t fully activated can lead to biceps muscle pulls or elbow pain.
2) Perform.Following the prime, you’ll do one or two strength-focused lifts using heavier weights and lower reps (around 8, give or take). This is the real meat-and-potatoes of your workout, but don’t think that means you can skip the prime exercise andjumpright into it.
For back, barbell and dumbbell rows are money.Pullups can also be done here, simply because Rusin says most people can’t do more than 8–15 reps of them, so they can’t go in the (next) pump phase of the workout.For biceps, barbell and dumbbell curls, or cable curls will suffice.
3) Pump.Here’s where you chase total hypertrophy and finish the muscle off using light- to moderate-weight and moderate- to high-reps.
“What we don’t want is the spine, core position, or posture to be the limiting factor in any back exercise when we’re chasing those higher rep ranges,” says Rusin. This is why an exercise like the lat pulldown is perfect here; being seated and locked into place minimizes core and postural muscle involvement.Seated cable rows, machine rows, and rows with a band are also good options.
For biceps, preacher curls, incline dumbbell curl, and band curls work well.“Any curls where you’re putting a stretch on the biceps should definitely be at the back of the workout,”says Rusin.
]]> https://www.onnit.com/blogs/the-edge/how-to-properly-do-glute-ham-raises2025-07-10T10:55:27-05:002025-08-14T14:19:24-05:00How To Properly Do Glute-Ham RaisesJeremy GottliebThe glute-ham raise is probably the most efficienthamstringexercise you can do. The catch? It’s also the most difficult. But if you have a glute-ham bench, this tutorial will help you master the movement in short order (and if you don’t, read on, and we’ll show you how to get the same benefits with other equipment).
Summary
– The glute-ham raise trains thehamstrings‘ two key functions simultaneously.
– Sets of 5–8 reps may be appropriate to start; later, the glute-ham raise can be trained with low-, moderate-, and high-rep ranges.
– The glute-ham raise movement can be approximated with the Nordic hamstring curl, and other variations that don’t require a glute-ham bench.
The glute-ham raise is a posterior-chain exercise. That is, it trains the muscles on the back side of the body that work together in unison. The hamstrings, however, get hit the hardest.The glute-ham raise is unique in that it works the hamstrings’ two functions—bending the knees and extending the hips—in one fluid movement, and through a full range of motion.We’ll explain in detail how to perform it below, but to get a sense of how the glute-ham raise is done, picture starting off with your torso parallel to the floor, and using the back of your legs to lift your entire body up until it’s perpendicular to the floor. (If that sounds hard to do, well¦ it is!)
There are only a handful of exercises that mimic the glute-ham raise movement (we’ll show you how to do some of them below, if you don’t have a glute-ham bench). Without them, you would need to perform multiple different exercises to achieve complete hamstring development. For instance, leg curls to work the knee flexion component, andRomanian deadliftsorkettlebell swingsto train hip extension.So, glute-ham raises maximize efficiency. They also train the hamstrings in a very functional way that’s perfectly suited to faster running and overall lower-body explosiveness.
Think of how your foot strikes the ground during a sprint. Your hamstrings help to pull it underneath and behind your hips, and bend the knee, to propel your body forward. Powerlifters and weightlifters—guys and gals who need strong posterior muscles to lift the heaviest weights—also flock to the glute-ham bench. Glute-ham raises are a powerful assistance exercise for building up your numbers on thesquat, deadlift, and clean.
And that’s why they were originally created.Glute-ham raises were first implemented by weightlifters in the U.S.S.R.sometime in the 20thcentury. Soviet athletes dominated the world stage in many different sports for decades. In the 1970s, when American weightlifter Bud Charniga was studying up on Soviet training methods, hediscovered the glute-ham raise, and brought it to the States. Unable to find a bench that would allow him to perform it,Charniga mocked up his own using apommel horse and a car seat.Specially-designed glute-ham benches have since become staples in serious strength and conditioning facilities, and are used by different kinds of athletes of all levels.
Step 1.Glute-ham benches have a foot plate that is adjustable, and many have adjustable ankle pads as well. The foot plate can slide closer to and further away from the big pad that your hips rest on, and the ankle pads can be elevated or lowered. You’ll have to take a few minutes to experiment with setups until you find one that’s comfortable.
Ultimately, you want the foot plate far enough away from the pad so that, when you climb onto the bench,your knees can hang below the pad.The height of the ankle pads should be set so that your shins are angled slightly upward when your feet touch the plate and your torso is vertical (the top of the movement).
When you slide your feet between the ankle pads, your toes should touch the foot plate. Make sure these pads are secure, as they’re about to support your bodyweight.Try to get your feet to point straight down at hip-width distance, but you may find that you need to turn your toes out a few degreesto perform the exercise. Use your hands on the big pad to push your body up until it’s vertical. Draw your ribs down, take a deep breath into your belly, and tuck your pelvis slightly so it’s perpendicular to your spine. Brace yourcore.
Step 2.From this tall kneeling position, slowly extend your knees to lower your body. When your torso is parallel to the floor, bend your hips slightly so that it dips a few inches below parallel. You want to use as big a range of motion as you can, but without taking tension off your hamstrings. For that reason, don’t bend so much that your head points toward the floor. And whatever you do, don’t let your lower back round. Stay rigid.
Step 3.Extend your hips and drive the balls of your feet into the foot plate, allowing your heels to rise off the plate. Push through the big pad and bend your knees to pull your body back to vertical. This should look similar to how your leg works when it’s running. (You drive off the ball of the foot while the hamstrings are extending the hips and curling the leg.)
You can cut the range of motion a little short, stopping slightly before vertical, if you like.This is a good technique for targeting pure muscle gain, as the tension won’t subside at either end of the range of motion.
The glute-ham raise is relatively simple to perform, but because it’s foreign to most people, it’s liable to pose some problems at first.If you notice your calves cramping up, it’s a sign that you’re setting up with your upper body too far in frontof the pad. This is making your calves work harder than they should to pull you back up. Move the foot plate more rearward, and check to see that your knees are pointing out below the bottom of the pad at the top of the exercise. If your bench doesn’t adjust to the right position for you, fold a towel over the hip pad, or drape a rubber mat over it, to add a little moremassto the pad and position your body further back. An inch or two can make a big difference.
Another common mistake is lowering your body until your torso is perfectly parallel to the floor. This shortens the range of motion a little bit, but it’s also the hardest position in the range, and it puts you at the greatest leverage disadvantage. When you’re just starting out on glute-ham raises, it pays tolower your body a little deeper so your hips flex; then you can use a bit of stretch reflex to come out of the bottom position.This makes the lift safer and will allow you to get more reps.
Finally, avoid hyperextending your spine on the way up. As your hamstringstireout, you’ll have a tendency to want to finish the lift by arching your back hard. This can cause injury, so remember to keep your ribs down and your core tight.
“The glute-ham raise can provide such a large overload directly to the glutes and hammies—without a substantial lower-back strength demand—that it can serve as the big strength move for those muscles for most people,” says Harski.“It can actuallyreplace the deadliftfor a period of time.It is important to train the posterior chain aggressively and often, but to do so while minimizing loading of the spine, specifically the lower vertebrae.” In other words, the glute-ham raise can play a key role in strengthening your lower body without risking injury to the lower back in the way heavydeadliftsand backsquatscan. While it’s a simple bodyweight movement, the glute-ham raise packs a similar punch to big barbell exercises.
Once you’re experienced with it, the glute-ham raise can be trained through several different rep ranges.You may need to use sets of 5–8 reps at first, because the exercise is so challenging,but within a few weeks, you will likely be able to do it for 8–12 reps, treating it like you would most other assistance exercises that are done with moderate weight for moderate reps. If you’re pretty strong on glute-hams, or want them to serve as a substitute for a big barbell lift such as the deadlift, you can add resistance by holding a weight plate to your chest or wrapping a band around the feet of the bench and the back of your neck, allowing you to train in the 5–8 rep range again.
As your own bodyweight becomes easier to manage, you can do glute-ham raises for sets of 20 or more reps, which can serve as a brutal finisher for your leg day.
The glute-ham raise focuses on the hamstrings, but the tension it creates on the back side of the body irradiates all the way up the chain. That means that the glutes get involved as well (as the name of the exercise would imply), along with the spinal erectors, which run from the pelvis all the way up to the neck. The ab muscles also have to work with your erectors to brace your spine, so it doesn’t flop over while you perform the raise. Anddon’t be surprised if you wake up with some calf sorenessthe day after doing glute-ham raises the first time, since the gastrocnemius activates to assist the hamstrings in flexing the knee.
If you really want to nerd out, tell your friends that you’re training your semimembranosus, semitendonosis, andbicepsfemoris, aka, the leg biceps. (These are the three hamstring muscles, from the medial side of the leg to the lateral side.) All three muscles originate on the lower portion of the pelvis and insert below the knee, which gives thema unique ability to bend the knee and extend the hips at the same time.Imagine doing a machine leg curl but without the machine to support your hips. You’d have to keep them from bending while you flexed your knees. In the glute-ham raise, you have to do this against the resistance of your bodyweight—which is far more than what you can load on a leg curl machine. Now you see why glute-hams are such a ruthless move for the hamstrings.
Can I Do the Glute-Ham Raise Without A Machine?
A glute-ham bench is the best option for performing the glute-ham raise movement safely, but if you don’t have access to one, you can mimic it with other equipment. The Nordic hamstring curl, typically done with a barbell or regular utility bench, is a challenging but suitable substitute exercise. That said, it is even HARDER than the glute-ham raise, and definitely not for beginners. However, if you’ve been training a while and are confident in the strength of your hamstrings, give it a go.
Nordic Hamstring Curl
Step 1.Load a barbell on the floor and wrap a pad or towel around it to protect your ankles. Place a pad or mat on the floor to save your knees. Kneel on the pad and secure your ankles under the bar. (You can also use a bench that’s secured to the floor, or the spotter bar in a power rack, or have a partner hold your ankles down).
Step 2.Tuck your pelvis so it’s perpendicular to your spine. Take a deep breath into your belly, and brace your core. Have your hands ready at your sides so that you can catch yourself if you lose control on the descent.Bend your hips back so your torso leans forward a little—maintain this hip position throughout the set.
Step 3.Begin extending your knees, lowering your body toward the floor under control. When you feel you can’t maintain tension in your hamstrings anymore, let your body fall and break your fall with your hands. The range of motion won’t be great, but the extreme tension you create in your hamstrings will still make the exercise effective.
Step 4.Push off the floor and try to perform a glute-ham raise to return to the starting position.
You will probably only be able to manage a few negative reps at first (just the lowering portion of the movement). Build up to where you can perform full reps, and gradually increase your range of motion from there. (That is, aim to use less assistance from your hands over time.)
Harski says you can try using a physioball as well—the big inflatable ball most people use for situps and other ab exercises.
“Place the ball under your thighs andanchoryour feet under a stable bench,” says Harski. Make sure the bench is secured to the ground—you may have to weight its feet down. The movement is done the same as the glute-ham raise and Nordic curl.
Yet another option is to use a Bosu ball, which looks like half a physioball (dome on one side, flat on the other).Kneel on the edge of the inflated dome side and press your feet against a wall, driving primarily through the balls of your feet.Perform the Nordic curl movement, using your hands on the floor to push yourself back up if you can’t make it through the full range motion.
Great GHR Alternatives
(See03:57in the “Perfect Your Glute-Ham Raise” video at the top.)
If you don’t have a glute-ham bench, and you aren’t inclined to build a DIY one, you can still work your hamstrings and glutes hard with exercises that train these muscles in a similar fashion and are doable athome.
Sure, you’ve done hamstring curls, and they’re nowhere near as powerful as the glute-ham raise, but they can be with a small tweak. What we miss in an isolated hamstring curl is the hip extension we get in a glute-ham raise.One easy way to bring both knee flexion and hip extension together is to do a leg curl motion with furniture sliders,which allow you to drive your feet into the floor to raise your hips first, followed by sliding your feet toward your butt for knee flexion.
Sliders can be bought in any hardware store. They’re cheap, effective, easy to store and carry in a gym bag, and have a myriad of uses. The only catch is that you need to be on a smooth waxed floor, turf, or carpet to use them. Rubber flooring can cause too much friction and make the move overly difficult or even impossible.
Step 1.Lie on your back on the floor and place the sliders under your feet. Bend your knees and slide the sliders in close to your butt. Tuck your pelvis slightly so that it’s perpendicular to the floor and take a deep breath into your belly. Brace your core. Drive the back of yourarmsinto the floor at a 45-degree angle to your torso to add stability.
Step 2.Push through your heels to raise your hips up to full extension. Keep your core tight so you avoid arching your lower back.
Step 3.Slowly extend your knees, sliding your feet out in front of you as you lower your hips. Stop just short of where your butt would touch the floor. When your legs are extended, reverse the motion, curling your legs as you bridge your hips again.
One way around the stickiness of sliders is to use aglute-ham rolleror glider. It works the same as sliders but offers a platform to rest your feet on and wheels that roll it, making it usable on any flooring.
With any sliding leg curl variation you do, start by adding reps to progress the challenge. When you can do several sets of 10 or more, you’ll need to add resistance, which you can easily do by adding an elastic exercise band around your ankles. The band will amplify the concentric portion of the exercise (pulling the heels back), and make you work to stabilize yourself on the eccentric (extending your legs).
Step 1.Attach a light band to a sturdy object and wrap the open end around the back of your heels. Lie on your back on the floor and rest your heels on the roller.
Step 2.Perform the movement as you would the sliding curl described above.
Note:There are still more options that will allow you to perform the same sliding/rolling hamstring curl movement. A suspension trainer and a physioball can also be used.
Leg-Banded Ab Rollout
You’re probably familiar with rollouts done on an ab wheel. By adding a band around your feet, you can make a standard rollout into a posterior-chain exercise that nearly replicates the glute-ham raise while you train your core at the same time. The band forces you to maintain hip extension while you flex the lower leg, just as a glute-ham raise does.
Step 1.Anchor a band to a sturdy object and place a towel, mat, or pad on the floor to protect your knees. Kneel on the pad and hook the band around the back of your ankles. Curl your heels toward you to 90 degrees, so that there’s tension on the band, and you feel your hamstrings engage. Hold an ab wheel on the floor directly under your shoulders (or use a barbell loaded with light plates so it can roll, as shown above). Your body should form a straight line from your head to your knees, with your core braced.
Step 2.Roll the wheel forward, extending your hips while maintaining a tight core and alignment between your spine and your pelvis. Maintain the isometric hold in your legs. From the end position, draw the wheel back into the floor and return to the starting position. That’s one rep.
Back Extension and Leg Curl
If you don’t have the equipment to address both knee flexion and hip extension in one solid move, performing each of the movements separately is enough to ensure that you at least don’t skip training one of the hamstrings’ key functions. Though its name is something of a misnomer, the back extension exercise done on a 45-degree back extension bench trains hip extension. Do a few sets followed by leg curls—seated, standing, or prone—and you’re giving the hamstrings the one-two punch they need to grow and strengthen to their potential.
Back Extension
Step 1.Adjust the pad of a back extension bench so that it fits in the crease of your hips when you mount the bench. Get on the bench, and secure your feet under the ankle pads. Tuck your pelvis so it’s perpendicular to your spine, and brace your core. Your body should form a long, straight line.
Step 2.Bend only at the hips to lower your torso toward the floor. Stop before you feel your lower back is about to round forward. Squeeze your glutes as you extend your hips and return to the starting position.
]]> https://www.onnit.com/blogs/the-edge/the-best-at-home-back-exercises-and-workouts2025-07-10T10:55:27-05:002025-08-11T12:34:15-05:00The Best At-Home Back Exercises and WorkoutsJeremy GottliebIt’s not that hard to figure out how towork your chest without exercise equipment.Everybody knows what a pushup is. It’s no big thing to write yourself aleg workouteither, as you can dobodyweight squatsand lunges anywhere.Arms? Curl something. Even water jugs will work if you do enough reps. But training your back with no equipment at all is a little trickier. And we’re talking NO equipment at all.That is, nothing to hang from to do chinups or rows. Hell, even most convicts can do those liftsin their cells or prison yards. But if you live in a small, sparsely-furnished apartment—or you’re under quarantine—a home gym may be out of your budget, or just out of reach.
That’s why we contacted Sam Pogue, a performance coach in Boulder, CO (follow him on Instagram,@spogue86), and asked him to come up witha back workout that doesn’t require a single chinup or bodyweight row,and can be done in a small space—safely—with only the most common household objects on hand. He didn’t disappoint us.
Check out the at-home bodyweight back workout below, and, if you have the luxury ofowning a light pair of dumbbells, give the db workout he designed that follows it a try as well. Either way, you’ll discover for yourself that you don’t need heavy weight or a gym or build a muscular, injury-resistant back.
This workout makes use of slow tempos and isometric holds. That is, you’ll often control the eccentric (negative) portion of each rep and pause at certain points in the exercise’srange of motion. This creates more tension in the muscles than powering through your reps with momentum (as most people do), which leads to more fatigue and growth stimulus. It also reinforces good technique. You have to be mindful and intentional of every movement you do. As a result, you’ll gain stability and control over your shoulders, back, andcore, which will have carryover to any training you may do in the future. Don’t be surprised if you see your posture improve as well. A stronger back retracts the shoulders naturally, which automatically makes your chest look bigger, and contributes to an overall more confident-looking appearance.
Directions: Perform the exercises as straight sets, completing all the prescribed sets for one movement before moving on to the next.
1 Wide-Grip Pushup With Tempo
Sets:5 Reps:5 Rest:75–90 sec.
Step 1.Get into pushup position with your hands outside shoulder width. Tuck your pelvis slightly so that your hips are perpendicular to the floor. Your body should form a straight line from your head to your feet. Brace your core.
Step 2.Take 5 seconds to lower your body. Think about actively pulling your body toward the floor with your lats. When your chest is about an inch above the floor, hold the position with your core braced for 5 seconds.
Step 3.Take 5 seconds to push yourself back up to the starting position. That’s one rep.
2 Split-Stance Row Iso Hold with Towel
Sets:4 Reps:Work for 20 sec. (each side) Rest:90 sec.
Step 1.Tie a knot on one end of a towel or T-shirt and stand on that end to pin it down. Stagger your stance and grasp the free end of the towel with the hand that’s opposite the foot standing on it. Bend your hips back so that your torso forms a long line from your head to your hips. Brace your core.
Step 2.Row the towel toward your hip. It won’t move much, but pull it as hard as you can. Keep your shoulders square to the floor and create tension throughout your torso. Maintain the row and the tension for 20 seconds, and then switch arms and immediately repeat on the opposite side.
3 Off-set Bent-over Row with Broomstick
Sets:4 Reps:15 (each side) Rest:60 sec
Step 1.Load a barbell, broomstick, or other long bar unevenly, so there’s some weight on one end and nothing on the other side. (Water jugs will work fine.) Grasp the bar with hands shoulder width and stand with feet shoulder-width apart. Keeping your head, spine, and pelvis in a long line, bend your hips back with soft knees until you feel a stretch in yourhamstringsand your torso is nearly parallel to the floor. Draw your shoulders back and down—think: “proud chest.”
Step 2.Row the bar to your belly, being careful to keep the bar even in spite of the uneven load. When the bar touches your body, pause for 4 seconds, and then take 4 seconds to lower the bar back down. Squeeze your lats throughout the set. Complete your reps on that side, rest, and then repeat on the other side.
4 Plank Pull
Sets:4 Reps:30–45 sec. Rest:60 sec.
Step 1.Get into pushup position with hands shoulder-width apart. Lower your body into the bottom of the pushup.
Step 2.Push your hips back toward your heels, and then reverse the motion, pulling your body back to the bottom of the pushup with your lats (as opposed to pushing with your legs). Stay low, and keep your body in a straight line throughout the movement, using your core to brace your body and keep your lower back flat. Perform reps for 30–45 seconds.
At-Home Back Workout With Light Dumbbells
Being limited to light weights is a great opportunity to practice stabilizing your body with unilateral exercises that knock it off balance. Throughout this workout, you’ll be fighting to keep alignment while the weight seeks to shift you out of place. Are you going to let alittle old dumbbell do that to you?Especially if it’s a mere 10 or 15 pounds?
Whatever weight increments you have access to will be more than enough when you apply the techniques described here.
Directions: Perform the exercises marked A and B as supersets. So you’ll do one set of A, and then one set of B, before resting as directed. Repeat the superset until all sets are complete for both exercises. Perform the last exercise (the farmer hold) on its own.
1A Split-Stance Row
Sets:4 Reps:15 (each side) Rest:0 sec.
Step 1.Hold a dumbbell in one hand and get into a split stance, as described in the split-stance row iso hold above. The hand holding the weight should be opposite of the foot that’s in front.
Step 2.Row the dumbbell to your hip, and then hold it in the top position 2 seconds. Take 4 seconds to lower it back down. Complete your reps on that side, and then switch sides and repeat.
1B Single-Leg Rear-Delt Fly
Sets:3 Reps:12–15 (each side) Rest:75 sec.
Step 1.Hold a dumbbell in one hand and stand on the opposite leg. Keeping your head, spine, and pelvis in a straight line, bend your hips back until you feel a stretch in your hamstrings and your torso is nearly parallel to the floor. You can extend your freearmout to the side to help you balance.
Step 2.Raise the dumbbell out 90 degrees to your side, while drawing your shoulder down and back. Maintain your balance as you repeat the fly for reps. Afterward, repeat immediately on the opposite side.
If it’s too hard to balance, use a split stance instead, bending your rear big toe as much as possible.
2A Half-Kneeling Eccentric Press
Sets:4 Reps:6 (each side) Rest:0 sec.
Step 1.Hold a dumbbell in one hand at shoulder level and get into a half-kneeling position with your rear knee on the floor. Both knees should be bent 90 degrees and your pelvis should be slightly tucked so it’s parallel to the floor. Brace your core.
Step 2.Press the weight up slowly and with full control (no momentum), and then take 10 seconds to lower it, actively pulling with your back to bring the weight down. Maintain your balance and avoid bending or twisting in any direction. Complete your reps on that side, and then switch sides and repeat.
2B Pullover
Sets:4 Reps:25 Rest:75 sec.
Step 1.Lie on your back on the floor and hold a dumbbell with both hands over your chest. Tuck your pelvis so that your lower back is flat against the floor, and brace your core. Your knees should be bent 90 degrees, and your feet flat on the floor.
Step 2.Keeping your arms straight, reach your arms back behind your head until you feel a strong stretch in the lats. Your ribs will want to pop up, taking your lower back off the floor—keep your core braced so this doesn’t happen. Pull the weight back over your chest.
3 Farmer Hold
Reps:Work for 5–10 min.
Step 1. Load a duffle bag, backpack, orsandbagwith as much weight as possible—30–50 pounds is ideal. Stand with feet hip-width apart, and pick up the bag with one hand.
Step 2.Hold the bag at your side for a few seconds, resisting any bending or twisting. Now heave it up to shoulder level and hold it. Transfer the bag to both hands and bear hug it to your body and hold. From there, pass the bag to the opposite hand at shoulder level and hold. Finally, lower the bag to your side and hold. Continue passing the bag back and forth for 5 minutes (set a timer to track it). Work to increase your time each time you repeat the workout until you can pass the bag around for 10 minutes, and then increase the weight of the bag.
]]> https://www.onnit.com/blogs/the-edge/the-best-upper-chest-workout-for-getting-defined-pecs2025-07-10T10:55:27-05:002025-08-14T14:10:20-05:00The Best Upper-Chest Workout for Getting Defined PecsJeremy Gottlieb Key Takeaways
– A good upper-chest workoutrequires learning to better isolate the clavicular head of the pec major muscle.
– The best angle to set the bench for incline presses and flyes depends on the dimensions of your own sternum and ribcage.
– The path of motion that yourarmstravel is a critical factor in upper-chest training technique.
The Best Upper-Chest Workout for Getting Defined Pecs
Your pecs are sure to look fuller and more impressive when the region that attaches to the clavicle—called the clavicular head—is more prominent, but for some reason, the upper part of the chest doesn’t seem to respond like the rest of the muscle. You’ve heard it before: “If you want your upper chest to grow, doincline presses and flyes,bro.”The thing is, if you’ve been lifting for any length of time, you’ve probably already tried that.And if that was all there was to it, you wouldn’t be reading this now.
The truth is, putting your bench on an incline isn’t the only consideration for targeting the upper chest. The new, more scientifically-sound advice for boosting the upper chest is to base your training on your own individual anatomy, so we asked a trio of physique-training experts to tell you how to do that for a more balanced pair of pecs, top to bottom.
The 4 Best Upper-Chest Workouts
(See01:28in the “Best Upper-Chest Workout for Defined Pecs” video at the top of this article)
Here are four sample workouts (A, B, C, and D) you can do that prioritize the upper chest. Continue reading below to get the science behind why these exercises work, and our experts’ opinions on how to set up your own upper-chest workouts in the future.
Sample Upper-Chest Workout A
Here’s a solid routine that trains all the upper-body pushing muscles—chest, shoulders, and triceps. (What trainers call a “push workout.”) Still, the upper pecs are heavily emphasized, as you hit them directly with the first two exercises.
1. Dumbbell Incline Press with Semi-Pronated Grip
Sets:2Reps:6–8
Muscles Worked:upper chest, front delts, triceps
Step 1.Set an adjustable bench to a 30–45-degree angle, depending on your sternum angle (see How Do You Target The Upper Chest? below). Grasp a pair of dumbbells and lie back on the bench, making sure your entire back is in contact with it—do not arch your back so that it causes your lower back to rise off the pad.
Step 2.Start with the dumbbells just outside your shoulders, elbows bent, and your forearms/wrists in a semi-pronated (or neutral, palms facing in) position.
Step 3.Keeping your elbows pointing at about 45 degrees, press the dumbbells straight up until your arms are just shy of full lockout. Lower the dumbbells back down under control, until they’re just above and outside your shoulders.
Step 4.As you press and lower the dumbbells, establish a natural, comfortable wrist position—something between neutral and semi-pronated. The dumbbells give you the freedom to adjust mid-set.
Perform as many warmup sets as you need until you reach a weight that’s heavy enough for your first work set.Choose a load that allows you to do 7 or 8 reps, but perform only 6.In your second set, reduce the load as needed so you can perform 6 reps again. Each week, try to add a rep to your first set until you can perform 8–10 reps. At that point, increase the weight by 2.5–5 pounds and repeat the process.
2. Low-to-High Cable or Band Flye
Sets:2Reps:10–12 (or 12–15, if you use bands that don’t provide as much tension)
Muscles Worked:upper chest
Step 1.Set the handles on both sides of a cable crossover station to the lowest pulley setting. Grasp the handles, and step forward to lift the weights off the stack so that there’s tension on the pec muscles. If you don’t have access to cable stations, use elastic resistance bands as shown, attached to a rack or other sturdy object.
Step 2.Stagger your feet for stability, and let your arms extend diagonally toward the floor, in line with the cables—but keep a slight bend in your elbows. Your palms will face forward. Keep your torso upright and stationary throughout the movement.
Step 3.Contract your pecs to lift the handles upward and in front of your body. The upward path of motion should be in line with the clavicular fibers of the upper pecs—think: diagonal.
Step 4.At the top of the rep, your hands should be touching each other in front of you at around face level, wrists in line with your forearms. Squeeze the top position for 1–2 seconds, and then lower the weight under control, back to the start position.
3. Seated Lateral Raise
Sets:2Reps:5–10
Muscles Worked:lateral delts
Step 1. Sit up straight with your arms at your sides. (You may keep a slight forward lean if that feels better for your shoulders.)
Step 2. Raise your arms out 90 degrees with your palms facing down.
Step 1. Kneel down on the floor and wrap the center of a band around your ankles. Grasp the ends with both hands and reach your arms overhead, allowing the band to pull your elbows bent. Straighten up so that you’re in a tall-kneeling position, and brace your core.
Step 2. Extend the arms up overhead, and hold for a count of 2. Slowly return the arms back to the flexed position where you began. That’s one rep.
Sample Upper-Chest Workout B
This workout focuses on strength—specifically on the bench press—but since we want to prioritize the upper chest, we’ll perform a neutral-grip incline press instead of a flat one and use a Swiss or football bar.
1. Neutral-Grip Incline Bench Press
Sets:2Reps:5–7
Muscles Worked:upper chest, front delts, triceps
Step 1.Rack a Swiss bar (or football bar) at an incline bench press station. Lie back on the bench and grasp the neutral or semi-pronated grips (palms facing each other or a little angled) with hands just outside shoulder-width.
Step 2.Unrack the bar, and lower it under control to your upper chest with your elbows tucked in close to your sides, about 45 degrees from your torso.
Step 3.When the bar touches your upper chest, explosively press it straight up to fullarmextension, keeping your elbows tucked in as you press.
Perform as many warmup sets as you need until you reach a weight that’s heavy enough for your first work set. Choose a load that allows you to do 6 or 7 reps, but perform only 5.In your second set, reduce the load as needed so you can perform 5 reps again.Each week, try to add a rep to your first set until you can perform 7–8 reps. At that point, increase the weight by 2.5–5 pounds and repeat the process.
2. Single-Arm Tate Press
Sets:2Reps:6–12
Muscles Worked:triceps, core
Step 1. Hold a light dumbbell in one hand and lie back on a bench. Press the weight above you as in a dumbbell chest press so your elbow is locked out.
Step 2. With your palm facing toward your feet, allow your elbow to bend and slowly lower the weight toward the center of your chest. Stabilize your upper arm so only your forearm is moving. When the weight touches your chest, extend your elbow again. That’s one rep.
Step 1. Set an adjustable bench to about a 60-degree angle and lie down with your chest against it. Your spine should be long and your core braced. Grasp dumbbells with your arms extended, and allow your shoulder blades to spread apart while the weights hang at arm’s length.
Step 2. Row the dumbells to your sides, drawing your shoulder blades back and down. Lower under control.
4. Barbell Landmine Raise
Sets:2Reps:6–12
Muscles Worked:lateral delts, core
Step 1. Set up a barbell in a landmine unit, or wedge one end into the corner of a wall. Grasp the very end of the sleeve (where you load the weight plates) and stand with feet shoulder-width apart with the end of the bar in front of your hips.
Step 2. Raise your arm up 90 degrees as you would in a normal lateral raise. Note that you’ll probably only be able to use the empty bar or very light weight. Don’t try to go heavy. Repeat on the opposite side.
Sample Upper-Chest Workout C
This routine alternates push and pull exercises to work the entire upper body as quickly as possible. It’s also extra joint-friendly, making it a great choice for older or very busy lifters who need to get in and out of the gym fast.
1. Converging Incline Machine Press
Sets:2Reps:6–10
Muscles Worked:upper chest, front delts, triceps
Step 1.Set up for the exercise by raising your upper arms to line up with the direction the clavicular fibers of your pecs run. (This should be roughly 45 degrees out from your sides.) Draw your elbows back and retract your shoulder blades—that’s the bottom end of your range of motion. Now set up in the machine so that you can duplicate that end range position, adjusting the seat height as needed.
Set the incline according to your sternum angle—less steep for a flatter sternum, and closer to 45 degrees for an angled one (we explain this more below).If your machine’s incline isn’t adjustable, this may require scooting your butt forward on the seat to (ironically) take away some of the incline.If your machine allows it, you can use a neutral (palms facing in) grip, which may feel better for your shoulders or allow a better angle of the arms to hit the upper pecs.
Step 2.Unrack the weight to put tension on the pecs, and then press the handles up to full elbow extension, focusing on driving up and in. Think about bringing your biceps up to your collarbone on each side, so you squeeze both ends of the clavicular pec head together.
Step 3.Lower the weight under control. Stop when your hands are just above chest level (don’t let the weight rest on the stack between reps).
Perform as many warmup sets as you need until you reach a weight that’s heavy enough for your first work set.Choose a load that allows you to do 7 or 8 reps, but perform only 6.In your second set, reduce the load as needed so you can perform 6 reps again. Each week, try to add a rep to your first set until you can perform 10 reps. At that point, increase the weight by 2.5–5 pounds and repeat the process.
2. Inverted Row
Sets:2Reps:5–10, or as many as possible
Muscles Worked:upper back, core
Step 1. Set a bar or suspension handles to around waist height, and hang with your feet on the floor. Extend your hips and position yourself so that you’re suspended above the floor and your body forms a straight line. Draw your shoulders back and down to engage the lats.
Step 2. Pull your body up to the bar or handles, and lower yourself back under control. It’s important that your body moves as a unit. That means no hiking the hips or bending the knees to help yourself out.
Do a few warm-up sets with low reps (5 or fewer) to determine the right height. Try to find a range that will allow you 5–10 reps.
3. Cable Or Banded Straight-Arm Pulldown
Sets:2Reps:5–10
Muscles Worked:triceps, lats
Step 1. Attach a band to the top of a power rack or other sturdy object, and grasp the open loop with both hands. (You can also use a cable with a rope handle attachment.) Hinge your hips back while maintaining a tall posture and driving your shoulder blades down and together to create tension in the back and arms. Your hands should be at face level.
Step 2. With arms extended, pull your hands down toward your hip pockets. Pause at the bottom, and slowly return to the starting position. That’s one rep.
4. Banded or Cable Rotating Biceps Curl
Sets:2Reps:6–15
Muscles Worked:biceps
Step 1. Pick up a circle band and grasp an end in each hand. (You can also use cables.) Stand on the center of the band so it’s secured to the floor. Stand tall with your abs braced and pelvis level with the floor. Your palms should face in to your sides.
Step 2. Curl the band, rotating your palms outward as you come up, so that you lift against the resistance of the band.
Sample Upper-Chest Workout D
If you want a minimalist,do-it-at-home, virtually no-equipment-required routine,try this one. It starts with upper chest but works the whole body in just three moves (every major muscle group gets some work). Do the exercises one at a time or perform them as a circuit to get done faster and amp up the conditioning challenge. In other words, you can do a set of each resting only briefly in between, and then rest as needed at the end of the round. Repeat for 3 rounds.
1. Feet-Elevated Pushup
Sets:3Reps:5–12
Muscles Worked:upper chest, front delts, triceps
Step 1. Place your hands around shoulder-width on the floor, and raise your feet behind you on a bench, box, or other stable surface. Your feet should be high enough so that your arms will press your body up at a roughly 45-degree angle from your chest. Tuck your tailbone slightly so that your pelvis is neutral, and brace your core. Your body should form a long, straight line.
Step 2.Lower your body, tucking your elbows about 45 degrees from your sides, until you feel a stretch in your pecs. Press yourself back up, allowing your shoulder blades to spread at the top. This action is another advantage of the pushup—pressing exercises done on a bench restrict your scapular movement, while the pushup allows these muscles to work naturally to stabilize your shoulders.
If that’s too hard, lower your feet closer to the floor. If it’s too easy, raise your feet higher if you can, or, perform your reps with a slower negative (lowering phase).
2. Split-Stance, One-Arm Dumbbell Row
Sets:3Reps:5–15
Muscles Worked:lats, upper back, biceps
Step 1. Hold a dumbbell in one hand and get into a split stance. Bend your hips back and brace your forearm against the inside of your thigh. The hand holding the weight should be opposite the foot that’s in front. Your torso should form a straight line with your back flat.
Step 2. Row the dumbbell to your hip. Complete your reps on that side, and then switch sides and repeat.
If you only have one or a few light dumbbells at home, hold the top position 2 seconds. Take 4 seconds to lower the weight back down.
Step 1.Place weight plates or blocks on the floor, and rest your heels on them with feet hip-width apart.
Step 2. Without letting your feet actually move, try to screw both legs into the floor as if you were standing on grass and wanted to twist it up—you’ll feel your glutes tighten and the arches in your feet rise. Take a deep breath into your belly and bend your hips back. Bend your knees and lower your body down. Push your knees out as you descend. Go as low as you can while keeping your head, spine, and pelvis aligned, and then extend your hips and knees to return to standing.
Ideally, having your feet elevated will allow you to achieve a full bend in the knees without losing your balance or your lower back position. If bodyweight alone is too easy, add some weight for resistance (a loaded backpack is one option), or slow down your descent to three full seconds on each rep.
Best Exercises for Building Upper-Chest Strength
Pop quiz: Are presses or flyes better for hitting the pecs, and, in this case, the upper (clavicular) fibers in particular? Despite what you may have heard, there’s no blanket approach that applies to everyone, and both movement types can be beneficial when performed with the proper setup.
“Presses tend to be better for working the lengthened portion of the range of motion,” says Kassem Hanson, a trainer of bodybuilders, designer of gym equipment, and creator of biomechanics courses formuscle building(available atN1 Education;@coach_kassemon Instagram). That means that chest presses of any kind activate more muscle fibers when your pecs are stretched out at the bottom of the rep. “Flyes, [when done with a cable], tend to be better for working the short portion of the range of motion,” when the muscle is nearly fully shortened (such as when your hands come together on a cable flye). “The best option is to use both exercises.Presses tend to have more total pec recruitment, so, when programming, you may do more presses, because one to two good presses in a workout will cover it.”
“If I’m doing a flye, I’m going to be able to better isolate [the pecs] from the deltoids and triceps” says Jordan Shallow, DC, an Ontario, Canada-based strength coach and licensed chiropractor (@the_muscle_docon Instagram). “With the press, you’re going to be able to use more load, but that load will be dispersed through the delts and triceps,” and that relieves some of the tension that the pec muscles could be experiencing and use as stimulus for growth. However, this isn’t to say pressing can’t work the pecs in a more isolated fashion. (It won’t isolate them like flyes can, but it can be closer.) “If we can set it up properly to make the pecs a prime mover based off the anatomical variants,” says Shallow, “we can really make the press a good exercise and challenge the pecs.”
Below are five moves that, if performed properly, will emphasize the clavicular head of the pec major for most individuals. They come courtesy of Hanson and Bill Shiffler, owner ofRenaissance Physique, and a competitive amateur bodybuilder. (The moves without directions are explained step-by-step in the workouts above.)
1. Low-to-High Cable or Band Flye
One of the problems with dumbbell flyes is the lack of tension at the top. As your arms come up from the outstretched position, the resistance drops off, and at the very top, your shoulder, elbow, and wrist joints are stacked,so the weight is just resting on your arms like they’re pillars.You also can’t bring the dumbbells past the midline of your body at the top, because they’ll clang together. Hanson and Shiffler both argue that full range of motion (ROM) is key to developing the clavicular and upper-sternal pec fibers, so pulling the arms across the body is especially important. With cables, you can keep tension on the pecs throughout the entire arc of a flye.
“Free weights give resistance in one direction, which eliminates the ability to get full range of motion,” Hanson says.“A low-to-high cable flye is going to be your best way to get full ROM—especially the range where the muscles are fully shortened.”
Other than offering optimal ROM and biomechanics, the low-to-high cable flye will also provide some much-needed variety to a chest program that includes a healthy dose of pressing movements. “When doing machine and free-weight presses for your middle [sternal] pecs,” says Hanson, “you’ll get some overlapping stimulus in the upper chest, but not in the range of motion you get in a low-to-high cable flye.”
Of course, if you don’t have access to cables, bands can be used as a substitute.
Sets/Reps:2–4 sets of 8–15 reps, training close to failure, is Hanson’s general recommendation.
2. Converging Incline Machine Press
A converging pressing machine is one where the handles come together as you press the weight, rather than remain static on one path of motion. This allows you to perform a movement that’s more of a hybrid press/flye than what you’d get from most pressing machines, better mimicking the range you’d use during a cable or resistance-band flye and keeping tension on the pecs in multiple planes. When doing a barbell or Smith machine incline press, for example, your hands don’t come together as you press because they’re fixed on the bar, and, as explained earlier, a dumbbell incline press offers no tension in the top position. Though not available in all commercial gyms, a converging press can be a great addition to your training arsenal if you have access to it. (PRIME Fitness USAmakes an excellent converging incline press machine, as shown above.)
The upward pressing angle combined with converging handles makes this particular type of incline machine press extremely effective for targeting both the clavicular and upper sternal pec fibers, provided you also achieve an optimal arm path through proper setup.
Exercise Variations:To target more of the sternal fibers that make up the middle/upper portion of the pecs, the upper-arm position will be slightly different than what’s described above. Because the sternal fibers run more or less side to side, you’ll want the arms to line up with those fibers. That means your elbows will be up a bit higher and pointed out to the sides, with a path of motion going from out to in, straight across the body. (This is shown better in the first variation used in the video above.)
Hanson shows both variations of the incline converging machine press (sternal and then clavicular pec emphasis) inthis video.
Sets/Reps:2–4 sets of 6–12 reps, training close to failure.
3. Dumbbell Incline Press with Semi-Pronated Grip
According to Hanson, a relatively narrow grip better targets the upper chest because it allows the elbows to stay in closer to the body, and that prevents the front delts from taking over the movement (as is the case on presses done with a wide grip). If you’re pressing with a barbell, he recommends a grip just outside shoulder-width. “However,” he says, “narrower arm paths work better with a neutral grip [palms facing each other] or semi-pronated grip [palms somewhere between facing each other and facing straight forward],” whichever is more comfortable for you. This being the case,dumbbells are a better option than a barbell for targeting the upper pecs.
With dumbbells, you can easily assume a neutral or semi-pronated grip, whereas a barbell locks your hands in a fully pronated position, and, Hanson says, “encourages the elbows to flare out.”
Sets/Reps:2–4 sets of 6–12 reps, training close to failure.
4. Swiss-Bar Incline Press
This exercise, also recommended by Hanson, is more or less the barbell version of the incline dumbbell press described above. A Swiss bar (aka “football bar”) is a specialized barbell with handles that offer neutral and sometimes semi-pronated grips. While not typically available at big box fitness clubs, if you can find a hardcore powerlifting or bodybuilding gym, or athlete training facility that has one of these bars, it’s worth trying out.
With the Swiss bar incline press, you get the upper-pec biases of the angled bench and neutral grip with the added bonus of greater overload placed on the muscles because you’re using a barbell (which is more stable than pressing a pair of dumbbells).
If your sternum is fairly flat, go with a 30-degree angle. If the top of the sternum is behind the lower ribs (an inverted angle), go with 45 degrees. (More about this below.)
Sets/Reps:2–4 sets of 6–12 reps, training close to failure.
5. Incline Dumbbell Flye
The key to targeting the upper chest with a dumbbell flye is the same as with the low-to-high cable flye: establish an arm path that moves in the same direction as the diagonal fibers of the clavicular pecs. Doing a flye with the torso at an inclined position should automatically help you.
If you were doing a flye on a flat bench, the upper arms would more or less be moving in the same direction as the sternal fibers—straight horizontal, not diagonal. (The exception here would be someone with a sternum angle where the clavicles are significantly further forward than the lower ribs, which would put you at a natural incline even on a flat bench.)
An incline bench, on the other hand, puts you at such an angle that the same flye motion has your upper arms moving diagonally upward in relation to your torso—same as the clavicular fibers. Will there still be some sternal fibers activated? Of course. But as mentioned earlier, these fibers reach into the upper chest area, so no harm there.
As for what bench angle to use, again, assess your sternum angle. If your sternum is fairly flat, go with a 30-degree angle. If the top of the sternum is behind the lower ribs, use 45 degrees (see How Do You Target the Upper Chest? below). As mentioned above, a free-weight flye isn’t quite as effective as one done on a machine or with cables/bands, because the resistance is reduced at the top, but it’s a solid option for those who don’t have access to fancy equipment.
Step 1. Set a bench to the appropriate angle for you and lie back against it with dumbbells at arm’s length overhead. Your back should be flat on the bench.
Step 2.Open your arms, lowering them out to your sides until your feel a big stretch in your pecs. Allow your elbows to bend a little as you descend.
Step 3.Bring your arms back up overhead. Stop the range of motion short of where your arms are perpendicular to your torso.
Exercise Variation:The incline flye can also be done with cables, placing an incline bench in the middle of a cable crossover station and using handles at the lowest pulley settings.
Sets/Reps:2–4 sets of 8–15 reps, training close to failure.
If you’re training at home without the luxury of much equipment, you can resort to the classic pushup done with your feet resting on an elevated surface. “This is pretty similar to an incline press in the way it targets the upper chest,” says Shiffler, “with the added benefit of targeting some stabilizer/core muscles while you’re at it.”
Pushup with Feet Elevated
As with other variations, adjust the height of your feet based on your sternum angle—body at around 30 degrees to the floor if you have a flat sternum, and feet up a little higher if your sternum is angled.
Sets/reps:2–4 sets of 8–15 reps, training close to failure.
How Do You Target the Upper Chest?
The idea that any chest exercise done on an incline bench hits the upper pecs has been perpetuated for more than a half-century, at least. Arnold credited his outstanding upper chest to incline presses and flyes, and most bodybuilders still swear by them. Indeed, some degree of incline is important to get the clavicular pec fibers working against gravity in the most efficient way, but elevating your bench is only part of the equation.
The key to targeting a certain area of the chest, says Shallow, is“understanding where to look from an anatomical standpoint. That will indicate what pec fibers you’re training.Arm path is going to be a key factor, but sternum angle and ribcage depth are going to be anatomical variations that will drastically affect how you recruit the pecs.”
“The pecs gain their mechanical leverage by using the ribcage as a fulcrum,” adds Hanson, “allowing them to pull the arm forward when it’s behind you, and pull your arm across your body when it’s in front.When you put your elbows out wide, you move the pecs away from the ribcage, taking away that fulcrum and leaving you to rely more on your anterior deltoids. This is a common mistake people make when performing an incline press, and also one of the reasons there’s conflicting research on the impact of incline angles on chest recruitment.”
In other words, you can choose any degree of incline that you like, butif you move your arms out too wide on your incline presses, you still won’t target the upper chest effectively.
In addition to arm path, the angle of your sternum and the depth of your ribcage should be considered. Yes, we know that sounds very technical and complex, but it’s not that difficult to assess.
Why Your Sternum and Ribcage Matter
The degree to which you incline your bench depends on your sternum angle and ribcage. “Some people have a very straight up and down chest—a flat sternum angle,” says Hanson, “while others have a steeper angle where the lower portion of their sternum sticks out further. The more angled your sternum, the greater the incline you should use,” up to 45 degrees.“The flatter the sternum,” says Hanson, “the less of an angle—usually around 30 degrees.”
Determining your own sternum dimensions is really as simple as standing in front of a mirror, turning to one side, and taking your shirt off.Look at where your collarbone is versus the bottom of your breastbone and lower ribs.If it’s behind these bones, you’ll probably need a steeper incline than if the two are nearly in a straight line. And if your clavicle is slightly in front of the sternum and ribs, you may need only a few degrees of incline, because your chest is basically on an incline already.
But don’t just rely on bench angle. “One of the most common cheats is people arching their back and completely negating the incline on the bench,” says Hanson. So, once you’ve found the appropriate bench angle,make sure you take advantage of it by keeping your back flat against the bench(even though, alas, it will force you to go lighter and use stricter form).
Remember, too, that the orientation of the pec fibers determines the way you need to move to work the muscle. As you can see in the diagram above, the fibers of the different pec major heads don’t all run in the same direction. The fibers of the clavicular head run at an upward angle (diagonal), not side-to-side like the sternal head. So using an incline bench isn’t as important as making sure your arms are moving along the path that the upper-chest fibers go.
“The clavicular pec is unique in that it originates on the clavicle, not the sternum,” says Hanson. “This gives it more of an upward line of pull, which means you’ll use motions that go low to high. This can be done with a cable, using an incline on a bench, or adjusting your torso position in a machine. Bottom line is, you need to be pressing at an upward angle [to target the clavicular fibers].”
What Muscles Are In The Upper Chest?
When discussing the upper chest, we’re only talking about one muscle: pectoralis major. However, the pec major consists of three distinct portions of muscle fibers, called heads, and the way they’re arranged determines their function (i.e., the mechanics you need to use to develop them). From the top down, the sections of the pec are:
1. The Clavicular Head (Upper Chest)
The fibers originate on the clavicle (collar bone) and run diagonally downward to attach to the humerus (upper-arm bone). They work to pull the arms in front of the torso and up overhead.
2. The Sternal Head (Middle Chest)
The fibers start on the edge of the sternum (breastbone) and reach across to attach to the humerus (just below where the clavicular head goes). The sternal head pulls the arms forward and crosses them in front of you.
3. The Costal Head (Lower Chest)
Fibers run from the cartilage of the ribs and the external oblique muscle to the humerus. The costal head pretty much assists the the sternal head.
To improve the upper chest specifically, you’ll want tofocusmainly on training the clavicular head, but with some emphasis on the sternal head as well, because it covers the upper portion of the sternum (see the diagram above).
Now for the big question:can you really train specific portions of a muscle?For decades, bodybuilders have argued that you can, but scientists have rebutted them, citing the “all or none” principle, which states that a muscle either contracts or it doesn’t. Indeed, due to the way muscles are innervated, when the signal to contract is sent from the brain, all sections of the muscle shorten at once.
“The ’all or none’ principle is more around the actual depolarization of the muscle [that] causes it to contract,” says Shallow. “There’s no partial contraction—the muscle’s contracting or it’s not. But people conflate that with the idea that a muscle contracts and we can’t put particular tension, or effective tension, across certain fibers¦ and we absolutely can.”
The truth is, both sides of the debate are correct to a degree. That is, when you work your pecs, you work the whole muscle, butone part of it will work harder than another depending on the movement you’re doing.That means that certain muscle fibers will be activated to complete the movement while others won’t be, and that makes sense, as we know the brain works for maximum efficiency in all things. If you’re raising your arms up in front of you from a 45-degree angle at your sides, your nervous system will call on more clavicular pec muscle fibers than sternal pec, and it won’t require much from the costal pec heads.
Astudyin theJournal of Strength and Conditioning Researchshowed as much, with regard to the upper chest specifically. Researchers had subjects perform the bench press at various angles and tested the muscle recruitment for each.Pressing at an incline of 44 degrees resulted in greater activation of the upper-chestmuscle fibers than pressing on a flat bench, or a bench set to 28 degrees of incline. A 2020studyon bodybuilders in theEuropean Journal of Sport Sciencehad comparable findings, with the incline bench press again outperforming horizontal and decline presses for recruiting the upper chest.
How To Stretch Your Upper Chest
Prepare your chest, shoulders, upper back, and elbows for your upper-chest training with this quick mobility routine from Eric Leija (@primal.swoledier). Perform each move for 2–3 sets of 10–15 reps.
Tips for Building More Muscle
Here are a few more tips for getting the greatest possible upper-chest growth.
Sets and Reps
You don’t have to train the pecs with a wide range of reps, or bomb it with multiple exercises in one session.One or two movements is enough.The fewer sets you do, the faster you’ll recover, and the sooner you can train again and make progress, so aim to train your chest at least twice in a seven-day period (three times, via full-body workouts, is probably the most you should do).
Moderate rep ranges strike a balance between weight that’s heavy enough to efficiently recruit lots of muscle fibers and a load that’s so heavy you risk injury and burnout. Hanson generally recommends doing no fewer than 4 reps per set on presses and no fewer than 6 reps per set on flye movements, unless you’re training for a specific strength goal. However, virtually all rep numbers and rangeshave been shown to work equally well for muscle gain, at least in the short-term.Reps between 5 and 10 seem to be a good mainstay, keeping fatigue to a minimum and lessening the chance that your performance will suffer in subsequent workouts. Choose your reps based on efficiency, or just personal preference, but there’s no need to do very high numbers (15+) or very low ones (1–3). Avoid the extremes.
Tempo
When it comes to the speed with which you perform your reps (which trainers call tempo), Hanson says the biggest key is making sure you control the resistance during your sets. Don’t bounce the weights up, or let them drop as you lower down on a rep.
“Presses can be performed with a wide variety of tempos,” says Hanson. “But you shouldn’t be going super slow or throwing the weight up explosively. For flyes, you’re using your whole arm as a lever, so controlling the eccentric [negative/lowering portion of the rep] is much more important for safety and stimulus.”
Advanced Techniques
The more experienced you get, the more creative you can get with tempo. For pressing exercises, “adding a two-second pause or an extra quarter-rep at the bottom can be a great variation in stimulus,” says Hanson. “You’ll get more sore with those techniques, and they increase volume,so consider dropping a set or two when using a more advanced tempo, and then progressing back up.”
With cable flyes, Hanson recommends a one to two-second squeeze in the end position, when your hands are close together. “Because you fatigue in the shortest part of the range of motion first, an advanced technique is to use a pause in your early sets and decrease or remove it in the later sets,” he says. This way, you can keep up your reps and not be limited by the weakest part of the movement [as you get tired].”
]]> https://www.onnit.com/blogs/the-edge/how-to-do-the-single-leg-glute-bridge-like-a-pro2025-07-10T10:55:27-05:002025-08-14T14:25:06-05:00How To Do The Single-Leg Glute Bridge Like A ProJeremy GottliebThe single-legglute bridgeis a progression of the two-legged glute bridge, where you lie on the floor and raise your hips up to full extension. Because the single-leg bridge works one leg at a time, it’s much more challenging than the basic glute bridge and requires a lot of stability through your hips andcore. This makes it a great move for building functional strength and balance. Running, jumping, and most sports activities require you to stabilize your body and produce force on one leg at a time, and the single-leg glute bridge will train you to do that. It’s also good for improving range of motion in the hips, which can help relieve lower-back pain.
Keep scrolling, and you’ll learn how to perform the single-leg glute bridge correctly, when to use it, and what to do instead if you find it too challenging (or too easy).
What Is The Single-Leg Glute Bridge?
In any glute bridge exercise, you lie on your back on the floor and use your glutes to extend your hips. In the single-leg version, just one leg works at a time while the other is tucked near your chest. Supporting your bodyweight on one leg is very challenging—your hips will have a tendency to tilt, and your lower back may want to take over the movement to compensate for your glutes (if they’re weak).Therefore, the single-leg glute bridge is not a beginner’s movement.If you’re new to glute training, or bridging specifically, you should start with the two-legged version (and we’ll go over it below).
The single-leg glute bridge doesn’t offer as much range of motion as other glute exercises, such as the hip thrust orRomanian deadlift. It works the glutes in a more shortened position, focusing on the lockout of your hips to extension. For this reason, it serves as a nice complement to other glute exercises. It can also bea good option for when you’re traveling, or other times that you don’t have access to heavy weightsor other gym equipment. For most people, their bodyweight alone makes for a challenging workout and will only allow them a handful of reps.
Step 1.Lie on your back on the floor and set up to do a regular, two-legged glute bridge. Place your feet flat on the floor close to your butt so your shins are nearly vertical. Tuck your chin toward your chest. Bend your elbows and make fists with both hands, actively driving yourarmsinto the floor. This will help brace your upper body. At the same time, tighten your core, pulling your ribs down.
Step 2.Push through your feet to raise your hips up to full extension and squeeze your glutes as you come up. It’s important that you don’t hyperextend your lower back at the top of the movement, so keep yourabsbraced (think: “ribs down”) andfocuson pushing your feet hard into the floor rather than trying to drive your hips up as high as possible.
Step 3.Lower your hips back to the floor with control.
Do a few practice reps and think about how it feels.If you feel the exercise more in yourhamstringsthan in your glutes, move your feet in a little bit closer to your butt.If you feel it more in your quads or knees, move your feet further away from you. You may also want to experiment with where your toes point and how wide your stance is. When you find a comfortable position where you feel like you’re balanced and working mostly glutes, you’re ready to do the exercise with a single leg.
Step 4.Raise one leg off the floor and bend that knee 90 degrees. “Your single-leg glute bridge stance should look like your standard glute bridge stance,” says David Otey, CSCS, a trainer, gym consultant, andfitnessbook author (OteyFitness.com). Some people like to keep the non-working leg extended straight from the hip, butOtey says this makes the exercise unnecessarily harder, turning it into more of a balancing actwhen you really just want to focus on glute bridging. So keep the non-working leg bent.
Step 5.Drive through the foot that’s flat on the floor to raise your hips up. Your shoulders, hips, and working knee should all move in alignment. Now control the way back down.
Many coaches suggest pushing through the heel of your foot as you bridge, and sometimes even letting your toes raise off the floor, but Otey recommendsthinking of your foot as a tripod and pushing through the heel, ball, and pinkie toe knuckle.“To develop the glutes, hamstrings, and the rest of the posterior chain muscles in a way that will translate to your other activities,” says Otey, “your body has to learn to push with full foot contact. That gives you the most stability and activation.When you do athletic movements, you can’t sit on your heels, so learn to press through the ground.”
Otey also suggests wearing flat-soled shoes, or no footwear at all, to facilitate stable contact with the floor. “Fluffy shoes like running shoes or other types with a big heel or padding will make it harder,” says Otey.
You’ll immediately notice how much more unstable the single-leg bridge is than the double-leg, so be extra careful to drive with your elbows and keep your core braced.Your hips shouldn’t tilt or twist.
Aim to do as many reps as you can, which may be a lot or only a few. That makes the single-leg glute bridge both a good strength exercise to do if you don’t have weights as well as a good high-rep burnout exercise for the end of a lower-body workout.
What Muscles Do Single-Leg Glute Bridges Work?
The single-leg glute bridge works (surprise!) the glutes, but Otey notes that it engages the glute medius and minimus more than most other glute drills. These muscles act as stabilizers for the pelvis and keep the head of the femur in the hip socket.
Your back extensor muscles and core have to work as well to keep your pelvis level throughout the motion, and your upper back has to engage to prevent your torso from collapsing.
Further down the chain, the hamstrings, calves, and anterior tibialis (the muscle on the front of your shin) can’t help but get involved too.
Difference Between A Single-Leg Glute Bridge and A Regular Glute Bridge?
Again, the regular glute bridge is done with two feet on the floor while the single-leg bridge uses one leg at a time. Since it’s more stable,the regular glute bridge will allow you to add more external load (such as a barbell) when you’re ready to progressit, whereas the single-leg bridge requires more balance and may be challenging enough for you with bodyweight alone. Both exercises train the glutes, but the single-leg glute bridge is a more advanced progression, and the better choice for developing the smaller glute muscles that provide stability for everyday life activities like running and jumping.
“It’s important to do single-leg movements,” says Otey. “It benefits smaller muscle groups that support a limb when it’s working on its own.When you do bilateral [two-legged] exercises, it’s like doing a group project in school: one or two kids do all the workand the others coast. But when you do single-leg stuff, every muscle has to do its job or the movement will fail. If you force the body to use weaker muscles, it will use them, and make them stronger.”
Because of its benefits to balance, Otey says the single-leg glute bridge is good for kids as well as people in their 90s who are trying to stay active.It can also improve range of motion in the hips, which is helpful for relieving or preventing lower-back pain.The more your hips can move, the less the lower back will involve itself in various exercises, and that takes pressure off the spine.
Difference Between a Glute Bridge and a Hip Thrust?
The glute bridge and hip thrust are two distinct exercises that are often confused. Glute bridges are always done with the back on the floor, and that means their range of motion is fairly short.A hip thrust is done with the upper back supported on a bench (shown in the photo above), and that allows you to sink your hips to the floorand then extend them to the height of the bench. This takes the glutes through their full range of motion, so many coaches argue that the hip thrust is a better glute exercise for glute muscle gains than a glute bridge.
However, because the hip thrust’s range of motion is so wide, it does recruit somehamstringand quad muscle as well, and can be done to bias those areas even more depending on how you set it up. For those reasons, some coaches counter that the glute bridge is a better glute exercise, as it isolates the glutes to a greater degree.
The truth is, both the glute bridge and hip thrust should be done for complete, balanced glute development, and that includes their single-leg versions.
Kas Glute Bridge vs. Hip Thrust vs. Single-Leg Glute Bridge
The Kas glute bridge is yet another glute exercise that often gets spoken of interchangeably with hip thrusts and glute bridges, but it’s really a separate exercise entirely. Named for the coach who popularized it, Kassem Hanson, founder ofN1, an online trainingeducationcourse,the Kas bridge is a hip thrust with a shortened range of motion.(If you’ve been paying attention, you know by now that the term “bridge” implies that you do it on the floor, but this is NOT the case with the Kas glute bridge.)
You set up on a bench (usually with a barbell in your lap) and start with your hips locked out;then lower your hips about a third of the way down to the floor (or until your knees start to drift backward), and lock out again.This keeps the tension of the exercise squarely on the glutes, rather than involving the hamstrings and quads, as the basic hip thrust does.
You can perform the same movement with one leg (a single-leg Kas glute bridge), but the single-leg bridge on the floor achieves mainly the same thing.
The single-leg glute bridge is a lot harder than the two-legged glute bridge, so if you find that you can’t bridge up all the way or keep your balance, take it down a notch with a simpler exercise. One option is the B-stance glute bridge, which uses your non-working leg like a kickstand, providing a little more stability but still allowing you to work one side of the hips at a time.
Step 1.Set up as you did for the single-leg glute bridge and slide your non-working leg forward until the heel of that foot is even with the toes of the working foot.
Step 2.Now bridge up as you did for the single-leg glute bridge. The heel of the non-working leg shouldn’t really push into the floor—it’s just there to help your balance. Try to keep most of your weight on your working leg when you bridge.
Another alternative to the single-leg glute bridge that’s a little easier is the glute march. Here, you’ll bridge up with both legs and, keeping your hips elevated, raise one leg at a time like you’re marching your feet. When you master this move, you should be able to do the single-leg glute bridge with no problem.
Bret Contreras, PhD, a coach and world-renowned expert on glute training (@bretcontreras1on Instagram) uses glute marches as his preferred regression of the single-leg glute bridge.In his textbook,Glute Lab, a comprehensive guide to glute training, he says that he often has clients do this movement as a warmup before they attempt the single-leg glute bridge, performing 2 sets of 20 reps (10 on each leg).
A third option is to bridge up with both legs and then raise one leg off the floor and lower your body back down with the other leg. This will help you build control in your hips and set you up for a full-range single-leg glute bridge down the line.
When you feel like you’ve mastered the single-leg glute bridge, Otey recommends you try the single-leg hip thrust, which increases the range of motion by resting your shoulders on a bench.
Step 1.Rest your upper back on a bench with your body perpendicular. The bottom of your shoulder blades should line up with the edge of the bench. Place your feet in front of you and find your comfortable stance. Bend your elbows and dig your arms into the bench for stability, making fists with your hands. Raise one leg off the floor and bend that knee, bringing it toward your chest.
Step 2.Push your working foot into the floor and raise your hips until they’re roughly in line with your working knee and your shoulders.
]]> https://www.onnit.com/blogs/the-edge/how-to-properly-do-the-jm-press-get-stronger-bigger2025-07-10T10:55:27-05:002025-08-14T14:13:11-05:00How to Properly Do the JM Press: Get Stronger & BiggerJeremy GottliebIf your bench press max has been stuck on the same stubborn plateau for any length of time, one very unique hybrid movement—the JM press—may well be the exercise you need to break through.
Adding another 20 or 30 pounds to your bench is often just a matter of increasing your lockout strength—the top portion of the range of motion where the triceps take over and lock out your elbows.
That’s exactly why JM Blakley, a former elite-level bench press specialist, invented the exercise 20+ years ago.
Inserting the JM press into your weekly routine could mean going from a weight that staples you to the bench to one you’re lifting for reps in short order. You’ll also gain some triceps size in the process, which will go a long way toward making youlooklike a strong bencher.
What Is the JM Press?
The JM press is essentially a cross between aclose-grip bench pressand a barbell skull crusher (triceps extension)—both of which are hallmark strength- andmass-gaining exercises for the triceps.
In theclose-grip bench press, the lifter uses a narrower grip than on the conventional bench press—such as hands at shoulder-width, or slightly inside—to emphasize triceps involvement over the chest and shoulders. With the skull crusher, the bar is lowered to the forehead, putting a stretch on the triceps to increase activation. The JM press puts both exercises together in a movement thatworks the triceps in the range of motion they use to lock out the elbows in the last few inches of a bench press rep,when the weight is going up overhead. This makes it very specific to bench press gains, and, therefore, a popular exercise among powerlifters.
In aninterview with Dave Tate(powerlifting coach and founder ofEliteFTS), JM Blakley said the following, when recalling how he came to invent his namesake exercise: “I’m super big on recovery¦ I couldn’t do three, or four, or even twotriceps exercisesafter a while, because the [cumulative] load was so much…So how can I get the value of a skull crusher and a close-grip bench and not have to do both of them? I blended them together.”
In other words, the JM press was an efficiency hack to get the most out of two great bench press-building exercises for the price of one.
“A close-grip bench press normally comes to the lower part of your chest, and a skull crusher ends at the top of the forehead,” says Julia Ladewski Anto, CSCS, a strength and conditioning coach to powerlifters, athletes, and CrossFitters of various ages, and an elite powerlifter herself (julialadewski.com). “With the JM Press,you’re looking to bring the bar to the chin/neck area.”[Exactly where you bring the bar largely depends on the length of your upper and lower arms, as you’ll see in the description below.]
Benefits of the JM Press
When powerlifters do an exercise specifically for the triceps, it’s usually to increase lockout strength for the bench press. This is certainly the case with the JM press. Most lifters will stall somewhere past the halfway point as they press the bar up. This is known as the sticking point. The JM press was Blakely’s solution to the problem, asit strengthens the triceps at precisely the point where they would normally be unable to extend the elbowswith a heavy load.
“I’d put the JM press into a training program for someone who needs to build pure triceps strength,” says Anto. “I would gear it more toward powerlifters and those looking to improve their bench press.” Conventionaltriceps exerciseslike cable pushdowns and kickbacks, she says, are fine for building triceps muscle size,but they won’t develop strength that’s specific to the bench press, mainly because the movement mechanics are too different.Another advantage of the JM press over more conventional triceps moves: loading potential.
“You can move more weight on JM presses than on a skull crusher,” says Anto, “and really push the limit on that lower part of the triceps [where the muscle inserts into the elbow]. It may take a few sessions to feel out the movement pattern, but once you’re aware of where on the triceps you should be feeling it, you’re golden.”
While theJM press was really intended for powerlifting training, that isn’t to say that it can’t or shouldn’t be used by those who merely want biggerarms.“It can definitely be used for hypertrophy [muscle gain],” says Anto. “It will overload the triceps, which can create some solid density in those muscles.”
However, Anto says novice lifters may be better served with more standardtriceps exercises. “Beginners and general gym goers can get more benefit with greater ease of movement by using close-grip presses,dumbbell presses, and various skull crusher variations,” she says. “I just can’t justify having a general population person use the JM press when there’s a larger learning curve to actually get something out of it.” As you’ll see below, the JM press is a fairly technical lift that needs to be done precisely to see gains, so attempt it only after you’ve gained some experience with the bench press and its more common assistance lifts.
What Muscles Does the JM Press Work?
The JM press is used to target the triceps, but there is some movement at the shoulders, which makes it a compound exercise that works the pecs and delts a bit as well.
“The [muscle involvement] really depends on how you perform the exercise,” says Anto. “I’ve seen it doctored over the years and morph into various things from how it was originally intended. The original way the exercise was performed was meant tofocuson the triceps—specifically the lower part of the triceps, near the elbow—and you tried to keep any shoulder rotation out of it.” This is the version we’ll describe how to do below.
Of the three heads of the triceps brachii muscle,the JM press emphasizes the lateral head the most, similar to how aclose-grip bench pressacts on the muscle.The lateral head is the portion of the muscle that runs down the outer side of yourarm, and mostly accounts for its horseshoe appearance when well developed. FYI, the long head and medial head of the triceps (on the inner/medial side of the arm) are targeted with overhead and reverse-grip elbow extension movements, respectively. It’s not that the JM press won’t activate these areas, but it doesn’t recruit them as well.
Researchconfirms that the triceps are involved to a greater extent when doing barbell presses with a narrow grip versus a wide one. The JM press falls in the narrow-grip category. Furthermore, researchers have found that the triceps’ lateral head is highly active during the top portion of a bench press.
How to Properly Do the JM Press
Here’s how to perform the JM press as originally intended by its creator, JM Blakley.
Step 1.Use a bench press station, or lie back on a bench that’s situated in a power rack, making sure you’re scooted forward enough so that the bar is behind your head when it’s racked (not over your face).
Step 2.Grasp the barbell with hands roughly shoulder-width apart. For most people, this will mean hands 15–16 inches apart—a narrower grip than you’d use for a standard bench press. For the highest degree of safety, keep your thumbs wrapped around the bar.
Step 3.Unrack the bar and begin with your arms fully extended overhead. Make sure the bar is stacked over your wrists and forearms. Don’t let your wrists roll backward into extension.
Step 4.Tuck your elbows about 45 degrees from your sides and point them forward (toward your feet).They should stay in front of the bar throughout the exercise.Bend your elbows and lower the bar, under control, straight down to somewhere between the very top of your upper chest and your chin; a lot of coaches cue to lower the bar to the throat.
Step 5.When your forearms andbicepstouch each other, that’s the end of the range of motion. For those with bigger arms (particularly large biceps), the stopping point will be roughly 90 degrees of elbow flexion; others may go past 90 degrees, but there’s no need to touch the bar all the way to your chin/throat/upper chest.
Step 6.From the bottom of the rep, extend your elbows to explosively press the bar straight up (not in an arc like a standard bench press). “Because of the way the bar moves,” says Anto, “you’re going to have to cock your wrists up a bit, then punch your hands toward the ceiling.” That is, actively flex your wrists as you lower the bar to keep them straight, and maintain that tension as you press the bar.
Sets/Reps/Load
The JM press is most effectively used with relativelyheavy weights, but you need to work up to such loading gradually. As Blakley notesin this video, when starting out with the exercise, it’s best to go very light and do a higher number of total reps to learn the movement and practice technique. Specifically, he recommends4–6 sets of 10 reps, using “extremely light weight.”Do this once a week for a month or so before moving onto heavier loads.
When you’re sure you’ve got the form down, try Blakley’s go-to set/rep scheme:4 sets of 6 reps, using the heaviest weight that you can handle for roughly six repson your first set. As you fatigue, you’ll inevitably get fewer reps on the subsequent sets, but stick with the same weight until you can do all 4 sets for 6 reps.
The JM press should be the first exercise you do for triceps in whichever workout you train them. In other words, if you’re doing an arm day, do the JM press as your firsttriceps exercise, so you’re fresh and can give it your best focus. If you train triceps on the same day you bench press, do the bench press first, and then the JM press.
Safety Tips for the JM Press
The JM press is an unorthodox (some would say awkward) exercise that, if done carelessly, can place excessive strain on the elbows. As mentioned above, start off very light and keep the overall volume in check.Limit your frequency on the JM press to only once per week.
“Take it slow,” Blakley told Dave Tate in their interview. “Build it into your program [gradually]¦ It builds so much tendon strength, but that takes time.”
Anto echoes these sentiments, but she doesn’t necessarily consider the JM press to be any more dangerous than other related exercises.
“It’s a different movement pattern, so it takes practice to get that right, and then to get it right enough to be able to load it and actually get something out of it,” she says. “Sure, if you load too heavy, too fast, the bar could fall on your face, but then again, so can a bench press or a skull crusher. I’d be more concerned about loading slowly and getting used to the stress that’s placed on the triceps tendon, as it can feel a little taxed afterward. Start slowly and work up.”
Can I Use Dumbbells?
As an exercise that’s specifically intended to boost bench press strength, the JM press’s most effective application is with a barbell. But can you use dumbbells instead if you’re training at home, or for whatever reason would rather not use a bar?
“Possibly,” says Anto, “but I think it would be a little more awkward than it already is, since you’d have two individual weights [to stabilize]. The straight line of the barbell allows you to stay a little more balanced and in control. That’s not to say it can’t be done, but again, the exercise was meant to be loaded heavy, and I don’t know if you could get the same movement pattern or loading with dumbbells as you could with the barbell.”
A JM press done with dumbbells, then, may be a useful exercise for triceps muscle mass, but it wouldn’t have much carryover to benching max weight.
Great JM Press Alternatives
The JM Press is a highly unique exercise, so it’s hard to find a comparable move that targets the same movement path and muscles.
“To this day, I’ve never done an exercise that directly stretches that lower triceps tendon like JM Presses,”says Anto. “Most alternatives would be some type of close-grip press or floor press, but now you’re getting into shoulder and chest work as well.”
That said, if you’re not a seasoned bencher who’s already putting up huge numbers, you probably don’t need anything fancy to see gains.
Start with the standard close-grip bench press, which will train your triceps to contribute more to the movement, thereby boosting your lockout strength.
How To Close-Grip Bench Press
Step 1. Lie on the bench and arch your back, pulling yourshoulder bladesdown and together. Grasp the bar at shoulder width or just inside, and pull it out of the rack.
Step 2. Take a deep breath, tighten your glutes, and lower the bar to your sternum, tucking your elbows to your sides at 45 degrees on the descent. When the bar touches your body, push your feet into the floor and press the bar up at the same time.
Close-Grip Board Press
Bench presses of any kind can be done with a board (a block of wood with a handle) held against the chest to shorten the range of motion. This allows you to work just the lockout range and train even heavier to strengthen it maximally. Board presses can be done with a standard bench press grip, but to target the triceps to a greater extent, Anto recommends close-grip board presses.
“Sometimes you need to do an exercise that will allow you to handle weights near your max,” says Anto, “which will allow your nervous system to adapt to moving that weight on a regular basis.” She recommends using two to three boards depending on your arm length (longer-armed lifters need more boards to keep the exercise in the triceps’ main range of motion). “You’re looking for slightly less range of motion so you can load, but you don’t want it so high that you aren’t stressing the triceps.”
How to do the Close-Grip Board Press
Step 1.Lie back on the bench and grasp the bar with a shoulder-width grip (or slightly narrower), and have a partner place two to three wooden boards on the middle of your chest. Have your partner hold the boards in place on your chest throughout the set. If you don’t have a partner to hold the boards for you, you can use Repboards (repelbullies.com), as shown here, which are hard foam boards that you can clip onto your torso. (Yet another option is to stuff a foam roller under your shirt, so that the roller stops the bar a few inches above your chest.)
Step 2.Unrack the bar, and slowly lower it to the boards, keeping your elbows tucked so that your upper arms are at a roughly 45-degree angle with your torso. On a close-grip bench press (unlike the JM Press), the bar should be lowered toward the lower portion of the pecs.
Step 3.When the bar touches the boards, explosively press back up in a slightly backward arc until the bar is directly over your face.
JM Board Press
This is just a reduced-range JM press, allowing you to zone in on the lockout even more.
How to do the JM Board Press
Step 1.Perform the JM press as described above, but have a partner place two to three boards on your chest as explained in the close-grip board press. (Or use Repboards, or a foam roller.)
]]> https://www.onnit.com/blogs/the-edge/how-to-lat-spread-like-a-bodybuilder2025-07-10T10:55:27-05:002025-08-14T11:13:40-05:00How To Lat Spread Like A BodybuilderJeremy Gottlieb
If there’s one set of muscles that always seems to lag behind the others on gym rats everywhere, it’s the back—specifically, the lats. (OK, the calves too, but that’s the subject of another article.) Some people claim that they just can’t feel their lats working in the same way they do their pecs orbiceps, so they can never fully stimulate them. For others, simply not being able to see the lats as clearly in the mirror has caused them to neglect these muscles.
That’s a bummer, because the lats are essential for a physique that looks muscular and lean. When you flex them,they make your waist look smaller and your shoulders look wider, giving the impression of a powerful, even super-heroic upper body.
Whether you’re a regular guy or gal who wants to sculpt a more balanced physique, or a die-hard lifter who has aspirations of one day competing in a physique show (Bodybuilding, Figure, Classic Physique, etc.), we’ll help you get your back training on track, so that when you spread your lats, you look like you’ve sprouted wings!
What Is A Lat Spread and Why Do People Do It?
The lat spread is a traditional bodybuilding pose used in competition to highlight the width and thickness of the competitor’s latissimus dorsi muscles. The lats, if you weren’t sure, are the big slabs of muscle that run down the sides of your back. They originate on the lower three or four ribs, lower six thoracic vertebrae, and iliac crest (the top border of the pelvis), and insert on the humerus (upper-armbone) just below the shoulder joint.
In a physique contest, the athlete is required to display their lats in two distinct lat poses—the front and rear lat spread. (The competitor must show the lats facing the judges/audience, as well as facing away, so the dimensions of the muscles can be appraised.) The term “spread” refers to how the lats appear when they’re flexed in a dramatic fashion. When well-developed, the lats appear to spread out from the person’s torso, andthe effect is something like a bird spreading its wings—the back looks so wide and dense that you can see it from the front!
Of course, if you’re not planning on posing your physique on stage for sport, you don’t absolutely need to know the technique of flexing the lats aesthetically. But many people like to motivate themselves to get in their best shape by scheduling a photo shoot or other event where they’ll have pictures taken to commemorate their condition, and in that case, understanding how to show off your lats to their best advantage will help them get the credit they deserve, and prove that you put some serious time and dedication into building them. Scroll down for a full tutorial on how to pose your lats effectively when that time comes.
Exercises To Build Stronger Lats
The lats work to pull thearmsfrom overhead to down to your sides, extending your shoulder joints. They’re the main upper-body muscles involved in climbing and swimming. For ages, the go-to lat-building exercises for bodybuilders and other weight-training populations alike have been theclassic pullup, chinup, and lat-pulldown, along withvarious types of rows. These are all great options, but if you’ve lived on a steady diet of thestandard lat exercisesfor years and still feel like your wings haven’t spread, we’ve got some variations to show you that may help you target your lats a little better.
These come by way of Jonny Catanzano, an IFBB Classic Physique pro bodybuilder and coach to physique competitors at all levels (@jonnyelgato_ifbbproand@tailoredhealthcoachingon Instagram).
Pulling with your palms facing each other (a neutral grip) helps you to keep your arms closer to your sides during a pulldown or row. This in turn helps tofocusthe exercise on the lat muscles, as opposed to the muscles of the upper back. Furthermore, doing the movement with your torso supported on a bench makes the exercise more stable,so your muscles can focus purely on lifting the weight rather than trying to brace your body position at the same time.
“This type of pulldown primarily hits the lower lat fibers, which really contributes to the V-taper,” says Catanzano, referring to the impression the lats give as they descend from their widest point beneath your shoulders to their insertion at your pelvis. The lower fibers are usually underdeveloped relative to the rest of the lats, and adding size to that area will improve the cobra-hood effect of your lats when you spread them. In other words, it will make your waist look smaller while your back looks broad.
Step 1.Set an adjustable bench on a 45–60-degree angle and place it in front of a cable station with a high pulley. If the station offers dual pulleys, attach single-grip handles to them. But if it’s a single pulley, attach a lat-pulldown bar and then attach some single-grip handles to the bar at about shoulder width (we usedAngles90 Gripsin the video, another great option).
Step 2.Rest your chest on the bench and grasp the handles with palms facing each other (inward). Pull the handles down until your elbows reach your hips. Lower the weight with control.
Be careful not to pull the handles too far back—go until your arms are in line with your body. Pulling further than that can shift the emphasis to the upper back, and we want to keep it on your lats.
You’re almost certainly familiar with the close-grip pulldown done with a V-grip handle attachment, butCatanzano recommends using two separate single-grip handles instead(preferably the type with soft, spongy material on the handle). These are the kind you’re probably used to using for chest flyes and lateral raises.
The single-grip handles will allow you to move your hands further apart as you pull the cable down, and that means more range of motion, so you can get your elbows closer to your hips for a full contraction of the lower lats.
Step 1.Attach the two handles to the pulley of a lat-pulldown station and grasp them with a neutral grip. Secure your knees under the pad so your lower body is braced. Lean back a bit so you feel a stretch on your lower lats, but try not to arch your back.
Step 2.Pull the handles down until your elbows line up with your hips. Lower the weight with control.
This one hits the lats but puts more emphasis on the rhomboids in the middle back, which is literally the centerpiece of a rear lat-spread pose. “Developing this area will add to the overall width of your back,” says Catanzano. As with the reverse-incline pulldown, using a bench takes the lower back out of the movement and reduces your ability to cheat or use momentum, so the target muscles get worked in near isolation.
Step 1.Set a bench to a 45-degree angle and grasp dumbbells. Rest your chest against the bench and allow your shoulder blades to spread apart at the bottom of the movement.
Step 2.Row the weights to your sides with your elbows pointing at about 45 degrees from your torso. Squeeze your shoulder blades together at the top. You may want to use wrist straps to reinforce your grip, as your hands will likelytirebefore your back does.
Done standing upright, shrugging motions work the uppertraps, but when done with your chest supported, they hit more of the trap fibers, along with the rest of the upper back. Like the incline rows above, this movement will widen and thicken the middle part of the back, which contributes to a powerful lat spread viewed from behind.
Step 1.Set up as you would for the incline row and simply retract your shoulder blades, squeezing them together at the top of the movement. Keep your elbows straight. Lower the weights with control, and allow your shoulder blades to spread apart at the bottom.
Incidentally, Kelso shrugs can be done at the end of a set of incline rows to finish off the upper back. In other words, do a set of rows to failure, and when you can’t perform another full-range row anymore, simply retract your shoulders for a few reps of shrugs to failure.
“Pullups with a neutral grip almost force you to keep your elbows a little in front of your body,” says Catanzano, “which is where your lats are more active than they would be pulling with your elbows flared out to the sides.”
Step 1.Hang from a bar using a neutral grip. If your chinup bar doesn’t allow that, attach single-grip handles as explained in the close-grip pulldown above. Your hands should be about shoulder-width apart.
Step 2.Pull yourself up until your chin is over the bar and your elbows are in line with your hips. Lower your body down with control.
If that’s too hard, attach an exercise band to the bar and stand on the free loop. The band’s tension will unload some of your bodyweight so that you can get more reps.
Sample Workout For a Better Lat Spread
Catanzano offers the following routine to bring up your lats andimprove your lat spread. Perform it once every five to seven days. Rest 2–3 minutes between sets.Note that the neutral-grip pullups and Kelso shrugs are paired, so perform them in alternating fashion,doing a set of the pullup and then a set of the shrug without rest in between. Then rest 3 minutes before repeating until all sets are complete for the pair.
1. Reverse-Incline Lat Pulldown
Sets: 4 Reps: 10–12
2. Close-Grip Cable Pulldown
Sets: 4 Reps: 10–12
3A. Neutral-Grip Pullup
Sets: 4 Reps: 10
3B. Kelso Shrug
Sets: 4 Reps: 12
4. Reverse-Incline Dumbbell Row
Sets: 4 Reps: 12
A Lat Flexing and Spreading Tutorial
Once you’ve built a substantial set of lats, you can work on posing them effectively. Catanzano, who coaches posing as well as training for physique competitors, offers this three-step guide to mastering the lat spread.
(See04:09in the video for Catanzano’s demonstration)
1. Squeeze your shoulder blades together and place your fists on your hips.“Imagine holding a pencil between your shoulder blades,” says Catanzano. That’s how far back you want to pull your shoulders.
2. Drive your shoulders down.The movement is the opposite of a shrug, so get your shoulders as far south of your ears as you can. You should feel your lats get tense.
3. While keeping your shoulders down and your lats tense, roll your shoulders forwardand slightly upward. Your chest and ribcage should lift in front of you, “nice and high and proud,” says Catanzano. Think about spreading your lats apart as wide as you can.
Catanzano warns that you need to havegood shoulder mobilityin order to spread your lats impressively. You should be able to raise your shoulders up and down and retract and protract them through a large range of motion—and pain-free. If you can’t, then you won’t be able to achieve the positions that showcase the lats to their fullest potential. If you need work on shoulder mobility, start with this article,Shoulder Mobility for Strength and Injury Prevention.
]]> https://www.onnit.com/blogs/the-edge/what-is-the-best-kettlebell-weight-to-start-with2025-07-10T10:55:26-05:002025-08-15T06:29:55-05:00What is the Best Kettlebell Weight to Start With?Jeremy GottliebReady to get started withkettlebell training, but don’t know where to begin? No problem. This article will provide you with all the information you need to pick the correct kettlebell weight, whether you’re a man or a woman, experienced or a total noob.
What’s The Best Starting Kettlebell Weight For Men?
Men tend to OVER-estimate the amount of weight they can lift with kettlebells. If you’re used to conventional training, doing exercises like bench press and curls, or using weight machines, a kettlebell that’s only 35 pounds might seem too light.
The thing is though, kettlebell training recruits muscle from all over your body, and your ability to stabilize the weight you use depends on your core and grip strength. These are limiting factors. Kettlebell lifting is also very dependent on skill—your technique has to be really crisp. The heavier you go, the more likely you’ll muscle the weight up rather than lift it with correct form. Lighter weights allow you to learn your exercises perfectly (and once you do, you’ll be able to handle much heavier weights with greater ease).
“If you’ve been in the iron game for a while,” says John Wolf, former Chief Fitness Officer for Onnit—that is, you have experience with barbells, dumbbells, and strength training in general—“I recommend starting with a 16-kilo bell,” which is a little over 35 pounds. “If you’re brand new to training, I recommend a 12-kilo bell,” (a little more than 26 pounds).
What’s The Best Starting Kettlebell Weight for Women?
Women, on the other hand, tend to UNDER-estimate the amount they can lift. They might pick up a light kettlebell and think it’s too heavy, but they don’t realize that they’ll be using it for full-body exercises like the goblet squat, swing, and clean. Because your whole body is working—not just one or two muscles in isolation—you can probably handle more weight than you think. That’s why Wolf recommends women start with an 8kg kettlebell, which is a little under 18 pounds.“If you’re new to weight training in general,” he says, “the six-kilo bell may be more appropriate.” (Six kilos is about 13 pounds.)
When Should I Go Up In Weight?
Kettlebells typically go up in weight in increments of four kilograms, which is about 10 pounds. On some exercises, this can be a big jump, so get used to the idea of sticking with one weight for a while until you feel you’ve really mastered it. If you start out doing, say, three sets of five reps for most of your exercises, you might aim to progress to where you’re doing five sets of six to eight reps before you graduate yourself to the next weight increment. If you began by doing your reps at a normal or brisk tempo (the speed at which you lift), work on slowing them down, especially the negative (lowering) portion of each rep. Lifting with less momentum and more control puts a greater challenge on your muscles and your technique.
When you feel that your lower body isn’t being challenged enough—that is, you can do several more reps on your squat, deadlift, hinge, and other lower body-based movements than you started—it’s probably time to go up to the next weight level. Another marker of progress, says Wolf, is your pressing strength. “If you can do an overhead press with the bell super-slow for five reps, and you can do that set over set, chances are it’s time to move up.” Of course, you’ll progress faster on some exercises than others, so it’s ideal to have at least two kettlebells of different weights so you can choose the one that’s optimal for the given exercise at the given time.
What Is A Pood?
No, it’s not some new slang term that all the coolest rappers are using. Nor is it a baby talk synonym for fecal matter. A pood is simply the Russian measurement of weight. In Russia, where kettlebells originated, kettlebells are measured in poods, and a pood is equal to roughly 16 kilograms, or 36 pounds. You’ll hear this term used in CrossFit gyms and by some traditional kettlebell instructors.
4 Things To Look For In A Kettlebell
In addition to finding the right weight, you should make sure any kettlebell you use has these four features.
1. A Comfortable Handle
“Kettlebell instructors often recommend a thicker-diameter handle,” says Wolf, “which will increase the challenge to your gripping muscles.” However, such handles aren’t a great choice when you’re new to kettlebells and trying to develop technique. “Fatiguing your hands will be a big limiting factor in getting the best workout,” says Wolf, who recommends finding a bell with a handle that fits your hand comfortably.
2. The Kettlebell Should Rest Against Muscle, Not Bone
A kettlebell’s “window” is the space between the bottom of its handle and the ball of iron itself. Wolf says it should be wide enough to allow the bell to rest on the muscle of your forearm, not the bone that sticks out on your wrist, when you hold the kettlebell in the rack position (hand at shoulder level, knuckles pointing to the ceiling, and elbow tucked to your side). Learning to clean a kettlebell properly will reduce the likelihood of the weight banging into your wrist and bruising it, but choosing a more ergonomic kettlebell design is critical as well.
3. Powder Coating
A good kettlebell will have a slightly rough, grainy texture to its handle. This is a sign that it was powder coated, and will help you keep your grip even when your hands get sweaty. “It gives you a little bit of friction,” says Wolf, “while still allowing your hand to move around the handle freely.” Don’t confuse a rough texture with burrs—sharp edges or bumps that protrude from the handle. Burrs are a sign of a cheap bell that will grate your hands like a block of cheese with continued use.
4. Color Coding
Most kettlebells are dark in color and many look alike from a distance. If you do circuit training with kettlebells, in which you perform several exercises in a row in sequence, you’ll likely have to change weights, and it’s much easier to grab the right one if you can look at the handle and know in a glance what the weight is. Onnit’s kettlebells are coded as follows:
6 kilograms = baby blue
8 kilograms = pink
12 kilograms = dark blue
16 kilograms = yellow
Kettlebell Strength and Mobility Workout
Once you’ve found the right kettlebell weight, you can experiment with it in the following workout, which was designed by Onnit-certified coach and kettlebell expert Eric Leija (@primal.swoledieron Instagram). The routine combines basic kettlebell movements with bodyweight exercises and mobility drills, delivering the best of all worlds—strength, conditioning, and greater range of motion and body control in different planes of movement. This is an awesome routine for those who want to get familiar with kettlebell training, as well as more advanced exercisers who may want to train for better sports performance and overall athleticism.
Directions
Perform the exercises as a circuit. So you’ll do one set of each in sequence, resting as little as possible between movements.Repeat for as many rounds as possible (AMRAP) in 15 minutes.Over time, try to increase your speed and reduce your rest so that you perform more rounds of the circuit in the same time frame.
See the video above for a demonstration of the exercises and a sample round of the workout.The sample round starts at03:55.
1. Half-Kneeling Overhead Press
Reps:5 (each side)
– Keep the shoulder, hip, and knee of the working side in alignment.
– Tense the lat on the working side to keep the shoulder in a strong pressing position.
– Maintain a vertical torso with your core braced. Avoid bending or twisting to either side.
2. Pushup
Reps:10
– Point your elbows out 45 degrees from your sides.
– Lower your chest as far as you can without losing tension in your core.
– If the standard pushup is too hard, or you get fatigued before 10 reps, it’s OK to rest your knees on the floor.
– Keep your pelvis level with the floor as you twist your torso.
4. Deadlift to Clean and Squat
Reps:5
– Tilt your tailbone back and push your hips backward (a hinge movement) to reach down and grasp the kettlebell.
– Maintain a “proud chest” position: shoulders pulled back and down.
– Keep your torso vertical and drive your knees out as you sit down into the squat.
5. Step-Over Lateral Lunge
Reps:5 (each side)
– Bring the knee up and out in a circular motion to begin the rep.
– Try to go slightly deeper with each rep.
6. Windshield Wiper
Reps:3 (each side)
– Drive your palms into the floor the entire time, and keep your chest elevated.
– Keep your knees bent 90 degrees.
Take Your Kettlebell Training to a New Level
Few tools are as versatile and portable as the kettlebell. Whether you’re a trainer or fitness enthusiast, the kettlebell should have a place in your training for the results it can deliver.
Whether you decide to use your kettlebell to supplement the training you already do, or as a stand-alone tool, there’s a system that can help you get the most out of it.
TheKettlebell Specialist Coursewas created to give the user a simple, powerful approach to learning and teaching proper kettlebell techniques.
]]> https://www.onnit.com/blogs/the-edge/kettlebell-swing-the-1-exercise-that-fixes-99-problems2025-07-10T10:55:26-05:002025-08-15T06:32:54-05:00Kettlebell Swing: The 1 Exercise That Fixes 99 ProblemsJeremy GottliebIn today’s world, we spend the majority of our time doing things with terrible posture. We slouch over smartphones with our chests caved in. We sit at keyboards, allowing our hip flexor muscles to shorten. We drive with ourarmsin front of us and our shoulders rounded.
While the muscles on the back side of our body get overstretched and weak, the ones on the front get overworked and tight. This muscle imbalance causes us to move and perform at a lower level than we’re capable. It compresses our lungs, so that instead of taking deep, long breaths into our belly like we were born to do, we take short, shallow breaths into our shrunken chests. It also makes us look weak and unconfident—at least compared to the rare few who can still stand tall with their chin up.
There is hope, however. And there is one exercise that, if you incorporate it into your routine daily, can easily combat the ill effects of poor posture and a weak backside while making you stronger, better conditioned and more athletic overall. You might even say it’s one exercise that solves 99 problems.
If you were about to be stranded on a deserted island with only a kettlebell, and had to make a short list of exercises you could do to while away the hours there, the swing would probably top it. Here are the benefits that make it so necessary.
Better Posture
The swing strengthens all the major muscles on the back side of your body, from the various movers of the upper back to the lower back and hips. Stronger posterior muscles keep the shoulders and hips in better alignment, which not only improves your appearance, but helps to prevent injury.
No-Quit Conditioning
While technically a strength-training exercise, the kettlebell swing can double as cardio when performed for high reps. Set a timer for a minute or so and see how many reps you can do in that period, and try to break your records over time. Or, perform rounds ofkettlebell swingswith short breaks in between. You’ll see why combat athletes such as wrestlers andMMA fightershave relied on this move to build fight-specificendurancefor years.
Your core muscles’ most important function is to protect the spine from outside forces that try to bend it out of shape. Whether there’s an opponent trying to tackle you, or you’re lifting a heavy weight off the floor or overhead, the core muscles brace your spine to prevent injury. The kettlebell swing teaches your body to be strong while the spine is moving into end ranges that can be dangerous—deep hip flexion, when the lower back is at risk of rounding, and hip extension, when the spine may hyperextend. Get comfortable in these positions, and you’ll keep your back healthy for life. As you progress in your training and experiment with single-hand and alternating kettlebell swings, you’ll learn to resist rotation, which challenges the core to an even greater degree (see Kettlebell Swing Alternatives below). Basically, once you get good at swings, you can bet that nobody—and nothing—will push you around anymore (literally).
Power
Most sports require explosive hip extension. Blocking a lineman, taking ajumpshot, suplexing an opponent, and running down the field all demand that your glutes andhamstringsextend your hips quickly and with great force. The kettlebell swing mimics that movement perfectly, loading up these muscles and training them to slow down oncoming forces (decelerating the kettlebell as it swings back between your legs) and then change the direction with a quick burst (swinging the weight up). It’s one of the most athletic movements you can do.
Grip Strength
Your grip muscles get a workout just from holding onto the kettlebell handle and keeping it from flying out of your hands. It may not seem like much at first, but when you work up to heavier bells and use higher reps, you’ll see how quickly you develop the grip of a bear.
Muscles Used In The Kettlebell Swing
Here are the major muscles used in a kettlebell swing, from head to toe.
How To Stretch Before Performing The Kettlebell Swing
The following mobility drills will help to warm and limber up your hips, shoulders, and thoracic spine before performing the kettlebell swing. Complete 3 sets of 5–10 reps for each exercise before your swing workout.
Hip-Opening Mountain Climber
Step 1. Get into a pushup position with hands directly beneath your shoulders and legs extended behind you, feet shoulder-width apart. Tuck your tailbone and brace your core—your head, spine, and pelvis should form a straight line. Draw your shoulder blades back together and downward. Think: “proud chest,” and “long spine.” Take a deep breath.
Step 2. Exhale your breath and, keeping your core braced, raise your right leg to the outside of your rightarm, landing with your foot flat and the knee pointed straight ahead. Try to maintain your spine and pelvis alignment as you do this. It’s OK if you can’t do it perfectly now, but be aware of how you’re moving so you can correct it. When your leg is in position, pull it inward while driving your right arm out so the knee touches the outside of your arm firmly.
Step 3. Allow your hips to sink a bit and adjust so you re-establish your proud chest and long spine position. Hold for 3–5 seconds.
Step 4. Return your right leg back to the original pushup position, and repeat on the opposite leg. That’s one rep of each.
Sky Reach To Arm Thread
Step 1. Get on all fours with your hands under your shoulders and your knees directly beneath your hips. Brace your core.
Step 2. Inhale as you draw your right arm up and across your chest, twisting your right shoulder toward the ceiling and reaching overhead. Be careful to keep your hips facing the floor.
Step 3. Exhale as you reverse the motion, reaching your arm across your body and behind the support arm. Twist as far as you can, ideally until the back of your right shoulder touches the floor. That’s one rep. Complete your reps on that side, and then switch sides.
How To Perform The Kettlebell Swing
About the only thing we don’t like about the kettlebell swing is the way most people perform it. Go into any gym and you’ll see inexperienced exercisers turning a swing into a combinationfront squatand shoulder raise, which works more of the front of the body than the posterior muscles, and therefore defeats the whole purpose.
The kettlebell swing has a lot more in common with a deadlift than a squat, as it relies on hip hinge mechanics—the ability to bend purely at the hips and drive your butt backward while keeping a long spine.
Here’s how Onnit’s ChiefFitnessOfficer says you should do a kettlebell swing (demonstrated in the video above). It breaks down into four parts.
Step 1. Hinge
Place the kettlebell on the floor just in front of your feet, and stand with feet slightly wider than shoulder width. Draw your elbows back so your shoulder blades pinch together. This creates a posture we call “proud chest.” Notice your back muscles engaging, and keep this shoulder position throughout the exercise.
Now bend your hips (if it helps, you can chop your hands into the crease of your hips to cue you to move only from the hips and not the spine). Bend until you feel a deep stretch in your glutes and hamstrings and your fingers can barely reach the kettlebell handle. If you’re keeping the proud-chest position, your chest should still be visible from the front.
Step 2: Root and Wedge
The kettlebell handle should be directly under your eyes. Reach to grasp the handle—it’s OK if you have to lower your hips a little further to do so, but don’t round your back or shoulders. This is called rooting, which means developing a solid base of support. Now think about tucking your shoulder blades into your back pockets, which will draw your shoulders down and prevent any shrugging. Try to bend the kettlebell handle in half, which you’ll feel activates your lats. Drag the bell back a bit—not enough to move its position on the floor, but enough to feel your back and hips coiling up like a spring. This is known as a wedge—as in, you’ve wedged yourself into a tight position from which the exercise can begin.
Step 3. The Hike
Now you’ll put the swing into motion. Hike the kettlebell back as if it were a football, aiming for the triangular area formed by the space between your knees and your crotch. Think about pulling the weight back between your legs, not bending forward at the waist. When the weight hikes back, your forearms should lightly touch the inside of your thighs.
Step 4. Drive and Float
As the weight swings back from between your legs, drive your feet into the floor and stand tall, locking out your knees. This will cause the kettlebell to swing up to shoulder level and prevent you from hyperextending your lower back (keep your core tight too, just in case). If you do it right, the kettlebell will feel weightless at the very top of the movement (called the float). As the weight swings back down, think about catching it and absorbing the momentum with your whole body by bending your hips to accommodate it. Then begin the next rep.
If all else fails, “Think of the swing as doing an Old Granny pass,” says Wolf, like you did as a kid playing basketball. On the way down, “picture yourself catching a water balloon.”
Kettlebell Swing Alternatives
When you feel you’ve mastered the basic kettlebell swing, you’re welcome to try some more advanced variations of the lift to heighten the challenge even more. The single-hand swing and alternating single-arm swing are natural progressions.
Single-Hand Kettlebell Swing
Once you’ve got the classic kettlebell swing down, you can take the challenge up a notch by performing the movement one hand at a time. This places more demand on your core and the muscles of the working shoulder, as you have to resist the body’s need to rotate when it’s loaded asymmetrically. See the video above for a complete demonstration (at 5:40).
Perform the same four steps as described for the regular swing, but on one hand. You’ll have to use a lighter kettlebell to start. You should also let your free arm follow the working one and allow it to lightly touch the kettlebell in the float position. This will help you maintain stability and proper timing on each rep.
Alternating Single-Arm Kettlebell Swing
This movement builds on the skills you’ll establish with the single-hand swing, adding an extra rhythm component that helps you develop timing. Swinging the bell up with one hand and catching it with the other prepares you for more sophisticated kettlebell training later on, such as flows and combination movements that will have you switching hands and lifting the bell in all different directions. See the video above for a complete demonstration (at 6:40).
Perform the single-hand swing, but let go of the bell at the top of the float. Quickly catch it with the other hand (this is easier to do if you follow the working arm with the free arm, as described above). Use a light kettlebell to start until you get the hang of it.
Chest Swing
If you find you’re having trouble with the basic kettlebell swing, back up a step and try the chest swing (aka goat-belly swing). In this case, you simply hold a light bell against your chest (or the top of your abdomen) and work your hip hinge mechanics. It’s a great way to get familiar with hip hingeing while you practice holding a proud chest and gripping the bell at the same time. After a few workouts with the chest swing, you’ll feel ready to give the kettlebell swing another shot. See the video above for a complete demonstration (at 7:47).
Step 1.Grasp the kettlebell by the horns and place the bottom of the bell against your belly, just under your sternum. Pull it in tight while you hold a proud chest. Take a wider than shoulder-width stance and soften your knees.
Step 2.Bend your hips back and then stand tall again. As you get more comfortable, you can pick up the pace so you’re moving explosively like you would doing the normal kettlebell swing.
]]> https://www.onnit.com/blogs/the-edge/the-pro-s-guide-to-upper-ab-exercises-workouts2025-07-10T10:55:26-05:002025-08-15T06:24:02-05:00The Pro’s Guide To Upper-Ab Exercises & WorkoutsJeremy GottliebBy now, you’ve probably heard enough conflicting opinions about ab training to give you a stomach ache. These range from, “You have to do 100 crunches a day,” to “ab work isn’t necessary at all; you can see the muscles by simply dieting off the fat that covers them.” You’ve been told you should treat your midsection like two different muscles, doing “upper-ab exercises,” and then a different set of movements to develop the lower part, and heard elsewhere that situp and crunch motions will hurt your lower back, so don’t do them at all anymore.
What’s the whole truth, bottom line, and final answer onabs? We’re about to clear up all the misconceptions. Consider the following your tome on ab training.
What Muscles Make Up The Abs?
The term “abs” can refer to all the muscles of the midsection, ranging from the deepcoremuscles that stabilize your spine to the obliques on the side of your torso that help you twist your shoulders and hips and bend to each side. But when most people say abs, they mean therectus abdominis, more popularly known as the six-pack muscle.
The rectus abdominis originates on the pubic bone and stretches up to the xiphoid process (the bottom of the sternum), as well as the cartilage between the fifth, sixth, and seventh ribs.It works to bend the lumbar spine forward (spinal flexion), pull the rib cage down, and help stabilize the pelvis when you’re walking.When an individual is very lean with well-developed musculature, the rectus abdominis can appear to be six distinct muscles, but it’s only one. The six-pack look is due to a web of connective tissue that compartmentalizes the muscle. Whether someone has a six pack or an eight pack comes down to genetics alone—it’s the way nature shaped their abs—and has nothing to do with training or diet. (For all his gargantuan muscles, Arnold Schwarzenegger’s abs were always comparatively less impressive; he famously sported only a four pack!)
How Is Working Your Lower Abs Different From Upper Abs?
Bodybuilders have long believed that exercises that bring the ribs toward the pelvis (crunch variations, for example) work the upper portion of the rectus abdominis, while movements that do the reverse—lifting the pelvis toward the ribs—train the lower portion. Scientists and some trainers, however, have disputed this, arguing that, since there’s only one rectus abdominis muscle and its function is pretty simple, any movement that brings the ribs and pelvis closer together is going to work the whole muscle.
So who’s right?
Astudyfrom theJournal of Strength and Conditioning Researchmeasured rectus abdominis activation across six different ab exercises, concluding that, while some of the moves worked the muscle more than others,none showed much of a difference in which part of the abs (upper or lower) was activated.Still, other research has shown the opposite. Onetrialfound that the old-school curlup worked the upper portion of the muscle to a greater degree, and the posterior pelvic tilt (basically a reverse crunch, in which the tailbone is tucked under, lifting the pelvis toward the upper body) favored the lower abs—just as the bodybuilders have claimed for years.
So far, the correct answer seems to be a little from Column A and a little from Column B. In his 2021 book,Science and Development of Muscle Hypertrophy, Brad Schoenfeld, PhD, CSCS, the world’s foremost muscle-growth researcher, concludes that while the entire rectus abdominis will be worked during exercises that target it,it is also possible to emphasize recruitment of the upper abs over the lower abs, and vice versa.
He writes: “Although somewhat speculative, there is a sound rationale for performing traditional crunch variations to target the upper abdominal region and performing reverse crunch variations to develop the lower aspect of the muscle… Not only do the tendinous intersections [of the rectus abdominis] suggest some degree of functional independence of the muscle, but its upper and lower aspects are segmentally innervated by the ventral rami of the lower six or seven thoracic nerves, providing a further mechanism for selective activation.”
Schoenfeld goes on to cite pro tennis players whose abs are bigger on their non-dominant side, which he says indicates thatpeople can, to some degree, recruit not only the upper and lower abs selectively, but also the sides of the muscle.
Long story short: you can target different areas of the abs to shape them according to your goals, but you’ll never be able to isolate any one area of the muscle completely while turning off another one.
What’s The Difference Between Situps and Crunches?
Before we go any further, we should clarify some terms. If ab training really comes down to situp and crunch-type movements, let’s define what these are.
For many years, the situp was the primary ab exercise. You lie on your back with knees bent, and raise your upper body off the floor and up to your knees. This works the entire abdominal area, but it also recruits the legs and hip flexors, and it can be hard on the lower back (as we’ll examine in the next section). In the past few decades, trainers began recommending crunches in place of the situp—a more isolated movement for the rectus abdominis that requires you only lift your head and shoulders off the floor.It’s the safer, more targeted ab workout option between the two, but crunching alone won’t get you a six pack.These days, it seems best to favor crunches over situps, but perform them with different tools—such as a cable machine, stability ball, or inclined bench—to get more muscle activation without sacrificing safety.
Is It Safe To Do Situps and Crunches?
Whether you’re trying to work upper abs, lower abs, or both, the standard prescription is to perform some kind of spinal flexion exercise—i.e. situps or crunches—because bending the spine is a major function of the rectus abdominis.
In recent years, however, some athletes and trainers have contended that repeatedly bending the spine over time can lead to lower-back injury, including disc prolapse or herniation.The idea is that bending the spine pinches the intervertebral discs, gradually pushing them backward until they bulge out and press against a nerve, causing pain.While situp and crunch exercises may not cause back problems entirely on their own, they could throw gas on a fire that’s already burning in many athletes and recreational lifters. If you’ve been following a program that includes regular backsquatsand deadlifts, which compress the spine, and your lifestyle includes a lot of sitting and slouching (spinal flexion), you can understand how the concern arose.
For these reasons, some experts recommend developing the abs using only variations of the plank exercise, where the ribs and pelvis are held still and the rectus abdominis, along with the other core muscles, contracts isometrically. Schoenfeld agrees that well-chosen plank exercises can effectively train both the upper and lower abs, but argues that there’s nothing inherently dangerous with spinal flexion exercises either, assuming you’re not already contending with a back issue. In areviewhe co-authored, Schoenfeld determined that, if an individual has no pre-existing back problems,spinal flexion exercises are not only safe when done as normally prescribed, but probably necessary for maximizing development of the rectus abdominis.If you have aspirations of competing in a physique show, where your opponents will surely have well-defined abs, you’ll probably have to do some spinal flexion exercises to get the ab development needed to keep up with them.
For abs that look great and perform well, including having the ability to protect your back, healthy people should probably perform both planks and spinal flexion. Schoenfeld and spinal-flexion critics do agree, however, that too much spinal flexion isn’t good for anyone.If you’re old-school and think that 100 crunches or situps every day is the only way to see results, you could be setting yourself up for injury.Whatever the ab exercises you choose, they should be performed with moderate sets and reps like training any other muscle, with time off for recovery afterward. (We’ll give more specific recommendations below.)
Tips for Isolating Your Upper Abs
Just to recap, you can’t completely isolate your upper or lower abs, but you can emphasize one section over the other with different exercises and careful technique. To lock in on the upper abs, “You want exercises that are going to bring your ribcage down toward your hips,” says Jonny Catanzano, an IFBB pro bodybuilder and owner of Tailored Health Coaching, afitnesscoaching service (@tailoredhealthcoachingon Instagram).
This means crunch/situp motions of all kinds, generally starting with your spine straight and finishing where it’s fully flexed at the lumbar. Yes, that means you’ll be rounded in your lower back, which is a major no-no for most loaded exercises such as squats and deadlifts, where the spine has to be kept neutral for safety’s sake. But to fully activate your abs, you have to take them through a full range of motion, and that means crunching your body into a tight ball.If you have lower-back pain, you may want to skip these kinds of exercises and do plank variations (we have a good one for you below),but otherwise, a few sets done two or three times a week shouldn’t present a problem.
Perform your crunch exercises formoderate sets and reps (2–4 sets of 6–15, generally speaking);don’t train them heavy. This will help to prevent placing unnecessary stress on the lower back.
To get the most out of your upper abs, “Squeeze your glutes to tilt your pelvis back, so your tailbone tucks under you when you begin a rep,” says Catanzano. Called a posterior pelvic tilt, this helps take your hip flexor muscles out of the exercise, so that your abs do the majority of the crunching.
Astudyby the American Council on Exercise showed that, out of 15 exercises tested, crunches done on a stability ball—as well as reverse crunches done on an inclined surface—both worked the upper abs the hardest,and nearly equally. (Incidentally, the reverse crunch on the incline also ranked highest for lower-ab activation.)
But don’t take these findings as gospel. Only 16 subjects participated, and two of them weren’t counted because they didn’t complete the study. Still, the results do suggest that you’d be smart to include crunches done on both a stability ball and an inclined bench in your program, provided you can do them safely.
In addition to those two moves, Catanzano recommends the following.
This exercise isolates the upper abs as much as possible, and the cable ensures that there’s tension on the muscles even when the spine is extended (where they would normally rest in a crunch done on the floor). The cable stack also makes it easy to increase the load as you get stronger. Use a V-grip to go heavier, or a rope handle for greater range of motion.
Step 1.Attach a V-grip or rope handle to the top pulley of a cable station, and grasp it with both hands. Kneel on the floor a foot or so in front of the cable so that you have to reach forward a bit with your hands to grasp the handle, and you feel a stretch on your abs. You may want to place a towel or mat under your knees for comfort.
Step 2.Squeeze your glutes and tuck your tailbone under so your lower back rounds a bit and you feel your abs engage. Crunch down, pulling the cable down behind your head as you bring your ribs to your pelvis. When your abs are fully contracted, that’s the end of the range of motion. Slowly return to the starting position. That’s one rep.
Don’t get carried away with the weight you’re using. It should never be so heavy that it pulls you up off the floor at the top of each rep.
Performing a cable crunch on a lat pulldown machine may be a more comfortable option than the kneeling cable crunch, as it makes it easier to keep your hips stable.
Step 1.Attach a lat-pulldown bar to the pulley of a lat-pulldown station and sit on the seat facing away from the machine. Reach overhead and grasp the bar with hands shoulder-width apart and palms facing behind you.
Step 2.Squeeze your glutes and tuck your tailbone under so your lower back rounds a bit and you feel your abs engage. Crunch down, pulling the cable down behind your head as you bring your ribs to your pelvis. When your abs are fully contracted, that’s the end of the range of motion. Slowly return to the starting position. That’s one rep.
The pelvis flexes toward the ribs on this one, so it’s a good lower-ab move too, but it will hit the upper part of the rectus abdominis as well. Doing the movement with legs extended creates a longer lever and puts more tension on the muscles, but that will be too advanced for many people. If that’s the case for you, performing the motion with knees bent (a hanging knee raise) is a good modification. In either case, Catanzano warns that you don’t just lift your legs/knees. “That just works the hip flexors,” he says. “Make sure you bring your hips all the way up,” rounding your back as you do so.
Step 1.Hang from a pullup bar with your palms facing forward or toward each other. You may want to use lifting straps to reinforce your grip, so your hands don’ttirebefore your abs do.
Step 2.Tuck your tailbone under and raise your legs up, keeping your knees as straight as you can until your abs are fully contracted. Control the motion as you lower your legs back down. That’s one rep.
For the hanging knee raise, perform the same movement, but keep your knees bent 90 degrees the whole time. On either exercise,be careful not to swing your legs up or let them swing behind you at the bottom.You want your abs to do the lifting, not momentum, and swinging can strain your lower back.
Here’s an upper-ab exercise that also hits the obliques, the muscles on your sides that help you bend and twist.
Step 1.Lie on your back on the floor with yourarmsextended 90 degrees from your sides. Raise your right leg straight overhead, and then twist your hips to the left, resting your right leg on the floor. Cup the back of your head with your right hand.
Step 2.Crunch your torso off the floor and toward your right leg. Hold the top position for a second, and then return to the floor. That’s one rep. Complete your reps, and then repeat on the opposite side.
If crunching movements aggravate your lower back, try plank exercises instead. Catanzano likes the classic yoga plank done a little differently—with the tailbone tucked under and knees bent to work the rectus abdominis more.
Step 1.Get into pushup position. Squeeze your glutes and tuck your tailbone under to activate your abs. Bend your knees and arms a bit so you feel like your midsection is hollowed out—abs braced, preventing your lower back from sagging.
Step 2.Hold the position for time. Aim for 30 seconds to start.
Your upper abs may get sore just from reading all this, but don’t make the mistake of thinking that training alone will produce a six pack.Exercise builds the ab muscles, but only a healthy diet can lower your body fat levels enough to reveal them,so if your belly currently hangs over your belt line, cut calories from your meals. Catanzano says that most men aren’t able to see ab definition until their body fat is in the range of 8–12%, and women need to be 14–18%.
Catanzano offers the following mobility drills for preparing your midsection for a session of ab training. Perform 10–12 reps for each exercise in turn, and repeat for 2–3 total sets of each.
Walking Knee Hug
Step 1.Stand tall and take a step forward, raising one knee to your chest as high as you can. As the knee rises, grab hold of your shin with both hands and pull it into your chest for a deep glute and inner-thigh stretch. Avoid slouching or bending forward as you do. Try to keep the support leg straight as well.
Step 2.Release the leg, plant your foot, and repeat on the opposite leg, walking forward with each rep.
Bird Dog
Step 1.Get on all fours with your hands under your shoulders and your knees under your hips. Tuck your tailbone so that your pelvis is perpendicular to your spine, draw your ribs down, and brace your core.
Step 2.Extend your rightarmand left leg at the same time while maintaining your tight core. Don’t let your back arch. (Think about reaching forward with the arm and leg, not just raising them up.) Lower back down, and repeat on the opposite side. Each arm and leg raise is one rep.
Prone Scorpion
Step 1.Lie facedown on the floor and reach your arms out to your sides. Tuck your tailbone so that your pelvis is perpendicular to your spine, draw your ribs down, and brace your core.
Step 2.Raise your right leg up and reach it across toward your left arm. Reverse the motion and repeat on the other side. A touch on each side is one rep.
Prone Cobra
Step 1.Lie facedown on the floor with your hands on the floor at shoulder level, as in the bottom of a pushup.
Step 2.Press your hands into the floor as you extend your spine and raise your torso off the floor. Hold the top a second, and then return to the floor. That’s one rep.
Windmill Lunge
Step 1.Step forward and lower your body into a lunge. Extend your arms 90 degrees out to your sides.
Step 2.Twist your torso away from the front leg until it’s 90 degrees, with one arm reaching in front of you and the other behind. Come back to the starting position, and then repeat on the opposite leg, twisting and reaching in the other direction. Each lunge is one rep.
The Ultimate Upper-Ab Workout
Below are two sample ab workouts, courtesy of Catanzano, that you can add at the beginning or end of your current sessions, or on an off day. Alternate between the two workouts (A and B) for no more than three total ab workouts in a week. They’ll both work the entire abdominal region, but will emphasize the upper part of the rectus abdominis.
Workout A
1. Kneeling Cable Crunch
Sets:3 Reps:12–15
2. Hanging Leg or Knee Raise
Sets:3 Reps:6–12
3. Pushup Plank with Tailbone Tucked
Sets:3 Reps:Hold 30 seconds
Workout B
Perform exercises 2A and 2B as a superset. So you’ll do one set of 2A and then one set of 2B before resting. Rest, and repeat until all sets are completed for both exercises.
1. Crossover Crunch
Sets:3 Reps:12–15
2A. Hanging Knee Raise
Sets:3 Reps:12
2B. Pushup Plank with Tailbone Tucked
Sets:3 Reps:Hold 30 seconds
3. Seated Pulley Crunch
Sets:3 Reps:12–15
]]> https://www.onnit.com/blogs/the-edge/5-posterior-chain-exercises-for-stability-and-strength2025-07-10T10:55:26-05:002025-08-08T16:34:06-05:005 Posterior Chain Exercises For Stability And StrengthShane Heins Summary
– The posterior chain is the collective term for the muscles on the backside of the body that are the main drivers of explosive power.
– The posterior chain includes the glutes,hamstrings, and lower back, but also muscles of the upper body andcore.
– Due to imbalanced training, the posterior chain is often weak in relation to muscles on the front of the body, especially the quads.
– Targeting the glutes and hamstrings with different exercises for power, strength, and muscle size will develop the posterior chain as a whole and build athleticism, as well as help to prevent injury.
5 Posterior Chain Exercises For Stability And Strength
What you can’t seecanhurt you. Or, it can take your strength, muscle gains, and athletic performance to the next level.
What you can’t see, at least not without contorting in front of the mirror, are all the muscles on the backside of your body. The glutes, hamstrings, spinal erectors (lower back), lats, and a handful of other key movers. Collectively, these are known as the posterior chain.
Developing the pecs,abs, andbiceps—aka, the “beach muscles”—might make you look good (at least from the front), butit’s the muscles on your backside that are most responsible for producing power, helping you dominate in sports and in the gym, and keeping you injury-free.
“On the front of the body are the ’show’ muscles,” says Jim Smith, CPPS, a strength coach and owner of Diesel Strength & Conditioning (Dieselsc.com). “The posterior chain is the ’go’ muscles.”
If you’re currently dedicating more time and intensity to your pecs and abs than your glutes and hams, it’s time to start focusing more on your rearview. This article provides a simple yet thorough guide to exactly why and how to train your posterior chain for better gains, better performance, and a better overall physique.
What is thePosteriorChain?
Some confusion exists as to what exactly constitutes the posterior chain. The glutes, hamstrings, and lower back muscles are the centerpieces, and represent the musculature most trainers are referring to when they use the term posterior chain. But it doesn’t stop there.
“There’s more back there than hamstrings and glutes,” says Jeff Jucha, owner and head coach at West Little Rock CrossFit in Arkansas (westlittlerockcrossfit.com). “Thetraps, lats, and other muscles along the spine are also part of the posterior chain.”
Smith adds a few more muscles to the count, including the adductors (which span from the front of the thigh to the rear), calves, and core musculature (not including the rectus abdominis, your six-pack muscle, which is obviously on your front). But basically, he says, “When you look in the mirror, [the posterior chain is] all the muscles you can’t see.”
The reason it’s called a “chain” is because these muscles all work together to create movement.
“The posterior chain works synergistically to propel the body forward, perform reactive agility, and initiate throwing, jumping, sprinting, acceleration, and deceleration of athletic movements,” says Smith. “The fancy term for how they work together is ’intermuscular coordination.’”
Why is Working Out the Posterior Chain Important?
Jumping, sprinting, and all the foundational gym lifts require posterior chain action.Squats, deadlifts, lunges, and their many variations, naturally use the muscles of the core and lower body, but classic upper-body lifts like rows, presses, and chinups call on the backside muscles too. If you’re bench-pressing properly, your glutes should be clenched and your feet driving into the floor. These actions help stabilize the torso.
The posterior chain is mainly responsible for hip extension (pushing your hips to lockout, which uses the glutes and hamstrings), knee flexion (bending your knees, working the hamstrings, primarily), and plantar flexion (raising up onto your toes, performed by the calves).While the pulling and retracting motions provided by the traps, lats, rear delts, and rhomboids are part of the chain, they get worked in most back and pull day workout routines(see examplesHEREandHERE), so we won’t spend more time on them here. The lower-body posterior chain muscles are more often ignored, so they’re thefocusof this article.
If you’ve been paying attention, you might be wondering about the quads. They’re not part of the posterior chain, but knee extension, initiated by the quadriceps, is obviously important for sports and strength athletes as well; it makes up one-third of the all-important “triple extension” sequence—the simultaneous extension of the hips, knees, and ankles to produce explosiveness. The problem is,lifters commonly overemphasize knee extension in their training.Most gym warriors like to do squats and leg presses (it’s fun to see the legs get a big pump). The posterior chain can also get undertrained simply because the lifter doesn’t see it in the mirror, and so working it is an afterthought. In any case, the result is quads that overpower the glutes and hamstrings, and a posterior chain that’s disproportionately weak. Therefore, most athletes would do well to prioritize the posterior chain and put the quads on the back burner for a while.
“There should be a balance,” says Smith. “Many athletes and lifters become quad-dominant, and begin their squatting patterns by initiating knee flexion first, instead of sitting back into their hips to engage the glutes. When lifters can’t sit back in asquat, the glutes get even weaker, the knees push forward, and that puts even more focus on the quadriceps.” It also shifts more of the load to the lower back, which can lead to injury. “The development of the quads is important for all things, including athletics,” says Smith, “but the hamstrings, glutes, and other posterior chain musculature must also be strengthened to create a balance of forces across the ankles, knees, and hips.”
Imbalanced development due to weak hamstrings, glutes, and other posterior muscles is a recipe for not only diminished strength and athletic performance, but also injury.Lower back and knee pain, just to name a couple common issues, are the debilitating byproducts of neglecting the posterior chain.This is because of the improper squatting Smith described above, as well as a general imbalance that has a domino effect on all movements and exercises.
“A weak posterior chain, especially in relation to the rectus abdominis, quads, and hip flexors, can create an increased potential for injury,” says Brian Strump, DC, a licensed chiropractor, certified strength coach, and owner ofLive Active Charlottein Charlotte, North Carolina. “The risk of low-back pain, hip pain, and knee pain are often greater with increasing imbalances in musculature. The body does best with similar push and pull capability of the muscles and tendons on the joints.”
Further down are five posterior chain-focused exercises to incorporate into your training to improve (or avoid) these issues, and boost your gains and performance.
How To Stretch Your Body Before and After Training
Perform the following exercises from Onnit Durability Coach Natalie Higby (TheDurableAthlete.com) before training the posterior chain. Complete each exercise in sequence. Work for 45 seconds on each move (don’t rush), and then repeat for 3 total rounds.
Sumo Squat
Step 1.Stand with feet outside shoulder width and feet turned out as far as you can. Tuck your tailbone under slightly so that your pelvis is parallel to the floor, and brace your core.
Step 2.Squat down while driving your knees out as much as you can. Keep your shoulders stacked over your hips. Note: don’t hinge at the hips as you would for a back squat movement—keep your body as vertical as possible.
Half Mountain Climber to Full Mountain Climber
Step 1.Get into a child’s pose—sitting back on your heels with botharmsstretched in front of you. From there, come up to all fours, and then raise your right knee up to your chest, and plant your foot on the floor outside your right hand (your hands should be directly under your shoulders now).
Step 2.Extend your spine as much as you can, striving to create a long line from your head to your pelvis. Drive your shoulders back and down (think “proud chest”), and keep your right foot flat.
Step 3.From there, extend your left leg, raising your knee off the floor. Your torso may want to round forward, forcing you to lose your spine position. Fight it, and try to maintain extension.
Step 4.Lower your knee to the floor, return to child’s pose, and repeat the entire sequence on the opposite side.
Lying Sphinx
Step 1.Sit upright with your legs extended and rotated out 30–45 degrees.
Step 2.Twist your torso to the left, placing your hands on the floor outside your left hip and driving your shoulders back and down (“proud chest”). Keep your left leg as straight as you can, but allow your right leg to rotate inward as you turn.
Step 3.Bend your hips, trying to bring your torso closer to the floor. Feel the stretch in your left glutes. Come back up, and then twist to the opposite side and repeat.
After training, try this move from Onnit’s Director ofFitnessEducation, Shane Heins. Hold the position for 30 seconds, and repeat for 1–3 rounds.
Downward Dog
Step 1.Get on all fours, and push through your hands and feet to raise your knees off the floor.
Step 2.From there, push your hips back and high into the air, straightening your legs as much as you can while keeping your head, spine, and hips aligned. Don’t put your heels flat on the floor at the expense of your spine position—focus on length.
Top 5 Posterior Chain Exercises
These moves can be inserted into virtually any lower-body workout. As Smith mentioned, balance is the key—a balance between movements as well as muscles used. There’s no one-size-fits-all description for how to juggle your exercise selection, but a good rule of thumb is to include one of the below movements for every quad-dominant exercise in your program (i.e., back squat,front squat, leg press, leg extension).
If your training has been imbalanced for some time, or you consider your glutes, hamstrings, or lower back to be a major weak point,do twice as many posterior-chain exercises as you do lifts for the quads.For instance, if you want to barbell squat, you might begin the workout with cable pull-throughs and then follow the squat withRomanian deadlifts. (See more on placement of exercises below.) If you follow a body-part split, and find it hard to fit enough posterior chain moves into your leg day, you can add some of them (say, Romanian deadlifts orkettlebell swings) to your back day for some extra pulling—just space it two or more days apart from any leg day you do. Glute/hamstring/lower-back training pairs well with lat and upper back training, as both sets of muscles perform pulling motions and overlap to a degree.
Many will contend that the traditional deadlift is the “king of posterior chain exercises” (as if such a thing existed). It’s a great exercise, and it will absolutely build your posterior chain, but we’re putting the crown on the Romanian deadlift for this list. The conventional deadlift (and, really, the sumo deadlift as well), is very difficult for most people to do with good form. As a result, it’s been the cause of many back injuries. It also takes a lot of drilling to perfect the technique. The Romanian deadlift is more user-friendly, and works nearly all the same muscles (mainly the glutes, hamstrings, and lower back), so we’re giving it the edge here.
The Romanian deadlift (RDL for short) is performed with lighter loads than traditional deadlifts, and doesn’t involve pulling a barbell off the floor. You start at the top, hips locked out, and bend your hips into flexion.That means you’re less likely to round your lower back, regardless of any mobility restrictions you have in your hips.There’s also virtually no strain on the front side of the knee, because the knees remain only slightly flexed throughout the movement.
These features make RDLs a good alternative to traditional deads for those getting up in age, those who have a lot of miles on their joints already, or anyone else that’s concerned about wear and tear on the knees and lower back.
How To Do Romanian Deadlifts
Step 1. Place a barbell on a rack set to hip level. Grasp the bar with your hands at shoulder width, and pull the bar out of the rack. Step back, and set your feet at hip width; hold the bar at arms length against your thighs. Draw your shoulders back and down—think “proud chest,” and keep this upper body tension throughout the lift.
Step 2. Take a deep breath into your belly and brace your core. Begin bending your hips back. Keep your head, spine, and pelvis aligned as you slide the bar down the front of your body—keep it in contact with your legs. Allow your knees to bend slightly as you hip hinge. Continue until you feel a stretch in your hamstrings. On the way back up to standing, squeeze your glutes.
For most people, the bar will end up somewhere between the knees and lower shins in the bottom position.
Exercise Variations
The RDL can also be done with one leg at a time using a barbell, one or more dumbbells, or a barbell in a landmine unit (all of which are discussed in our guide to the single-leg RDLHERE). Single-leg RDLs are a must-do for ensuring balance between the right and left legs; with the standard double-leg version, a stronger side can potentially compensate for the weaker side and further magnify strength imbalances. One good strategy is to alternate between double- and single-leg RDL variations every other time you do RDLs.
Sets/Reps/Load
Perform 3–4 sets of 6–10 reps on heavy days, and anywhere from 12–20 reps on light days.
2) Cable Pull-Through
Like RDLs, cable pull-throughs are a great way to zero-in on the glutes and hamstrings. But that’s not to say they’re just the same exercise with different equipment. Running the cable between your legs and behind your body creates a unique line of pull. On any deadlift variation, the resistance is pulling straight down; but with a pull-through, it’s going backward.
“Pull-throughs are great for teaching the hip hinge,” says Smith—your ability to bend your hips while keeping your head, spine, and pelvis in line—“because the line of pull of the cable drives the athlete’s hips back. The exercise also teaches a powerful lockout of hip extension at the top of the rep, which is important for jumping, deadlifts, and squats.”Another benefit to pull-throughs is that they’re easy on the lower back. You’re not loading it directly as you do in a back squat, deadlift, RDL, or good morning,so you’re not likely to aggravate it. You can just concentrate on extending the hips.
Because it’s something of an isolation move done with a cable instead of free weights, the pull-through may seem like a natural finishing move for a leg workout, but Smith actually prefers to program it early,beforethe big lifts. “Pull-throughs create a neural drive to the glutes, and work well as a primer before a loaded lower-body strength workout with exercises like squats and deadlifts,” he says. In other words, if you start your workout with pull-throughs you may feel your glutes and hams working harder on your other exercises, as well as feel that you have better control over them.
How To Do Cable Pull-Throughs
Step 1.Stand in front of a cable column, facing away from it, with a rope handle attached to the pulley. If possible, set the pulley height to where it’s right below your crotch, which will make for the most direct line of pull. Otherwise, use the low setting.
Step 2.Straddle the cable and grasp the ends of the rope in front of your thighs so that the cable runs between your legs and behind you. Step forward to raise the weight off the stack, far enough so that it won’t touch down at the bottom of the rep. Space your feet shoulder-width part.
Step 3.Push your hips back to slowly your lower torso, keeping your back flat throughout, and your knees slightly bent. Lower until you feel a stretch in the hamstrings.
Step 4.Extend your hips, focusing on contracting your glutes and hamstrings, to return to the standing position.
Exercise Variations
Pull-throughs can also be done with a resistance band. When using a band,anchorit to a sturdy object, and step far enough away from the anchor point to create a good amount of tension. As with the cable version, there should still be tension on the band at the bottom of each rep.
Sets/Reps/Load
Perform 2–3 sets of 12–15 reps using a moderate weight. As mentioned above, you can slot pull-throughs early in a lower-body workout, before compound moves like squats or deadlifts, but they also work well done for high reps to finish out a session.
3) Medicine-Ball Throw for Height
This exercise works similar to ajumpsquat, but don’t let the squat fool you into thinking this is just a dynamic quad move. As Smith puts it, what you have here is a “full-body expression of explosive power, utilizing the major joints of the body and the entire posterior chain working together as a single unit.”
This version of the med-ball throw first teaches you to decelerate. You drop into the squat quickly to generate power, but you put the brakes on fast so you don’t sink too low. Then it builds your ability to change direction on a dime, as you have to come back up out of the squat fast and jump up while launching the ball overhead. The ankles, knees, and hips do this, just as they work in any other triple extension movement.
In other words, with one powerful, lightly loaded move, you’re training your ability to absorb, redirect, and explode, all the way up the backside of your body, from calves to upper traps.
How To Do the Medicine-Ball Throw for Height
Step 1.Pick up a 10- to 20-pound medicine ball and go to an open area (no people or equipment close by), either outdoors, or a room with high ceilings. Stand with feet shoulder-width apart, and hold the bottom portion of the ball at arms’ length in front of you.
Step 2.Keeping your head, spine, and pelvis in a straight line, quickly bend your hips back, and squat about halfway down.
Step 3.Rebound out of the bottom of the squat explosively, extending your hips and knees to propel you upward. As you do, throw the ball straight up in the air as high as possible. The movement should be so powerful that your feet leave the floor by a few inches at the top.
Step 4.Land with soft knees, and keep an eye on the ball to make sure it doesn’t hit you on the way down. Let it fall to the floor (don’t try to catch it), and then pick it up and perform the next rep. Don’t rush between reps—settle yourself and get back into proper position.
Exercise Variations
Medicine-ball throws can be done several different ways. The ball can be thrown out in front of you for distance, or even back behind you. You can also change the exercise by holding the ball in front of your upper chest and performing an overhead pressing movement as you come up from the squat, again releasing at the top and letting the ball fall back to the floor.
Sets/Reps/Load
Perform 2–3 sets of 5–8 reps using a 10-20-pound ball. The purpose of med-ball throws in this context is to develop explosive power; it’s not about building muscle directly or even conditioning. Keep the volume low, the weight light, and recover fully between sets with 2–3-minute rest periods. Do this move early in a lower-body strength session, before loaded squats, deadlifts, and/or lunges.
Kettlebell swings have become a poster child for posterior chain development in the last couple decades, thanks in part to the popularity of CrossFit and kettlebell training. When performed correctly, swings check off several important boxes.
“Not only does the kettlebell swing work your hamstrings and glutes, it also requires explosiveness and coordination from the trunk, core muscles, and shoulders,” says Jucha. “You’ll work the posterior chain, but you’ll also practice the essential hinge movement pattern for explosive power.”
The kettlebell swing is a unique exercise in that it’s effective for developing explosiveness, but it’s also commonly done for high reps to improve conditioning (as in CrossFit WODs). If doing the latter, proper form is paramount for keeping the lower back safe.
How To Do Kettlebell Swings
Step 1: Place a kettlebell on the floor and stand about two feet behind it with feet shoulder-width apart. Draw your shoulder blades together and downward (think: “proud chest”). Draw your ribs down, and tuck your tailbone slightly to make your pelvis level with the floor. Brace your abs.
Step 2: Bend your hips backward to lower your torso and grasp the handle of the kettlebell with both hands, overhand. Keeping a long line from your head to your pelvis, and your shoulder blades pressing downward toward your back pockets, shift your weight to your heels. Bend your knees slightly and lift the kettlebell off the floor and hike it back between your legs.
Step 3: When your wrists make contact with your inner thighs, forcefully contract your hamstrings and glutes and thrust your hips forward, coming into a standing position. The momentum you generate will swing the kettlebell forward and up to about eye level. Allow the kettlebell to swing back between your legs, folding at the hips and bending your knees slightly as the kettlebell swings down and back to begin the next rep.
Do not lift the kettlebell with your upper body, as if performing a front raise shoulder exercise. The swing is an explosive movement and the glutes and hamstrings must perform almost all of the work.
Exercise Variations
Kettlebell swings can be performed holding the weight in only one hand, and they can also be done holding one kettlebell in each hand (but that’s advanced). Swings can be done with a dumbbell in place of a kettlebell (holding it in one or both hands), but a kettlebell generally offers a better grip and is more practical.
Sets/Reps/Load
Kettlebell swings are most often programmed with relatively high rep counts—anywhere from 15 up to 50+ reps per set. That said, if you’re new to the exercise, start at the low end to build good technique without fatigue setting in.
Beginners to the swing (or lifting in general) should do 2–3 sets of 10–15 reps using a light kettlebell (10–15kg, or 22–33 pounds). More experienced lifters can work up to 3–5 sets of 25–50 reps using a heavier kettlebell (up to 24kg/53 pounds, or more for very advanced individuals).
5) Hip Thrust
When you want to target one particular group of muscles, isolation exercises are best. Three of the aforementioned posterior-chain moves—RDLs, pull-throughs, and kettlebell swings—focus on the hip hinge, with the upper body moving freely in space. To better isolate the glutes, the shoulders and upper back can be locked into place with a flat bench while the feet are anchored to the floor.
The hip thrust is an exercise utilized as much by physique athletes wanting to develop their glutes as it is powerlifters looking for a relatively safe way to load up the posterior muscles with heavy weight. As with the pull-through, there’s little stress on the lower back with hip thrusts.
We’d be remiss not to reference Bret Contreras here, aka “The Glute Guy,” and arguably the leading torchbearer of the hip thrust exercise. (He even invented a special piece of equipment,The Hip Thruster, specifically for this movement.) Research performed byContrerasandothershasshown greater muscular activation by the hip extensor muscles (glutes, hamstrings) during the barbell hip thrust compared to other major exerciseslike the front squat and traditional deadlift.
“The hip thrust is incredibly functional,” Contreras states on his websiteBretContreras.com. “Not only does it safeguard people from injury to the knees, hips, and low back, it also transfers quite favorably to performance. Lifters and athletes who employ the hip thrust notice improved gait function at all speeds, increased hip power, stronger squats and deadlifts, increased throwing/striking power, and more. They build glute hypertrophy [muscle growth] incredibly well, and this added glutemassdoes wonders for improving functional fitness.”
How To Do Hip Thrusts
Step 1. Load a barbell on the floor. Lie with your upper back resting on a bench and your legs flat on the floor in front of you. Your torso should make a roughly 45-degree angle with the floor. Roll the bar into the crease of your hips (you may want a pad or towel to cushion it), and hold it firmly on each side. Place your feet flat on the floor, hip-width apart, and turn your toes out slightly.
Step 2. Tuck your tailbone so that your lower back is flat. Take a deep breath into your belly, and brace your abs. Drive through your heels to extend your hips, finishing when your torso and hips are parallel to the floor, and your shins are vertical. Hold the position for a moment.
Exercise Variations
Hip thrusts can (and should) also be done one leg at a time. When doing so, the technique and equipment is the same, only the non-working leg is lifted off the floor in front of you. You will, of course, have to use much less weight.
Single-leg hip thrusts are ideal for promoting balanced development between the right and left sides. Alternate between double-leg and single-leg versions every time you do hip thrusts.
Sets/Reps/Load
Perform 2–4 sets of 12–15 reps. Make sure you use a weight that allows you to reach full hip extension on every rep.
]]> https://www.onnit.com/blogs/the-edge/strengthen-your-hamstrings-with-these-8-exercises-and-4-workouts2025-07-10T10:55:26-05:002025-08-15T06:29:06-05:00Strengthen Your Hamstrings With These 8 Exercises and 4 WorkoutsJeremy Gottlieb
If you’re an athlete, or even just a sports fan, you should know how important it is to do workouts for hamstrings, or to have a hamstring-focused leg day. Here’s why: Picture your favorite player sprinting down the field, dusting the competition. The crowd is on its feet! He’s about to score, and¦
and suddenly he collapses, as if picked off by a sniper at long range, clutching the back of his thigh. The crowd goes quiet. The announcers turn somber. It’s another hamstring tear.
What Are Hamstrings And How To Train Them?
The hamstrings—a collection of three muscles extending from your sit bones to the backs of your knees—are among the most frequently injured muscles in sports. A study on NFL players reported 1,716 hamstring injuries over a 10-year period, which breaks down to roughly five or six injuries per team, per season.The numbers are similar in pro soccer, basketball, and among regular people in recreational sports (1, 2).
If you’re a desk jockey who spends most of his/her day sitting at a computer, you may be even worse off, especially if you’re planning to get in shape or be more active again. A 2017 study of college students found that 82% of the subjects had tight hamstrings due to prolonged sitting—and these were young adults with a mean age of 20.
Finally, if you’re a gym rat who’s long made the mistake of focusing your leg training on the fronts of your thighs—hitting the hammies as an afterthought—you’ve already lit the fuse that can lead to a hamstring blowout. A study in Isokinetics and Exercise Science showed that imbalances in quad and hamstring strength were associated with non-contact leg injuries.
The problem lies in the hamstrings’ design; they’re much more complex than most other muscles. They cross two major joints—the hip and the knee—and shorten at both ends. At the top end, the hamstrings work with your glute muscles to extend your hip (picture the movement of standing up out of a chair). At the lower end—near the back of your knee—the hammies bend your knee joint, pulling your heel up and back. When you use the hamstrings’ two functions at once, such as when you’re sprinting and you drive one leg behind you, they do double duty: the two ends of the muscles pull toward one another, like the ends of a stretched-out exercise band. That’s a lot of tension passing through a single muscle group, and one reason the hamstrings cramp and tear with relative frequency.
The remedy: train both major hamstring functions—hip extension and knee flexion—with good form and appropriate loads. Workouts for hamstrings make these muscles less susceptible to injury, and more capable of producing force and power, so you’ll end up a better lifter and athlete, and less likely to become a statistic.
The 8 Best Hamstring Exercises
A hamstring exercise will require you to either extend your hips or bend your knees—and some of the most effective movements will actually combine both actions, training the glutes as well as the hammies. The following are the best hamstring builders, organized by their primary function.
HIP EXTENSION
In these movements, the hamstrings work with the glutes to push your thigh bones from a flexed position (knee pulled up in front of you) to an extended one (knees moving away from your body). The movement is known as a hinge, and it helps you run faster, jump higher, and maintain a pain-free back. “Most of us can’t get enough hinging,” says Tony Gentilcore, C.S.C.S., owner of Core Fitness in Brookline, MA.
1) Stiff-Legged Deadlift
Target:hamstrings, glutes, adductors
You should feel a deep stretch in the back of your thighs from your butt to your knees
Step 1: Set a barbell on a rack at about hip level (if you’re very mobile, you can start with the bar on the floor). Grasp the bar with a shoulder-width grip and take it off the rack. Step back and plant your feet hip-width apart. Draw your shoulders back together and downward (think: “proud chest”).
Step 2: Take a deep breath, draw your ribs down, and brace your core. Push your hips backward and, maintaining a long spine from your head to your pelvis, lower your body until you feel a stretch in your hamstrings. Allow your knees to bend only slightly.
Step 3: Squeeze your glutes as you extend your hips and come back up.
The stiff-legged deadlift can also be performed with dumbbells/kettlebells.
2) Back Extension
Target:hamstrings, glutes
You should feel tension in the center of the back of your thighs
Step 1:Adjust the pad on the back extension bench so that when you lie on it the top edge lines up with the crease in your hips. Using the handles for support, set up on the bench so your hips rest on the pad and your ankles are braced by the ankle pads and your feet rest against the foot plate about hip-width apart.
Step 2:Turn your toes outward slightly. Interlace your fingers behind your head, spread your elbows wide, and keep them there throughout the movement. Bend at the hips to lower your torso toward the floor, stopping before your lower back rounds. Your head, spine, and pelvis should form a straight line.
Step 3:Take a deep breath into your belly and brace your core. Now squeeze your glutes and hamstrings and extend your hips to raise your torso up until your body forms a straight line from your head to your feet.
If bodyweight alone is too easy for you, add resistance by holding a dumbbell (as shown above).
You should feel a stretch in the back of your thighs as you swing the weight back between your legs.
Step 1:Place a kettlebell on the floor and stand about two feet behind it with feet shoulder-width apart.
Step 2:Draw your shoulder blades together and downward (think: “proud chest”). Draw your ribs down and tuck your tailbone slightly to make your pelvis level with the floor. Brace yourabs.
Step 3:Bend your hips backward to lower your torso and grasp the handle of the kettlebell with both hands, overhand.
Step 4:Keeping a long line from your head to your pelvis, and your shoulder blades pressing downward toward your back pockets, shift your weight to your heels. Bend your knees slightly and lift the kettlebell off the floor and hike it back between your legs.
Step 5:When yourarmsmake contact with your inner thighs, forcefully contract your hamstrings and glutes and thrust your hips forward, coming into a standing position and swinging the kettlebell forward and up to about eye level. Allow the kettlebell to swing back between your legs, folding at the hips and bending your knees slightly as thekettlebell swingsdown and back to begin the next rep.
Do not lift the kettlebell with your upper body, as if performing a front raise shoulder exercise. The swing is an explosive movement and the glutes and hamstrings must perform almost all of the work.
You should feel a deep stretch in the back of your thigh and butt
Step 1:Hold a dumbbell in one hand and stand on the opposite leg with your foot facing straight forward.
Step 2:Bend the knee of the working leg slightly. Keeping a long spine and your core braced, drive your hips backward as far as you can, so that your torso lowers toward the floor. Stop when you feel your hamstrings are fully stretched and you can’t go any lower without losing your lower back position (it should be straight).
Step 3.Squeeze your glutes to come back up. If you have trouble keeping your balance, you can rest the non-working leg on the floor with your heel raised. Place the toes of that foot right behind the heel of your working foot. Your feet should be hip-width apart. This is called aB-stance Romanian deadlift, and it will provide stability so you can better isolate the hamstrings and glutes.
KNEE FLEXION
These moves (virtually all variations of a machine leg curl) minimize the action at the hip joint while dialing it up at the knee. “I prefer knee flexion isolation moves for beginners and those coming off injury,” says Gentilcore. “There’s more external support so it’s easier to perform and less intimidating.” Isolating a muscle can also help you feel its action more precisely—an essential skill for the novice lifter or athlete.
5) Machine Lying Leg Curl
Target:hamstrings
You should feel tension in the center of the back of your thighs
Leg curl exercises require machines, making them moves to include in any hamstring workout at the gym. If you don’t train in a public gym, we’ll show you some approximations you can do at home further down.
Step 1:Adjust the ankle pad of the machine so that when you lie down on the support pad your knees will line up with the leverarm’s axis of rotation. Lie facedown on the machine with the backs of your ankles against the ankle pad. If your machine has a support pad that bends upward, position yourself so that your hip joints rest directly over that point.
Step 2:Firmly grasp the machine’s handgrips, lengthening your spine and contracting your lats (the muscles on the sides of your torso). Set your feet so they are parallel and about six inches apart, and flex them hard at the ankles (bend your feet back so your toes are closer to your shins).
Step 3:Keeping your neck and torso long, your hips pressed down into the bench, and your feet parallel throughout the movement, squeeze your hamstrings and slowly bend your knees, drawing the lever arm as close as possible toward your butt.
Step 4:Hold the contracted position for a one-count, squeezing your hamstrings as hard as possible. Slowly reverse the movement, fully straightening your legs at the knees.
6) Machine Seated Leg Curl
Target:hamstrings
You should feel tension in the center of the back of your thighs
Step 1.Sit in a seated hamstring curl machine and line your knees up with the axis of rotation. Extend your knees and rest your lower legs on the ankle pad just above your ankles. Secure the knee pad at the bottom of your thighs.
Step 2.Hold the handles for stability and bend your knees, driving your heels back behind you until your hamstrings are fully flexed. Slowly extend your legs again under control.
If you can, try to hinge your hips and bend forward a bit and hold this position throughout the exercise (while keeping your back flat). This will help you put a greater stretch on the hamstrings and activate more muscle.
HYBRID HIP EXTENSION/KNEE FLEXION
These moves combine the hamstrings’ two functions, making them somewhat more complex than the exercises in the other categories. “Multifaceted movements are great for athletic populations,” says Gentilcore. “They emulate sport and real life to a high degree.” But that doesn’t mean you should skip the other types of hamstring moves, he says, no matter what your goals. “All three categories serve a purpose, and when trained in concert, will likely lead to the best results and more bulletproof hammies.”
7) Glute-Ham Raise
Target:hamstrings
You should feel tension all throughout the back of your thighs
Step 1:Adjust the foot plate of the glute-ham bench back far enough so that when you lie on it the top edge of the pad will line up with the crease in your hips.
Step 2:Using the handles for support, set up on the bench and place your feet on the foot plate, bracing the backs of your ankles against the ankle pads.
Step 3:Set your feet so they are parallel and about hip-width apart. Once your lower body is locked in place, release the handles and extend your hips until your torso is perpendicular to the floor and your knees are bent 90 degrees. This is your starting position.
Step 4:Draw your ribs down and tuck your tailbone under slightly so your pelvis is level. Brace your core. Now lower your body toward the floor under control until it forms a straight line, from head to feet. Your heels will come off the foot plate, and that’s OK. Drive your toes down hard. If that’s too difficult, you can bend slightly at the hips, or use a stick for support (see the Elite Hamstring Workout below).
Step 5:Push your toes into the foot plate and contract your glutes, hamstrings, and calves to pull your body back up to vertical (again, if you need an easier version, keep the bend in your hips). Pause for a moment, and then slowly begin the next rep.
8) Swiss-Ball Leg Curl
Target:hamstrings and glutes
You should feel tension in the center of the back of your thighs and glutes
Step 1:Lie on your back on the floor with your heels elevated on a medium-sized Swiss ball. Your feet should be about six inches apart and your hands placed beside you on the floor, palms down.
Step 2:Flex your feet, brace your core, and drive your heels into the ball to raise your hips off the floor. Try to keep your neck relaxed, but squeeze your glutes and hamstrings as you bridge up.
Step 3:Bend your knees as in a machine leg curl, rolling the ball toward you. Be sure to keep your core braced so you don’t hyperextend your lower back.
Step 4:Hold the contracted position, squeezing your glutes and hamstrings as hard as possible for a two-count. Then slowly reverse the movement, extending your legs and returning to the starting position.
Best Bodyweight Hamstring Exercises That Can Be Done at Home or On The Road
If you don’t have a gym membership or are limited to only the most basic equipment (and a little imagination), you can get a great hamstring-focused workout with these exercises.
You should feel tension in the center of the back of your thighs and glutes
This lift is a variation on the Swiss-ball leg curl and uses exercise sliders, but furniture sliders from a hardware store work too, and even paper plates can suffice—if you can train on a waxed or hardwood floor. Ideally, you can perform this move on a smooth surface that won’t create too much friction for the sliders.
Step 1:Lie on your back on the floor. Rest your heels on a pair of sliders and place your hands beside you on the floor, palms down. Set your feet parallel and about six inches apart. Now bend your knees, sliding your feet back close to your butt.
Step 2:Tuck your tailbone under slightly, draw your ribs down, and take a deep breath into your belly. Brace your core. Contract your glutes and hamstrings and press your heels into the sliders, elevating your hips and lower back to full extension. In other words, bridge your hips up. Be sure to keep your core braced to prevent hyperextending your lower back. This is your starting position.
Step 3:Slowly extend your legs, sliding your heels away from you until your butt and legs are just above the floor. When they’re straight, bend your knees and curl the sliders back toward your butt.
If that’s too tough, start by performing only the negative portion of the movement, lowering your body slowly from the bridge position. Take five seconds to straighten your legs, and then rest your butt on the floor if you need to when you reset your legs.
You should feel your thighs and butt, especially at the bottom of each rep
Step 1:Stand lunge length in front of a bench, step, or box that’s six to 12 inches high.
Step 2:Step your left foot back and rest the top of your left foot on the bench so that your knee is bent 90 degrees. Your right foot should point straight forward.
Step 3:Hinge your hips back a bit so you feel like you’re leaning forward, but keep your spine straight and tall. Slowly bend your right leg until your left knee is just above the floor. Your front leg should be bent about 90 degrees. Pause, and reverse the movement, squeezing your glutes as you come up.
You can perform the movement with your bodyweight, dumbbells/kettlebells, or a barbell.
You should feel a deep stretch in the back of your thighs from your butt
Sets:2 Reps:8–12
Step 1:Hold a pair of dumbbells at your sides and stand with feet hip-width apart, toes pointing forward. Draw your shoulders back together and downward (think: “proud chest”).
Step 2:Take a deep breath, draw your ribs down, and brace your core. Now push your hips backward and, maintaining a long spine from your head to your pelvis, lower your body until you feel a stretch in your hamstrings. Try to keep your knees nearly straight, but not locked. Your range of motion may not be great, and that’s OK. Go for the stretch, but be safe, and don’t go lower than you feel you have the mobility for. Keep your lower back flat the whole time, and actively pull the weights back to keep them close to your body.
Step 3:Extend your hips and come back up and stand tall.
At first glance, this routine may not seem like enough work, but consider how you should be performing it. Take each set to within one rep of failure—that is, the point at which your form is about to break down. So if you get 8 reps for an exercise and it’s very hard, to the point where you felt yourself slow down, and you don’t think you can get a ninth rep with good form, STOP the set there. Done in this fashion, the Bulgarian splitsquatsare very challenging (even at only one set apiece).
Complete Hamstring Workouts
Find the workout that suits your experience level and goals.
Just starting out on your quest for unbreakable hamstrings? This is step one: three moves that will blitz the muscles from both ends. Take it easy your first few times in this workout. The moves are entry-level—but if you’re not used to working your hamstrings, they can cramp up when you do too much work too soon. Perform this workout twice a week on nonconsecutive days, either in the same workout that you train your quads and calves, or tacked onto an upper-body day.
Been working out for a while? Below is a leg workout that will give your hamstrings—and the rest of your lower body—a going-over that you might need a few days to recover from. Perform it once or twice a week (do not do any other leg training).
Alternate sets of the paired exercises (marked A and B). So in Superset 1, for example, you’ll perform a set of Bulgarian split squats (one leg and then the other), rest 60–90 seconds, and then a set of slider leg curls. Rest 60–90 seconds, return to the first move, and continue alternating the two moves until you’ve completed three or four sets of each exercise. Then perform the exercises in Superset 2 in the same fashion (do exercise 3 as normal straight sets after you’ve finished all sets for 2A and 2B).
Feel like your hammies are lagging behind your quads and want to add a little extra work to your leg program? The two mini-workouts below work well as end-of-workout hamstring finishers that you can do after a full-body workout, cardio session, or an upper-body day. You could also add them in on an off day. As in the intermediate workout, alternate sets of each exercise.
Warm up your hips and hamstrings before any lower-body workout with the following moves, courtesy of Onnit-certified Durability Coach Cristian Plascencia (@cristiangplascencia on Instagram).
Lying L Sit
Step 1:Lie on your back on the floor. Bend your knees and rest your feet close to your butt. Extend your arms by your sides and press your palms into the floor.
Step 2:Tuck your tailbone under slightly so that your pelvis is perpendicular to the floor and your lower back flattens into the floor. Take a deep breath and brace your core.
Step 3:Extend your legs overhead and pull your toes back toward your face. You’ll feel a strong stretch in your hamstrings. Continue to actively pull your toes down and fight to keep your legs straight for 30 seconds. Don’t let your lower back break off the floor. Repeat for 3 total rounds.
Kneeling Half-Mountain Climber Bow Draw
Step 1:Get on all fours with your knees directly under your hips and your hands underneath your shoulders.
Step 2:Step your left foot forward so it lands just outside your left hand. Drive your knee in toward your left arm while pushing your arms apart (left arm toward the left knee, so the two press against each other).
Step 3:Draw your shoulder blades back together and downward. Think: “proud chest.” Tilt your butt up to the ceiling, flattening out your lower back as much as you can, and brace your core. Your body should form a straight line from your head to your tailbone.
Step 4:Begin extending your left knee, pushing your pelvis back toward your right heel. Fight to keep your spine extended and your proud chest position the whole time. Push your foot into the floor so your heel and toes don’t rise up. Finally, bend the knee slowly to come back, and repeat on the opposite side. Perform 5 reps on each side, and repeat for 3 rounds.
Lying Warrior
Step 1:Sit on the floor and spread your legs.
Step 2:Lock out your left leg and twist your torso to the left. Plant your left hand behind your hips and use it to help pull you deeper into the twist. Reach your right arm past your left foot. Allow your right leg to roll inward as it follows you and turn the hip into the ground as much as you can.
Step 3:Plant both your hands on the floor behind your hips and extend your spine, drawing your shoulder blades together and downward—think: “proud chest.”
Step 4:Reverse the movement and repeat on the opposite side. As you repeat for reps, try to twist a little deeper, and even bend forward at the hips and rest on your forearms if you can. Perform 5 reps on each side, and repeat for 3 rounds.
FAQs
How can I target my hamstrings effectively?
Include exercises that flex the knee and extend the hip in your program.Knee flexion exercises—seated leg curls or lying leg curls—are a good idea to start your lower-body workouts,as they pump blood into the legs and prepare them for more complex and riskier exercises that follow, such as squats and deadlifts. Training them first also makes the hamstrings a priority, so you’ll be able to hit them hard with your full effort andfocus, and that will lead to better gains.
Do stiff-legged deadlifts or RDLs later in your workout when you’re fully warmed up. These muscles put the hamstrings under a big stretch, so it’s safer to do them when you’re warm and ready. Perform both exercises for a variety of rep ranges, but sets of 5–10 are good to start. Add weight and reps as you’re able.
Are hamstrings important to train?
The hamstrings perform hip extension and knee flexion, meaning that they draw your leg underneath and behind you and bend the knee. Think about it… it’s exactly the motion you perform when running, bounding, jumping, or doing any other explosive, athletic movement that begins with the lower body. Many people focus on their quads and train squats, leg presses, and leg extensions hard, but that’s only because you can see those muscles in the mirror. The hamstrings are often an afterthought, but you’ll never reach your full potential for strength or athleticism until you bring them up.
Do squats effectively train the hamstrings?
No. As you descend in a squat, the origin point of the hamstring muscles (the hips) gets stretched, but the insertion point (the back of the knees) shortens as the knee bends. As you come up, the reverse happens. What this means is that the hamstrings are never really lengthened under load,so they don’t experience sufficient tension or receive much of a growth stimulus from squatting.Compare the squat to a movement like the stiff-legged deadlift or lying leg curl, where the hamstrings are lengthened fully and then shortened fully against resistance, and you can see that they must work much harder. The squat is a great exercise for the quads and adductors and, depending on how it’s performed, can also recruit the glutes heavily as well, but it does not constitute a hamstring workout on its own.
How can I strengthen my hamstrings at home?
Exercises like the slider leg curl and Swiss-ball leg curl can be done at home and train the hamstrings’ two functions—hip extension and knee flexion—simultaneously. All you need is a pair of furniture sliders or a Swiss ball, and even a set of paper plates can work if you have a smooth, waxed floor to train on. If you have dumbbells, you can do deadlift variations like the RDL and stiff-legged deadlift as well.
How often should I train my hamstrings each week?
Aim to train your hamstrings twice in a seven-day period, or as many as three times if you consider them a major weak point. You can train them on Monday and then again on Friday, Saturday, or Sunday, depending on your split, or train them Monday, Wednesday, and Friday if following a full-body routine. (If you’re doing full-body, limit yourself to one hamstring exercise each session and one to three hard work sets, to allow for recovery).
Will bigger hamstrings make my glutes look bigger?
The hamstrings share a job with the glutes—hip extension—and there aren’t many exercises that work the hams and won’t train the glutes to a degree at the same time, so focusing on your hamstrings may allow you to add some size to your glutes as well. However, because they’re separate muscles, you’ll see better results training them with exercises that are more targeted for each muscle. So, if you want bigger glutes, emphasize glutes in your training.
What exercises specifically target the hamstrings?
Leg curls done both lying down and seated along with stiff-leg deadlifts, slider leg curls, and glute-ham raises are all very good choices.
What are the benefits of strong hamstrings?
Strong hamstrings help you run faster, jump higher, and generally perform more explosively in athletics. They’ll also help you lift heavier weights on deadlifts and other weightlifting exercises.
]]> https://www.onnit.com/blogs/the-edge/basic-to-beast-complete-bodyweight-workout-program2025-07-10T10:55:26-05:002025-08-14T17:16:01-05:00Basic to Beast Complete Bodyweight Workout ProgramJeremy GottliebToo many trainees and athletes are quick to overlook (and sometimes forget) about thebodyweight workout. Even so, you can become very strong when training with just your bodyweight.
Bodyweight trainingis all about the basics and the truth is, no matter how advanced you are, your body will always fall back on its base level of strength. Your overall bodyweight strength will always serve as the foundation and bridge to your other strengths.
Obviously there are hundreds, if not thousands of different variations for each of the basic bodyweight training movements out there, but no matter what, all of them come back to being able to perform the basics.
Bodyweight training serves as your foundation and is the driver of all of your other strengths and skills. Strength tools such askettlebells, dumbbells,barbells, andsandbagsare useless without having the proper bodyweight strength and conditioning foundation.
One of my biggest pet peeves is when young athletes or new clients come into my gym and they get frustrated when I don’t quickly put them under a heavy barbell to see how much weight they can lift.
Most of my clients (and even advanced athletes) have HORRIBLE form and technique when they first come in; this is totally normal, and quite frankly, all too common.
I’ve always made it a point to go bodyweight training first and to make my clients prove to me and themselves that they are strong enough to handle their own bodyweight correctly and efficiently before using other strength tools extensively.
Bodyweight Workout Program for Strength and Conditioning: Bodyweight Standard
Duration:30-40 minutes Frequency:3x per week Exercise Type:Strength training Intensity:Steady, deliberate Repetitions:Varies by workout Rest:As needed
The rule of thumb I have for my clients and athletes is that they have a solid level of bodyweight strength before they go on to any external types of resistance. You should easily be able to perform the following:
Standing Poses – Build leg strength as well as flexibility in the hips andhamstrings. 2. 25 “Ass to Grass” Bodyweight Squats. 3. 5 Chest-to-Bar Pull Ups (any variation). 4. 25 Chest-to-Deck Push Ups 5. 25 Lunges per Leg Non-Stop. 6. 3 Handstand Push Ups OR 5 Pike Presses. 7. 20 Recline Rows. 8. 10 Hanging Knee Tucks. 9. 90 sec Basic Plank Hold.
The Bodyweight Gauntlet
One of the best types of tests that I like to put my athletes and clients through challenge their general bodyweight conditioning and strength levels is the Bodyweight Gauntlet.
I’ve always been a huge believer of training aggressively and pushing your body to the limit in order to take your results to the next level. Yes, there are progressions to follow, but the bottom line is that in order to get the best results possible, you must attack your workouts relentlessly.
Basics are always important, but intensity andfocusshould be number one over everything else!
The Bodyweight Gauntlet features four essential movements:
1. Push Ups – any variation
2. Strict Pull Ups – all grips and variations
3. Squats – ass to grass only!
4. Burpees – chest to floor with a jump at the top
Perform an all out, three minute set of each exercise and keep track of all of your reps.
For a beginner, this can get brutal real quick. As a person progresses overtime, they’ll start to see the differences in strength and overall conditioning quickly.
I don’t recommend an absolute beginner to take this on. I’ll usually have a complete beginner progress through each of the four basic movements first to get a solid base of bodyweight strength and conditioning built up before I let them loose on the Bodyweight Gauntlet.
While this may look like nothing more than a simple conditioning test, the real key to success is having a solid base of bodyweight strength to begin with. From there, it’s all about improving on this strength and increasing your efficiency of each movement over time.
Try it out and take the test to see where you’re at. Are you a BEASTor just a Proven Soldier? Leave your comments and score!
Beyond Bodyweight Training Basics
Now, beyond the basics of bodyweight training, you must understand that in order to get stronger with your own bodyweight, you must start to progress in difficulty.
Being able to bang out squats, push-ups, lunges, and pull-ups by the dozens or even hundreds is pretty good, but to what point? This will indeed help you achieve more conditioning-wise, but overtime, you won’t get that much stronger maximum strength-wise.
In order for your training to be truly effective in helping you gain more strength, you must start to build more strength with more progressed movements over time.
A great way to enhance your training and make it more advanced is to make it explosive by increasing the speed of the movement.
While this won’t work strength directly, it will help the body move with more force and speed which will ultimately crossover into helping you increase in overall strength. The faster you can move, the better.
One of my main coaching cues to my athletes and clients is to always be as explosive as possible with your movements during the concentric phase. I want my people to be thinking about lifting fast, never slow.
Obviously, I want people to be under control during the eccentric portion of the movement, but when it’s time to contract, you must contract with speed!
An example of this would be the push-up. Imagine yourself at the top of the movement; as you descend down into the push-up, you want to keep your whole body tight from head to toe (coreespecially).
A key point is that your whole body should work as one solid unit, never in parts, so keep your whole body engaged throughout the movement. As you come down you want to be in control.
You don’t have to go slow, but make sure to be under control. This is the eccentric portion of the movement. Now, as you come back up, you want to imagine moving your body as fast and as explosively as possible.
This is the concentric portion of the movement and you always want to focus on moving as fast as possible here.
Once you start to really slow down with your movement and you can’t move as fast as you know you can, (i.e. you start to grind out your reps), that’s a good point to stop your set.
This is known as “submax” training and this is a very important key to focus on to help increase bodyweight strength overtime. I refer to this point a lot when training push ups, pull ups, and rows.
I see too many people do these movements to failure, and when you train like this all the time, you fry out your central nervous system.
To make a long story short, it takes your central nervous system a lot longer to recover than it does for your muscles, so whenever you train to failure, it’s going to take your body a lot longer to recover from your workout.
Recovery and Bodyweight Training
Getting stronger requires your body to recover, and if you’re always cashed out from taking all of your movements to clear failure, you’ll be struggling at getting stronger, faster.
The overall point of this is to focus on being FAST with your movements and avoiding taking your sets to failure most of the time. Be efficient and crisp with your movements and you’ll continue to progress. Just think: quality over quantity.
Another way to increase your overall strength is to use advanced variations of movements. Obviously, if you’re not someone who can do advanced movements, you need to work through your progressions.
When it comes to building up more strength via bodyweight movements, it should be a no-brainer to make the movement harder.
One of the simplest ways to make a bodyweight movement more advanced is by moving the positioning of your feet or hands.
I’ll use the push up as an example again: a simple beginner’s push up would be your regular push up from the floor, the next level would be a push up with your feet elevated on a box.
You could also implement the use of asuspension trainerand do push ups while holding the straps or having your feet suspended in the straps. You could also do extended range of motion push ups with your hands on medicine balls or boxes.
There’s pretty much a limitless amount of things you can do to progress.
You can implement speed and power into the mix by doing explosive plyometric push-ups which would be another way to make your normal push-ups even harder.
One of the top progressions would be to totally remove the oppositearmout of play and perform single arm push ups.
The point is, there are literally thousands of ways you could progress your different bodyweight training movements to make them harder. The harder you make them, the more strength you’ll build up in the end.
Switching over to the lower body, another example would besquatprogressions. Obviously, you would start off with your basic bodyweight squat, making sure to always get your “ass to the grass” first and then progress from there.
One of the first things you could do to make it more difficult is to add an explosive jump at the end of your squat. This would be another example of manipulating the speed of your movement.
You could also hold your hands overhead in a prisoner position or an overhead position to make it more difficult. To take things up another notch, implement the single leg squat (also known as a pistol squat).
Bodyweight Standard Tips and Tricks
1. Focus On The Basics First
Master your basic squat, push up, pull up, row, lunge, and your abilities to sprint, jump, climb, and crawl. Once you get those down, you can then move on to the more advanced movements.
2. Train FAST
Focus on performing your movements as crisp, clean, and explosive as possible.
3. Avoid Failure
Grinding out reps by going to complete failure will have you regressing in the long run. Leave a few reps left in your tank each set. This will keep you fresh and allow you to train aggressively more often.
4. In Reference To The Bodyweight Gauntlet
Make sure you only do this type of challenge every 4-6 weeks since you will be pushing yourself beyond failure when doing so. Doing the Bodyweight Gauntlet or a similar type of extreme workout too much and too often will result in a decrease in overall results.
How To Stretch For A Bodyweight Workout
Follow the videos below for routines to warm up your entire body before a workout. For more tips on mobility and stretching, follow Onnit’s Durability Coach, Cristian Plascencia, on Instagram (@cristian_thedurableathlete).
Bodyweight Exercises and Workouts
The following are three different levels of workouts: Beginner A and B, Intermediate A and B, and Advanced A and B. The workouts are progressive in nature, so if you are a beginner, you would want to start on the beginner workouts A and B and then progress to the intermediates then hit up the advanced.
The workouts are set up in such a way that you’ll first hit an explosive/plyo-type movement to get the body moving fast, hyping it up for the rest of the workout.
From there, you’ll hit a few non-combative supersets using a mixture of upper and lower body strength movements, then you’ll end your sessions off with some core work. The advanced workouts end off with a short conditioning interval via a Tabata set.
If you wanted to use these workouts as a whole program, spend four weeks on each level like this:
Week 1 – A, B, A Week 2 – B, A, B Week 3 – A, B, A Week 4 – B, A, B
With this, you would hit each workout six times, giving you plenty of time to increase efficiency on the different movements contained in each workout. After the fourth week, I would take an off-week to allow the body to recover, then come back with the next set of workouts at the next level.
]]> https://www.onnit.com/blogs/the-edge/3-dumbbell-chest-workouts-and-top-6-exercises-to-get-ripped2025-07-10T10:55:26-05:002025-08-15T06:38:14-05:003 Dumbbell Chest Workouts and Top 6 Exercises to Get RippedJeremy GottliebGym wisdom suggests that building a big chest is all about slapping as much weight as you can find on a barbell and bench-pressing it till you’re blue in the face.
But if benching hurts your shoulders, you train at home without a trusty spotter, or you’ve found that barbell training just doesn’t give you a bigger chest, dumbbell work is the answer.In this article, we will guide you through some of the best dumbbell chest exercises and chest workouts with dumbbells.
Key Takeaways
1. Dumbbell chest exercises are vitalfor building a strong chest, especially if barbell training causes shoulder discomfort, or you train without a spotter.
2. Dumbbell workouts offer a greater stabilitychallengeand balanced muscle development compared to barbells, reducing the risk of joint stress and injury.
3. Dumbbells allow for a wider range of motion,maximizing muscle activation and promoting muscle growth.
4. Dumbbell training enables customization of exercisesto fit individual body mechanics, enhancing effectiveness and safety during workouts.
How To Build Your Chest Muscles With Dumbbell Exercises
Dumbbell training may not be as sexy as loading up the bar till it bends, but for most people, it’s actually a better road to a bigger, stronger, set of pecs, and offers less risk of injury to boot. In this comparison article, barbells vs dumbbells, we’ve explained the major differences between working out with both.
Now, we’re about to show you our recommended top 6 best dumbbell exercises and 3 workouts to develop your chest, top to bottom.
What Are The Most Effective Dumbbell Chest Exercises You Can Do?
Any chest move that you can do with a barbell can be replicated with dumbbells. Here are our favorites—many of them classic moves you’re probably already familiar with, but with a clever twist that elicits even greater gains—courtesy of Dr. John Rusin, a strength and conditioning coach and author of Functional Hypertrophy Training (available atdrjohnrusin.com). We categorized them by the area of the chest they emphasize most.
Step 1:Elevate one end of a flat exercise bench on two or three heavy barbell plates, or a small box or step. The angle should ideally be 30 degrees or less.
Step 2:Lie back on the bench, your head at the elevated end, holding two dumbbells atarm’s length above your chest.
Step 3:Slowly bend your elbows and pull your shoulder blades together on the bench, lowering the dumbbells until they are close to the sides of your chest. In the down position, your elbows should be at a 45-degree angle to your torso—not straight out to the sides.
Step 4:Pause in the stretched position, and then press the dumbbells back up, flexing your chest as you push.
Standard incline bench presses put your hips in a flexed—or bent—position, says Rusin. This basically takes your entire lower body out of the exercise, which isn’t always what you want. By elevating the bench just a little bit, you can incorporate leg drive into the movement in the same way you do (or should) perform a flat barbell bench press.This effectively turns the move into a full-body exercise, which will allow you to handle more weight.
The incline also works the pec fibers that attach to the clavicle more strongly.
Step 1:Elevate one end of a flat exercise bench on two or three heavy barbell plates (the same as you did for incline press described above).
Step 2:Lie back on the bench with your head at the elevated end, holding two medium-heavy dumbbells at arm’s length above your chest, palms facing inward.
Step 3:Slowly lower the dumbbells directly out to the sides, simultaneously bending your elbows and squeezing your shoulder blades together until your chest is comfortably stretched and your elbows are at about a 90-degree angle. (If you experience shoulder pain in the fully stretched position, limit the range of motion).
Step 4:Reverse the movement, contracting your pecs as you straighten yourarmsfully, until you are back in the starting position.
Standard flyes are great for building muscle—but brutal on the shoulders. Bend the arms as you lower the weights, explains Rusin, and you maintain the stress on the pecs while taking it off the shoulder joints.Learn more effective exercises tailored to the upper pecs with ourupper chest workoutarticle.
Step 1: Lie back on a flat exercise bench holding two heavy dumbbells on your chest, palms facing one another.
Step 2:Press the dumbbells together in the center of your chest (this is your starting position).
Step 3: Keeping the dumbbells pressed together, slowly push them to arm’s length over your chest. Pause for a moment, squeezing your chest muscles.
Step 4: Slowly reverse the movement, returning to the starting position.
Crush presses force the pecs to contract hard in a shortened position. This makes for a good contrast to flyes and dumbbell pressing movements—where the weights lower past your chest, emphasizing a stretch on the muscles. Squeeze hard at the top on crush presses and you’ll get a similar effect to cable crossovers, without needing two fancy cable stations to do it.
For an even better contraction, attach bands to the dumbbells so they’re pulling the weights away from each other when you do the exercise. You’ll have to work much harder to maintain the squeeze. The crush press with dumbbells is one of the most effective exercises for targeting the inner chest during a workout with dumbbells. Explore other inner-chest training options with our comprehensive guide in this inner chest workout article.
Step 1:Lie back on an exercise bench holding two dumbbells at arm’s length above your chest, palms facing inward. This is your starting position.
Step 2: Slowly lower the dumbbells directly out to the sides, simultaneously bending your elbows and squeezing your shoulder blades together, until your chest is comfortably stretched and your elbows are at about a 90-degree angle. (If you experience shoulder pain in the fully stretched position, limit the range of motion).
Step 3: Reverse the movement, contracting your pecs as you straighten your arms fully, until you are back in the starting position.
Flyes take the triceps virtually out of the equation, largely isolating the pecs and working them hardest in the fully stretched position—where the maximum amount of muscle fibers can be recruited.
Step 1:Lie on your back on the floor, holding two dumbbells at arm’s length over your chest. You can either lie back from a sitting position while holding the dumbbells, or have a partner hand them to you.
Step 2: Rotate your wrists so that the thumb sides of your hands are closer together than the pinky sides (as if holding a steering wheel at 10 and two o’clock). This is your starting position.
Step 3: Slowly lower the weights, keeping your elbows close to your sides, until your triceps lightly contact the floor.
Step 4: Press the weights back to the starting position.
The floor press works similarly to the crush press, working the pecs when they’re in a shortened position. Because the range of motion is abbreviated, resulting in little stretch on the shoulders, they’re a good option for people with shoulder pain.
Step 1:Elevate one end of a flat exercise bench on two or three heavy barbell plates.
Step 2: Lie back on the bench, your head at the lower end, holding two heavy dumbbells at arm’s length above your chest. Place your feet flat on the bench.
Step 3: Slowly bend your elbows and pull your shoulder blades together on the bench, lowering the dumbbells until they are close to the sides of your chest.
Step 4: Pause in the stretched position, and then press the dumbbells back to the starting position.
The slight decline works the pecs with the shoulders in a centrated—or neutral—position. This balanced position permits maximal drive from your muscles, while the decline angle recruits more of the muscle fibers that connect to the sternum (targeting the lower chest). Want to load up on a chest exercise? Choose this one. It’s safer than doing flat or incline presses with heavy weight.
What Is The Best Dumbbell Chest Workout?
If you’re ready to build some serious pressing strength and size in your chest, try one of the suggested workouts below. Each is designed to suit a specific goal and experience level. If you are looking to build up your arms and chest in the same session, make sure to check out our article chest and tricep workout.
Dumbbell Chest Workout For Beginners
If you’re fairly new to the iron game and are looking for some basic dumbbell chest exercise, start with this simple, two-move chest workout with dumbbells. You can do it as part of a full-body workout or upper-body day. On the pushup, perform each rep at a deliberate pace, stopping before you reach failure on your first set. On the final effort, get as many reps as you can. Then hit the second move, leaving a couple of reps in the tank on all your sets. Perform this workout up to three times a week on nonconsecutive days.
1. Pushup
Sets:2 Reps: Stop two reps shy of failure on the first set; last set, as many reps as possible
Step 1: Place your hands on the floor, or on a stable elevated surface (a bench, box, or table work well—the higher the surface the easier the exercise). Set them slightly wider than shoulder width and do the same with your feet. Your arms should be locked out and your body straight from your heels to the top of your head. Tuck your tailbone under, brace your core, and squeeze your glutes, so your pelvis is perpendicular to the floor.
Step 2: Keeping your body straight and your head in a neutral position, simultaneously bend your arms and retract your shoulder blades until your chest is just above the floor—or as far as you can go without losing good form.
Step 3: Press back up, spreading your shoulder blades at the top of the movement. (Think of yourself as pushing through the floor.)
2. Incline Fly-Press
Sets:2–3 Reps:12–15
See the directions above.
Dumbbell Chest Workout For Intermediates
If you’ve been hitting the weights consistently for at least six months, this trifecta of pec punishers will nudge you up another level. Use it in place of the chest day you were doing, or add it to your program for extra work (spaced out a few days from any other chest work you do). Rest about 2 minutes between sets of the first move, 60 seconds between sets of the second, and 30–45 seconds between sets of the third.On each exercise, choose weights that allow you to complete the lowest number of reps listed. Over time, work up to completing the highest number of reps listed for every set before increasing the weight. Perform this chest dumbbell workout twice a week on nonconsecutive days.
1. Slight-Incline Dumbbell Press
Sets: 4–5Reps: 4–6
See the directions above.
2. Press-Fly
Sets: 2–3 Reps:8–12
See the directions above.
3. 45-Degree Dumbbell Floor Press
Sets: 1–2 Reps: 15–20
See the directions above.This exercise is easily performed in the comfort of your home, and you can discover more home-suitable exercises by reading our article about chest workouts at home.
Advanced Dumbbell Chest Workout
Ready to sear your chest? This workout will do it. Use it in place of your current chest day and limit any other chest training you do in the same week to ensure recovery. Load up on the decline presses—they’re a serious strength builder—and use progressively lighter weights as the workout goes on and fatigue sets in. Finish with two sets of old-fashioned pushups, which will feel shockingly difficult after the other moves.
1. Feet Up, Slight-Decline Dumbbell Bench Press
Sets:4-5 Reps: 3–5
See the directions above.
2. Incline Fly-Press Hybrid
Sets: 3–4 Reps:6–10
See the directions above.
3. Crush Press
Sets:2–3 Reps: 12–15
See the directions above.
4. Pushup
Sets: 2 Reps:As many reps as possible
See the directions above. If you can do more than 20 reps, wrap an elastic exercise band around your back and grasp an end in each hand for extra resistance. If you want info on how to maximize gains with the crush press, check out our article on the dumbbell hex press exercise (the same movement by a different name).
How To Stretch Before A Dumbbell Chest Workout?
We know you’re anxious to get to the gym and start trying all these moves out… but before you start training your pecs, please make sure to warm up your chest, shoulders, and elbows. These chest warm up exercises from Onnit’s former Chief Fitness Officer, John Wolf, will help you prepare properly for the chest workouts that follow. (See the video above.)
What Are The Benefits of Working Out My Chest With Dumbbells?
“The second you put two weights into your hands, it becomes doubly hard to stabilize them,” says Dr. John Rusin, a strength and conditioning coach and author ofFunctional Hypertrophy Training(available atdrjohnrusin.com). That’s a good thing, he says: the smaller muscles in your shoulder joints learn to stabilize those joints, while the big muscles (the pecs, mainly) work harder to control the weights, preventing them from drifting in all directions. Dumbbell training offers the following benefits for chest gains.
#1. Dumbbells Allow a Greater Range of Motion
When you perform bench presses with a barbell, the bar hits your chest before your pectoral muscles achieve a full stretch. That’s not so bad if your goal is to press the biggest weight you can. But if you want to gain size and athletic performance, you may be better off with dumbbells, which allow you to lower the weights past chest level—maximally stretching the pecs and activating more muscle fibers. Astudyfrom theJournal of Strength and Conditioning Researchsuggests that larger ranges of motion lead to more muscle growth.
#2. Dumbbells Build More Stability
Yes, they’re harder to control than a barbell or machine handle, but that’s kind of the point. Your arms may shake a bit when you’re doing a dumbbell bench press or flye for the first time, or the first time in a long time, but that’s because your muscles are learning to stabilize your shoulder joints while they’re producing force. This is helpful for making you functionally stronger in the long run, so your muscles can produce force under various conditions—not just when the object they’re pushing against is perfectly balanced or moving in a straight line.
#3. Dumbbells Place Less Stress on Your Joints.
Funny thing about the human body: it only looks symmetrical. In fact, your shoulders, hips, wrists and other joints are all slightly different from one side to the other. So, when you force the body to move with perfect symmetry—as when you lower an evenly-weighted bar directly to the middle of your chest—one side will always take on a little more of the stress than the other. Do this often enough, and the joints on that side will start to complain.
Dumbbells allow both sides of your body to find their optimal path when performing an exercise. Your wrists are free to rotate, and your elbows and shoulders can travel along the path that’s most comfortable for them, essentially customizing the exercise for your body. That places the stress of the exercise right where it belongs—in your muscles, and not your joints.
#4. Dumbbells Give you Balanced Development and Strength.
This builds on our last point. You may feel like your right and left arm push with equal force on the barbell bench press, but humans are very good at compensating—throwing a little more stress onto their stronger side while favoring their weaker one. That’s not possible with dumbbells: your right and left sides have to stabilize and push with equal force—and if one side lags behind, you feel it immediately. This ensures that you never push a set farther than your weaker side can handle. Eventually, the strength on your two sides should roughly even out. And if you need extra work to bring up the weaker side, dumbbells make doing a few more reps or sets with it simple to do.
#5. Dumbbells Work the Pecs Harder.
Bench-press a pair of dumbbells and you’ll feel that the chest muscles have to contract at the top of the movement to prevent the weights from drifting outward. That’s not something you need to worry about when your hands are connected by a steel bar. A 2017studyfound that dumbbell bench presses activate the pectoralis major—the impressive slab that makes up most of the chest musculature—more effectively than both the barbell bench press and the Smith machine bench press.
#6. Dumbbells Are Safer
We all know somebody who’s gotten trapped under a barbell when he couldn’t press it back up (you probably see him in the mirror every day). When you train at home, alone, such accidents can be extremely dangerous, so dumbbells are the better equipment choice for solo chest training. If your muscles give out sooner than you expect, you can easily drop the weights to the floor and live to lift another day.
What Kind of Dumbbells Should I Buy?
If you’re tired of schlepping to the gym and are ready to build a weight room of your own at home, dumbbells should be one of your first buys. You basically have two choices in the dumbbell market:
1) Adjustable dumbbells.Plates can be added and held on with collars, or the turn of a dial or lever.
2) Fixed dumbbells.The weight is secured to the handle. This means you’ll need multiple pairs of dumbbells to cover an array of weight increments.
While fixed-weight dumbbells are inexpensive, indestructible, and have a nice old-school vibe to them (your grandfather probably had a pair), they’re not all that practical. If you work out at home, you’ll need at least three pairs (something that feels light, medium, and heavy) right off the bat, plus new ones whenever you get too strong for the old models. Over time, you’ll be tripping over dumbbells, and wondering why you didn’t shell out a little more for the adjustable type up front.
But, if you like the real-gym feel of one-piece dumbbells, and money and space are no object, it’s hard to beatCAP Barbell Rubber-Coated Hex Dumbbells, which feel great in your hands and won’t nick up your flooring if you drop them.You’ll pay about 25 bucks for a pair of 10-pounders, 60 bucks for two 25-pounders, and 110 for a pair of 45s.
With adjustable dumbbells, you’ll save money in the long run, and space right away.PowerBlocks($160 per bell for the Elite model, adjustable from 5–50 pounds in 2.5 or 5-pound increments)—are industry standard, and easy to use after some practice shifting the weight around. Known as selectorized dumbbells,the handles sit in the center of square-shaped plates, and you can load and unload them quickly with the flip of a lever.Try a pair before you buy though, as some people find the handgrips a little awkward.
Another adjustable option isBowflex Selectech Dumbbells, which range in weight from 5 to 52 pounds in 2.5 or 5–pound increments. They work similarly to the PowerBlocks and they’re about as pricy (you’ll pay around 300 dollars for a pair), but are a little easier to use and feel better in your hands.
If you’re after a classic strongman feel, and don’t feel like plopping down three bills for hand weights, you can’t beat a pair ofYork Fitness Cast Iron Dumbbells.You load and unload plates with these guys like they were mini-barbells, spinning the collars into place around the ends of the threaded bars.Not as convenient as the other adjustable options, but at about $120.00 for a 5 to 45-pound pair, they’re way less expensive.
One other thing about adjustable dumbbells vs. fixed: sometimes it pays to get both. Most selectorized sets only go up to around 50 pounds, and ones that do offer more weight tend to be long and bulky and cumbersome to use.To economize space as well as cash, it’s a good idea to get a selectorized set that goes up to 50 pounds, and then fixed-weight dumbbellsfor every increment you need beyond that.
]]> https://www.onnit.com/blogs/the-edge/kettlebell-cold-war-american-vs-russian-kettlebell-swing2025-07-10T10:55:26-05:002025-08-14T17:23:46-05:00Kettlebell Cold War: American Vs. Russian Kettlebell SwingJeremy GottliebIf you follow the differentkettlebellcoaching factions out there in thefitnessworld, you might think that the U.S. and Russia are in the midst of another Cold War. Real political differences between the two nations aside, we’re talking about the conflict between the American and theRussian kettlebellswing—two versions of the basic swing exercise that kettlebellers use to build power and strength in the hips and posterior muscles.
Traditional kettlebell zealots favor the so-called Russian swing, where the weight is swung to around chest level witharmsbent, while maverick coaches argue for the version that’s perhaps become more popular in America—swinging the weight clear overhead with arms extended.
We say both have their place and that, ultimately, the argument for one at the exclusion of the other is, like so many political debates, mere propaganda. We asked Onnit Director of FitnessEducation, Shane Heins, to compare and contrast the two exercises so you can choose which side you wish to align yourself.
What’s The Difference Between The RussianKettlebell Swingand The American Kettlebell Swing
“The father of modern kettlebell training who revitalized its use in the West is Pavel Tsatsouline,” says Heins. Beginning around the turn of the century, Tsatsouline—a coach of Eastern European origin—taught and popularized kettlebell training mechanics around the U.S. Pavel primarily demonstrated the Russian version of the swing, raising the bell to between waist and chest height, because that’s the way it was traditionally taught in Russia, the kettlebell’s motherland.
Heins notes that swinging in this fashion is less challenging to learn and more accessible to most people than swinging the weight overhead (the American style), and so this technique caught on.The swing in general gained a following because it was a simple way to add power to a training program—a quality that most general population fitness seekers ignore—as well as a good way to teach hip hinging. (Most of us bend at the waist and spine when we need to learn to drive our hips back).
“As awareness of kettlebell training grew, practitioners started exploring other variations of the swing,” says Heins, “with CrossFitters promoting a swing style where the arms travel overhead.” This has since come to be known as the American swing. “Naturally, controversy ensued about which version was the safest and most effective,” says Heins, “but if you really look at them, they’re essentially the same exercise, with some minor differences that make one a better choice for some people and the other the right choice for others.” To assure you that there really shouldn’t be any bad blood between the two sides, Heins notes that Pavel—the “Russian coach”—has also taught the American swing, and featured it in his programs. Peace at last…
How To Do The Russian Kettlebell Swing
For a really intricate look at the mechanics of the Russian swing (often just called the “kettlebell swing”), see ourcomplete guide to the kettlebell swing.(Also, watch the video above, beginning at3:30.) Once you’re familiar with the concept of the swing, it really boils down to two steps.
Step 1.Stand with feet between hip and shoulder width. You can place the kettlebell on the floor in front of you if you have experience hiking the weight back into position, or you can simply begin from a standing position—either are OK. In both cases, once the kettlebell is in hand, soften your knees andbend your hips back and allow the kettlebell to swing back in the triangular space between your knees and your crotch.You must begin each rep with the kettlebell in this triangle—any lower than your knees and you risk back injury and improper reps. Keep a long spine from the top of your head to your tailbone as you bend at the hips, and keep your head in neutral—focusyour eyes on a spot about 10 feet in front of you on the floor.
Step 2.Drive your feet into the floor and extend your hips, tucking your pelvis under as you lock your hips and knees out and stand tall. Use your back muscles to keep your shoulders pulled down (away from your ears).Allow the power from your hips to raise the weight up to roughly chest level—don’t lift the weight with your shoulders. Your arms should stay tight to your sides at the top of the swing, but allow your elbows to bend as needed.
Take a few reps to gradually swing the kettlebell to its full height and find your rhythm.
The Russian kettlebell swing uses a shorter range of motion and doesn’t require good overhead body mechanics, so it’s ideal for using heavy weight and developing power. To be clear, you’ll be able to train heavier and build more hip extension strength and power with the Russian swing vs. the American one. Since it serves as a foundation for the American swing, it only makes sense for beginners to master the Russian version first.
How To Do The American Kettlebell Swing
The great challenge for many people when it comes to the American kettlebell swing is the overhead position. Can you raise your arms overhead without hyperextending your back? Can you get your arms vertical, or is your range of motion limited?Do you have any shoulder injuries that might make raising a weight straight overhead painful or uncomfortable?If the answer to any of the above is yes, then Heins suggests you hold off on the American swing for a bit while you work on shoulder and T-spine mobility and otherwise address any restrictions you have. Otherwise, if you’re good to go, here’s how to do it right (see10:43in the video).
Step 1.Set up exactly as you did for the Russian swing, and begin the exercise by swinging the weight back between your legs and then extending your hips.
Step 2.Instead of keeping your arms tight to your sides and bending the elbows, allow the power generated by your hips to let you drive the kettlebell overhead, extending your arms instead of holding the weight back. Let the kettlebell travel overhead—it should feel weightless as it goes vertical—and then control its descent back down.
Be careful that you keep your ribs pulled down, pelvis tucked, andcoretight. If you allow your ribs to flare, you will hyperextend your back and will lose control of the swing as it moves overhead.
Benefits of the American Kettlebell Swing
The American swing takes the kettlebell over a greater range of motion, which is more challenging to total-body stability. Your core, as well as your overhead range, will be tested.It’s a great way to build strength in the shoulders as well as mobility that supplements any kettlebell pressing movements you do,and a fun variation to employ in general once you’ve got the Russian swing under your belt. What you sacrifice in power in the American swing you can make up for in work capacity. Because the range of motion is longer and the overhead position more precarious, the American swing doesn’t lend itself to heavy loads like the Russian one does. But it can be done for high reps and short rest periods, building your conditioning.
Should I Use The Russian or American Kettlebell Swing?
In the real Cold War between the U.S and the U.S.S.R., both sides were right… or, at least, thought they were right. The conflict between the Russian and Americankettlebell swings, fortunately, is much easier to resolve. Try both, as both have their merits. If you’re a newbie tokettlebells, conquer the Russian swing. Likewise if you have shoulder troubles. But if you’re healthy and seeking a tougher conditioning workout with light weight, give the American version a go.
]]> https://www.onnit.com/blogs/the-edge/plank-jacks-how-to-do-them-why-your-workout-needs-them2025-07-10T10:55:25-05:002025-08-15T07:43:54-05:00Plank Jacks: How To Do Them & Why Your Workout Needs ThemJeremy GottliebAplank jack sounds like something you might find in aisle 33 at Home Depot, but it’s actually a potent exercise that’s becoming increasingly popular inHIIT,core, and circuit training classes. It’s time you found out how to do a plank jack, the muscles it works, and how you can fit it into your workouts for better core strength and greater conditioning.
What is a Plank Jack?
The plank jack is a combination of two very common exercises: the plank and (big surprise) the jumping jack. You get on all fours in a plank position, and then hop your feet outward and inward while trying to keep your spine and pelvis aligned. The plank jack first started to hit the pages offitnessmagazines in 2014, when it was offered up as a more advanced alternative to the standard plank—a longtime staple of core workouts because of the total-body stability it demands.
Celebrity trainers like Tracy Anderson, Anna Kaiser, and Erin Oprea started including plank jacks in their programming for ab/core workouts, and that catapulted the humble plank jack into the fitness mainstream. Whether you train at a big box gym, a boutique studio, or work out at home with a fitness plan you found online, you’re likely to come across the plank jack.
What are the Benefits of Doing Plank Jacks?
Plank jacks are similar to themountain climberexercise, in that you try to stabilize the hips and spine while moving the lower limbs. Because pretty much the whole body is active, there’s a great demand placed on your heart, so plank jacks build cardio capacity while also developing strength and stability.“Plank jacks get your heart rate up quickly, and are lower-impact than exercises like high-knees or burpees,”says Carmen Morgan, a Houston-based trainer (@mytrainercarmenon Instagram). “So they’re suitable for a wide range of clients. The hopping component of the exercise allows you to feel your core engage more than when doing a regular plank, and most people seem to enjoy the plank jack more, too.”
What Muscles Do Plank Jacks Use?
Plank jacks require some muscles to maintain the isometric hold of the plank while asking others to generate motion in the hips and legs. First, they call the internal and external obliques, rectus abdominis, transversus abdominis, and other core muscles into action to keep your body straight. On the other side of the body, plank jacks activate the muscles of the posterior chain to help you remain stable.These include thehamstrings, glutes, spinal erectors, rhomboids, rear delts, and lats.Since you’re elevated off the floor, plank jacks activate the forearms,biceps, triceps, front deltoids, and pecs to help you retain a stable plank position.
Then there’s the dynamic portion of the exercise. Your abductors pull your legs away from you when you hop, and the adductors draw them back toward your midline as you return to the starting position. Meanwhile, the calves (gastrocnemius and soleus) and quads also contribute to the explosive hop.
Wow¦ that’s quite the list, isn’t it? If you thought the plank jack was a basic bodyweight movement, you can see that there’s a lot more to it. It may be used to target the core, primarily, but it’s really a total-body exercise.
How To Do a Plank Jack
Carmen Morgan demonstrates the plank jack
Step 1.Kneel down on the floor and place your hands on the floor. Bend your elbows so that your forearms rest on the floor. Your elbows should be directly beneath your shoulders.
Step 2.Extend your legs behind you and tuck your tailbone slightly so that your pelvis is perpendicular to the floor. Squeeze your glutes and brace your core. Your body should be in a straight line, your back flat.Focusyour eyes on the floor.
Step 3.Keeping your body in a straight line, slightly bend at the knees and hop both feet out to the sides as if doing a jumping jack.
Step 4.Land on your toes, allowing your knees to bend slightly again, and then hop your legs back to the starting position.
The movement should look like a jumping jack performed from a plank position.Make sure you keep your belly button pulled in (core engaged) so you don’t let your hips drop.“That will prevent you from feeling all the bouncing in your lower back,” says Morgan.
Also, be careful not to move your feet out too wide with each hop. Morgan adds that, “Some people go a lot wider than is needed, which means they move slower and do fewer reps than they’re capable of.” Instead, hop your feet out just three or four inches from the starting position.
How Many Reps Should I Do?
Morgan advises performing reps for 20 seconds at a time, because “most people get gassed pretty quickly doing plank jacks.” The longer your set goes, the more likely you’ll fatigue and break form, and sloppy plank jacks where your hips bounce up and down aren’t good for anything.
When programming forHIIT workoutsor bootcamps, Morgan usually includes three to four sets of plank jacks, and only prescribes them once her clients have thoroughly warmed up. “If you’re pushed for time and want to do a quick workout at home,” says Morgan,“you could do three sets of plank jacks by themselves to get your heart rate upand challenge your core strength.”
If you want to do plank jacks as part of a fat-loss circuit, Morgan typically sandwiches the exercise between renegade rows and floor presses. “It’s a quick and easy transition into and out of plank jacks when you combine them with other floor-based exercises,” she says. You can also use plank jacks as a finisher. Morgan often pairs them with regular planks. Try ending your workout with a superset in which you do 10 seconds of plank jacks followed immediately by 20 seconds of a plank hold. Rest 30–60 seconds, and repeat for three rounds.
Alternatives to the Plank Jack
Like all good exercises, the plank jack can be modified based on your experience level. The following are options you can use to regress or progress the plank jack as needed.
Regression
Can’t do a full plank jack? Don’t despair. Just work on mastering the regular stationary plank, which will help you improve head-to-toe stability before adding in the dynamic movement component.Perform three sets, holding the position as long as you can.When you can hold one set of the plank for two minutes, you should have ample stability to move on to a tougher plank variation.
When you’re ready to add a little motion to your plank,start with the plank jack toe tap (see the video below).While in the plank position, slowly move your right leg out to the side by a couple of inches and, as the name suggests, tap your toes lightly on the floor. Pull your leg back to the starting position and then repeat on the other side. Continue for 20 seconds, rest for a minute, and then do another set. Do this twice a week until it feels comfortable, and then try the full plank jack.
Plank tap
Progression
As you become more confident in and competent with the plank jack, you can increase your speed, the length of your sets, or do it in conjunction with other exercises, such as pullups, pushups, or jumping rope, as well as the movements Morgan suggested earlier.
If you want another exercise that combines a similar level of stability and motion, you can perform mountain climbers, particularly thehip-opening version, to improve your mobility.
]]> https://www.onnit.com/blogs/the-edge/a-beginner-s-guide-to-the-bench-press2025-07-10T10:55:25-05:002025-08-15T07:13:30-05:00A Beginner’s Guide to the Bench PressJeremy GottliebThe Bench Press is acore movement that will hammer you in commercial gyms every Monday across America. Don’t get me wrong, it is a great tool for building muscle in your chest,arms, and shoulders. As well as being a movement you have in your tool box. But, it should not take up the majority of your training.
Everyone should bench, just like everyone shouldsquatand deadlift (or at least know how to).
So, let’s talk about how to increase strength safely with your bench press.
Numero Uno¦warm up. Please, please, please don’t walk in to the gym, put a plate on either side of the bar and start benching.
Push ups, pull ups, dumbbell bench, or dumbbell flys are just a few examples of exercises you can do to warm up.
You might get away with not warming up for a while, but eventually it will catch up with you.
How to Set Up the Bench Press
1. Grab the bar shoulder width to just outside. Close grip and wide grip are good exercises to use in addition to a standard bench press, but shoulder width to just outside will put you in a strong position. This position will help to protect your shoulders, pecs, andbiceptendons.
2. Squeeze the bar as tight as you can.
3. Position your eyes just underneath the bar.
4. Squeeze your shoulder blades back and down, or “put them in your back pockets.” Imagine you are trying to pinch the bench between your shoulder blades. This will protect your shoulders and lock in your technique (making you stronger).
5. Arch your back. No, it is not bad for your back. Your spine has a natural curve in it. Keep it that way and use it to connect your legs to your upper body.
6. Either tuck your legs or leave them out in front of you. But the goal is to get your hips higher than your knees so you can transfer leg drive into the bar to help you bench more weight.
7. Take a big breath, filling your belly just like the squat, squeeze the bar and unrack it WITH THE HELP OF A SPOTTER. Have you ever dropped 100lbs on your throat or your face? Don’t be a dummy. The best lifters in the world use spotters.
8. Let the bar settle. Keep your shoulder blades squeezed tightly. Flex your lats like you’re doing a pull up. Begin the eccentric (downward) movement with your elbows at 45 degrees. Touch the bar just below your nipple line (or on the bottom of your sports bra ladies). Reverse the bar keeping your elbows in the same 45 degree position.
Again, there a lot of more technical aspects that I’ll get into in later articles, but these are the basics. If you can do this, you’re better than 90% of America’s gym-goers.
How do I program for the bench press? Well, you can actually follow the same rep scheme I laid out for the squat. But I’ll give you a few more examples that might pique your interest.
Beginner Bench Press Program
Sets x Reps
% of 1 rep max
Ex. 200# Bencher
Week 1
3×15
65-70-80
120-140-160
Week 2
3×3
65-75-85
130-150-170
Week 3
3×1
75-85-95
150-170-190
Week 4
3×10
50
100
Week 5
3×5
65-75-85
130-150-170
Week 6
3×3
70-80-90
140-160-180
Week 7
3×1
90-95-100
180-190-200+
Week 8
3×10
50
100
A very simple and effective program for beginners.
Advanced Bench Press Program
Sets x Reps
% of 1 rep max
Ex. 400# Bencher
Week 1
5×5
65
260
Week 2
4X4
70
280
Week 3
5×1
50
200
Week 4
5×5
70
280
Week 5
4×4
75
300
Week 6
5×1
50
200
Week 7
5×3
65-70-75-80-85
260-280-300-320-340
Week 8
5×2
60-70-80-90-95
240-280-320-360-380
Week 9
5×1
50
200
Week 10
3×1
90-95-100
360-380-400+
Similar program numbers wise, but the key difference is the incorporated deloads (weeks 3, 6 and 9). This is beneficial for a more advanced bencher who is moving heavier weights. The body needs more time to recover from the heavier loads, so the rest weeks are essential.
Photography By:Ken Hicks and Elite FTS.
]]> https://www.onnit.com/blogs/the-edge/10-rules-of-yoga-for-beginners2025-07-10T10:55:25-05:002025-08-15T07:07:55-05:0010 Rules of Yoga for BeginnersJeremy GottliebIf doing yoga is your new goal, but you don’t know where to start…fear not, we got you covered. Here are 10 yoga tips for every beginner to help you get started towards yourfitnessgoals!
No need to be flexible or even warm-up before class! The purpose of yoga is not to do all those fancy, pretzel-like poses. The purpose is to breathe and find the edge – not tojumpoff of it.
Yoga Rule #2: Bring a Yoga Mat
A non-skid, yoga mat that is at least the length of your body and preferably a foot wider than your shoulder girdle.
Yoga Rule #3: Wear Comfortable clothing
Comfortable clothing you can move in. From sweats to shorts and t-shirts, make sure your clothes won’t get in the way and offer the most mobility. You’ll sweat for sure, so synthetics are generally the best bet.
Yoga Rule #4: Show Up to Class!
Sweaty classes at Black Swan Yoga are great to start with because the standard sequence will not only work and release your entire body but will allow you to benchmark your progress as well.
Yoga Rule #5: Embrace Bare Feet
Yes! Many beginning yogis come to their mats wearing socks. You’ll be less stable in the standing poses with socks — so take those suckers off!
Yoga Rule #6: Power Down Your Electronics
Nothing is more embarrassing than your phone going off during opening or closing meditation.
Yoga Rule #7: Non-comparison and Non-judgment
Don’t compare yourself to other yogis in the room and don’t judge yourself for not being able to do all the poses. Take things at your own pace. Really! This isn’t a competition.
Yoga Rule #8: Bring a Sense of Humor
You may over exert yourself or completely fall out of a pose. No worries! That’s part of the process and the fun of it. Laugh it off, kick back into Child’s Pose or give it another shot.
Yoga Rule #9: Arrive on Time and Stay Until the End
Yoga is a progression, so you don’t want to miss the warmup by arriving late or skip out early and miss the most important (and yummy) pose of them all: corpse pose.
Yoga Rule #10: Stay Relaxed
The awesome, euphoric, centered feeling you’ll experience at the end of class. Wanna know what brings people back to the mat time and time again? It’s the sense of lightness, presence and ease one feels after a good class. There ain’t nothin’ like it!
]]> https://www.onnit.com/blogs/the-edge/the-best-kettlebell-arm-exercises-and-workout-to-get-strong2025-07-10T10:55:25-05:002025-08-15T07:27:58-05:00The Best Kettlebell Arm Exercises and Workout to Get StrongJeremy GottliebThekettlebellis renowned for its ability to work the whole body. When you lift a kettlebell, you can’t help but train your grip,core, and dozens of other muscles with virtually any move you perform. Want bigarms? You’re better off using dumbbells, isolation exercises, and machines¦ right?
Not so fast. While training withkettlebellswon’t target thearmmuscles as directly as those other methods, they offer some pretty cool benefits that you can’t replicate without them. Let us show you how to use kettlebells to get biggerbiceps, triceps, and forearms while you build total-body strength and conditioning, improve athleticism and mobility, and more.
Benefits of Using Kettlebells To Work Out Your Arms
Kettlebells lend themselves to combination lifts—a blend of two or more exercises that flow into one another. For example, doing a curl into a shoulder halo, or a triceps extension into a pullover while maintaining a hollow-body position (both are featured in the workout below).Combo lifts like these emphasize the arms but allow you to train numerous other muscles and movements too,making the kettlebell a very multi-functional tool. In other words, you’ll get an arm pump with these exercises, but you’ll also build strength and movement skills that carry over to sports you may like to play and other training you enjoy.
Kettlebells also force you to squeeze the handle (or sometimes the bell itself) hard to hold on and keep control of the movement.This is a phenomenon that strength coaches call irradiation,where your gripping starts a chain reaction that creates tightness throughout the body. All this tension lights up lots of muscles, encouraging you to keep your form tight to prevent injury and build total-body strength.
How To Stretch Your Arms Before Working Out
Perform the mobility routine from Onnit Coach Eric Leija (@primal.swoledier)—featured at00:30in the video above—before you do the arm workout below. It will warm up your shoulders, elbows, and wrists, improving flexibility and preparing you for the training ahead.
Perform the exercises in sequence (a circuit), doing reps of each for 30–60 seconds.Repeat for up to 4 total circuits,depending on how much warming up you feel you need. If you’re coming off some injuries and your joints feel cranky, do more circuits. If you’re short on time and have healthy joints, you can get away with a shorter warmup.
Get Strong Arms With This Balanced Kettlebell Arm Workout
Leija put together the following arm routine. You’ll need at least two light kettlebells (8 kilos or less) and one heavier one (16–20kg) to do it, and it should be done once per week, separate from your other upper-body training.
The exercises are grouped in pairs, marked A and B. Perform a set of A and then B before resting (called a superset), and then rest 2–3 minutes. Repeat until 3 sets are complete for each exercise in the pair, and then go on to the next pair. Perform 8–12 reps for each exercise.
The first exercise in the routine really illustrates the principle of irradiation discussed above. “Smashing the bell between your hands activates the biceps, lats, and pecs,” says Leija, so you work your arms while giving some extra attention to the bigger muscles they support on your other exercises. “Crush the bell like it’s a tomato can.”
Step 1.Hold a moderate-weight kettlebell by the bell itself with both hands and squeeze it between your palms as hard as you can. Keep this tension throughout the exercise.
Step 2.Keeping a long line from your head to your tailbone, bend your hips back until your torso is nearly parallel to the floor.
Step 3.Row the kettlebell toward your belly until your elbows are at your sides, retracting your shoulder blades and pulling them together. Lower the weight back down until your arms are straight again, making sure to maintain the squeeze the whole time.
The pullover works the lats and triceps, but doing it from a crunch position, says Leija, adds a little extra range of motion, since the floor isn’t there to stop the kettlebell when you lower it behind your head. You’ll feel this move all through your upper body and deep in your core.
Step 1.Lie on your back on the floor. Extend your legs in front of you, and dig your heels into the floor. Crunch your shoulders off the floor and hold the position, keeping your ribs drawn down toward your hips. Grasp the kettlebell by its bell end and reach your arms overhead and bend your elbows so that the weight is held just above the floor behind you. As you did with the row above, squeeze the kettlebell hard between your hands.
Step 2.Extend your elbows to lockout, and then pull the weight over your chest. Lower the kettlebell to your chest with your elbows close to your sides, and then press it back up. Reach your arms behind you again, and bend your elbows to begin the next rep.
“This move isolates the biceps and pumps up the shoulders, but it and also works mobility,” says Leija.
Step 1.Hold the kettlebell by its horns in front of your chest with your elbows tight to your sides.
Step 2.Slowly extend your elbows to lower the weight until your arms are straight. Then curl the weight back to your chest.
Step 3.Raise the weight up and around the back of your head in a circular motion, keeping the kettlebell close and your elbows in as tight as you can. Lower the weight down, curl again, and perfom the halo in the opposite direction. Each curl to halo counts as one rep.
Any press will work your triceps, but trying to keep the bell from toppling over makes the bottom’s up press a real killer for the forearms/gripping muscles too. It also challenges shoulder stability, which can translate to stronger pressing with heavier, more conventional press exercises down the line. Leija says that, once you’ve mastered this move from the half-kneeling position, you’re welcome to try it standing for an even greater stability test.
Step 1.Get into a lunge position and lower your body to the floor. Both knees should be bent 90 degrees and your hips should be level with the floor. Hold a light kettlebell by its handle on the same side as the downed knee, and lift it to shoulder level upside down, so the bell end is facing the ceiling.
Step 2.Move your elbow away from your body about 45 degrees and press the weight overhead slowly—take two full seconds. Control it on the way down (another 2 seconds). You’ll have to squeeze the handle hard to maintain control of the kettlebell.
Sure, you could just do close-grip pushups on the floor and get a hell of a triceps and chest hit, but doing them on a kettlebell demands more of your shoulders and core to keep you stable.
Step 1.Place a kettlebell on the floor and tilt it over so the handle digs into the floor and provides some stability. Res your hands on the bell and extend your legs behind you to get into pushup position. Your body should form a long, straight line. Brace your core.
Step 2.Lower your body until your chest is just above the kettlebell, tucking your elbows close to your sides as you descend. Squeeze your shoulder blades together as you go down, and then spread them apart as you press yourself back up.
To make the exercise harder, bring your feet closer together. To make it easier, widen your stance.
Trying to keep your wrists straight on these is a workout all by itself, and it will strengthen both sides of your forearms. “The way the weight is distributed with the kettlebell,” says Leija, “it’s a long lever. The weight is further away from the handle than it is when you use a dumbbell. So it’s going to feel a lot heavier. Go light on these.” Eight- or even six-kilo kettlebells will be fine for most people.
Step 1.Grasp two light kettlebells by their handles and squeeze hard. Keeping your elbows close to your sides, curl the weights up.
Step 2.At the top, turn your palms over to face the floor, and lower the bells back down slowly. Rotate your palms forward again to begin the next rep.
How Often Should You Train Your Arms?
The triceps are involved in any pushing or pressing exercises you do. The biceps are recruited on every pulling or rowing move, and the forearm muscles can’t escape working whenever you grip and carry anything—so, chances are, your arms are getting plenty of muscle-building stimulus as it is, if you’re following a balanced strength program.One day of more direct arm training, such as the routine outlined here, is a good adjunct for boosting your arm volumewhile giving a little extra attention to all the other upper-body muscles. To make a long story short, as long as your other workout days feature some kind of pushing and pulling, you only need one focused arm workout per week.
]]> https://www.onnit.com/blogs/the-edge/6-kettlebell-exercises-to-build-muscle2025-07-10T10:55:25-05:002025-08-15T07:00:31-05:006 Kettlebell Exercises to Build MuscleJeremy GottliebDeadlifts,squats, presses, and pulls – these are the staples of anymuscle buildingprogram, and I am not here to argue that.
All of these fundamental movements can be transitioned from barbell exercises tokettlebell exercises.
These were all valid questions over a decade ago when kettlebells were first introduced, but get with the times my friends. The same principles of bilateral training with a barbell can be implemented with a heavy pair of kettlebells, and I mean heavy.
The following 6kettlebell exerciseswill have you packing on the muscle in no time:
The DoubleKettlebell Cleanand Press is a powerful exercise that combines both upper and lower body strength and power. The clean and press is a complete workout hitting nearly every muscle in the body, generating full body tension. This is one of the best strength exercises available yielding phenomenal results. Performing clean and presses with a heavy pair of kettlebells takes pressure off the wrists usually found when performed with a barbell.
The Double Floor Press combines a shoulder andchest workoutalong with yourcore. Using kettlebells for the exercise provides a unique challenge. This is a greatchest exercisefor those with shoulder issues, since you are only going as low as the floor rather than below as in normal benching, it takes a lot of strain off the rotator cuff. Because there is a little twist at the top yourabsreceive some attention as well. Use this exercise if you want to build some massive upper body strength!
An excellent upper-body pulling movement; the double bent over row will build strength in the back andbicepsmuscles. Pulling exercises are a necessity to ensure balance for the upper body. There is an alliance between pulling and pressing muscles. The better you get at pulling, the stronger your pressing will be andvice versa.
To avoid looking like a rec-room hero you need to work the legs. Even if you don’t care about leg development, lower body training will help upper body development through a greater release of growth hormone. The Double Front Squat is one of the best core and leg strengtheners out there. You not only get the benefit of stronger legs, but your shoulders will be given a fantastic workout as well. Simply holding the kettlebells in place is taxing on your shoulders, upper back,arms, and core.
Balance is key when building muscle and you need to balance the quad growth from the squats with somehamstringexercises. The DoubleKettlebell Swingis the brutal distillation of everything kettlebell training is about: power, explosiveness, flexibility and lung searing cardio. The double kettlebell swing will hit your lower back, glutes, andhamstrings, strengthening the entire posterior chain. Double swings are great progression that can be used to increase your strength and power.
The core connects the lower body to the upper body and if your midsection is weak, everything is weak. The Turkish Get Up is great core exercise that also had tremendous benefits to your pressing ability. Throughout the entire movement your core is being worked. To the same degree, the shoulder is being used to maintain that overhead position. Since you go through a wide range of positions, you’re flexibility and mobility are challenged giving you a far greater exercise.
Heavy kettlebells are bells you can only do a few reps with. Start with low reps to get used to the heavier kettlebells. Make each rep perfect. Once that gets easy, start building the reps. When you can start completing the lifts for 8-10 reps, increase weight.
A1:Double Kettlebell Clean and Press – 5 rounds x 5 reps
B2:Double Kettlebell Floor Press – 5 rounds x 5 reps B3:Double Kettlebell Bent Over Row – 5 rounds x 5 reps
C1:Double Kettlebell Front Squat – 5 rounds x 5 reps C2:DoubleKettlebell Swings– 5 rounds x 5 reps
D1:Turkish Get-Ups – 5 rounds x 3 reps (each side)
]]> https://www.onnit.com/blogs/the-edge/4-essential-resistance-band-exercises-for-increased-mobility2025-07-10T10:55:25-05:002025-08-14T18:04:16-05:004 Essential Resistance Band Exercises for Increased MobilityJeremy GottliebAt first glance, resistance band exercises may seem remedial to the average trainee, something used only by those who are recovering from injuries or new to working out.
Resistance band movements seem simple and the amount of resistance generated may seem like it does nothing to add strength, muscle, or the ability to increase your athletic performance.
Resistance band movements seem simple and the amount of resistance generated may seem like it does nothing to add strength, muscle, or the ability to increase your athletic performance.
However, before writing off this seemingly trivial piece of equipment, adding some resistance band exercises to your training protocol might be the exact thing you need to increase your mobility and correctly activate some dormant muscles.
In this article, I will give you my 4 essential resistance band exercises and how to add them into your current training program without making it look like you are taking an exercise class at the local senior center.
The nice thing about resistance band exercises is that they are easy to execute and you can perform countless reps without taxing your body. However, because of the general ease of movement and the moderate resistance compared to traditional strength exercises, it is easy to use resistance bands sub-optimally.
When working with resistance bands, it is crucial to execute the exercises slowly and controlled through the largest range of motion (ROM) possible. The most common mistake I see are trainees pulling a resistance band to forcefully in the concentric motion and letting the band snap back during the eccentric portion.
Doing the exercises in this manner will not activate or strengthen the stabilizing muscles of the movement; it will actually limit the potential increase in mobility of the joint you are trying to train.
When performing any of the exercises below you will get the most out of the movements by maintaining correct posture throughout the exercise, moving slowly, and keeping constant tension on the resistance band. It is important to concentrate on how your body is responding during the movement to see if you are activating the correct muscles while increasing your ROM.
It is best to perform these movements as a part of a dynamic warm-up. After your usual mobility warm-up, a few sets of resistance band exercises, focusing on the muscles and joints you are using for your main workout, can warm up the muscles and get the joints fine tuned.
One other way to perform these exercises is in between your main lift as an active recovery set. For example, after you finish your set ofsquatsthrow in 15 reps of Resistance Band Front Pull Aparts as you rest.
Resistance Band Exercise #1: Front Pull Aparts
Onnit recently posted an article by Joe DeFranco about Resistance Band Front Pull Aparts and I first learned this great exercise from him years ago. Resistance Band Front Pull Aparts are a staple in my training as well as in my athletes’ programs. This exercise is particularly easy to fall into thetrapsmentioned above by thinking it is easy.
This mindset will not allow you to get the most out of the movement. However, if done properly, Resistance Band Front Pull Aparts are one of the best ways to improve scapular mobility and strength in the back and shoulder muscles.
Set up with a resistance band in front of you, wrists as straight as possible, shoulder blades and rib cage down. When you draw the resistance band towards your body maintain a neutral posture throughout the exercise, and use your back to perform the exercise allowing your shoulder blades to move freely.
Imagine your shoulders gliding along the side of your body. Do not allow the resistance band tension to forcibly retract to the starting position, maintain your posture, and control the movement back to the beginning.
Resistance Band Exercise #2: Shoulder Flexion
Resistance Band Shoulder Flexion is my favorite resistance band movement for the upper body, because of the shoulder mobility gained through the movement.
Our daily lives constantly pull our shoulders forward. Activities such as driving, doing work on the computer, and carrying around children cause our shoulders to get pulled forward and can limit mobility, especially overhead.
Set up the resistance bands just like you do for the Front Pull Apart, and move the resistance band upwards like a front raise. Maintain your posture throughout the movement.Focuson keeping your ribcage and shoulder blades down as the resistance band gets overhead.
Stop and reset the movement if you feel your shoulders and ribcage move away from neutral posture. Also, do not try to gain more false ROM by pulling the resistance band apart; rather keep the same amount of tension on the resistance band during the movement.
Resistance Band Exercise #3: Lateral Walks
Most lower body exercises are performed in the saggital plane. While playing sports, we move in different planes and getting the hip rotator muscle to activate by training laterally is essential. Resistance Band Lateral Walks are great for activating the hip rotator muscles.
I prefer a small resistance band set up between the legs, just above the knees. If you do not have access to a small resistance band, you can use a full reistance band by placing it under the feet and holding it up with yourarms.
Keeping your foot and knee aligned take a set outward, laterally. I like to complete the step in a quarter or halfsquat, then with slow control, bring the other foot towards the first, reset, and step again.
Resistance Band Exercise #4: Knee Stabilizers
Resistance band exercises are a great way to train stability of certain joints and add some isometric tension. The resistance band tension creates a perturbation effect (vibration) which activates the muscles to contact and stabilize a joint during side to side motions that are common in sporting activities.
Use a large resistance band and set up a slip knot around a squat rack or post. Wrap the resistance band around your thigh just above the knee, and move away from theanchorso you are facing 90 degrees in either direction.
When the tension feels right, bend you knee slightly and work to maintain knee and foot alignment while your quads activate to stabilize your knee joint. I usually like to set a timer and go for about 30 seconds.
Add these resistance band exercises into your training program to work your way to better mobility and joint stability.
]]> https://www.onnit.com/blogs/the-edge/how-to-do-the-landmine-squat-hack-squats-goblet-squats-and-more2025-07-10T10:55:25-05:002025-08-15T07:09:27-05:00How To Do The Landmine Squat: Hack Squats, Goblet Squats, and MoreJeremy GottliebYou’ve heard the expression, “Thesquatis the king of all exercises,” and it usually refers to the barbell back squat. While that’s undeniably a great move for the legs, it’s not the only type of squat that will build up the thighs and give you a stronger, more explosive lower body. The landmine squat—where you load a barbell into a landmine unit and lift it like a lever in front of your body—is a very suitable substitute, and there are a few other squat variations that aren’t exactly court jesters either.
Let’s explore how to do the landmine squat for better squat technique, more quad development, and safer, user-friendly squatting in general.
What Is The Landmine Squat And What Are Its Benefits?
The landmine squat is done with the barbell in a landmine unit, which is a metal cylinder that swivels on an axis. A landmine allows you to lift the barbell in various arcing motions rather than straight up and down, letting you perform a number of exercises with a less complex squatting technique that can be easier on your joints.
In the landmine squat, the weight is held in front of your body rather than behind it, so landmine squatting resembles thefront squatas well as the goblet squat that many people do with akettlebell.Therefore, it’s sometimes called a landmine goblet squat.One big advantage of the landmine squat over the kettlebell goblet squat is that it’s more stable, and the barbell allows you to load more weight, so landminesquatsin general can be done heavier and are usually a better choice for building muscle than the goblet squat.
Like the goblet squat,the landmine squat reinforces good squatting mechanics that keep you safe—for example, sitting your hips back and keeping your chest up as you descend.If you have trouble squatting with a barbell on your back—that is, if it bothers your low back or knees, or you just can’t seem to keep form—the landmine squat can be an awesome replacement exercise. Use it to ingrain good squatting mechanics, and then go back to the barbell back squat or front squat. You’ll probably find that your technique is sharper, and you can squat deeper than before.
The landmine squat is pretty easy to perform, making it a great move for beginners, or other people who don’t have much experience squatting with load. You want the bar right up against your chest, and keep your torso as upright as possible as you squat down.
Step 1.Load a barbell into a landmine. If you don’t have a landmine unit, you can wedge the end of the bar into a corner in your gym. It won’t be quite as stable, but it should still work. Set a box or bench on the floor in front of the bar, right next to where the barbell plates will be loaded. Pick up the end of the bar and rest it on the box and load the plates you’ll use.Now you have a platform to lift the bar off, making it easier to get into positionfor the start of the exercise.
Step 2.Squat down in front of the bar and wrap your hands around the end of it. Tuck your elbows to your sides. Keeping your back straight and flat, lift the bar off the box and step away from the box if needed so it’s not in the way of your squat.You should end up standing with the bar right at your chest.(Don’t hold the bar any higher; that will make your shoulders work harder than they have to, and you’ll fatigue your upper body before your legs.)
Adjust your stance so your feet are between hip and shoulder width and your toes are turned out a few degrees. Now you’ll have to play around with your position and see what’s comfortable.You can lean forward so your weight is more on the balls of your feet, or you can stand tall—whatever allows you to squat with the deepest range of motion and good form.
Step 3.Draw your ribs down, take a deep breath into your belly, and brace yourcore. Keeping a long spine from your head to your tailbone, squat as deeply as you can, driving your knees apart so that they line up with your big toes. You should be able to go much lower than you normally could in a back squat without your heels rising off the floor or your lower back rounding.
Step 4.Extend your hips and knees to stand tall again. When you’ve finished your set, rest the weight on the box again.
Like the back squat, you can count on the landmine squat to work the following muscles:
Quadriceps (front thighs)
Glutes (butt)
Rectus abdominis, obliques (core)
Various muscles of the upper back (they act as stabilizers here)
Deltoids (shoulders, again, working to stabilize)
Spinal erectors (lower back)
The landmine squat is a perfect choice for people who want to emphasize quad gains.Because the range of motion is so great at the knee joint (greater than a hip-dominant back squat), your quads will work hard throughout each rep. It’s also ideal if you suffer from lower-back pain during back squats.Your torso stays very vertical on a landmine squat, minimizing shear forces on the lumbar.In other words, landmine squatting lets you train legs heavy and hard without undue stress on the spine.
The landmine can also be used as a substitute for the hack squat—the squat machine you see in most gyms where the weight is held behind the body and your back rests on a pad. The landmine hack squat may allow you to squat even deeper than the regular landmine squat, making it a great tool for emphasizing the quads. That said, it’s a little more awkward to set up and, for most people, will take some getting used to.
Step 1.Set up the barbell in a landmine as you did for the regular landmine squat.You don’t have to use a box to rest the bar on if you’re using light weights that you’re sure you can control,but if you do, make sure that when you squat, the bar will be clear of the platform. Wrap your hands around the bar and lift it up, turn around, and rest the bar on one shoulder.
Step 2.Play around with your foot position until you feel balanced and stable. Your feet should be between hip and shoulder-width apart and a little in front of you, and you should lean your bodyweight backward into the plate on the bar—that’s right, let the barbell support your weight just like a hack squat machine would.In this case, the bar really should be in a landmine unit. A corner alone may not provide the stability to support your body—so be smart and stay safe!
Step 3.Lower your body into the squat, going as deeply as you can without your pelvis tucking under and your lower back rounding. You should be able to get your knees almost fully flexed.
Step 4.Drive through the balls of your feet to stand back up. On your next set, switch the shoulder that the bar rests on so you don’t develop an imbalance.
How to Stretch Before Exercising
Use the following drills from Onnit-certified coach Eric Leija (@primal.swoledier) to warm up your hips and knees for strong squatting.
If you don’t have a landmine or a barbell, you can perform a goblet squat with either a kettlebell or a dumbbell. Like the landmine squat, the goblet squat is an excellent movement for learning and refining good squat technique, as it automatically forces you to squat with your chest up while driving your knees apart and sitting back into your hips.
Step 1. Hold a kettlebell in front of your chest by the sides of its handle. Draw your shoulders back and downward (think: “proud chest”), and tuck your elbows in close to the bell—try to get your forearms as vertical as you can. Stand with your feet between hip- and shoulder-width apart, and turn your toes out a bit—up to 30 degrees if you need to.
Step 2. Tuck your tailbone and draw your ribs down so that your pelvis is parallel to the floor. Take a deep breath into your belly, and brace your core. Actively twist your feet into the floor, but don’t let them move. Think of your legs as screwdrivers, or that you’re standing on grass and trying to twist it up beneath you. You should feel the arches in your feet rise and your glutes tighten, creating tension in the lower body.
Step 3. Keeping a long spine from your head to your pelvis, push your hips back and squat down, as if sitting down into a chair. Squat as low as you can while keeping your head, spine, and pelvis aligned. Push your knees apart as you descend. You should feel most of your weight on your heels to mid-foot area. If you feel your lower back beginning to round, stop there, and come back up. Keep your torso as vertical as possible—you shouldn’t have to lean forward or work extra hard to hold the bell upright. Avoid bending or twisting to either side.
Step 4. Drive through your feet as you extend your hips and knees to come up.
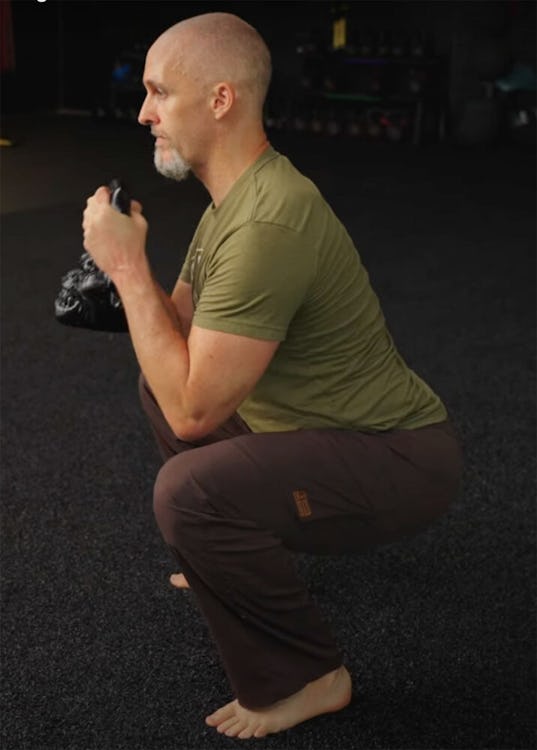
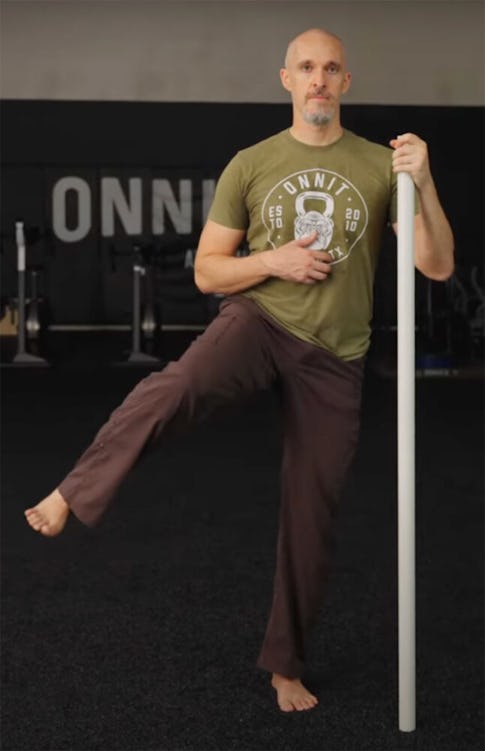
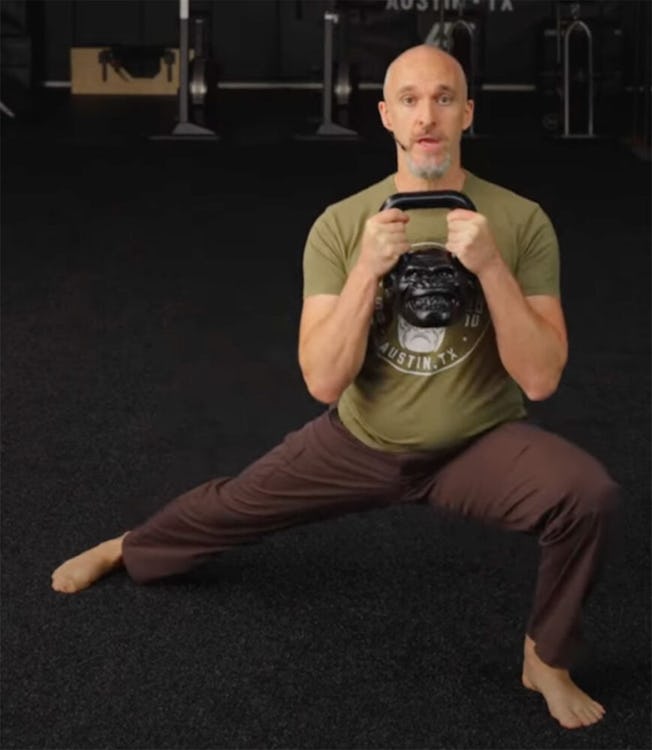
 barbell in a landmine unit can be a great solution. With a landmine squat, the load is held in front of the body the same as it is with a goblet squat, but the bar is anchored to the ground and travels on an arc. This all but guarantees that you’ll stay tall while you squat, because if you bend too far forward, the bar will poke you in the chest.
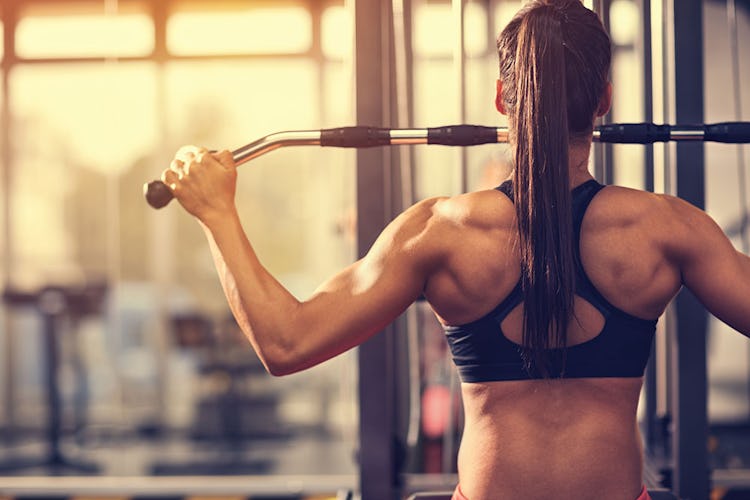
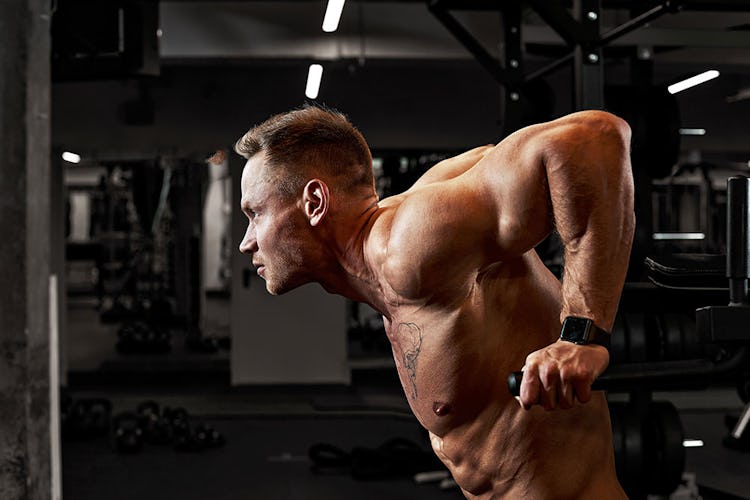
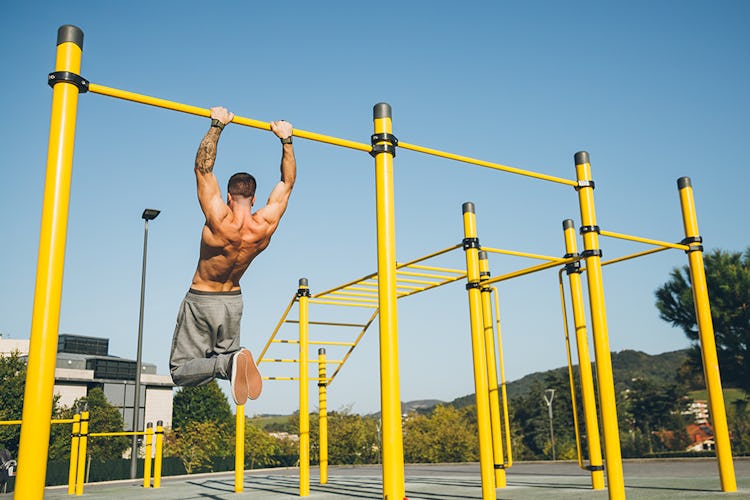
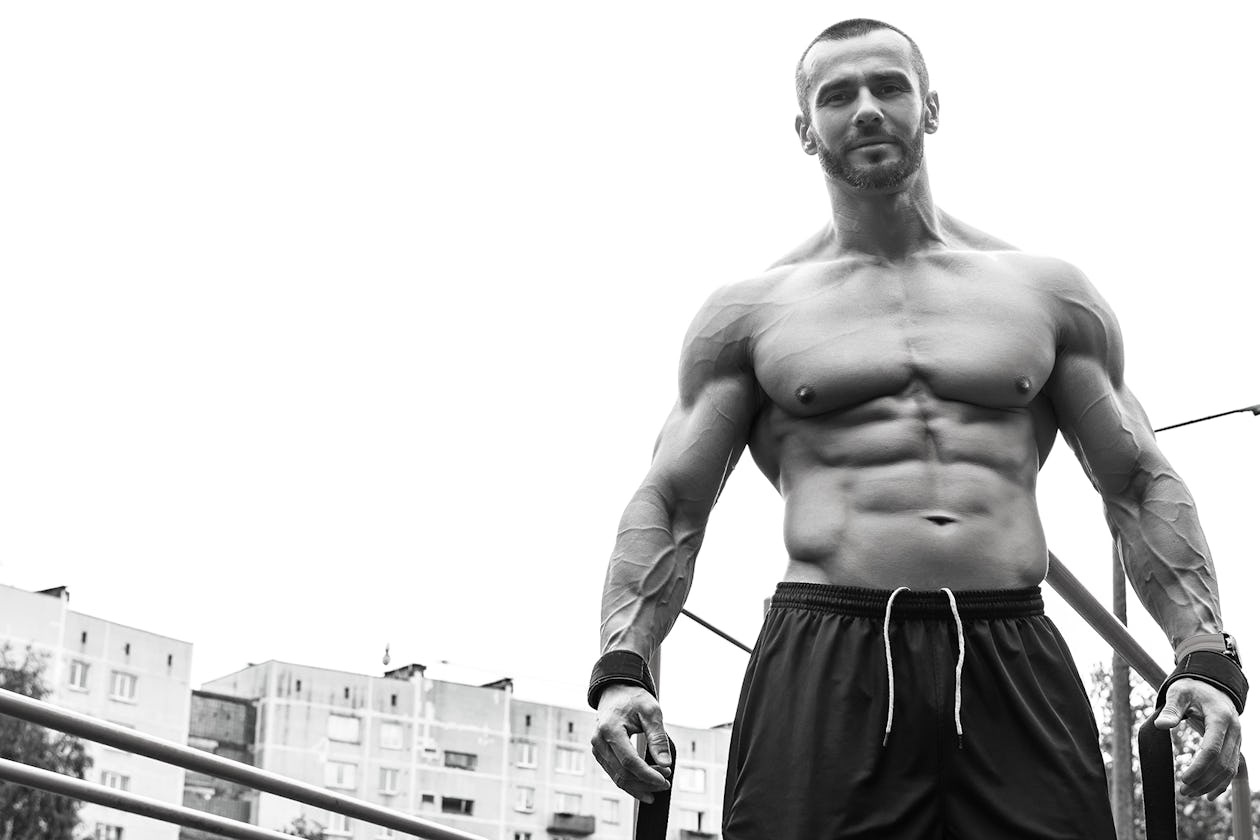
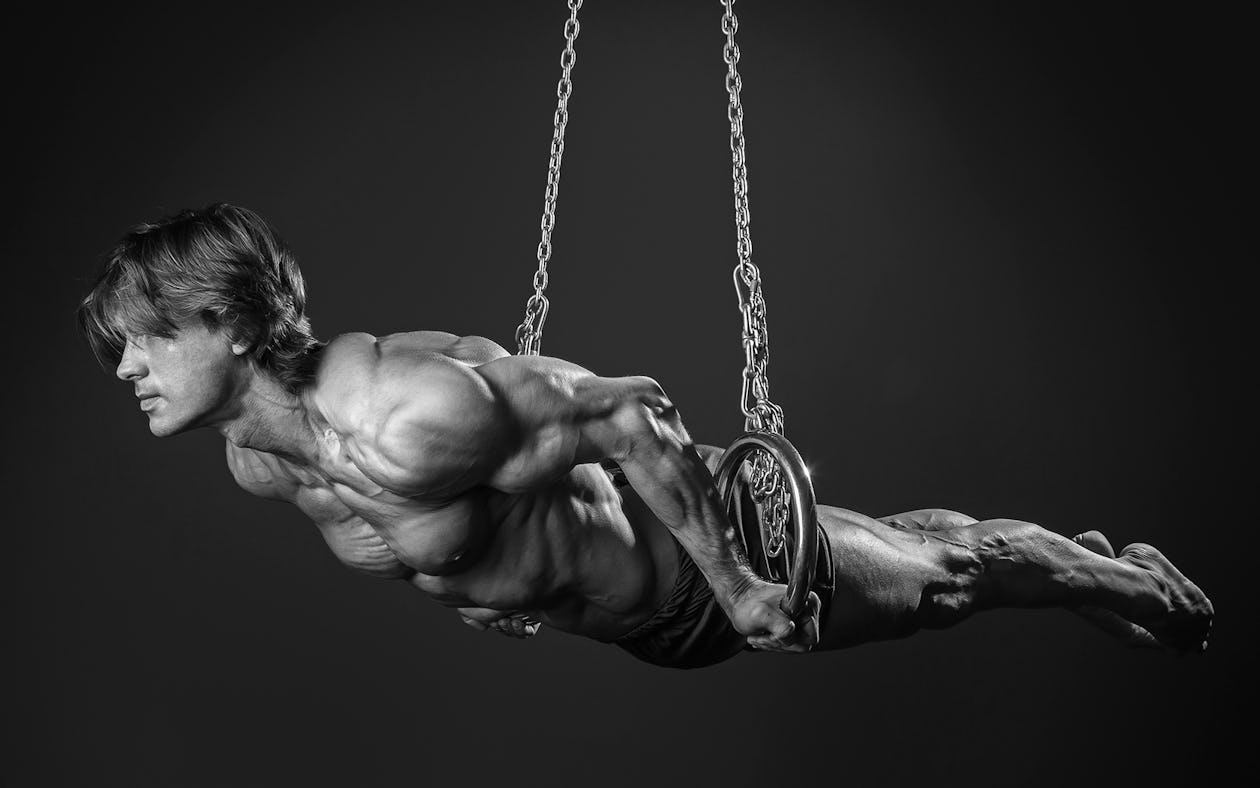
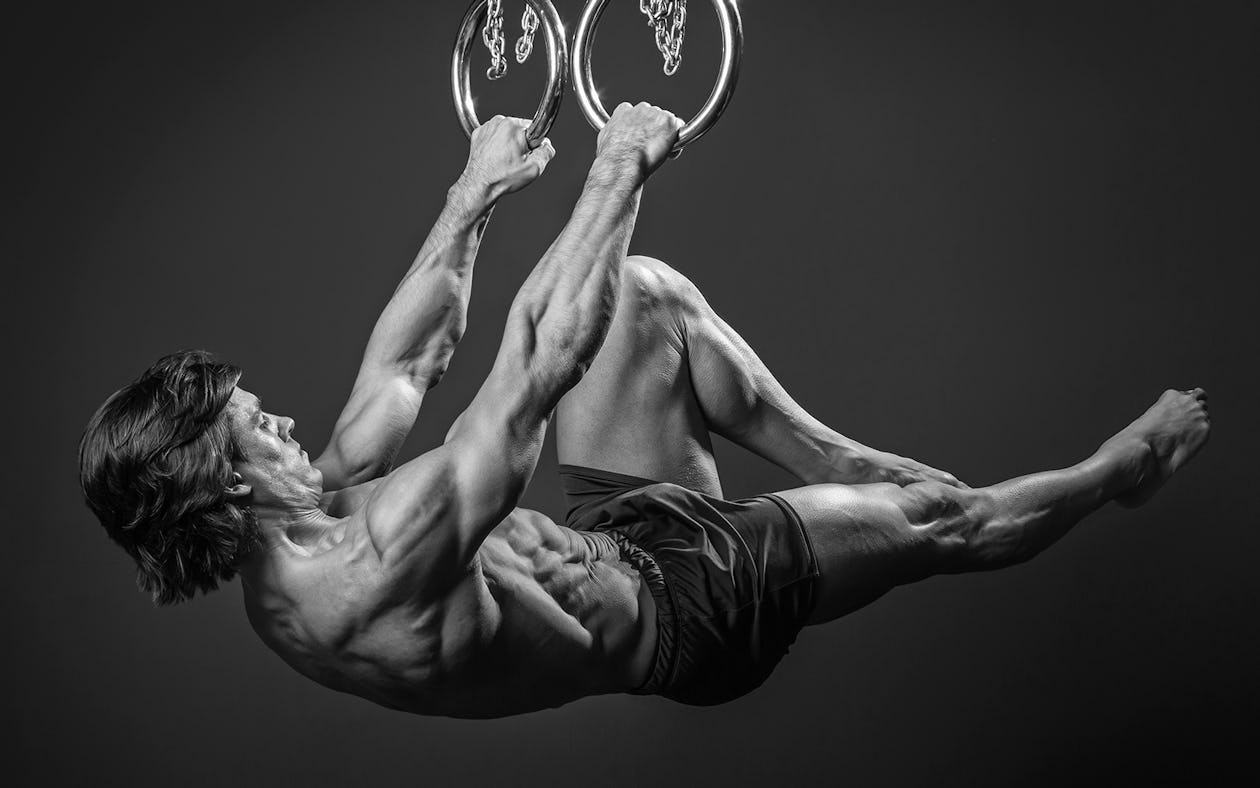
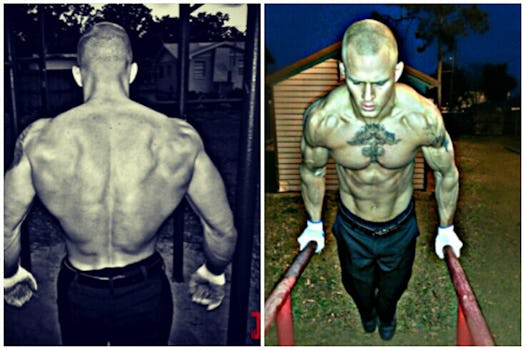


 The glute-ham raise focuses on the hamstrings, but the tension it creates on the back side of the body irradiates all the way up the chain. That means that the glutes get involved as well (as the name of the exercise would imply), along with the spinal erectors, which run from the pelvis all the way up to the neck. The ab muscles also have to work with your erectors to brace your spine, so it doesn’t flop over while you perform the raise. And