CrossFitters call it a landmine row. Bodybuilders call it a T-bar row. But this row, by any other name, would still build back muscle and strength as sweet. Use this guide to learn all the different ways to row with a landmine to build complete back and lat mass and strength.
That’s why we contacted Sam Pogue, a performance coach in Boulder, CO (follow him on Instagram, @spogue86), and asked him to come up with a back workout that doesn’t require a single chinup or bodyweight row, and can be done in a small space—safely—with only the most common household objects on hand. He didn’t disappoint us.
Check out the at-home bodyweight back workout below, and, if you have the luxury of owning a light pair of dumbbells, give the db workout he designed that follows it a try as well. Either way, you’ll discover for yourself that you don’t need heavy weight or a gym or build a muscular, injury-resistant back.

How To Stretch Before Working Your Back
Use the following warmup drills to mobilize your back before training.
At–Home Bodyweight Back Workout
This workout makes use of slow tempos and isometric holds. That is, you’ll often control the eccentric (negative) portion of each rep and pause at certain points in the exercise’s range of motion. This creates more tension in the muscles than powering through your reps with momentum (as most people do), which leads to more fatigue and growth stimulus. It also reinforces good technique. You have to be mindful and intentional of every movement you do. As a result, you’ll gain stability and control over your shoulders, back, and core, which will have carryover to any training you may do in the future. Don’t be surprised if you see your posture improve as well. A stronger back retracts the shoulders naturally, which automatically makes your chest look bigger, and contributes to an overall more confident-looking appearance.
Directions: Perform the exercises as straight sets, completing all the prescribed sets for one movement before moving on to the next.
1 Wide-Grip Pushup With Tempo
Sets: 5 Reps: 5 Rest: 75–90 sec.
Step 1. Get into pushup position with your hands outside shoulder width. Tuck your pelvis slightly so that your hips are perpendicular to the floor. Your body should form a straight line from your head to your feet. Brace your core.
Step 2. Take 5 seconds to lower your body. Think about actively pulling your body toward the floor with your lats. When your chest is about an inch above the floor, hold the position with your core braced for 5 seconds.
Step 3. Take 5 seconds to push yourself back up to the starting position. That’s one rep.
2 Split-Stance Row Iso Hold with Towel
Sets: 4 Reps: Work for 20 sec. (each side) Rest: 90 sec.
Step 1. Tie a knot on one end of a towel or T-shirt and stand on that end to pin it down. Stagger your stance and grasp the free end of the towel with the hand that’s opposite the foot standing on it. Bend your hips back so that your torso forms a long line from your head to your hips. Brace your core.
Step 2. Row the towel toward your hip. It won’t move much, but pull it as hard as you can. Keep your shoulders square to the floor and create tension throughout your torso. Maintain the row and the tension for 20 seconds, and then switch arms and immediately repeat on the opposite side.
3 Off-set Bent-over Row with Broomstick
Sets: 4 Reps: 15 (each side) Rest: 60 sec
Step 1. Load a barbell, broomstick, or other long bar unevenly, so there’s some weight on one end and nothing on the other side. (Water jugs will work fine.) Grasp the bar with hands shoulder width and stand with feet shoulder-width apart. Keeping your head, spine, and pelvis in a long line, bend your hips back with soft knees until you feel a stretch in your hamstrings and your torso is nearly parallel to the floor. Draw your shoulders back and down—think: “proud chest.”
Step 2. Row the bar to your belly, being careful to keep the bar even in spite of the uneven load. When the bar touches your body, pause for 4 seconds, and then take 4 seconds to lower the bar back down. Squeeze your lats throughout the set. Complete your reps on that side, rest, and then repeat on the other side.
4 Plank Pull
Sets: 4 Reps: 30–45 sec. Rest: 60 sec.
Step 1. Get into pushup position with hands shoulder-width apart. Lower your body into the bottom of the pushup.
Step 2. Push your hips back toward your heels, and then reverse the motion, pulling your body back to the bottom of the pushup with your lats (as opposed to pushing with your legs). Stay low, and keep your body in a straight line throughout the movement, using your core to brace your body and keep your lower back flat. Perform reps for 30–45 seconds.
At-Home Back Workout With Light Dumbbells
Being limited to light weights is a great opportunity to practice stabilizing your body with unilateral exercises that knock it off balance. Throughout this workout, you’ll be fighting to keep alignment while the weight seeks to shift you out of place. Are you going to let a little old dumbbell do that to you? Especially if it’s a mere 10 or 15 pounds?
Whatever weight increments you have access to will be more than enough when you apply the techniques described here.
Directions: Perform the exercises marked A and B as supersets. So you’ll do one set of A, and then one set of B, before resting as directed. Repeat the superset until all sets are complete for both exercises. Perform the last exercise (the farmer hold) on its own.
1A Split-Stance Row
Sets: 4 Reps: 15 (each side) Rest: 0 sec.
Step 1. Hold a dumbbell in one hand and get into a split stance, as described in the split-stance row iso hold above. The hand holding the weight should be opposite of the foot that’s in front.
Step 2. Row the dumbbell to your hip, and then hold it in the top position 2 seconds. Take 4 seconds to lower it back down. Complete your reps on that side, and then switch sides and repeat.
1B Single-Leg Rear-Delt Fly
Sets: 3 Reps: 12–15 (each side) Rest: 75 sec.
Step 1. Hold a dumbbell in one hand and stand on the opposite leg. Keeping your head, spine, and pelvis in a straight line, bend your hips back until you feel a stretch in your hamstrings and your torso is nearly parallel to the floor. You can extend your free arm out to the side to help you balance.
Step 2. Raise the dumbbell out 90 degrees to your side, while drawing your shoulder down and back. Maintain your balance as you repeat the fly for reps. Afterward, repeat immediately on the opposite side.
If it’s too hard to balance, use a split stance instead, bending your rear big toe as much as possible.
2A Half-Kneeling Eccentric Press
Sets: 4 Reps: 6 (each side) Rest: 0 sec.
Step 1. Hold a dumbbell in one hand at shoulder level and get into a half-kneeling position with your rear knee on the floor. Both knees should be bent 90 degrees and your pelvis should be slightly tucked so it’s parallel to the floor. Brace your core.
Step 2. Press the weight up slowly and with full control (no momentum), and then take 10 seconds to lower it, actively pulling with your back to bring the weight down. Maintain your balance and avoid bending or twisting in any direction. Complete your reps on that side, and then switch sides and repeat.
2B Pullover
Sets: 4 Reps: 25 Rest: 75 sec.
Step 1. Lie on your back on the floor and hold a dumbbell with both hands over your chest. Tuck your pelvis so that your lower back is flat against the floor, and brace your core. Your knees should be bent 90 degrees, and your feet flat on the floor.
Step 2. Keeping your arms straight, reach your arms back behind your head until you feel a strong stretch in the lats. Your ribs will want to pop up, taking your lower back off the floor—keep your core braced so this doesn’t happen. Pull the weight back over your chest.
3 Farmer Hold
Reps: Work for 5–10 min.
Step 1. Load a duffle bag, backpack, or sandbag with as much weight as possible—30–50 pounds is ideal. Stand with feet hip-width apart, and pick up the bag with one hand.
Step 2. Hold the bag at your side for a few seconds, resisting any bending or twisting. Now heave it up to shoulder level and hold it. Transfer the bag to both hands and bear hug it to your body and hold. From there, pass the bag to the opposite hand at shoulder level and hold. Finally, lower the bag to your side and hold. Continue passing the bag back and forth for 5 minutes (set a timer to track it). Work to increase your time each time you repeat the workout until you can pass the bag around for 10 minutes, and then increase the weight of the bag.
]]>
What Is The Landmine Row and What Are Its Benefits?
(See 00:15 in the video above.)
The landmine row is a barbell rowing movement where one end of the barbell rests on the floor, or is anchored using a landmine apparatus, allowing you to row the bar in an arcing motion rather than straight up and down. There are many ways to row with this setup, and we’ll go over all of them in this article, but the most basic and popular version is to straddle the bar and row it with both hands using a V-grip handle (the kind you see on cable machines). To bodybuilders, this is called a T-bar row, and it’s a great, old-school exercise for the back, and the lats specifically. (Some landmine machines provide barbells that have a handle fixed perpendicular to the bar, forming a T-shape, hence the name.)
While it’s very similar to the classic bent-over barbell row, the landmine row has some big advantages. “The arc that the bar travels allows you to keep a more upright torso, which is easier on your lower back,” says Jonny Catanzano, an IFBB pro bodybuilder and physique coach (@jonnyelgato_ifbbpro). It also means that the weight will be closer to your center of gravity at the top of each rep, and that allows you to control it better, and even hold the top position longer than you could with a bent-over row, if you choose to. That can give you a better muscle contraction in your back, and makes the landmine row a good choice for hypertrophy (muscle-gain) training.
With one end of the bar fixed on the floor, the landmine—aka T-bar row—is also a more stable movement than a conventional barbell or dumbbell row, and that allows you to lift heavier weights. Flip through old bodybuilding magazines or books and you’ll see many lifters hoisting hundreds of pounds on T-bar rows, but super heavy bent-over rows are less common. The landmine setup simply allows for heavier weights to be lifted in a safer, more user-friendly movement, so it’s arguably the better choice between the two barbell rowing movements for physique development.
How To Do The Landmine Row
(See 02:55 in the video.)

Ideally, you’ll perform the landmine row using a landmine unit. They usually look like home plate (baseball) with a metal sleeve attached that swivels, but some have feet (like furniture) or are simply a sleeve that can attach to the base of a power rack or even fit inside the donut hole of a weight plate (this is shown above). You can see a number of landmine options on amazon.com.
Using a landmine will keep the end of the bar secure and stable, but it isn’t absolutely necessary to perform landmine training. A second option is to cut a hole in a tennis ball and ram the end of the bar in so that you have a cushion, and then wedge the bar into the corner of a room. At the very least, you can wrap a towel around the bar and push it into a corner (the towel will help protect the walls).
Now let’s discuss how to perform the classic landmine row/T-bar row.
Step 1. Grasp a V-grip handle—the kind you often see people do cable rows with. If you don’t have a V-grip, you can improvise one by attaching gymnastics rings or any other adjustable handles you can access. The point is only to have a comfortable, firm grip that allows your palms to face each other when you row (a neutral grip). Place the handle on the floor next to the front of the bar.
Straddle the bar with feet about shoulder width, facing away from the landmine, and hinge your hips back. Allow your knees to bend, and keep a long line from your head to your tailbone, until your torso is 30–45 degrees to the floor and you can reach the handle. Hook the handle underneath the barbell, close to end of the bar where you’ll load the plates. Pick the bar up off the floor and play around with your stance, torso height, and the distance between your feet and the front end of the bar until you feel balanced and stable with your arms fully extended.
Step 2. Keeping your back straight and flat, and your core braced, row the bar until your back is fully contracted. Your elbows should come up close to your sides and your shoulder blades should squeeze together at the top. If the bar hits you in the groin, adjust your stance!
Step 3. Lower the bar until your arms are fully extended again, but don’t let the weight rest on the floor. Allow your shoulder blades to spread as you go down.
*Use 25-pound plates, or smaller. While it may be less efficient than loading the big 45s, smaller plates will allow you the greatest range of motion on the exercise. Bigger plates, on the other hand, will tend to bump into your chest and/or the floor, reducing the range you can train your muscles, and thereby making the exercise less effective.
“Think about driving with your elbows, rather than your hands,” says Catanzano. That will help you get the proper range of motion. “And be careful to keep a tight core.” As with a bent-over row, deadlift, or any other exercise that has you bending forward at the hips, you need to protect your lower back at all times. Bracing your abs and thinking “long spine” are essential. Catanzano also cautions against “ego lifting,” where you bounce the weight up and round your back on the way down for the sake of lifting heavier or getting more reps. Your hip and back position should remain the same the entire set; only your arms move.
Incidentally, if you’re in a gym that has a proper T-bar row (a handle that forms a T-shape), you can use that for your landmine rows too. The wider, palms-down grip will recruit more of your upper back and rear deltoids, while the landmine row with palms facing each other and elbows tight to your sides emphasizes the lat muscles.
What Muscles Does The Landmine Row Work?
(See 01:25 in the video.)
The landmine row works the back about as well as any exercise can. The muscles it activates include:
– Lats
– Traps
– Rhomboids (middle back)
– Rear delts
– Biceps
– Forearms
– Spinal erectors (lower back)
– Core (ab muscles)
It should be noted that holding the bent-over position tenses your hamstrings isometrically as well. Probably not to the degree that it will build hamstring size, but don’t be surprised if you feel stronger and more stable on deadlifts, RDLs, or other hip hinge exercises after a few weeks of landmine rowing.
Single-Arm Landmine Row Vs. T-Bar Landmine Row Vs. Barbell Landmine Row
Just to reiterate (or, if you’ve been skimming the page and missed it), the T-bar row and landmine row are essentially the same exercise. If you use a T-bar, which allows you to raise your arms out wider so your palms are turned down, you’ll work a little more upper/middle back and rear deltoids than if you use a V-grip handle and row with your elbows close in (the latter emphasizes the lats). There are several other variations of the landmine row, including single-arm versions, which we’ll explore in the next section. Single-arm landmine rows allow you to isolate one side of the back at a time and can increase the range of motion you get, making them a good option for physique training. They also allow you to use your free hand to help brace your hips, which can add stability. You’ll have to use less overall weight when doing a single-arm row of any kind, but this can be an advantage if your lower back is recovering from injury and you don’t want to load it with a heavy bent-over exercise.
Landmine Row Alternatives
The landmine row can be done in different ways to suit your changing goals.
Single-Arm Landmine Row
(See 08:20 in the video.)

By stepping off to one side of the barbell, you can easily turn the landmine row into a unilateral exercise for the lats, similar to a dumbbell row.
Step 1. Set up as you did for the regular landmine row, but stand to one side of the bar and narrow your stance to between hip and shoulder width. Hinge your hips and grasp the bar with the hand nearest to it (grip it close to the end of the bar). Stand up with the bar, and reset your hinge so your torso is angled forward and your back is straight and flat.
Step 2. Row the bar, retracting your shoulder blade, and then lower it back, allowing your shoulders to spread. Avoid twisting your torso to either side. Keep your core braced and your shoulders square to the floor.
“You can adjust your position to affect the muscles in different ways,” says Catanzano. If you stand with your feet a little further forward so that you get into an even deeper hip hinge, and then lift the bar with your elbow out a little wider, you will shift the emphasis from the lats to your upper back. “If you set up to where your legs are straighter and your chest is a little lower, you can hit a little more lower lat.”
Meadows Row (Elbow-Out Landmine Row)
(See 09:50 in the video.)

Standing perpendicular to the bar and rowing it with your elbow flared out really shifts the work from the lats to the upper back and rear delts. This version was popularized by the late bodybuilding coach John Meadows, and has therefore come to bear his name.
Step 1. Stand so that the end of the barbell points to your side and spread your feet shoulder-width apart, or stagger them—whichever feels more balanced and comfortable. Hinge at the hips and grasp the end of the bar with one hand. Since the sleeve where you load the plates is thick in diameter, it can be hard to hold onto—especially with sweaty hands—so consider using lifting straps to reinforce your grip. Brace the elbow of your free arm against your leg for some extra stability.
Step 2. Row the bar, driving your elbow as high as you can. Again, avoid twisting and keep your shoulders square. Your upper arm should end up about 60 degrees from your side—much farther away than the landmine rows we’ve shown up to this point.
Bench-Supported Landmine Row
(See 12:20 in the video.)

If the landmine row (any variation) has a weak link, it’s that it requires a lot of stability to perform. Bracing your core and torso in the bent-over position takes a lot of energy and spreads the muscle tension over your whole body. That’s cool if your goal is to build total-body strength with a movement that works a lot of muscle at once, but it’s a bit limiting if you want to make your back muscles work to the max and get the best stimulus for growth. In the latter case, Catanzano recommends pulling a bench over to rest your free hand and knee on while you perform the Meadows row. “The stability the bench provides will allow you to lift heavier loads,” says Catanzano, “and that will recruit more muscle fibers in your back.”
Band-Resisted Landmine Row
(See 13:00 in the video.)

Catanzano has one other minor gripe with the landmine row, arguing that, as you row the bar closer to your body, your mechanical advantage increases and the weight gets easier to lift. This reduces the tension on the muscles. “In a muscle-building scenario,” he says, “we ideally want the resistance to stay the same or get even heavier throughout the range.” The fix is as simple as adding a resistance band to the bar.
Step 1. Set up a bench as shown for the bench-supported landmine row, and place a heavy dumbbell on the floor next to it. Wrap a mini band around the dumbbell a few times so there’s only a foot or two of slack end. Loop the end of the band over the sleeve of the barbell.
Step 2. Row the bar in the Meadows row style explained above. Because the band will be pulling the bar back down, and the tension increases the higher you row it, you’ll have to row faster and more powerfully. This will ensure that your back is giving its all throughout the exercise.
See more back training ideas from Catanzano in our guide to getting a lat spread like a bodybuilder.
And check out these back and biceps workouts for the ultimate pull day routine.
]]>
What Is The Straight-Arm Pulldown?
The straight-arm pulldown exercise is a variation of the classic lat-pulldown. In this case, you perform the movement standing and keep your elbows locked out the entire time. The straight-arm pulldown trains the latissimus dorsi through a long range of motion, and is helpful for people who have trouble feeling their backs work on conventional pulldown exercises. As a result, it’s a great movement for focusing on lat development.
How To Do The Straight-Arm Pulldown
Step 1: Attach a rope handle to the high pulley of a cable station. Grasp an end in each hand and face the cable station.
Step 2: Draw your shoulder blades back together and down, as if you were trying to stuff them into your back pockets. Think: “proud chest.”
Step 3: Draw your ribs down, tuck your tailbone under, and brace your core muscles. Your torso should feel like one tight, solid column. Bend your hips back until your torso is at a 30–45-degree angle.
Step 4: Step back from the station a bit so that you feel tension on the cable and your arms are fully extended overhead. You should feel a stretch on your lats (the muscles along the sides of your back). Set your feet at shoulder width.
Step 5: Slowly drive your arms down to your sides in an arcing motion with elbows locked out, so your hands end up in line with your hips, or just behind them.
Step 6: Reverse the motion slowly to extend your arms again.
The straight-arm pulldown may also be done with a lat-bar or straight-bar attachment, but the rope allows for better shoulder positioning and a slightly greater range of motion. As a result, you’ll get greater muscle activation. If possible, use two rope attachments on the same cable so that you can use a wider grip and get an even greater contraction in the end position. Another option is to use a band, which will increase tension in the end range of motion, helping you get a greater contraction at the bottom of the movement. You can also do this exercise as a single arm lat pulldown to further work the muscles involved.
In any case, it’s important to keep the elbows extended, as any bending will cause the triceps to get involved and reduce the involvement of the lats.
Muscles Worked in the Straight-Arm Pulldown
- Lats
- Upper back
- Rear deltoid
- Triceps
- Chest
- Core
Straight-Arm Pulldown Benefits
- Enhanced mind-muscle connection. The straight-arm pulldown is ideal for lifters who can’t feel their lats working on traditional pulldown exercises. Keeping the arms straight prevents the mid-back and biceps from taking over the movement, so you can focus on the lat muscles you’re trying to work more directly.
- Greater range of motion than standard pulldowns.
- Improved stability on deadlifts. The straight-arm pulldown strengthens the lats in the same way that they’re used when deadlifting—pulling the bar tight to your body (“bending” it around the shins at the bottom of the lift/around the hips at the top). The ability to keep the bar in contact with your body throughout a deadlift creates a stronger, more stable movement and reduces the risk of injury.
When to Use The Straight-Arm Pulldown
- Perform the straight-arm pulldown before deadlifts or other back exercises to prepare your lats for the effort and enhance their muscle recruitment. Because it provides an intense lat stretch at the top (starting) position, the straight-arm pulldown is also useful at the beginning of a workout to improve back and shoulder mobility.
- Try it at the end of a workout for 2–3 sets of 10–15 reps. This will pump an enormous amount of blood into the area, which by itself may be a mechanism for muscle growth.
- Use it in place of rows or pulldowns if you have a lower-back injury. The movement is isolated to flexion and extension of the shoulders, so it prevents unwanted motion or stress in the lower back.
How To Stretch Before The Straight-Arm Pulldown
While the straight-arm pulldown can stretch your lats and increase mobility on its own, you should warm up your upper body before you perform it. The following video, courtesy of Onnit-certified Durability Coach, Cristian Plascencia, is a sample routine you can use before an upper-body or back workout. (Follow Cristian on Instagram, @cristiangplascencia).
Regression
If you feel like back muscles other than your lats are taking over the straight-arm pulldown, reduce the load you’re using, or try them with a band instead of a cable. You can also perform the movement while standing up more vertically, which will place less of a stretch on your lats but will make the movement easier to control.
Progression
To make the straight-arm pulldown harder, use a longer rope or two rope handles at once to increase your range of motion.
What Alternatives Are There To The Straight-Arm Pulldown?
If you don’t have a cable station or band at your disposal, you can use the following substitutes to get a similar training effect to the straight-arm pulldown.
Dumbbell or kettlebell pullover. Lying on a bench and pulling the weight from behind your head to over your chest stretches the lats, but will also involve the chest and triceps to a degree, which isn’t ideal if your goal is ultimate lat development.
Gironda Pulldown. This pulldown/row combination works the back hard, but doesn’t provide the same lat isolation that the straight-arm pulldown does.
]]>
If there’s one set of muscles that always seems to lag behind the others on gym rats everywhere, it’s the back—specifically, the lats. (OK, the calves too, but that’s the subject of another article.) Some people claim that they just can’t feel their lats working in the same way they do their pecs or biceps, so they can never fully stimulate them. For others, simply not being able to see the lats as clearly in the mirror has caused them to neglect these muscles.
That’s a bummer, because the lats are essential for a physique that looks muscular and lean. When you flex them, they make your waist look smaller and your shoulders look wider, giving the impression of a powerful, even super-heroic upper body.
Whether you’re a regular guy or gal who wants to sculpt a more balanced physique, or a die-hard lifter who has aspirations of one day competing in a physique show (Bodybuilding, Figure, Classic Physique, etc.), we’ll help you get your back training on track, so that when you spread your lats, you look like you’ve sprouted wings!
What Is A Lat Spread and Why Do People Do It?

The lat spread is a traditional bodybuilding pose used in competition to highlight the width and thickness of the competitor’s latissimus dorsi muscles. The lats, if you weren’t sure, are the big slabs of muscle that run down the sides of your back. They originate on the lower three or four ribs, lower six thoracic vertebrae, and iliac crest (the top border of the pelvis), and insert on the humerus (upper-arm bone) just below the shoulder joint.
In a physique contest, the athlete is required to display their lats in two distinct lat poses—the front and rear lat spread. (The competitor must show the lats facing the judges/audience, as well as facing away, so the dimensions of the muscles can be appraised.) The term “spread” refers to how the lats appear when they’re flexed in a dramatic fashion. When well-developed, the lats appear to spread out from the person’s torso, and the effect is something like a bird spreading its wings—the back looks so wide and dense that you can see it from the front!
Of course, if you’re not planning on posing your physique on stage for sport, you don’t absolutely need to know the technique of flexing the lats aesthetically. But many people like to motivate themselves to get in their best shape by scheduling a photo shoot or other event where they’ll have pictures taken to commemorate their condition, and in that case, understanding how to show off your lats to their best advantage will help them get the credit they deserve, and prove that you put some serious time and dedication into building them. Scroll down for a full tutorial on how to pose your lats effectively when that time comes.
Exercises To Build Stronger Lats
The lats work to pull the arms from overhead to down to your sides, extending your shoulder joints. They’re the main upper-body muscles involved in climbing and swimming. For ages, the go-to lat-building exercises for bodybuilders and other weight-training populations alike have been the classic pullup, chinup, and lat-pulldown, along with various types of rows. These are all great options, but if you’ve lived on a steady diet of the standard lat exercises for years and still feel like your wings haven’t spread, we’ve got some variations to show you that may help you target your lats a little better.
These come by way of Jonny Catanzano, an IFBB Classic Physique pro bodybuilder and coach to physique competitors at all levels (@jonnyelgato_ifbbpro and @tailoredhealthcoaching on Instagram).
1. Reverse-Incline Lat Pulldown
(See 00:52 in the video above)
Pulling with your palms facing each other (a neutral grip) helps you to keep your arms closer to your sides during a pulldown or row. This in turn helps to focus the exercise on the lat muscles, as opposed to the muscles of the upper back. Furthermore, doing the movement with your torso supported on a bench makes the exercise more stable, so your muscles can focus purely on lifting the weight rather than trying to brace your body position at the same time.
“This type of pulldown primarily hits the lower lat fibers, which really contributes to the V-taper,” says Catanzano, referring to the impression the lats give as they descend from their widest point beneath your shoulders to their insertion at your pelvis. The lower fibers are usually underdeveloped relative to the rest of the lats, and adding size to that area will improve the cobra-hood effect of your lats when you spread them. In other words, it will make your waist look smaller while your back looks broad.
Step 1. Set an adjustable bench on a 45–60-degree angle and place it in front of a cable station with a high pulley. If the station offers dual pulleys, attach single-grip handles to them. But if it’s a single pulley, attach a lat-pulldown bar and then attach some single-grip handles to the bar at about shoulder width (we used Angles90 Grips in the video, another great option).
Step 2. Rest your chest on the bench and grasp the handles with palms facing each other (inward). Pull the handles down until your elbows reach your hips. Lower the weight with control.
Be careful not to pull the handles too far back—go until your arms are in line with your body. Pulling further than that can shift the emphasis to the upper back, and we want to keep it on your lats.
2. Close-Grip Cable Pulldown
(See 01:28 in the video)
You’re almost certainly familiar with the close-grip pulldown done with a V-grip handle attachment, but Catanzano recommends using two separate single-grip handles instead (preferably the type with soft, spongy material on the handle). These are the kind you’re probably used to using for chest flyes and lateral raises.
The single-grip handles will allow you to move your hands further apart as you pull the cable down, and that means more range of motion, so you can get your elbows closer to your hips for a full contraction of the lower lats.
Step 1. Attach the two handles to the pulley of a lat-pulldown station and grasp them with a neutral grip. Secure your knees under the pad so your lower body is braced. Lean back a bit so you feel a stretch on your lower lats, but try not to arch your back.
Step 2. Pull the handles down until your elbows line up with your hips. Lower the weight with control.
3. Reverse-Incline Dumbbell Row
(See 02:09 in the video)
This one hits the lats but puts more emphasis on the rhomboids in the middle back, which is literally the centerpiece of a rear lat-spread pose. “Developing this area will add to the overall width of your back,” says Catanzano. As with the reverse-incline pulldown, using a bench takes the lower back out of the movement and reduces your ability to cheat or use momentum, so the target muscles get worked in near isolation.
Step 1. Set a bench to a 45-degree angle and grasp dumbbells. Rest your chest against the bench and allow your shoulder blades to spread apart at the bottom of the movement.
Step 2. Row the weights to your sides with your elbows pointing at about 45 degrees from your torso. Squeeze your shoulder blades together at the top. You may want to use wrist straps to reinforce your grip, as your hands will likely tire before your back does.
4. Kelso Shrug
(See 02:52 in the video)
Done standing upright, shrugging motions work the upper traps, but when done with your chest supported, they hit more of the trap fibers, along with the rest of the upper back. Like the incline rows above, this movement will widen and thicken the middle part of the back, which contributes to a powerful lat spread viewed from behind.
Step 1. Set up as you would for the incline row and simply retract your shoulder blades, squeezing them together at the top of the movement. Keep your elbows straight. Lower the weights with control, and allow your shoulder blades to spread apart at the bottom.
Incidentally, Kelso shrugs can be done at the end of a set of incline rows to finish off the upper back. In other words, do a set of rows to failure, and when you can’t perform another full-range row anymore, simply retract your shoulders for a few reps of shrugs to failure.
5. Neutral-Grip Pullup
(See 03:39 in the video)
“Pullups with a neutral grip almost force you to keep your elbows a little in front of your body,” says Catanzano, “which is where your lats are more active than they would be pulling with your elbows flared out to the sides.”
Step 1. Hang from a bar using a neutral grip. If your chinup bar doesn’t allow that, attach single-grip handles as explained in the close-grip pulldown above. Your hands should be about shoulder-width apart.
Step 2. Pull yourself up until your chin is over the bar and your elbows are in line with your hips. Lower your body down with control.
If that’s too hard, attach an exercise band to the bar and stand on the free loop. The band’s tension will unload some of your bodyweight so that you can get more reps.
Sample Workout For a Better Lat Spread
Catanzano offers the following routine to bring up your lats and improve your lat spread. Perform it once every five to seven days. Rest 2–3 minutes between sets. Note that the neutral-grip pullups and Kelso shrugs are paired, so perform them in alternating fashion, doing a set of the pullup and then a set of the shrug without rest in between. Then rest 3 minutes before repeating until all sets are complete for the pair.
1. Reverse-Incline Lat Pulldown
Sets: 4 Reps: 10–12
2. Close-Grip Cable Pulldown
Sets: 4 Reps: 10–12
3A. Neutral-Grip Pullup
Sets: 4 Reps: 10
3B. Kelso Shrug
Sets: 4 Reps: 12
4. Reverse-Incline Dumbbell Row
Sets: 4 Reps: 12
A Lat Flexing and Spreading Tutorial

Once you’ve built a substantial set of lats, you can work on posing them effectively. Catanzano, who coaches posing as well as training for physique competitors, offers this three-step guide to mastering the lat spread.
(See 04:09 in the video for Catanzano’s demonstration)
1. Squeeze your shoulder blades together and place your fists on your hips. “Imagine holding a pencil between your shoulder blades,” says Catanzano. That’s how far back you want to pull your shoulders.
2. Drive your shoulders down. The movement is the opposite of a shrug, so get your shoulders as far south of your ears as you can. You should feel your lats get tense.
3. While keeping your shoulders down and your lats tense, roll your shoulders forward and slightly upward. Your chest and ribcage should lift in front of you, “nice and high and proud,” says Catanzano. Think about spreading your lats apart as wide as you can.
Catanzano warns that you need to have good shoulder mobility in order to spread your lats impressively. You should be able to raise your shoulders up and down and retract and protract them through a large range of motion—and pain-free. If you can’t, then you won’t be able to achieve the positions that showcase the lats to their fullest potential. If you need work on shoulder mobility, start with this article, Shoulder Mobility for Strength and Injury Prevention.
What Is The Gorilla Row?
(See 00:27 in the video above.)
The gorilla row is a variation on the bent-over row you’re probably already aware of and usually see done with a barbell. You hinge at the hips and row the weight from the floor until your elbows are at your sides. The key difference with the gorilla row vs. a barbell bent-over row is that the kettlebells allow you to work one side at a time.
You’ll actively push one kettlebell into the floor while you row the other one, all while staying in that bent-over position. The movement can’t help but make you look something like a gorilla foraging for food, but it will also give you the back muscle strength to be king of your own (iron) jungle.
Gorilla Row Exercise Benefits
Any type of bent-over row is a good idea for stimulating total-body strength gains. Your lats and upper back work when you row the weight, but your lower back, hips, and core must also engage just to keep you in position and support your torso. Lifting the weight from the floor on each rep, as opposed to letting the weight hang just slightly above, as you do in some rowing variations, offers the added benefit of keeping the movement more strict, as well as training explosiveness. You can’t let your muscles’ stretch reflex bounce the weight up for you—you’ll have to pull the bell up with muscle power alone.
The gorilla row takes all of this to the next level by having you work unilaterally—one side at a time—which means you’ll be able to train your back through a greater range of motion, and you’ll have to resist any twisting or bending on one side while you row on the other, further heightening the core stability component. Of course, maintaining a deep hip hinge through it all is an important posture to master for lower back health and overall power and explosiveness (nearly all explosive movements involve hip extension, so you might as well master the setup for it).
How To Do the Gorilla Row Exercise Properly
(See 01:04 in the video.)
Step 1. Place two kettlebells on the floor and straddle them with your feet between hip and shoulder width. Hinge your hips back, keeping a long spine from your head to your tailbone. Allow your knees to bend as needed, but keep your lower back flat, not rounded. Grasp the kettlebell handles.
Step 2. Press one bell into the floor and brace your abs. Now row the opposite bell till your elbow is at your ribs. Lower it to the floor again, and repeat the row on the other side while you press the opposite bell into the floor.
The gorilla row is typically done by alternating sides, but you may choose to do all your reps on one side and then the other if you want to better isolate your back one side at a time.
For the best muscle gains, you should keep your shoulders square to the floor throughout the set. However, “You can also rotate your thoracic spine to get a little more mobility out of this exercise,” says Eric Leija, an Onnit-certified coach (@primal.swoledier) and the model in our video. “But you’ll get less lat activation, because the lat won’t be able to fully shorten.” So, if you’re an athlete like a fighter or baseball player who throws or twists a lot in their sport, you may want to allow your torso to turn a few degrees as you row. “But if you’re looking to put on a nice, thick back,” says Leija, “try to minimize that rotation.”
What Muscles Do Gorilla Rows Work?

(See 03:18 in the video.)
The gorilla row gives the following muscles a good drubbing:
– Lats (the big muscles on the sides of your back)
– Rhomboids (middle back)
– Trapezius (upper back)
– Rear delts (back of the shoulders)
– Deep core muscles
– Obliques (the ab muscles on your sides)
– Rectus abdominis (your six-pack muscle)
– Biceps
– Forearms
– Glutes
Dumbbell Vs. Kettlebell Gorilla Rows
(See 03:25 in the video.)
Due to kettlebells having handles that reach a few inches above their center of mass, they’re easier to grab a hold of than dumbbells when rowing weight from the floor. Unless you have a contortionist’s hip mobility, trying to grip dumbbells on the floor for gorilla rows will cause you to round your lower back, which you never want to do on a bent-over rowing movement for the sake of avoiding injury.
But, if dumbbells are all you have, you can still do the basic gorilla row movement and get plenty out of it. Simply elevate the dumbbells on a box, bench, or mats in order to raise them to mid-shin level. Now you’ll be able to bend over safely to grasp the handles.
How To Stretch Before Exercising
Warm up your upper back, lats, and core muscles with the sky reach to arm thread. Do this move as part of your warmup/stretching routine before any session that includes the gorilla row.
Step 1. Get on all fours with your hands under your shoulders and your knees directly beneath your hips. Brace your core.
Step 2. Draw your right arm up and across your chest as you twist your right shoulder toward the ceiling and reach overhead. Be careful to keep your hips facing the floor.
Step 3. Reverse the motion, reaching your arm across your body and behind the support arm. Twist as far as you can, ideally until the back of your right shoulder touches the floor. Complete 6–10 reps on that side, and then switch sides and repeat. Do 2–3 sets total.
Gorilla Row Alternatives
If the gorilla row feels too advanced, or you can’t seem to perform it with a safe lower-back position, try these two alternatives that will train the back and core in a similar way.
One-Arm, Split-Stance Row
(See 04:54 in the Build Muscle With The Gorilla Row video.)
Step 1. Step forward with your right leg, as if getting into a lunge position, and extend your left leg straight behind you. Your front knee should be bent about 90 degrees and your back heel may be raised off the floor. Bend at the hips and brace your right forearm against your right knee. Press it into your leg—this will help create stability. Your body should form a long straight line from your head to your heel. Reach with your left hand to grasp a kettlebell on the floor.
Step 2. Row the kettlebell to your side while keeping your shoulders square to the floor. Complete your reps on that side, and then switch sides and repeat.
Renegade Row
(See 06:10 in the Build Muscle With The Gorilla Row video.)
Step 1. Get into a pushup position, resting your hands on a pair of kettlebells (or dumbbells). Turn the handles so they make an A-shape, which will help you balance on them better. Place your feet as wide apart as is comfortable. A narrower stance will make the exercise harder; a wider foot placement will make it easier. Take a deep breath into your belly and brace your core.
Step 2. Lean your weight to your right side, pushing that hand into the floor. Your left side will feel lighter. Now row the left-hand weight to your side, but avoid twisting your hips or shoulders. Lower the weight and repeat on the other side.
]]>
What Is The Rear-Delt Fly and What Are Its Benefits?
(See 00:29 in the video above.)
The rear-delt fly is the simplest and most direct way to train the rear deltoid—the little muscle on the back of your shoulder. You start with your arm in front of your body and you extend it out to your side.
Rear-delt flys are important because most people have lopsided shoulders. They sit staring at a computer or their phone all day, rounding their upper back, and that causes the posterior muscles to weaken and lengthen while the anterior muscles get tighter. If you’re a fitness fiend, you probably do too much pressing and chest work in relation to your rowing and rear-delt work, and that contributes to the imbalance. So rear-delt flys help to build up the back of the shoulder, which contributes to the appearance of bigger and more even shoulders overall. Rear-delt flys can help to prevent shoulder injury by restoring muscle balance, as strong rear delts help keep the shoulder joints centered, rather than pulled forward, which wards off shoulder injuries like an impingement.
How To Do The Rear-Delt Cable Fly Correctly
(See 01:23 in the video.)

There are several ways to do a rear-delt fly with cables, but the version that follows is the most straight-forward.
Step 1. Set both pulleys at an adjustable dual cable station to the height of your head. Grasp the cables themselves with your palms facing down, crossing one arm over the other, and stand with your feet between hip and shoulder-width apart. You may want to stagger your stance for extra balance. Step back a bit so you feel tension on the cables and a light stretch in your rear delts before you even begin the set.
Step 2. Brace your core. Now drive your arms straight out to your sides while keeping a slight bend in your elbows. You really have to do this as an arcing motion, as if reaching out for the walls around you. Stop when your arms are 90 degrees.
Step 3. Lower the cables under control, and stop just short of where the weights touch down on the stack. You want to keep your rear delts working throughout the entire set, and letting the weight rest for a moment lets your delts rest too.
You can also do the fly using single-grip or D handles attached to the cables and your palms facing each other. This may bring a little more of your lateral delts into the exercise, but that isn’t a terrible thing. Ultimately, choose the setup and hand position that feels most comfortable to you and allows you to train the exercise hard and heavy.
How To Do The Dumbbell Rear-Delt Fly Correctly
(See 02:37 in the video.)
Without the tension of cables, you’ll have to adjust your body position to allow your rear delts to work against gravity. This can be done easily by bending at the hips so your torso faces the floor. Now when you perform the fly motion, your arms will be lifting up from vertical to 90 degrees to the floor, shortening the rear delt muscle completely.
Step 1. Hold a dumbbell in each hand and bend your hips back until your chest faces the floor. Keep a long spine as you do so to protect your lower back. Turn your hands so your palms face your legs.
Step 2. Raise the dumbbells out to your sides 90 degrees while keeping a slight bend in the elbows. Your torso should remain motionless.
Step 3. Control the descent and stop a little short of your arms being vertical. Again, you want to keep tension on the delts.
Note that this same motion can be done with cables as well, if you only have access to a station that has low pulleys, or won’t adjust to shoulder level.
If you have an adjustable bench, it’s a good idea to do the rear delt fly—with both cables or dumbbells—using the bench for support. The bench stabilizes your body for you, and that will allow you to focus more on the rear delts and give them a better stimulus. It will also force you to do the movement more strictly, as many people have a tendency to bounce their torso when doing dumbbell rear-delt flys.
What Muscles Do Rear-Delt Flys Work?
(See 03:31 in the video.)
No big surprises here. The rear-delt fly works—ta dah!—the rear deltoids. Your upper back muscles, such as the trapezius and rhomboids, will also get involved a little bit, but that’s why it’s so important to raise your arms out only to 90 degrees, where they’re in line with your sides. While it might seem like extending your arm back further will give you an even better contraction in the deltoid, you’re really just bringing the traps into the movement even more. The rear-delt fly is supposed to isolate the deltoids so you can focus on building up that muscle alone, so do it right and let the target muscles do their thing.
Is One Variation Better Than The Other? Who Should Do Which?
(See 04:05 in the video.)
OK, so here’s the big question: should you do the rear-delt fly with cables or dumbbells? Well, the advantage of a cable is that the resistance is constant throughout the whole range of motion. That means that even when your arms are in front of you, your deltoids are still going to be working pretty hard. You’ll notice that when you use dumbbells, this isn’t the case—the tension drops off the delts completely when your arms point toward the floor, and the fly feels the hardest at the end of the range of motion when your arms are extended at your side.
Either version is OK, and if you train at home or only have access to dumbbells, then the dumbbell rear-delt fly is what you’ll have to rely on to build your rear delt muscles. But if you can get your hands on a cable, it’s the better choice for a more complete rear-delt workout. Another good alternative would be exercise bands, which keep tension on the delts throughout the whole range.
How To Stretch Before Doing Rear-Delt Flys
Follow these five steps to better shoulder mobility—courtesy of Dr. Layne Palm (@laynepalmdc)—to warm up and stretch your shoulders before taking on any rear-delt workout.
Other Rear Delt Fly Variations
Rear-Delt Cable X Fly
(See 05:00 in the Rear-Delt Cable Fly video above.)
The rear-delt fly doesn’t always have to be done with your arms traveling to 90 degrees. Some trainers argue that if you perform the fly with a 45-degree arm path, you’ll be able to go a little further into shoulder extension and contract the rear delts even harder without getting the upper back involved. This point is debatable, but the rear-delt cable X fly is a worthy variation to experiment with.
Step 1. Set the pulleys of a cable station up high, at least to shoulder level. Grasp the cables themselves—you don’t need a handle—with a crossover grip, and step back so you feel some tension on the cables. Stagger your stance for balance.
Step 2. Extend your arms in a 45-degree path, as if drawing an X in the air, until your rear delts are fully shortened. (Your arms will be behind your body.) Keep your arms fairly straight, and don’t extend your elbows as you fly—that would turn the movement into more of a triceps exercise.
Rear-Delt Row
(See 05:45 in the Rear-Delt Cable Fly video.)

While a fly motion lets you work your rear delts without assistance from the back and biceps, it’s not the only way to train the rear delts. Rowing exercises certainly hit the rear delts as well, and you can emphasize them over the back muscles with a rear-delt row variation.
Step 1. Set an adjustable bench to a 45-degree incline and lie down with your chest against the pad. Grasp a dumbbell in each hand.
Step 2. Row the weights up with your elbows pointing 45 degrees out from your sides. Row until your upper back and rear delts are fully contracted, and then lower under control.
FYI, any row variation where the elbows are flared (as opposed to tucked near your sides) will recruit the rear delts significantly.
How To Fit The Rear-Delt Fly Into Your Workout
(See 06:45 in the Rear-Delt Cable Fly video.)
Rear-delt exercises in general are often left to the end of upper-body workouts, but if your rear delts are lagging, it’s a good idea to do them first in your session when you’re fresh and can give them your best effort. A few sets of rear-delt cable flys before you do any pressing or lateral deltoid work will help to bring your rear delts up fast.
In general, 2–3 sets of 5–10 reps is enough rear-delt training for any one workout. Do it twice a week with two different exercises. For example, one session could feature the rear-delt cable fly and the other the dumbbell rear-delt fly, or the cable X fly.
]]>
What Are the Trapezius Muscles (Traps)?
(See 00:28 in the video above.)
When weightlifters say “traps,” they’re talking about the trapezius muscles on the upper back. There are two of them, one on each side of the spine, and they consist of three parts—each with a different function.
The upper traps start at the top of the neck and attach to the upper and outer edge of the shoulder blade. This part of the muscle shrugs your shoulder, rotates your shoulder blade upward when you raise your arm above horizontal, and helps turn your head. The middle traps originate in the center of the spine and spread out to the shoulder blade and acromion joint. The mid traps pull your shoulder blades back and together.
The lower traps start out way down at the bottom of the rib cage and stretch up to the shoulder blade. They do the opposite of what the upper traps do, drawing your shoulder blades downward.
Most guys only train their traps with barbell and dumbbell shrugs, but as we just explained, that shrugging motion really only works the upper traps, so shrugging alone is incomplete training when you want an upper back like a bull. To get trapezius muscles that appear three-dimensional and make you look like you’re wearing an oxen’s yoke—hence the term “yoked”—you need to train the traps’ other two functions. And that’s not just a good idea for building a bad ass physique. Strengthening the middle and lower traps will also help to ward off shoulder injuries and keep your upper back in balance with your chest.
Ask any physical therapist who’s dealt with clients complaining of shoulder pain from too much pressing or poor posture—they often prescribe scapular retraction and lower-trap exercises to restore balance. Chronic slouchers often experience scapular winging—excessive outward movement of the shoulder blades—which can lead to poor shoulder mechanics in pressing and reaching overhead. Strengthening the lower and middle trap helps offset that, explains Chad Waterbury, DPT, a physical therapist and strength and conditioning coach in Los Angeles (@drchadwaterbury). “You’ll open space in the shoulder joint and avoid pain and impingement when you reach overhead.”
Finally, from a performance perspective, strong traps play a role in weightlifting cleans and deadlifts. “In sports, they help you throw a punch and swing a racquet,” says Andrew Heffernan, CSCS, an award-winning fitness journalist and co-author of The Exercise Cure and Your New Prime. In short, big traps aren’t just a sign of a guy or gal who can rip sh!t up—they actually help you do it.

Four Effective Exercises for Working Out Your Traps
(See 01:39 in the video.)
Start integrating the following movements into your training. They can be done toward the end of any upper or full-body training days you do, as well as on back days, if you follow a body-part workout split. (See sample workouts below in the Best Trap Workouts For Getting Huge section for examples of how they can fit in.)
1. Dumbbell Shrug With Forward Lean (Upper and Middle Traps)

(See 01:44 in the video.)
Most people do shrugs by shrugging their shoulders straight up. That will certainly hit the upper traps, but you’ll involve more of the muscle—specifically, the middle traps, the meatiest part of the muscle—by angling your body forward a bit. It also allows you to use a greater range of motion.
This kind of shrug was a favorite technique of Dorian Yates, a Mr. Olympia-winning bodybuilder with one of the biggest backs in history.
Step 1. Hold dumbbells at your sides and bend your hips back about 20 degrees. Keep a long straight line from your head to your tailbone, and brace your core. You don’t want to round your lower back here. Retract your neck and tuck your chin. Maintain this body position throughout the exercise.
Step 2. Shrug your shoulders up and slightly back. You should feel your whole upper back pinch together. Hold this top position for a second or two to really make the traps work, and then lower the dumbbells back down under control, letting the weight stretch your traps at the bottom of the rep.
As you get stronger, your grip strength will limit the weight you can use, shortchanging your traps of the stimulus. It’s OK to use lifting straps to reinforce your grip so you can shrug heavier weights and challenge your traps even more.
2. Wide-Grip Chest-Supported Row (Middle Traps)

(See 02:44 in the video.)
Any rowing movement that has you squeezing your shoulder blades together will involve a lot of middle traps. But supporting your chest on a bench will provide more stability, which allows you to lift heavier weight, and will better isolate the upper back muscles in general. There’s a time and place for bent-over rowing variations, but if you want to zero-in on the traps, it’s better to take your lower back out of the equation and not waste energy stabilizing the entire body.
You can do these on a machine, with a barbell, or with dumbbells, as shown in the video above.
Step 1. Set a bench to about a 45-degree angle. It just needs to be high enough to accommodate the length of your arms and prevent the weights you’re using from hitting the floor at the bottom of each rep. Lie on the bench, chest down, and grasp dumbbells.
Step 2. Row the weights with your arms out about 60 degrees. This will target the traps better than if your arms are close to your sides, which is more of a lat exercise. Drive your elbows back as far as you can and squeeze your shoulder blades together at the top. You may want to hold the top for a second or two as you did with the shrugs to make the exercise stricter and emphasize the traps as much as possible.
Step 3. Lower the weights and allow your shoulders to spread at the bottom.
As with the shrugs, it may be helpful to use lifting straps on your rows once you’ve worked up to very heavy weights that your grip can’t hold onto.
3. Kelso Shrug (Middle Traps

See 03:59 in the video.)
Here’s a movement that really isolates the traps. The goal here is to prevent the other back muscles, along with the biceps, from assisting, and force your traps to retract your shoulder blades alone. You can do these with a barbell or a machine, but dumbbells work fine too, as long as you use a wide enough grip to allow your shoulders to retract all the way.
Step 1. Set up on a bench the way we described for the chest-supported row.
Step 2. Simply retract your shoulders and squeeze them. Hold the top for a second or two. Be careful not to shrug your shoulders up or hyperextend your back. Just pull the weight straight back. Your chest may come off the pad a little, but don’t arch your back hard trying to get the weight up. It’s a short range of motion and a subtle movement, but the point is to isolate the traps, so don’t turn it into another row.
4. Y Raise (Lower Traps)

(See 04:41 in the video.)
Remember we said that your lower traps pull the shoulder blades down in a reverse shrugging motion, so any pullup or pulldown variation will involve the lower traps to a large degree while it trains the lats. Still, it’s a good idea to really isolate the lower traps to strengthen them, especially if you do a lot of overhead or chest pressing, which can be hard on the shoulder joints. Strong lower traps help to stabilize shoulders, and the Y raise is a great movement for this purpose.
Step 1. Set a bench to a 45-degree angle and lie on it, chest down. Hold a light dumbbell in each hand, and brace your core.
Step 2. Raise your arms out in front of you on an angle so your body forms a Y shape. Hold the top for a second or two. You should feel the tension in the middle of your back, and if you don’t, make sure you’re not going too heavy or arching your back.
The Best Trap Workouts for Getting Huge

(See 05:30 in the video.)
“The traps work in concert with other muscles—such as the rhomboids and serratus anterior—to perform a myriad of scapular movements,” says Waterbury. Any time you perform rows, chins, pulldowns, overhead presses, or deadlifts, you’re also hitting your traps—especially the upper traps. Because the traps are involved in so many of your other back exercises, you don’t need to blast them with a death ray of volume to see gains.
Try adding one or two trap-focused exercises to your routines for two sessions a week, and do only two hard sets to start. (This means sets taken to failure, or within one rep of failure.) If you feel your traps are really lagging and you want to emphasize them, prioritize them by doing a trap exercise first in your workout. Here are two examples of back workouts that emphasize the trapezius.
Sample Back Workout 1
1. Chinup
Sets: 2 Reps: 5–8
2. Wide-Grip Chest-Supported Row
Sets: 2 Reps: 5–10
3. Close-Grip Cable Row
Sets: 2 Reps: 5–10
4. Dumbbell Shrug
Sets: 2 Reps: 5–10
Sample Back Workout 2
1. Kelso Shrug
Sets: 2 Reps: 5–10
2. One-Arm Dumbbell Row
Sets: 2 Reps: 5–10
3. Lat Pulldown
Sets: 2 Reps: 5–10
4. Y Raise
Sets: 2 Reps: 6–10
How to Stretch Your Traps

(See 06:23 in the video.)
The traps can get tight from a lot of heavy training in combination with sitting in front of a computer or looking down at your phone all day, so it’s helpful to stretch them out a little bit throughout the day and after training. This stretch from Waterbury may help to prevent headaches as well as injury in the gym.
Step 1. Reach your right hand behind your back and place the back of your hand against the back of your left hip. Hold your shoulders down and back.
Step 2. Grasp the back of your head and gently pull it down and across in the direction of your left shoulder. You’ll feel a strong stretch in the back of your neck and traps. Hold for 30 seconds, and then repeat on the opposite side. Repeat for 3 rounds.
]]>Case in point: the rhomboids. In terms of back musculature, the lats—those big sheets of muscle on the sides of your back, often called the “wings”—are the big man on campus. But if you neglect the rhomboids, it will come back to haunt you by way of poor posture, decreased performance on big upper-body lifts like rows and the bench press, and, eventually, shoulder and/or elbow injury.
Give your rhomboids the attention they deserve, however, and you’ll feel better, walk a little taller (from better posture), and even lift more weight, resulting in a bigger, stronger upper body.
What Are Your Rhomboids?
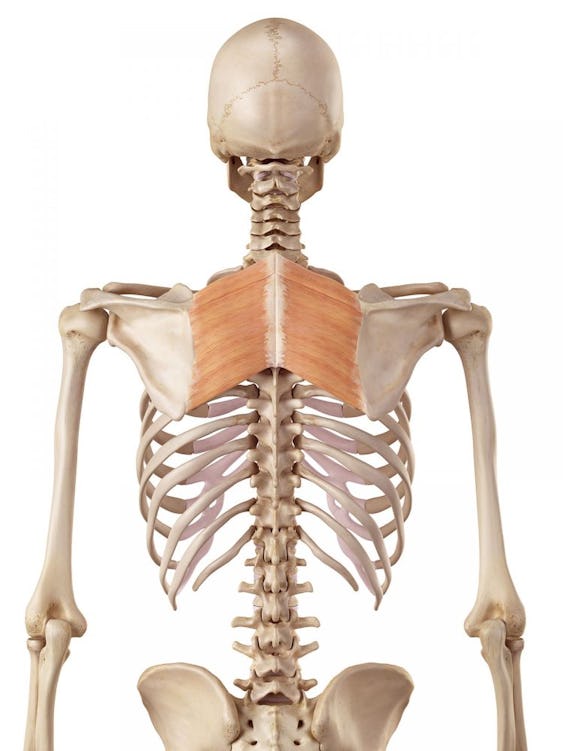
The rhomboids are a pair of upper-back muscles—rhomboid minor, and, directly below it, the larger rhomboid major—that run diagonally from the cervical and thoracic vertebrae of the spine down to the scapulas (shoulder blades) on each side of the body. (They’re rhombus shaped, hence the name.) Despite sitting relatively high up on the back of the body, the rhomboids are often referred to as a “middle back” muscle, because you tend to feel the middle of your back when you do exercises that work them.
The rhomboids are small and thin. They’re dwarfed by the huge latissimus dorsi (lats) and the trapezius (traps) that lie over them. Their unimpressive size and low potential for growth is one reason the rhomboids are often disregarded and undertrained. The lats get all the love on back day.
Another reason is that you can barely see the rhomboids. They’re hidden by the trapezius (particularly the middle and upper portions of the traps) and are virtually impossible to detect unless you’re looking at a high-definition image of a very lean and well-developed physique.
The primary purpose of the rhomboids (both major and minor) is to hold the shoulder blades to the vertebrae in the spine. Their main function is scapular retraction, meaning that they pull the shoulder blades back and together, such as at the end of a properly executed rowing exercise or lat pulldown. The rhomboids also help to raise the shoulder blades up, as in a shrugging motion, as well as draw the shoulder blades downward, such as in a pullup/pulldown motion.
Why Work Out Your Rhomboids?
The rhomboids get worked during back exercises you no doubt already do, but the truth is, they have a low ceiling for growth. No matter what you do, they’re not going to get big and beefy. So why care about strengthening the rhomboids? The answer isn’t sexy, but it’s crucial: because weak rhomboids lead to loss of scapular control. When this happens, the shoulder blades don’t move properly, and that results in injury.
“The rhomboids don’t work in isolation, but they’re part of the whole story of scapular control,” says Ryan Chow, DPT, a physical therapist at Reload Physical Therapy in New York. “If you don’t have scapular control due to lack of rhomboid contribution, you have to pick it up from somewhere else—meaning, other muscles are going to have to do a job they’re not prepared to do and can get worn out as a result. Loss of scapular control leads to excessive motion in the shoulder joint, and could even lead to elbow problems down the road.”
According to John Rusin, PT, DPT, CSCS, owner of John Rusin Fitness Systems, one of the consequences of undertrained rhomboids setting off a chain reaction in your body is “tightness in the neck and upper back that can lead to postural imbalances and incomplete breathing.”
Bad posture is an epidemic these days, due in large part to the constant hunched-forward shoulder position we assume when using our cell phones, typing at a computer, and holding the steering wheel while driving. Focusing too much on upper-body pressing exercises (i.e., bench press, military press) rather than pulling ones (pulldowns, pullups, rows) in the gym only exacerbates the issue.
Increasing the volume of pulling exercises you do can help develop the rhomboids, but this usually just results in greater buildup of the lats, since the body recruits big, strong muscles to do any task they can for the sake of efficiency. The lats don’t attach to the shoulder blades, so postural imbalance may or may not be improved. The only way to make sure the rhomboids get worked sufficiently is to hit them with exercises that really isolate the area.
How To Train The Rhomboids
The key to targeting the rhomboids is pulling the shoulder blades back and together (scapular retraction), and then squeezing the muscles in that retracted position; this is what should occur at the end of a row. However, most people don’t achieve a full range of motion on their rows, let alone squeeze the contraction in the rhomboids. This is often times because they’re going too heavy. When you lift heavier than you’re ready to, you can’t drive your shoulders and elbows back far enough on a row for the rhomboids to fully engage.
Lightening the load on your rows is a good place to start when you’re trying to target the rhomboids. Less weight will make it easier to keep good form and concentrate on the rhomboid contraction. To train the rhomboid muscles through the greatest range of motion possible, Chow strongly recommends unilateral (one-arm) rows with a rotation at the top.
“I like using T-spine rotation to improve the amount of retraction you get,” says Chow. For instance, on a dumbbell row, after you pull the weight to your side, follow the momentum of the lift by twisting your working shoulder slightly away from the floor. “If you row with both arms at the same time, you’re not going to be able to cover as much range of motion,” says Chow. “By rotating while doing rows one arm at a time, you can protract the opposite side [move the opposite shoulder forward], which allows you to retract the working side even further.”
Because the rhomboids are involved in initiating downward rotation of the scapula, you also want to pull the shoulder blades down (while retracting them) when doing rows and even lat pulldowns. “Don’t let the shoulders come up toward the ears during a set,” says Chow.
“The shoulder blades need to move fully on the thoracic cage,” adds Rusin. “Not just down and back, but with rotation. Think of tucking your scaps into your back pockets when you do back exercises.”
Chow offers another important technique cue: keep your spine in a neutral position when you do any pulldown or row movement. “Don’t arch the lower back,” he says, citing a common mistake people make when doing rows, “and don’t let the upper back slouch.” You want your spine in a straight line so that you don’t risk injury to spinal discs. “You sometimes hear lifters using a ’chest out’ or ’big chest’ cue, but if you focus on that, it could cause you to arch the lower back. You don’t want that excessive lumbar extension.”
How To Stretch Your Rhomboids and Back
Use the following warmup drills from Onnit Durability Coach Cristian Plascencia (@cristian_thedurableathlete on Instagram) to prepare your body (and rhomboids, specifically) for any back training you do.
The Best Rhomboid Exercises for Strengthening Your Back
Below are three specific exercises, prescribed by Chow and Rusin, that will sufficiently target the rhomboids for improved posture, injury prevention, and strength and muscle gains.
1) Face Pull
Face pulls have become a popular prehab exercise among lifters because they activate the upper back musculature to improve posture and shoulder health. They do this, in part, by hitting the rhomboids, training both scapular retraction and downward scapular rotation.
Step 1. Secure a rope attachment to a cable pulley set to around forehead height. (You can also loop a resistance band around a sturdy object and grasp the free end with both hands.)
Step 2. Grasp the ends of the rope (just above the knots/rubber stoppers) with a palms-down grip, and step back from the cable column to create tension. Start with your body square to the machine, arms fully extended out in front of you, feet in line with each other, and knees slightly bent for stability.
Step 3. Contract your back muscles and bend your elbows to pull the rope straight toward your face, letting your hands go off to the sides of your head at around ear level. Your elbows should point outward.
Step 4. At the end of the range of motion, squeeze your shoulders blades together (retraction) and hold for a second or two. Reverse the motion to slowly return to the start position, and repeat for reps.
Do face pulls at the beginning of your back workout to activate the rhomboids, so that they’ll be primed to kick in harder on bigger exercises like rows, pulldowns, and pullups. Perform 2–3 sets of 15–20 reps, using a light-weight.
2) High-Angle, One-Arm Cable Row
In this exercise, the rhomboids are worked with constant tension. The cables create a slightly diagonal line of pull from high to low to capitalize on scapular downward rotation. You’ll also get torso (T-spine) rotation at the top of each rep to achieve full retraction of the rhomboids.
Step 1. Secure a D-handle attachment to a cable pulley and position it on the column at around eye level (to create a downward line of pull).
Step 2. Grasp the handle with one hand and step back from the column to put tension on the cable. With your body facing the machine, start with your working arm fully extended, your feet in a split stance (the one opposite of the working arm in front) and your knees slightly bent. Your torso should be at a slight forward angle, with your back straight.
Step 3. Maintaining a neutral wrist position (palm facing in), contract your back muscles to pull the handle in close to your side, just above your waist. Keep your core tight to maintain a rigid torso.
Step 4. As you approach the end of the rep, rotate your torso to open up your working shoulder to the side. Hold the end position for a second or two, squeezing the contraction in the rhomboids (upper-middle back), then slowly reverse the motion to return to the start position. Repeat for reps, then switch sides.
Do this exercise near the end of your back workout, after heavier rowing movements, lat pulldowns, and/or pullups. Perform 2–3 sets of 15 reps, using a light-to-moderate weight.
3) Suspension-Trainer Reverse “Y” Fly
Unlike the first two exercises, this is a single-joint movement, where the arms are essentially removed from the action; the rhomboids, after all, have nothing to do with elbow flexion. The suspension trainer offers the challenge of having you lift your own bodyweight, but the exercise can be made less difficult simply by moving your feet away from the anchor point for a more upright torso.
There are two main variations of bodyweight reverse flyes: Ts (where you extend your arms straight out to the sides) and Ys (you raise the arms diagonally upward). Rusin prefers Ys for hitting the rhomboids. “The higher angle triggers more upward rotation of the scapulas [at the start of the movement] for a better stretch and gives you full range of motion of the rhomboids.”
Step 1. Grasp the handles of a suspension trainer hanging from a high anchor point (above your head).
Step 2. Keeping your body in a straight line, lean back so your torso is around 45 degrees to the floor with your arms fully extended. (The more upright your torso is, the less difficult the movement will be; move your feet forward and back to find the appropriate resistance.)
Step 3. Keeping your elbows extended, contract your back muscles to pull your arms overhead and back in a Y shape, so you lift your body just shy of vertical.
Step 4. Squeeze your shoulder blades together for a second or two, and keep them pulled down. Then slowly lower your arms to the start position. Repeat for reps.
The Y raise can be done either early in your back workout (as a pre-exhaust) or near the end—after rows, pulldowns, and/or pullups. Perform 2–3 sets of 10–15 reps, using a body position that allows for controlled movements and proper form.
How Do You Treat A Strained Rhomboid?
Injury to the rhomboids can result from playing sports or routinely carrying heavy objects with less than perfect posture—such as a backpack, gym bag, or heavy equipment. Rhomboid strains are usually caused by overuse.
According to Chow, one of the most obvious signs of a strained rhomboid muscle is a sharp pain in the upper/middle-back area when taking a deep breath. Symptoms can also include general tightness and tenderness in the area. The most straight-forward treatment is to ice the area multiple times per day for around 20 minutes each. Aside from that, there are three other treatment methods that may help as well: isometric training, deep breathing, and foam rolling.
1) Isometric Training
To train a muscle isometrically means to squeeze it, so the muscle isn’t shortening or lengthening, but tensing in a static position. “The tension will provide an analgesic effect,” says Chow, “and increase blood flow to jumpstart the healing process.” Even though you’re technically working an injured muscle, Chow says that simply tensing it isometrically shouldn’t irritate it (but, of course, stop if it does).
Chow notes that the isometric exercises he uses to treat a strained rhomboid vary from client to client. But each of the three movements described above can be done isometrically by holding the end position of the rep (using a light weight) for anywhere from 10 to 30 seconds at a time for 3–5 sets.
2) Deep Breathing
Deep breathing drills are often prescribed for general stress reduction in the context of meditation and yoga, but Chow and Rusin both recommend them for treating a strained rhomboid.
“A strain will cause incomplete inhalation due to a protective mechanism on the rib cage,” says Rusin, “where the rhomboids are local to.” Within a few days after you get injured, your breathing patterns will most likely have shortened. “Therefore, deep breathing strategies are a must for ensuring that the dysfunctional breathing pattern doesn’t stay around.”
There are any number of ways to practice deep breathing. Here’s one method, via our Star Wars Fuel Your Force program.
3) Foam Rolling
Self-myofascial release (SMR) techniques like foam rolling can provide effective treatment to injured areas by, in Rusin’s words, “reducing neurological tone in the targeted muscle tissue,” which essentially reduces tightness and helps the muscles relax.
For a strained rhomboid, Rusin recommends his 3-Way Thoracic Spine Foam Rolling series. Here’s a short 30-second video demonstrating the three drills, courtesy of Rusin’s YouTube channel:
]]>The Pendlay row is a variant of the barbell bent-over row exercise that builds muscle and strength throughout the entire back. It’s a favorite of competitive weightlifters and can help anyone build a back like a barn door and lift hundreds of pounds. Keep reading (and see the video below) for instructions on how to do the Pendlay row, troubleshoot any form problems you may have, and see how and where to fit this exercise into your workouts for better results.
Key Takeaways:
1. The Pendlay row is a bent-over row where you let the bar settle on the floor for a moment at the bottom of each rep.
2. The Pendlay row builds starting strength, and develops the lats and upper back.
3. Make sure you keep your hips and torso in the same position throughout the whole set.
4. The Pendlay row can be done first in your workout or as an assistance lift after deadlifts or cleans.
What Is A Pendlay Row and What Are Its Benefits?
(See 00:21 in the video above.)
The Pendlay row looks something like a deadlift, but is executed more like a bent-over row. The bar is on the floor, you bend your hips back to reach it, row, and then return the bar to the floor each rep. Because you have to reset the bar on the floor, your lower back gets a bit of a break, at least compared to doing the basic bent-over row, where you hold the flexed-hip position throughout the set and lower the bar to arm’s length. This reset also allows you to lift heavier weights, which makes the Pendlay row a great strength exercise for the lats, upper and lower back, core, and grip.
The Pendlay row is named for the late weightlifting coach Glenn Pendlay, who unwittingly invented the exercise in an effort to get his students to train bent-over rows more efficiently and with stricter form. It also carries over well to developing the explosive back strength needed for weightlifting and powerlifting movements such as the clean, snatch, and deadlift.
How to Perform Proper Technique For The Pendlay Row
(See 01:07 in the video.)
Step 1. Set up as you would to deadlift, placing your feet at about hip-width and just behind the barbell on the floor. Keeping a long spine from your head to your tailbone, bend your hips back as far as you can, and bend your knees until you can reach the barbell with your hands about shoulder-width apart or a little wider. Your hips should be bent about 90 degrees so that your torso is parallel to the floor, and you must maintain this angle throughout the set.
Step 2. Draw your shoulders back and down, as if pushing your chest out and closer to the bar beneath you. You should feel your lat muscles contract. Now brace your core. Your neck should be neutral, with your eyes focused on the floor in front of you.
Step 3. Keeping the rest of your body as still as possible, row the bar—explosively—to the bottom of your chest/upper abs. Remember to maintain your hip position so your lower back stays neutral and flat.

Step 4. Lower the bar quickly, but under control, until it touches the floor again. Take a moment to reset the bar (especially if it wobbles), and begin your next rep.
Make sure the bar touches down in the same place it started. It’s OK to let the bar come down fairly quickly, as the movement is supposed to be explosive with an emphasis on the concentric (upward phase of the lift), but for the sake of safety and control don’t just let it drop.
The Pendlay row works well when programmed for lower reps, with sets of 5–8 reps being the sweet spot.
Muscles Worked In The Pendlay Row
(See 02:26 in the video.)
The key players here are:
– Lats (drawing the arms back)
– Rhomboids (retracting the shoulders)
– Rear deltoids (pulling the arms back)
– Lower and mid traps (retracting the shoulder blades)
– Spinal erectors (stabilizing your spine in the bent-over position)
– Biceps (bending the elbows)
– Core (the various ab muscles brace your spine)
Common Mistakes and How to Avoid Them
(See 02:50 in the video.)
#1. Changing torso and hip position.
Coach Pendlay offered his version of the row to correct a problem he often saw in others rowing: raising the torso. A set might start off strict, but as the lifter tires, he/she tends to bounce the upper body, heaving the weight up with more of the low back than is necessary and pulling the weight to the stomach (thereby cutting off the range of motion).
In a proper Pendlay row, you must keep your hips bent 90 degrees and your torso locked in place. Only the shoulders and arms move.
#2. Rounding the spine
In any bent-over exercise where the chest is unsupported, there’s a greater demand on your trunk to stabilize the torso and spine. Rounding the back is the enemy here, and it invites the risk of lower-back injury. Remember to think “long spine” and keep your lower back in its natural arch. As you bend over into position, think about trying to touch your butt to the wall behind you, as opposed to folding over at the waist.
#3. Not letting the weight touch the floor between reps.
If you don’t touch the weight down between reps, you’re just doing a bent-over row. At the same time, if you bounce the weight off the floor too quickly, you’re likely to break form. The whole value of the Pendlay row comes from beginning each rep from a dead stop. By eliminating momentum, you develop more of what coaches call “starting strength”—the ability to get the weight moving. Relying on momentum to keep the bar in motion is a way to cut corners and miss out on the full benefit.
If you have trouble disciplining yourself to reset between reps, try counting to two after you touch the bar down and before you begin the next rep. Treat each rep like its own set.
#4. Pulling the bar to the wrong place.
Rowing the bar too high or too low on the torso can throw off the target muscles being used. For example, pulling the bar up toward the collarbone can end up working the arms and upper traps a bit more than the upper and mid back. Alternatively, pulling the bar to the waist can reduce the activation of the upper back.
Note the proximity of your body to the bar in your setup. Lining up the bar so it’s just over your shoelaces is a good starting point. Once you bend over the bar to pick it up, aim for your shoulder blades to be in line with the bar—not your deltoids or belly button. This will encourage you to pull in a straight line.
Pendlay Row Exercise Variations
(See 04:47 in the video.)
The Pendlay row can be customized for your needs and goals with a few simple tweaks.
Elevated Pendlay Row
If you’re especially tall, or lack the hip mobility to reach the bar when it’s on the floor without rounding your lower back, it’s OK to do a Pendlay row with the bar elevated on some blocks, mats, or weight plates. This will shorten the range of motion some so you can focus on rowing without worry about the safety of your spine position. An elevation of anywhere from 3 to 12 inches can be a game-changer.
Paused Pendlay Row
For variety, you can add an isometric hold at the top of each rep. That is, a pause when the bar is pulled to your chest. Most people have a habit of bouncing the bar off their chests, and the top of the rep is the weakest biomechanical position in the movement. Therefore, it’s a good idea to force yourself to hold the weight there from time to time, and it will not only strengthen your row but also help to clean up your form.
Pauses are also a good strategy to use if you’re injured or don’t have access to much weight. Taking an extra second or two to hold the top position with your back fully contracted will make lighter weight feel much heavier, and see that you get the best training effect from the weights you have access to or can handle.
Alternatives To The Pendlay Row
(See 06:15 in the video.)
Fisherman Row
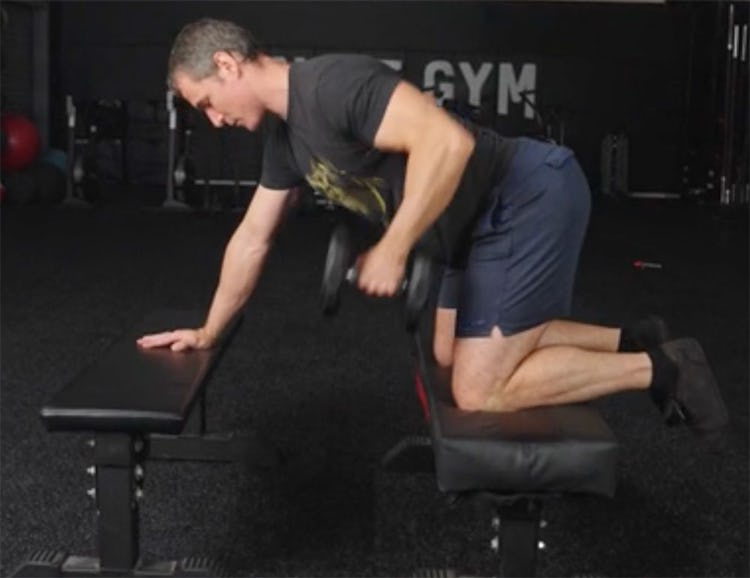
While the Pendlay row requires only a barbell and plates, you may work out at home with just a bench and dumbbells. In this case, you might consider doing a single-arm dumbbell row variation. A fisherman row is a dumbbell row done with two benches. This creates a lot of stability and helps you keep your hips square to the floor, which encourages a long, straight spine.
Step 1. Place two benches parallel to each other, and rest a dumbbell on the floor in between them. (If you don’t have two benches, use a step or box to substitute for one.)
Step 2. Place your knees on one bench, shoulder-width apart. Rest one hand on the bench in front of you, and grasp the dumbbell with the other. Your hips should be square to the floor.
Step 3. Row the dumbbell to your side, straight up from the floor. Return it to the floor, pause, and repeat.
Using a dumbbell also allows you to train the row through a slightly greater range of motion, as well as utilize a higher rep range than would be practical with the barbell version.
Inverted Row
The inverted row is ideal for home workouts or anyplace else you have very limited equipment. In this case, you’re moving your own bodyweight and not a barbell, although you can set it up with a barbell on a power rack, or a suspension training system like a TRX or gymnastics rings. The inverted row spares the lower back and enables the lifter to pause at the top and/or bottom of each rep.
Step 1. Set the bar or suspension handles to around waist height, and hang from the handles with your feet on the floor. Extend your hips and position yourself so that you’re suspended above the floor and your body forms a straight line. Draw your shoulders back and down to engage the lats.
Step 2. Pull your body up to the bar or handles, and lower yourself back under control. It’s important that your body moves as a unit. That means no hiking the hips or bending the knees to help yourself out.
How To Warm Up For Pendlay Rows
(See 07:50 in the video.)
Hip Hinge
Step 1. Stand with feet parallel and bend your knees slightly.
Step 2. Now drive your hips back as far as you can while keeping a long spine from your head to your tailbone. When you feel a stretch in your hamstrings, or you can’t push your hips back any further without losing your spine position, come back up to standing. Do 2–3 sets of 5–15 reps.
Cat Camel
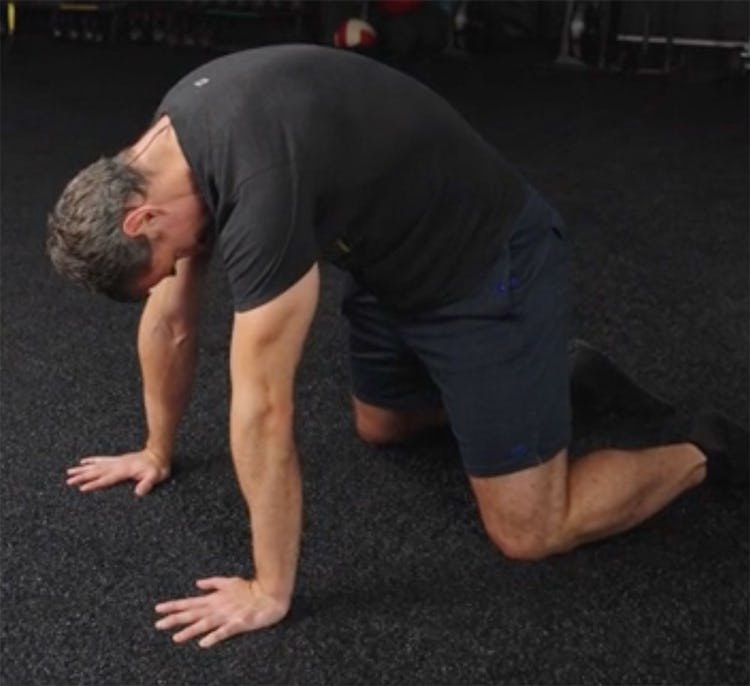
Step 1. Get on all fours and brace your core. Your arms should be directly under your shoulders and your knees under your hips.
Step 2. Press your arms into the floor while you round your upper back toward the ceiling, spreading your shoulder blades. Hold for a second.
Step 3. Now retract your shoulder blades while you arch your upper back and drive your solar plexus toward the floor. Hold for a second. That’s one rep. Imagine the motion as having a string running through your solar plexus with someone pulling it up and then down—try to move at the upper back and not the lower back. Do 3 sets of 10 reps.
Who Should Perform the Pendlay Row?
(See 09:48 in the video.)
Lifters who want a break from the conventional barbell row, as well as those whose lower backs bother them, may have an easier time doing the Pendlay row. Resting the bar between reps can be a saving grace for the lumbar region. Pendlay rows are also a great way to check your form and ensure your torso stays in the correct position, so you could consider them a good pre-requisite to master before returning to regular bent-over rows.
They’re also a perfect accessory lift done after deadlifts, cleans, snatches, or other movements that some lifters compete in. The Pendlay row trains you to keep your hips and torso braced while you pull explosively—a huge component to all of the aforementioned lifts.
Additionally, any lifter who wants to build a strong back from the base of the neck down to their sacrum can benefit from working on the Pendlay row from time to time, especially if they train at home or in a gym where equipment is sparse.
Differences Between the Pendlay Row and Other Rows
(See 10:36 in the video.)
As we explained above, letting the bar settle on the ground is a key difference between the Pendlay row and the conventional bent-over row. Resting momentarily between reps gives the lower back and core muscles a break. Plus, having to explode the weight up from a dead-stop position builds power that can translate to weightlifting and other sports. It also lets you train heavier than a bent-over row and make it a more strength-focused movement.
Both Pendlay and bent-over rows require plenty of trunk stability, and that sets both movements apart from machine and chest-supported rows, which allow you to isolate the lat and upper-back muscles more completely. Subsequently, supported rows are probably better overall choices for pure muscle gains, while Pendlay and bent-over rows are, arguably, more functional movements that involve the whole body and build strength that more readily applies to other lifts and real-life activities.
The T-bar row, in which you straddle the barbell while one end is fixed against the floor, is another barbell-based rowing movement. The T-bar setup allows you to stand more upright and is a little easier on the lower back than both the Pendlay and bent-over row, and also lets you go heavier than these lifts, but it doesn’t offer the full-body challenge of the Pendlay or bent row.
Choose the row that’s most appropriate for your goals, and feel free to experiment with each variation over time. For instance, people who are interested in greater strength and power for weightlifting or powerlifting competition may choose to make Pendlay and bent-over rows their mainstay, while muscle-seekers may opt for chest-supported or T-bar rows. Furthermore, if you’re dealing with a back injury, Pendlay rows are a better choice than bent-overs, and chest-supported rows would probably be better still.
How to Fit Pendlay Rows Into Your Workout
(See 12:15 in the video.)
The Pendlay row is a demanding lift that offers the potential to move a lot of weight. For those reasons, it will ask a lot of the nervous system and grip strength of the lifter. Placing the Pendlay closer to the beginning of your back (or pull day) workout would be a smart choice to maximize the amount of weight lifted and the stimulus (it can also come second in line behind deadlifts, if you do those on pull day).
Performing Pendlays later in your workout will mean you’ll have to go lighter and may not get as much out of them, but it’s a good strategy if you want to use less weight so as not to aggravate a back injury or cheat form.
In general, it’s good to keep the reps on the lower end (5–8). You can complement Pendlays with other lower-back intensive lifts done for higher reps (10 and above), like the back extension, good morning, and bird dog.
The good morning has been popular in bodybuilding and powerlifting circles forever, as it’s a tremendous exercise for the glutes, hamstrings, and lower back, and has the potential to add pounds to your squat and deadlift max. It can teach you to hinge at the hips and fire the muscles of your posterior in unison for better running, jumping, and overall explosiveness. But if you don’t respect it, you can end up with a back injury that plagues you for life—and that’s exactly what happened to the legendary Bruce Lee when he tried the good morning.
Here’s the ultimate guide to mastering this age-old lower-body builder for maximum safety and effectiveness.
What Are Good Mornings?
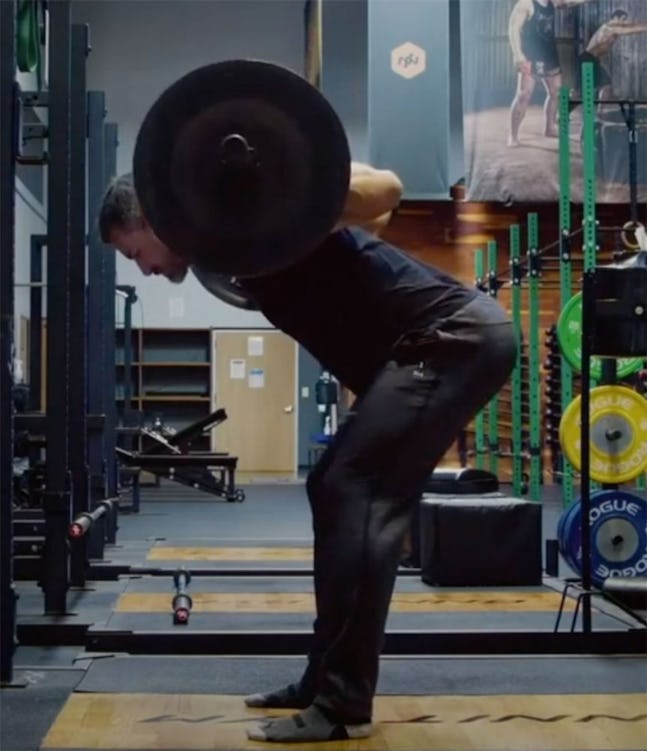
First, you need to understand what a hip hinge is. As LA trainer Ben Bruno (@benbrunotraining on Instagram) likes to explain it, a hinge is basically the movement you make when you have a boner in the morning and you have to pee: keeping a long spine, you bend your hips back, lowering your torso toward the floor. (For ladies reading this who may prefer a different, but no less crude analogy, imagine mooning a crowd.) That’s a hip hinge, and it’s a basic movement pattern we should all know how to do properly. Any time you pick something up from the floor, whether it’s a baby or a barbell, you’re hinging at the hips. The hip hinge is also necessary for jumping and other explosive movements, such as a power clean, and a football player couldn’t get into a three-point stance without one.
The good morning is a hip hinge in which external load is carried across the back of the shoulders. You hold a bar on your back and bend your hips as far as you can while keeping your head, spine, and pelvis aligned. (Alternatively, a band can be used, wrapped around the back of your neck and under your feet.) Legend has it that the good morning got its name because it looks like a stretch you’d perform as soon as you get out of bed. Imagine doing it without load, while yawning, and with arms reaching overhead, and you can kind of see why the name stuck.
Apart from where you hold the weight you’re lifting, a good morning really isn’t that different from other hip hinge movements like the Romanian deadlift or hip thrust. Holding the weight so far from your center of gravity makes the exercise less stable than these other examples, so you can’t go as heavy, and you have to be even more aware of your spine position throughout the lift. But on the plus side, the good morning seems to have more carryover to the back squat because its mechanics are so similar. It’s also a good alternative to the conventional deadlift, as it’s less stressful to the body as a whole, takes grip strength out of the equation, and allows you to perform more training volume. (You might only be able to handle one or two deadlift workouts per week without running into problems with recovery, but you could do several sets of good mornings throughout the week safely.)
What Muscles Do Good Mornings Work?
The good morning activates your body’s biggest muscles. To perform the hinge, the glutes and hamstrings have to work through a long range of motion. Stabilizing that motion are the back muscles—ranging from the rhomboids, teres major and minor, and lats, down to the spinal erectors—the core, including the quadratus lumborum, the deepest abdominal muscle and essential for good posture, and your calves.
Good mornings also have a way of training you to breathe and brace your core properly, says Kelly Starrett, DPT, creator of The Ready State and author of Becoming a Supple Leopard and Waterman 2.0. This can have much farther-reaching benefits than just giving you muscles you can see in the mirror. To prevent the weight from pulling your torso to the floor, you have to create stability by activating your diaphragm and taking air deep into your abdomen. (More on this under How To Correctly Perform a Good Morning below.) “This allows you to access the pelvic floor,” says Starrett, the muscles that control the bowels and bladder. Strengthening this area helps prevent medical problems like incontinence and pelvic floor prolapse. Yes, that means good mornings can play a role in keeping your guts where they belong—inside your body.
Are Good Mornings Effective?
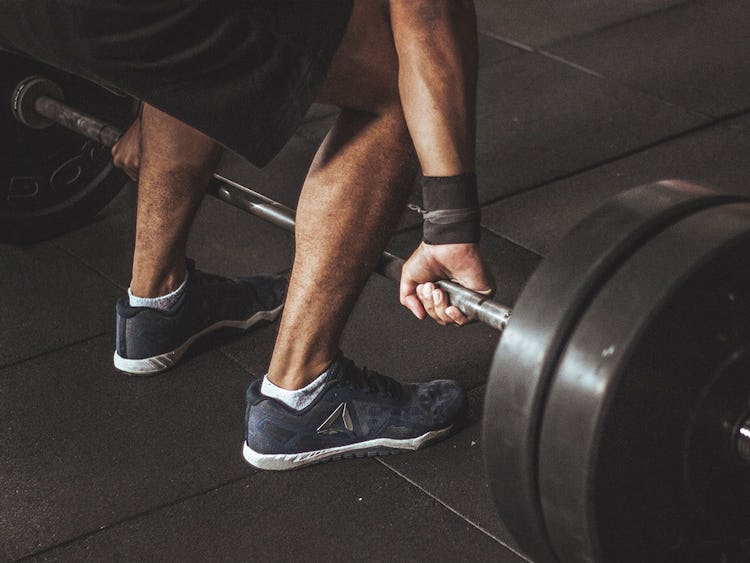
Just about every sport requires the ability to hip hinge, so good mornings are a useful exercise for athletes of every stripe. However, muscle-seekers and heavy lifters rely on them most.
They’re a favorite of bodybuilders who want to put more size on their glutes and hamstrings, and powerlifters who are striving to build their squat and deadlift. The good morning is particularly good for squatters, writes Bret Contreras, PhD, CSCS,*D, in his book Glute Lab, a guide to glute exercises. “The good morning helps reduce the risk of injury in a squat-gone-wrong situation, when the hips shoot up out of the bottom position, which is a common occurrence when squatting with maximal loads. Because the good morning mimics this exact movement pattern, the rationale is that the lifter strengthens the muscles used to carry out the movement, which might help prevent injuries if or when the fault occurs.”
Some Olympic weightlifters also use good mornings as an assistance lift for the clean and jerk and snatch. Barbell complexes, a form of conditioning circuit that’s grown out of weightlifting training, often feature the good morning. To do a complex, you perform several barbell exercises that feed into one another, all without putting the bar down. A complex could begin with five reps of the hang snatch, and then, since the bar finishes in an overhead position, go to an overhead squat for five reps. From there, the lifter can lower and press the weight behind the neck (five reps), and then lower it back to shoulder level, where he/she can finish the complex with five reps of good mornings. Used this way, one could argue that the good morning is an effective exercise for fat loss and cardio.
Finally, the good morning stretches the glutes and hamstrings at their end ranges of motion, making it highly valuable for improving hip flexion mobility. This is important for being able to squat, lunge, and crouch low, and access the full strength and power potential of these muscles.
“Good mornings might have started in modern weight rooms,” says Starrett, “but we see a similar pattern in practices like yoga’s sun salutation. People figured out a long time ago that you need to be able to hinge, extend the spine, and keep your hips, pelvis, and lumbar spine coordinated, organized, and stable. The good morning is a great expression of this notion.”
How To Stretch Before Doing Good Mornings
Perform the following mobility drills to prepare your body for the good morning. Do 5–10 reps for each.
Mountain Climber
Cat Cow
Mobile Table
How to Correctly Perform a Good Morning
If you’re new to the good morning, practice it with a PVC pipe, dowel, or broomstick before you use a barbell (yes, you can do this at home, if you like). The reason for this is twofold: the light weight of the stick will allow you to learn the mechanics of the movement with minimal injury risk, and its shape will provide you immediate tactile feedback on your form.
Position the stick vertically down your back (reach one arm behind your head and one behind your back to secure it), and try to maintain three points of contact with it throughout the exercise. The back of your head, your upper back, and butt should touch the stick at all times. When you can keep the stick against those three points, you know you’re keeping your head, spine, and pelvis aligned and neutral, which is critical for performing the good morning safely.
When you think you’ve got it down, move on to an empty barbell, and then load the bar gradually from there.
Step 1. Place a barbell in a power rack and grasp it with hands shoulder-width apart. Step under the bar and position it along the back of your shoulders. Draw your shoulders down and back (think: “proud chest”). Nudge the bar out of the rack, and step back, setting your feet hip-width apart. You can point your toes straight ahead, or turn them out slightly, to the 11 and 1 o’clock positions.
Step 2. Draw your ribs down, as if pulling them into your hips. Take a deep breath into your belly, trying to expand it 360 degrees. Now brace your core. You should feel very stable throughout your torso. Twist your feet into the floor so that you feel tension in your hips and the arches in your feet rise—keep this tension throughout the set. Focus your eyes on the floor a few feet in front of you.
Step 3. Soften your knees, and begin bending your hips back, lowering your torso toward the floor while keeping your head, spine, and pelvis in a straight line. Your lower back should be neutral—not excessively arched, and certainly not rounded over. Think about pulling your butt and hips straight backward. Continue hinging your hips until you feel a strong stretch in your hamstrings, or you think you can’t go any further without losing your stable spine position. Allow your knees to bend naturally.
Step 4. Squeeze your glutes as you reverse the motion and extend your hips to stand tall again.
As you get familiar with the movement, you can experiment with variations in your stance and grip. For an even greater glute and hamstring hit, you can perform good mornings with a wider stance, greater knee bend, and more toe flare. This better mimics the way most people squat, so it can have greater carryover to that exercise. You can also hold the bar higher up on your back—on your traps rather than the rear deltoids. Done with a narrower stance and less knee bend (as shown above), this version can help build your deadlift (assuming you deadlift with a conventional stance).
“If someone hasn’t done good mornings before, or we identify some technique errors, we regress back to a PVC pipe and see if they can perform 10 reps,” says Starrett. “Then we test again to make sure they’re breathing comfortably throughout the exercise. The next step is typically a regular 45-pound barbell, although some people find it easier to hold a light dumbbell behind their head as they hinge. This isn’t really about equipment or the muscles used—it’s about establishing sustainable motor patterns and testing their integrity.”
How To Fit Good Mornings Into Your Workout
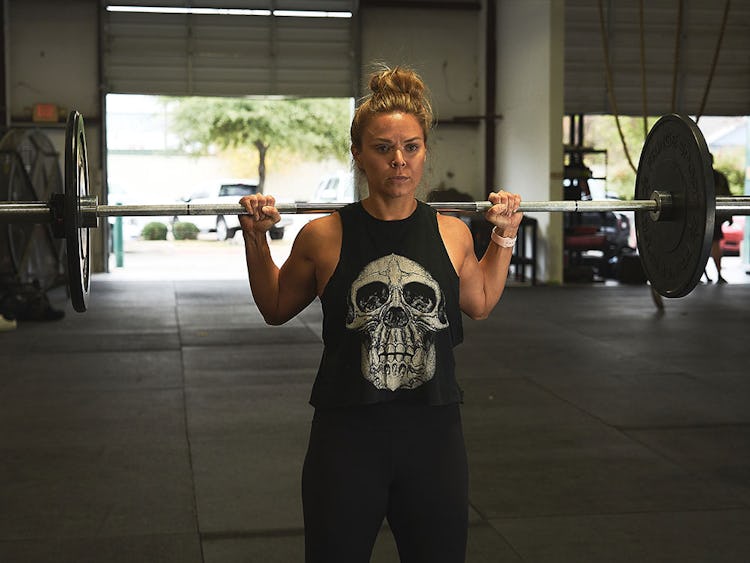
As mentioned above, good mornings work well as an assistance exercise for the back squat and conventional deadlift. You can perform them after you do one of those main lifts, or on a separate day elsewhere in your training week. In Glute Lab, Contreras recommends using 2–3 sets of 8–12 reps as a starting point.
Starrett says that he personally puts light good mornings at the start of a hip hinge-focused session, progressing from there to kettlebell swings or deadlifts. “The good morning can help groove the hip hinge pattern,” he says, “and also illustrates areas that are still sore from previous sessions and might need some mobility work after you’re done.” Starrett cautions that you don’t need to go very heavy on good mornings to see results, no matter where you choose to place them. “A couple sets of 10 with a light weight will still challenge you.” And whatever weight you use, work up to it slowly.
How to Prevent Good Mornings Causing Back Injuries

While the good morning is a safe exercise when done properly, many lifters have injured their lower backs performing it—including martial arts icon Bruce Lee. While reports vary, it seems that The Dragon was working out sometime in 1969, and skipped or rushed his warmup. Lee performed a good morning with around 135 pounds (approximately his bodyweight), and injured a sacral nerve. (No, he wasn’t kicked in the back by Wong Jack Man, as the movie Dragon: The Bruce Lee story posited.) After a long layoff, he was able to train again, but supposedly battled back pain for the rest of his life.
If Lee—a man who looked like he was built from coiled steel springs—can hurt himself doing good mornings, you can too. So take every precaution.
When people hurt their backs on the good morning, deadlift, or any other hip hinge, it’s often assumed that the spine went into unwanted flexion (you rounded your lower back), but Starrett states that improperly executed extension is more often to blame. That is, coming up out of the bottom of the movement too fast, or with too much of an arch.
“Go lighter and slower than your instinct tells you,” says Starrett. “Also, make sure you’re not going down too far—imagine reaching into a crib but not picking up your baby.”
If you have a history of lower back pain, the good morning may not be for you, at least until you’re sure the injury has healed. You can work on back extensions, Romanian deadlifts, and single-leg Romanian deadlifts in the meantime, and get a very similar training effect.
Another common mistake is to let your weight shift over your toes, says Starrett, “which, if overdone, can compromise your mechanics. Instead, make sure you apply pressure evenly throughout your feet for the duration of the movement, particularly when you start to hip hinge. This seems like a small thing, but will have a big impact on your lumbo-pelvic organization, and how well you’re able to maintain force production.”
]]>– The bent-over barbell row is primarily a back exercise, but works many other muscles as well, and can be considered a full-body movement.
– The row can be used as an assistance exercise to strengthen weak points in specific lifts you want to improve.
– Rowing with a barbell can be hard on the lower back, so it may be wise to consider alternatives.
Bent-Over Barbell Row: How To Do It & Get Ripped
When most people hear “back exercise,” they picture a pullup, pulldown, or other such vertical pulling motion. There’s nothing wrong with that, but rowing should be the priority in your back training. Rows train the scapular muscles (the ones that control your shoulder blades) to retract, and that helps fight the bad posture people develop from sitting and looking down at their iPhones. They balance out the effects of pushups and chest presses on the shoulders, and they build thickness throughout the back.
Perhaps the greatest and most time-honored row of all is the bent-over barbell row. About as old as lifting itself, the bent-over row has you fighting to maintain a rigid torso in a hinged position while you pull the barbell to your belly. While it’s mainly used to build up the lats, rhomboids, and traps, the barbell row is really a full-body exercise, calling on the lower back, core, biceps, hamstrings and more. Let us take you through the proper execution of the exercise, its many benefits, and a few alternatives you can use to get similar results, if you determine the bent-over barbell row isn’t for you.
How To Do The Bent-Over Barbell Row
Step 1. Place a barbell on a rack set to hip level. (You can also deadlift it up from the floor—but only if you can maintain a flat back/neutral spine position, for safety). Grasp the bar with your hands just outside shoulder-width, and palms facing down. Pull the bar out of the rack. Step back, and set your feet at hip width; hold the bar at arm‘s length against your thighs.
Step 2. Draw your shoulder blades back and downward—think: “proud chest.” Take a deep breath into your belly, trying to expand it 360 degrees. Brace your core. Now bend your hips back while keeping your head, spine, and pelvis aligned. Allow your knees to bend naturally as you drive the hips back until your torso is just above parallel to the floor—or as low as you can go without losing the neutral positioning of your lower back. Your arms should hang straight down, but not loose; maintain your proud chest position and actively pull the bar close to you so it’s touching your shins just below the knees. Your neck should be neutral—not extended or rounded forward. Focus your eyes on the floor a few feet in front of you.
Step 3. Actively contract/squeeze your back muscles as you row the bar up to your abdomen. Breathe out as you do so. The bar should touch your torso somewhere between your belly button and sternum. Hold it there for a second or two, and then lower the bar back down under control, taking another breath in.
Because it lends itself to training heavy, the bent-over barbell row is usually performed for sets of 6 to 12 reps, but it can be done for higher rep ranges to train the endurance of the lower back and core. Those new to the exercise should start with 3–5 sets of 5 reps to keep fatigue at bay while they master the technique.
Safety Tips
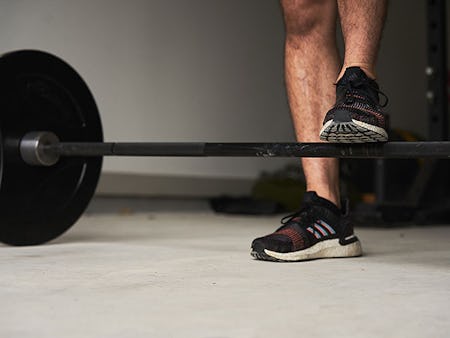
Be careful not to let your torso bounce up and down as you’re rowing the bar, as this can cause a lower-back injury. Focus on keeping your trunk motionless, and your bar path smooth. Furthermore, don’t drive your elbows up as high as you can. This can irritate the shoulder joints over time. Your upper arms should point out at about a 45-degree angle at the top of the row, and they should be level with your torso.
Training Tips
The bent-over barbell row can also be performed with different grip widths and hand positions to emphasize one muscle group over another. For instance, the classic row described above is great for overall back development, but gripping the bar even wider and flaring the elbows more shifts the muscle activation so that the traps and rear delts do more of the work. Meanwhile, a narrower, shoulder-width grip will have you pulling the bar lower on your abdomen with your elbows tucked closer to your sides. This will train your lat muscles to a greater degree. Another option: use an underhand (palms facing up) grip, which puts more tension on the lats and biceps, but less on the traps and upper back muscles. Choose the variation that best suits your goals.
For example, a lifter who wants to strengthen his/her back to improve performance on the deadlift should use the basic barbell row described above as a mainstay. The mechanics are most similar to those used on the deadlift, so this type of row will have the greatest carryover. However, someone who is trying to build thicker, wider lats for physique development may do better to focus on the underhand-grip row with the elbows in close to the sides.
Pendlay Row
The bent-over row can also be done with a slightly different technique. A Pendlay row, named for Olympic weightlifting coach Glenn Pendlay, is a bent-over barbell row with a lower torso position that allows you to touch the plates on the bar (assuming you’re using standard-sized Olympic plates, or 45-pounders) to the floor between reps. This variation helps to build more explosive strength, as you can’t rely on momentum or the muscles’ stretch reflex to help you row the bar.
It also makes cheating a bit more difficult. Many people will inadvertently stand more upright mid-set when doing heavy rows, taking pressure off the lower back and using momentum to get the weight up. The Pendlay row makes you stay in that bent-over position, but it gives your lower back a break between reps, letting you re-set, and that may allow you to lift heavier. However, the Pendlay row requires a strong lower back and good hip mobility in order for you to bend over that far and keep the position without rounding your lower back, so we wouldn’t recommend it for inexperienced lifters, or those with lower-back problems.
Benefits of the Bent-Over Barbell Row
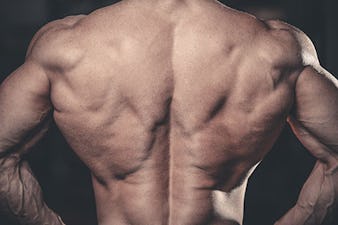
The bent-over barbell row is one of the most efficient exercises you can learn, as it trains a number of muscles and functions. Here’s a quick rundown of what we consider to be its key selling points.
#1. It trains the hip hinge. The ability to bend your hips back—activating your posterior muscles while keeping good alignment from your head to your pelvis—is a must for anyone who wants to be functionally strong or perform well at sports. A three-point stance in football, the beginning of any jump, and performing the simple action of picking a grocery bag up off the floor all require sound hinge mechanics. The bent-over barbell row teaches you not only to hinge but to hold that hinged position while you work the upper body. So, funny enough, while it’s thought of as a back exercise, it’s really a full-body, athletic movement.
#2. It works a ton of muscle. As you’ll see in the next section, the row trains pretty much the entire back side of the body, with some added stimulation for the biceps, forearms, grip, and core as well. If your workouts need to be brief, or you get overwhelmed by the idea of having to use a dozen different exercises to train all these muscles, the bent-over row can simplify things greatly. Additionally, the bent-over barbell row puts you in a strong biomechanical position and has you using both arms at once. That allows you to handle more weight than you could on most other back exercises. If lifting big weights—on any exercise—is a goal of yours, the bent-over row can help you get there.
A 2018 study looked at eight different exercises for efficiently targeting all the muscles of the back. The exercises were the bent-over barbell row, chinup, inverted row, IYT raise, lat pulldown, pullup, seated row, and suspension trainer row. The lead researcher concluded that if a person had to choose only one back exercise to do, the bent-over barbell row would be the best option, as it activates three of five main back muscles to the greatest degree (middle traps, infraspinatus, spinal erectors), and was the second best exercise for the other two muscles (lower traps and lats).
#3. It strengthens weak points. Some people struggle to keep the barbell close to their body when performing deadlifts or Olympic weightlifting exercises. The bent-over barbell row helps to strengthen the back so that you can maintain control of the bar, as well as rigidity in the torso and hips while in a hinged position. You’d be hard-pressed to find a weightlifter, powerlifter, or strongman who hasn’t used bent-over barbell rows to prepare for competition at some point.
#4. It promotes good posture. Most people slouch. Their shoulders are rotated forward and their upper backs are weak as a result. If you do a lot of chest pressing on top of that, you make the problem worse, and increase the risk of shoulder pain. Rows strengthen the upper back—specifically, the rhomboids and middle traps, which retract the shoulder blades. When these areas are strong, you stand up straighter with your shoulders back and your chest out—like a Marine standing at attention. In other words, rows make you look better, and avoid the disabled list.
Muscles Used in the Bent-Over Barbell Row
You can expect the following muscles to be trained when you do the bent-over barbell row, starting at the top of the body and scanning down.
- trapezius (middle and lower portions)
- rhomboids
- latissimus dorsi (lats)
- teres major
- rear delts
- infraspinatus (rotator cuff)
- teres minor
- pec major (the sternal portion)
- brachialis (upper arm)
- biceps
- brachioradialis (forearm)
- spinal erectors
- quadratus lumborum (core)
- rectus abdominis (the six-pack muscle)
- obliques
- glutes
- hamstrings
- adductors
- quads
How To Stretch Before Doing the Bent-Over Barbell Row
Try the following warmup mobility drills from Cristian Plascencia and Natalie Higby, founders of thedurableathlete.com, before you perform the bent-over barbell row. Do 3 sets of 5–10 reps for each move.
Shoulder Protraction/Retraction
Kneeling Arm Thread
Cat-Cow
Half Mountain Climber to Full Mountain Climber
Alternatives to the Bent-Over Barbell Row
For all its good points, the bent-over barbell row does have a downside: it can be hell on the lower back, especially if you’re over 40, or have a history of back problems. Furthermore, just getting stronger on the barbell row over time makes it a bit more precarious for the lower back because you’re subjecting the lumbar spine to increasingly heavier loads. That’s why we love the bent-over row for beginners and younger athletes looking to build a base of strength, but rarely prescribe the standard barbell version to older people or those with banged-up backs. When you’re rowing 185 pounds, you’re not at much risk. But build up to where you can row 225 for reps, and you may find that your lower back wants to round, giving out before your lats and upper back do. For these reasons, it’s good to cycle alternative exercises into your program that work the same muscles as the barbell row, but in a less risky way.
Inverted Row
The inverted row is a rowing motion done while hanging from a barbell or suspension trainer. Like the bent-over row, it’s a full-body movement that requires your core to stabilize your body, but you don’t load your back in a hinged position, so there’s no stress on the lumbar. Done on a barbell, the inverted row is a bit more stable. When using a suspension trainer, you have to stabilize the handles and you get a little extra range of motion.
Step 1. Grasp the handles with your palms facing down, and hang from the suspension trainer at whatever angle is appropriate for your strength level. A steeper angle will make the exercise easier, and a flatter one will be harder. Just make sure there’s tension on the straps. Brace your abs and draw your shoulders back and down—think “proud chest.” Retract your neck, as if making a double chin, so your body forms a straight line from your head to your feet.
Step 2. Row your body up to the handles, tucking your elbows close to your sides, and rotating the handles so that your palms face each other.
One-Arm Dumbbell Row
Rowing with dumbbells is often preferable to a barbell. The dumbbell allows a greater range of motion, a freer range of motion—so that your body can determine the best path of movement based on your own mechanics—and it forces you to stabilize your torso to prevent rotation. It’s also great for building up grip strength, and it can be trained both heavy and for high reps. It’s a staple exercise in many strength athletes’ workouts, as well as those of bodybuilding and fitness competitors.
Step 1. Hold a dumbbell in one hand and get into a staggered stance, balancing on the ball of your rear foot with your opposite forearm braced against your front thigh for support. The hand holding the weight should be opposite of the foot that’s in front.
Step 2. Row the dumbbell to your hip, and then hold it in the top position for a second or two. Lower the weight under control.
]]>It’s not just guys who want wider backs. Ladies benefit from broadening their lats because they make the waist look smaller by comparison. Meanwhile, a more defined upper back also looks great in a halter top, razorback tank, or backless dress, and a strong lower back helps you pull off a keyhole dress or crop top. And those are just the aesthetic benefits. Stronger back muscles are a must for good posture and injury prevention. Since most people (both women and men) focus on muscles they can see in the mirror, it’s the ones on the back side of the body that need the most attention, and must be built up for a balanced look.
Strengthen and Tone Your Back with These Workouts
The following are my favorite workouts for targeting every major component of the back musculature. Most of them are doable with only minimal equipment, but I’ve also included routines that are specially designed for a small home gym or a few pairs of light dumbbells.
Pre-Workout Back Stretches
Every workout should begin with a mobility warmup that prepares your joints, tissues, and nervous system for the kind of training you’re about to do. Onnit Durability Coach Cristian Plascencia (@cristian_thedurableathlete) offers the following movements for prepping the back and shoulders for strong pulling.
The Full Back Workout for Women
This routine works the entire back, from the muscles around the shoulder blades to the lats (the big muscles on the sides of your back) and spinal erectors (the ones that start at your lower back and run up the center).
Many people have trouble feeling their back muscles when doing exercises like pulldowns and rows. They feel the work more in their arms than in the back, and so they never fully activate the target muscles. This is why I’m starting you off with scap pullups. You simply hang from a pullup bar and draw your shoulder blades down to raise your body up. They don’t look like much—you’ll only move a few inches—but they’ll help you connect your mind to your muscles and feel your back working. This should help you focus on the right muscles during the rest of the workout. Note: don’t worry if you’re not strong enough to do a full pullup—you only have to pull with your back muscles on a scap pullup. Your elbows don’t bend.
Directions
The exercises are grouped and marked with letters. Do one set of 1A, then one set of 1B, and then 1C. Rest 60 seconds, and repeat for 3 total rounds. Perform the remaining groups of exercises in the same fashion. For the last two exercises, 4 and 5, perform only one set of each, resting 15 seconds after 4.
1A Scap Pullup
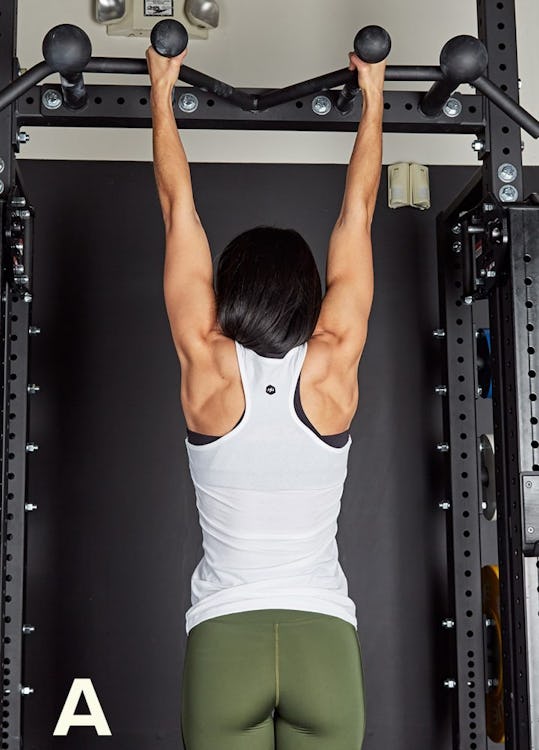
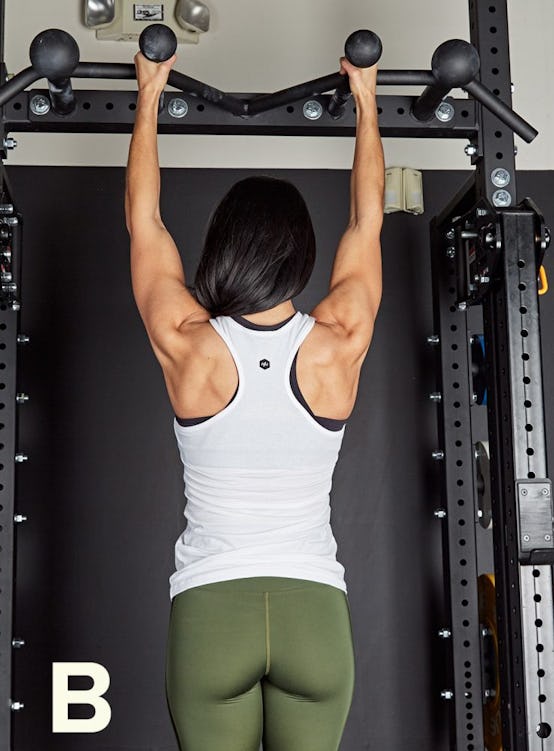
Reps: 6–8R
Step 1. Hang from a pullup bar with hands outside shoulder width.
Step 2. Draw your shoulder blades down and together to raise your body up. The range of motion will only be a few inches. Hold the top position a moment.
1B Band Face Pull
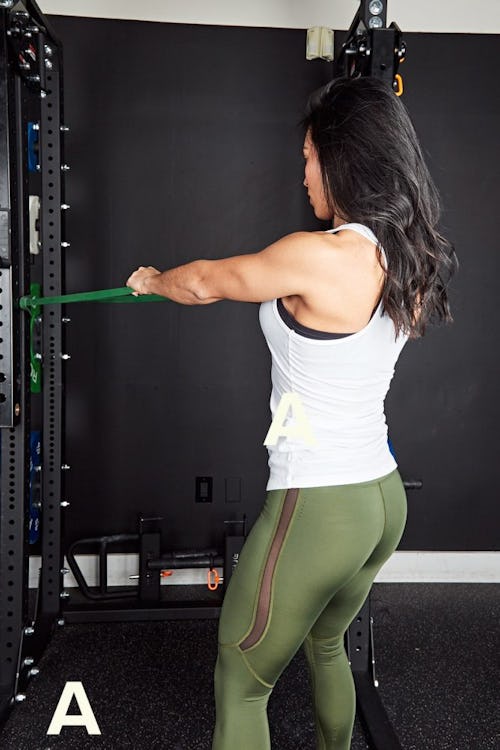
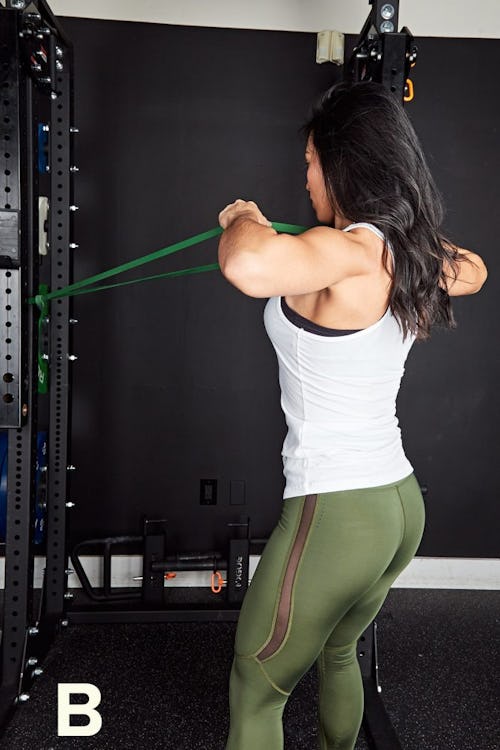
Reps: 12
Step 1. Attach an elastic exercise band to a sturdy object at about chest height. Grasp the loop with both hands a few inches apart and stand back so that your arms extend in front of you and there’s tension on the band.
Step 2. Draw your shoulder blades back together and downward as you pull the band to neck level, flaring your elbows out to your sides. Pause for a moment and then extend your arms again.
1C Suspension Row

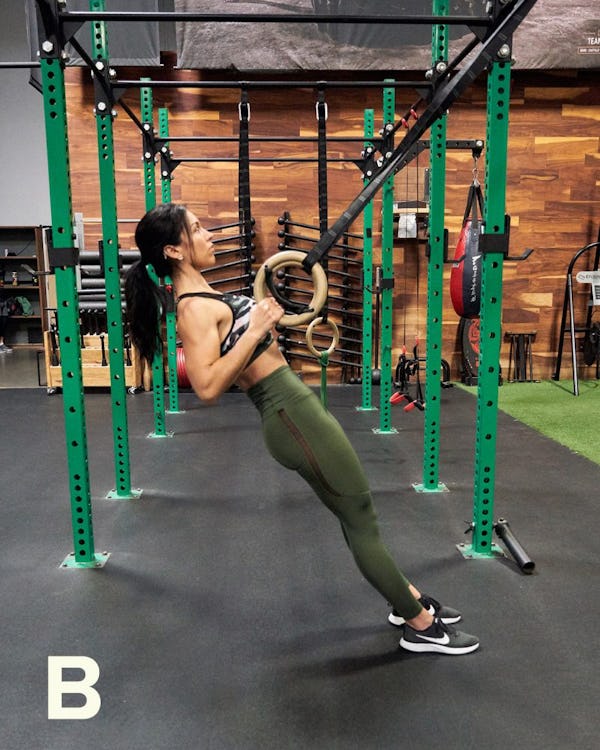
Reps: 12
Step 1. Set the handles of a suspension trainer to about hip level. Grasp the handles and hang from them with arms straight. Draw your shoulder blades together and downward (“proud chest”). Your body should form a straight line from your head to your feet. Brace your core.
Step 2. Row your body up to the handles, contracting your back fully.
2A Seated Cable Row
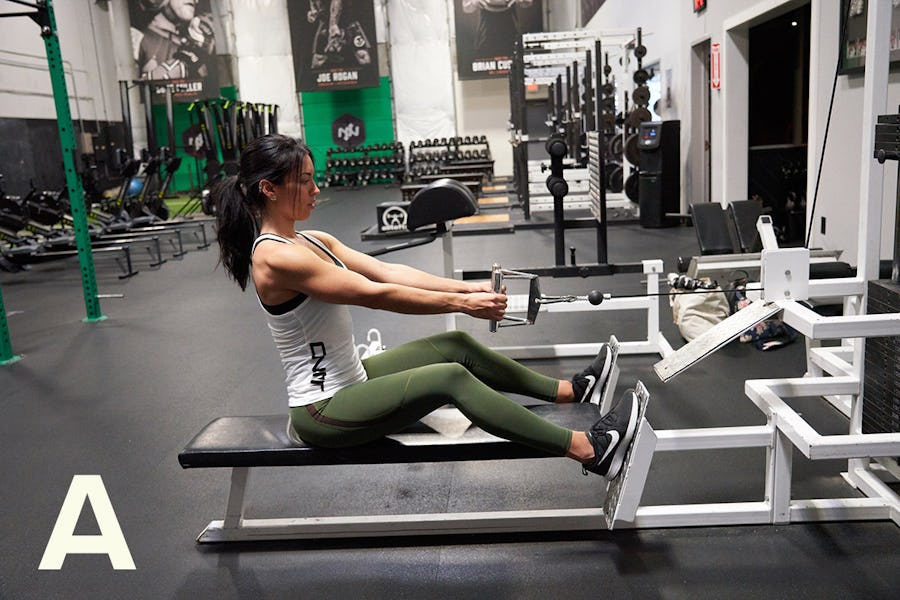
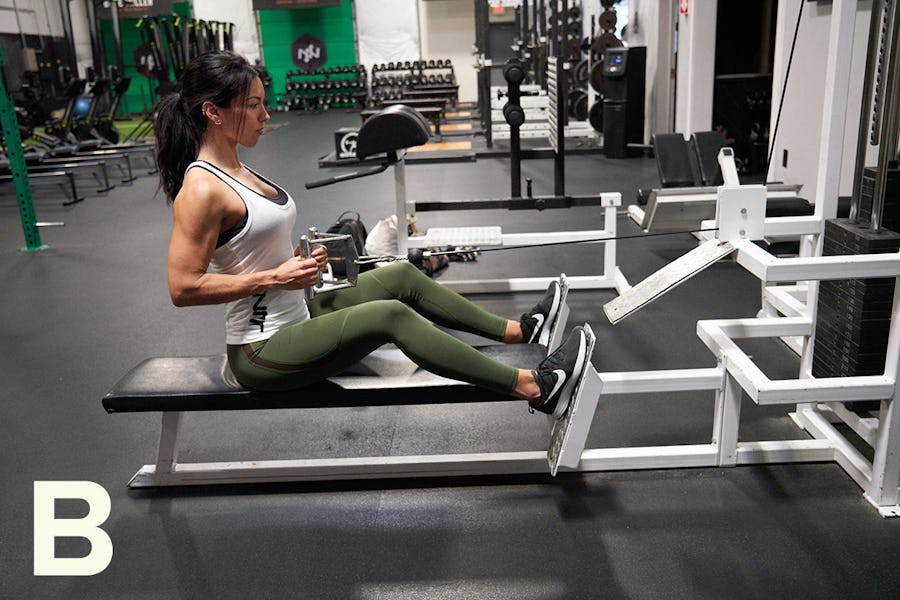
Reps: 12
Step 1. Attach a V-grip handle to a seated cable row station and sit tall on the bench with knees bent.
Step 2. Row the handle to your sternum, drawing your shoulders back together and downward as you pull. Stay upright; don’t lean back.
2B Pilates Double Kick
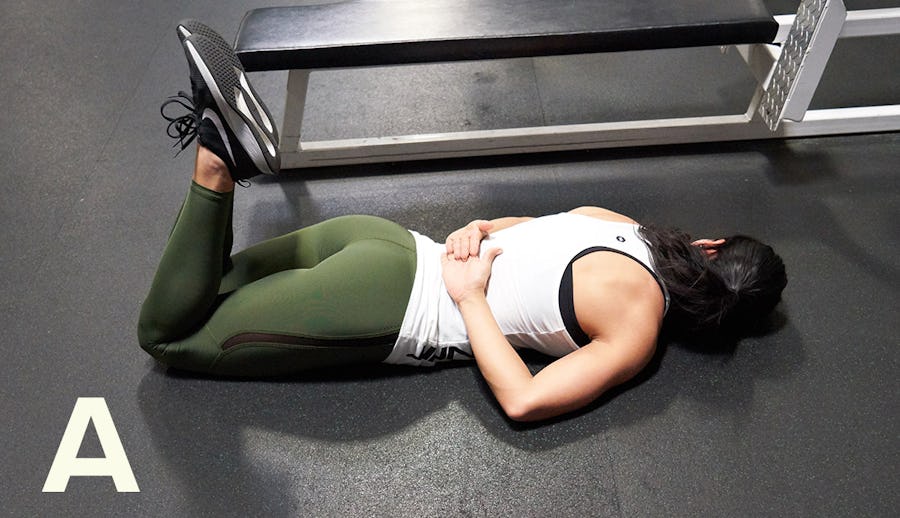
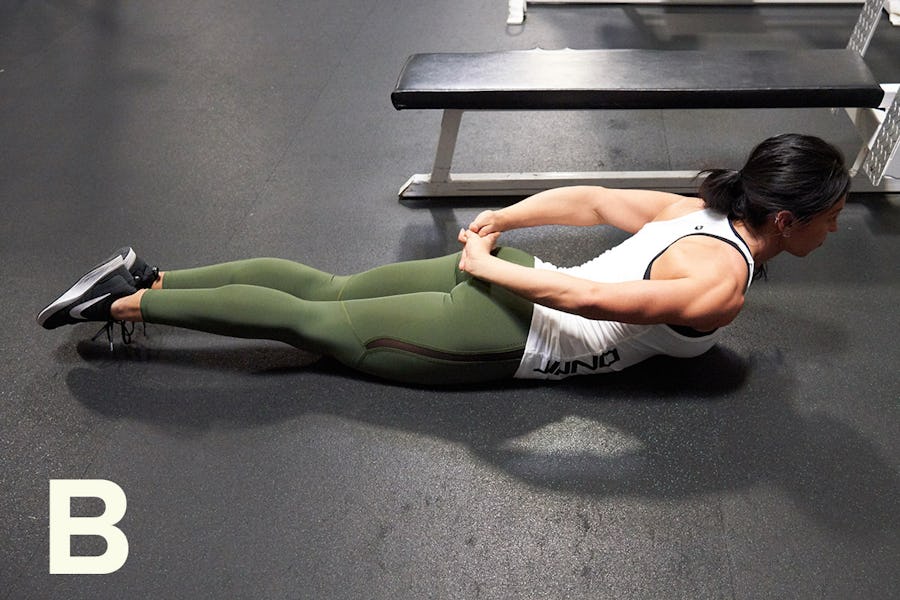
Reps: 10
Step 1. Lie facedown on the floor and turn your head to rest on your right cheek. Bring your hands behind your back to rest one on top of the other. Draw your elbows out wide and down to the floor. Squeeze your legs together.Bend your knees to bring your heels to your butt—“kick” it twice—and then lower your legs to the floor again.
Step 2. Take a deep breath into your belly. Extend your arms behind you, toward the floor, and raise your torso off the floor while looking in front of you. Hold for a moment, and then turn your head to the opposite side, bend your elbows, and lower back down to rest on the other cheek. The next rep begins with another kick of the feet.
2C Posture Band Hold
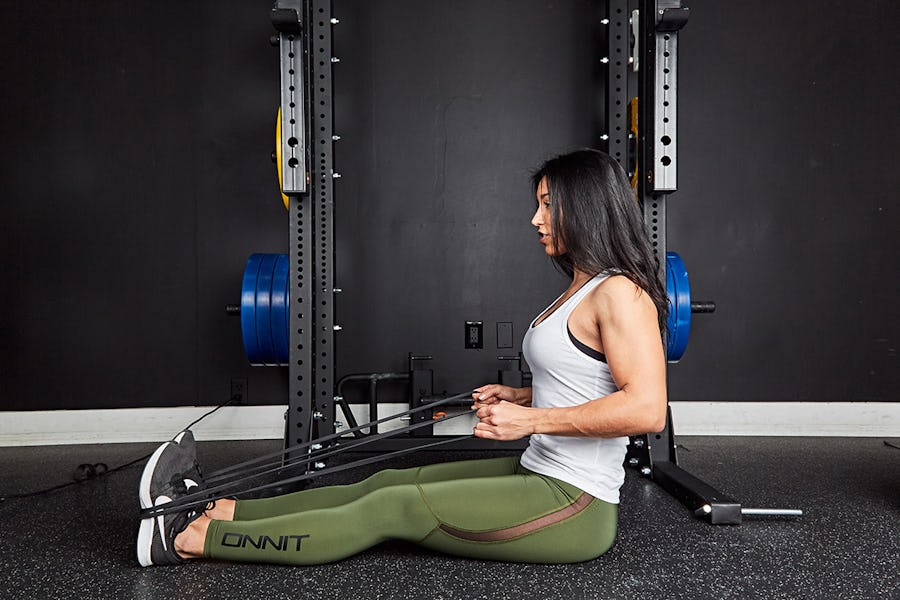
Reps: Hold for 20–30 seconds
Step 1. Sit on the floor with legs extended and wrap a band around the bottom of your feet. Hold a loop of the band in each hand and sit upright with your shoulders down and back (think: “proud chest”). Engage your core.
Step 2. Row the band to your belly and hold the position.
3A Bent-Over Dumbbell Row
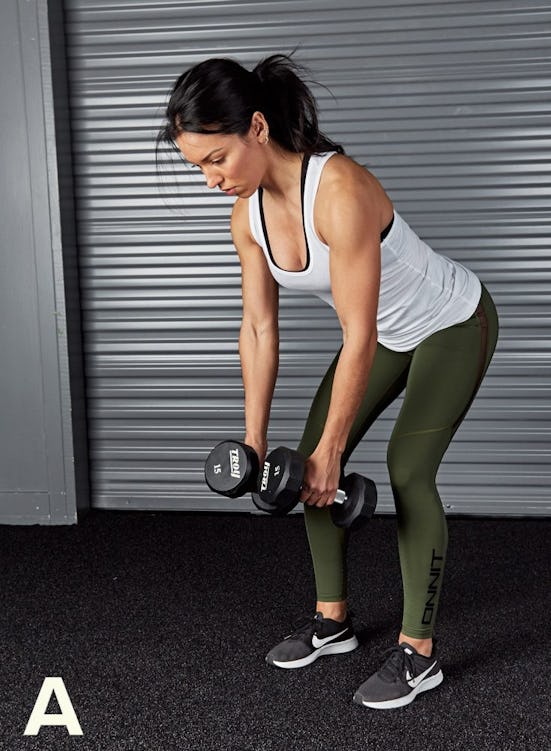
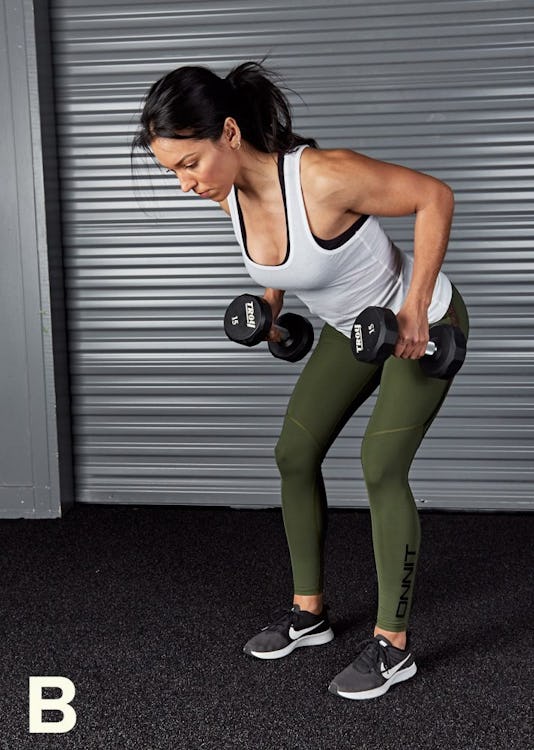
Reps: 15
Step 1. Hold a pair of dumbbells and, keeping a long spine from your head to your hips, bend your hips back until your torso is about 45 degrees to the floor.
Step 2. Draw your shoulder blades together and downward as you row the weights to your sides.
3B Renegade Row
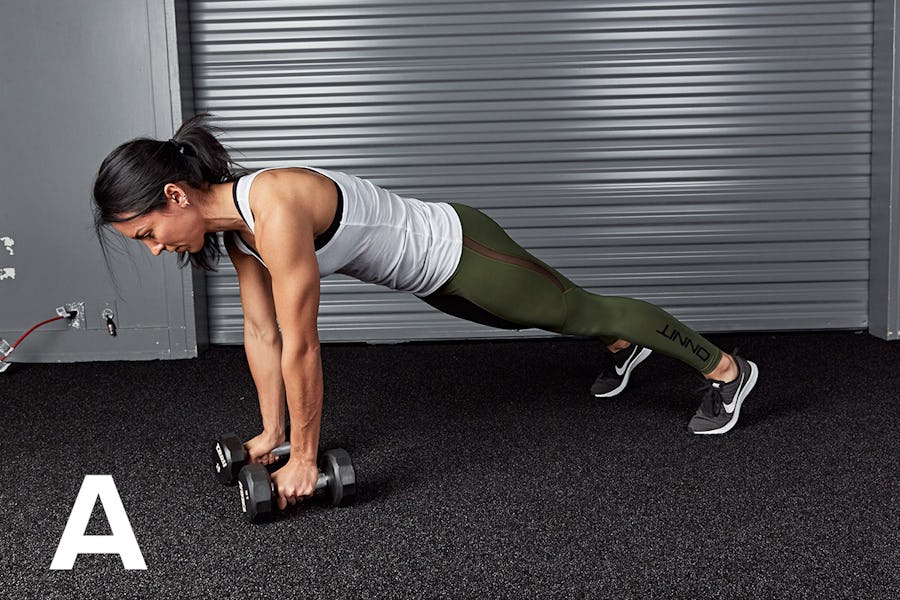
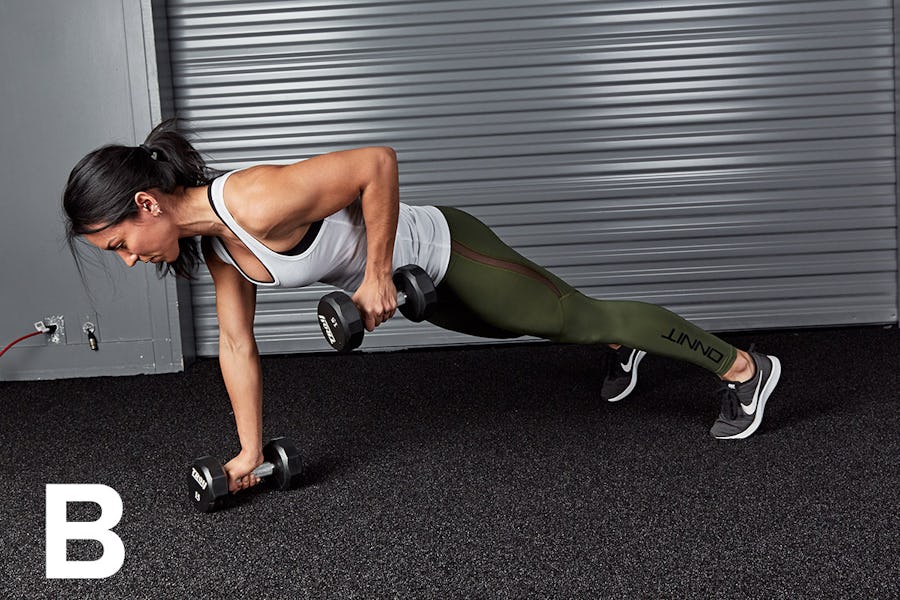
Reps: 6–8 (each side)
Step 1. Get into a pushup position, resting your hands on a pair of dumbbells. Take a deep breath into your belly and brace your core.
Step 2. Lean your weight to your right side, pushing that hand into the floor. Your left side will feel lighter. Now row the left-hand dumbbell to your side, but avoid twisting your hips or shoulders. Lower the weight and repeat on the other side.
3C Pilates Dart
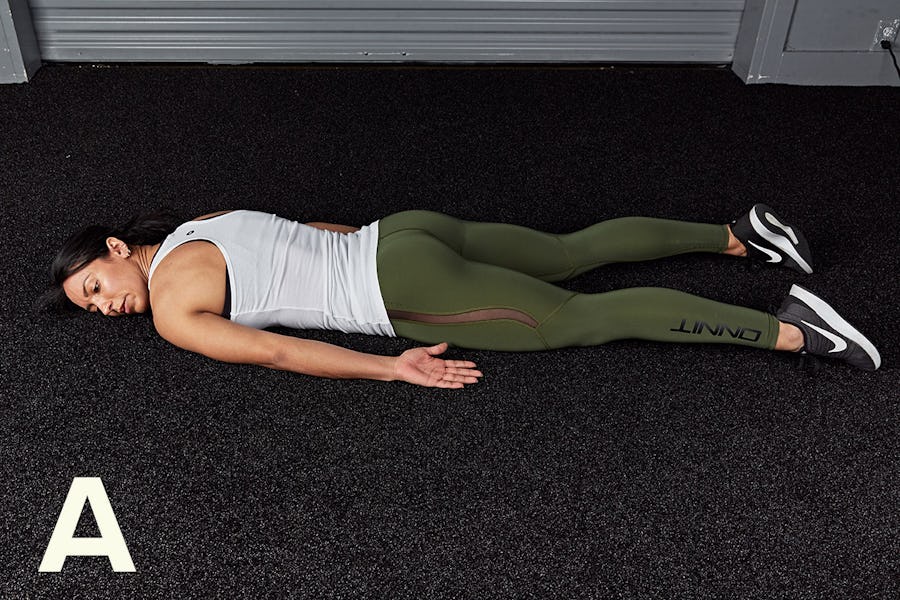
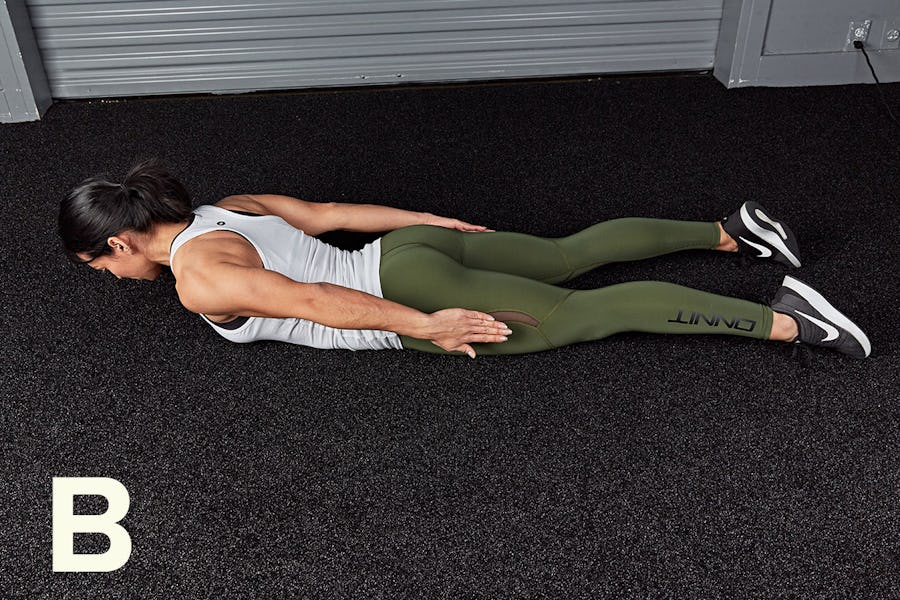
Reps: 4
Step 1. Lie facedown on the floor with your arms at your sides. Lengthen your neck and tuck your tailbone under so that your pelvis is perpendicular to the floor. You can rest your forehead on a towel. Inhale into your belly and brace your core.
Step 2. Extend your back to raise your head off the floor. Tuck your chin. Drive your shoulder blades back and down, and extend your arms as you rise, raising them slightly off the floor and turning your palms to face down. You should look like a dart flying toward its target. Exhale and lower back to the starting position.
3D Dancer Half Lift
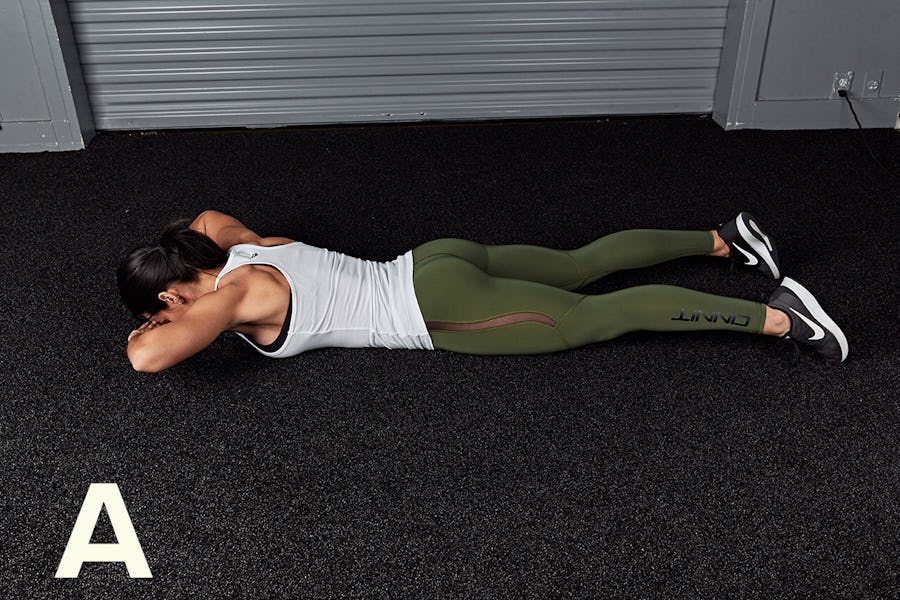
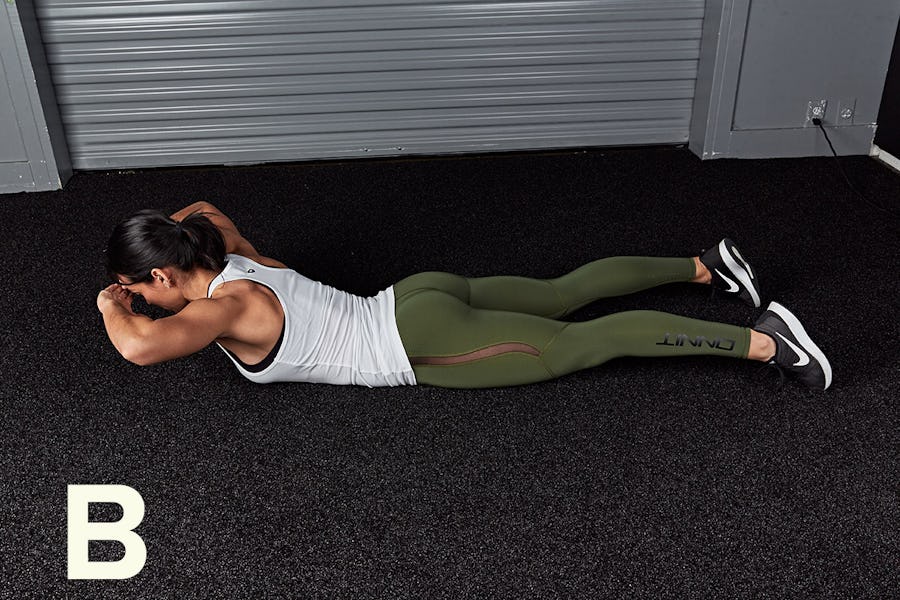
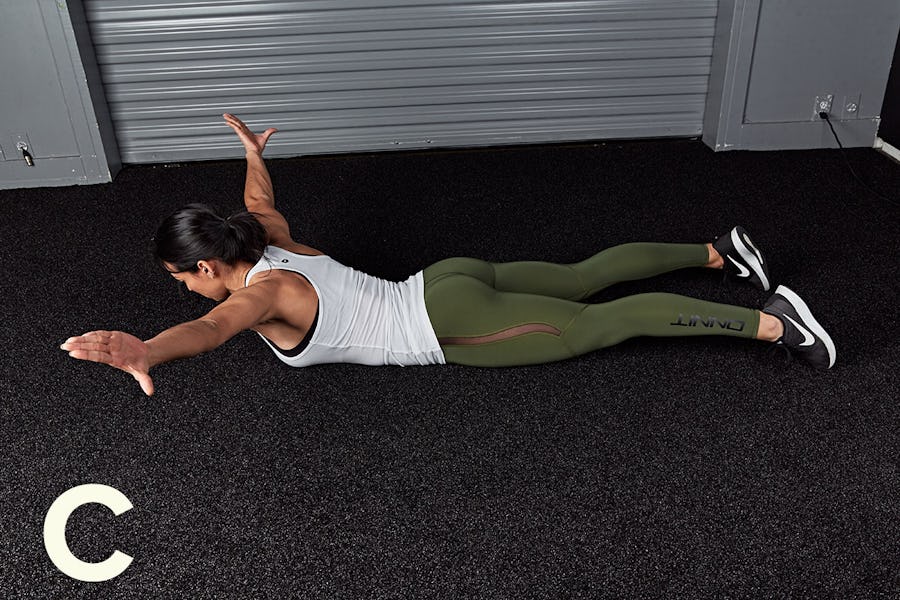
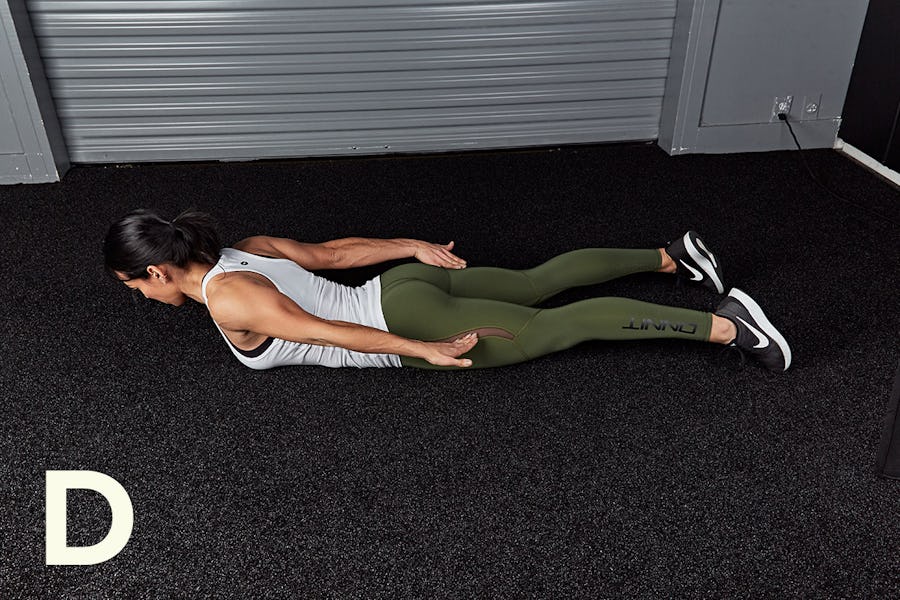
Reps: 10
Step 1. Lie facedown on the floor, resting your head on the back of your hands. Tuck your tailbone under slightly so that your pelvis is perpendicular to the floor and brace your core.
Step 2. Take a deep breath into your belly and extend your back to raise your torso and hands off the floor.
Step 3. Extend your arms out and away from your sides, rotating your wrists so that your thumbs face behind you.
Step 4. Continue reaching back with your arms until they’re at your sides, palms facing the floor. That’s one rep.
4 Ballistic Row

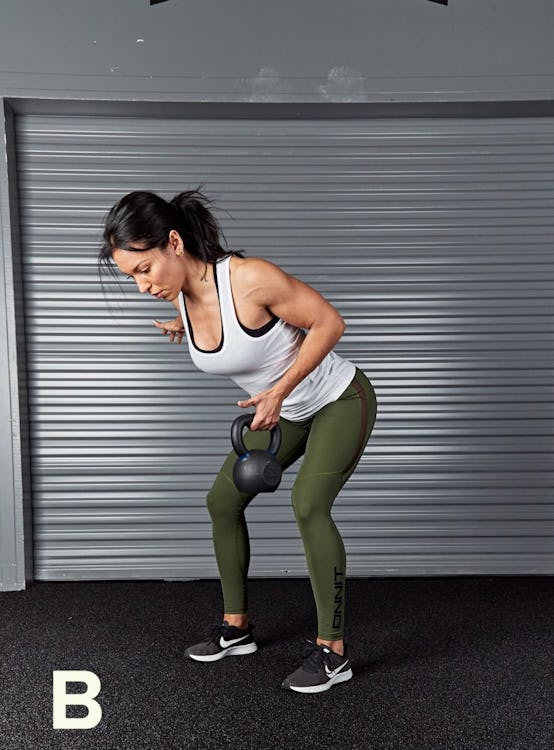
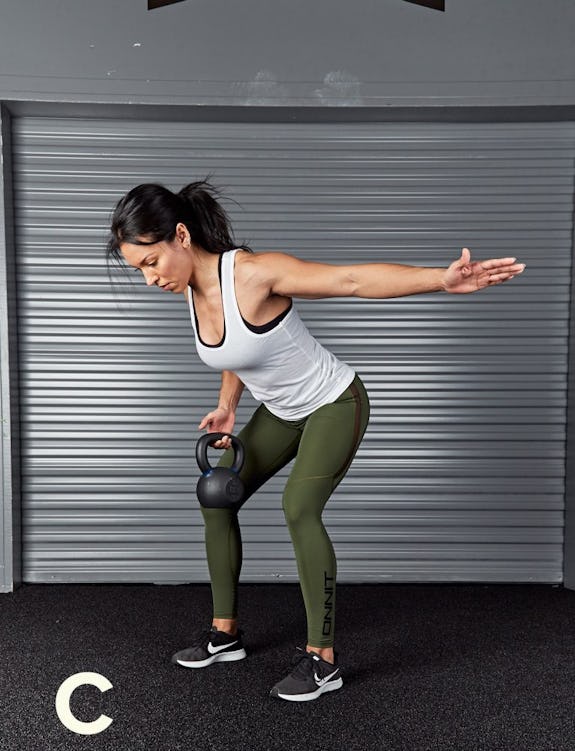
Reps: Perform reps for 60 seconds
Step 1. Hold a dumbbell (or kettlebell, as shown here) in one hand. Bend your hips back while keeping a long spine from your head to your hips. You can raise your free arm out to the side to help you keep your shoulders parallel to the floor.
Step 2. Explosively row the weight to your side and then let it go, catching it with the opposite hand in mid air. Lower the weight under control, and then row it explosively and catch it with the opposite hand again. Work for 60 seconds and then rest 15 seconds.
5 Swimmer
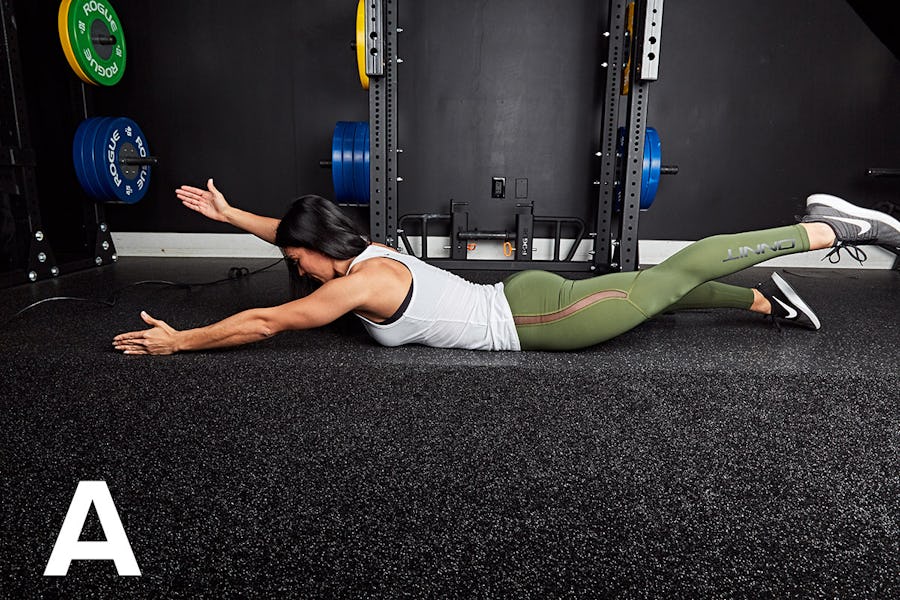
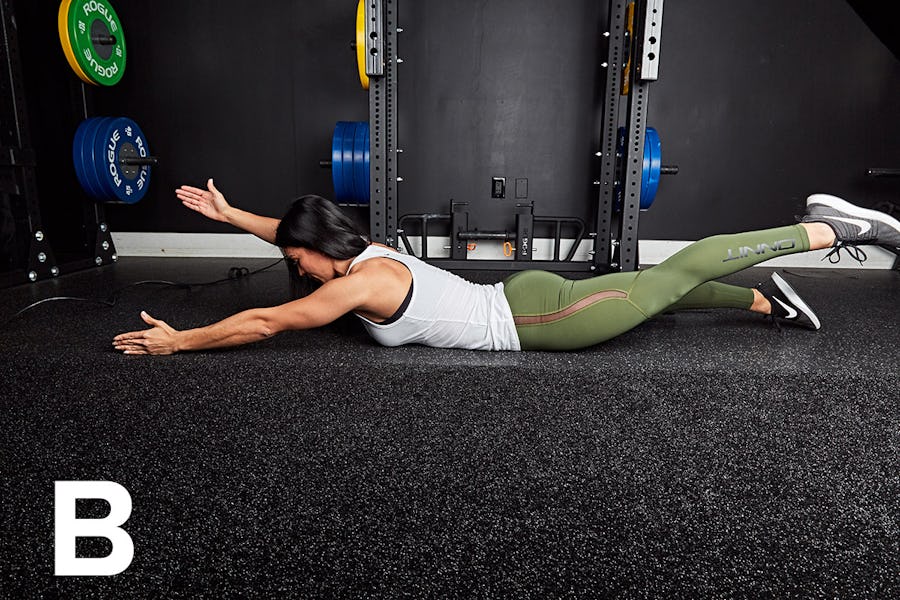
Reps: Perform reps for 60 seconds
Step 1. Lie facedown on the floor and extend your arms and legs. Take a deep breath into your belly and brace your core.
Step 2. Raise your left arm and right leg. Lower them as you raise your right arm and left leg. Continue fluttering your legs and arms as if swimming. Work for 60 seconds.
Upper-Back Workout For Women
Most women don’t want big, bulky traps like a wrestler. But a little extra muscle and definition in the upper back goes a long way toward building overall body strength, and making an off-the-shoulder top look great on you. This workout targets the traps, rhomboids, and rear delts—no “bro” exercises like shrugs necessary.
Directions
The exercises are grouped and marked with letters. Do one set of 1A, then one set of 1B, and then 1C. Rest 60 seconds, and repeat for 3 total rounds. Perform the remaining groups of exercises in the same fashion.
1A Negative Pullup
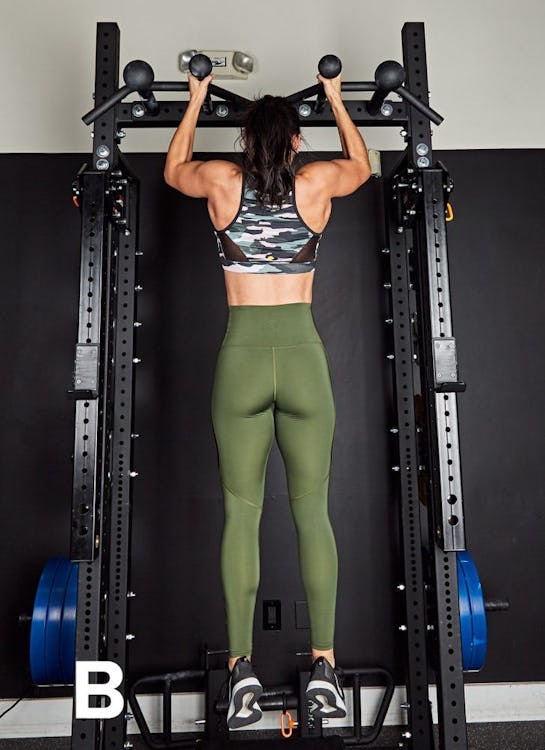
Reps: 6–8
Step 1. Stand on a box or step so you can reach the pullup bar. Grasp the bar with hands just outside shoulder width (or use the neutral-grip handles if your bar has them). Jump up so your chin is over the bar and hold yourself there.
Step 2. Lower your body under control until you’re at a dead hang. (Aim for 3–5 seconds.) Jump back up to begin the next rep. If that’s too hard, perform only one rep, but lower yourself as slowly as you can.
1B Pilates Foam Roller Pull
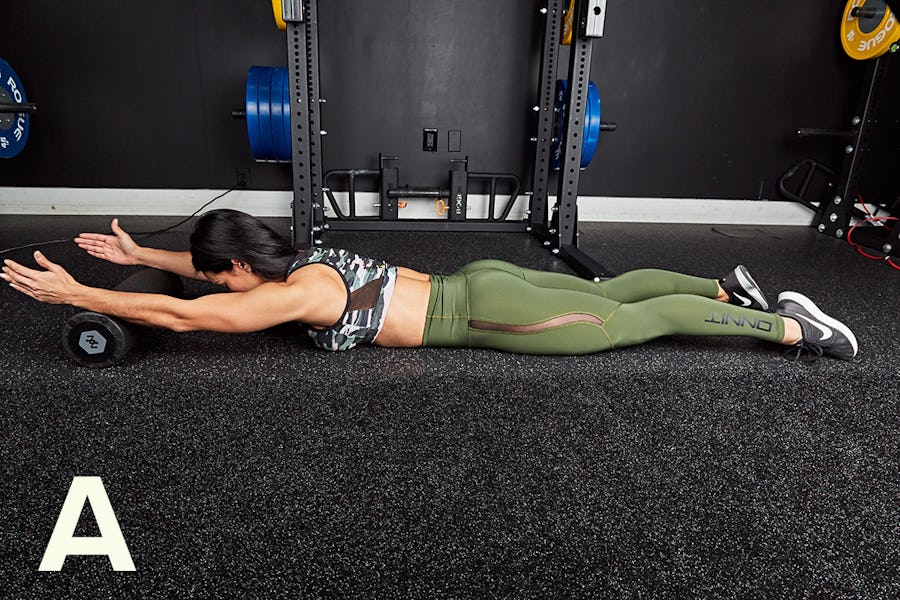
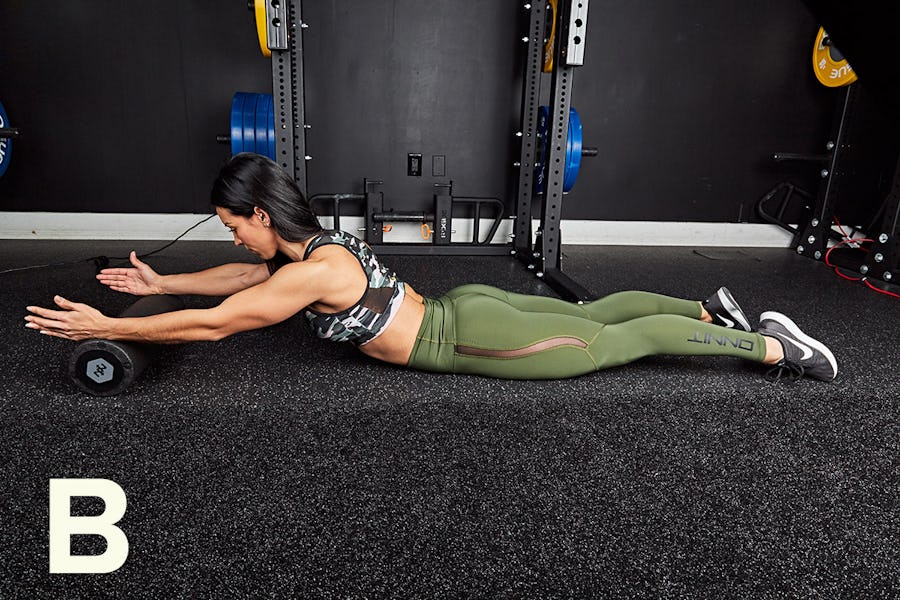
Reps: 10
Step 1. Lie facedown on the floor and extend your arms in front of you, resting them on a foam roller. Point your thumbs to the ceiling. Take a deep breath into your belly and brace your core.
Step 2. Draw your shoulder blades down and together and maintain the position as you exhale, raise your torso off the floor, and drive your forearms into the roller. The movement will roll the foam toward you a few inches. Reverse the movement to return to the starting position.
1C Suspension Row
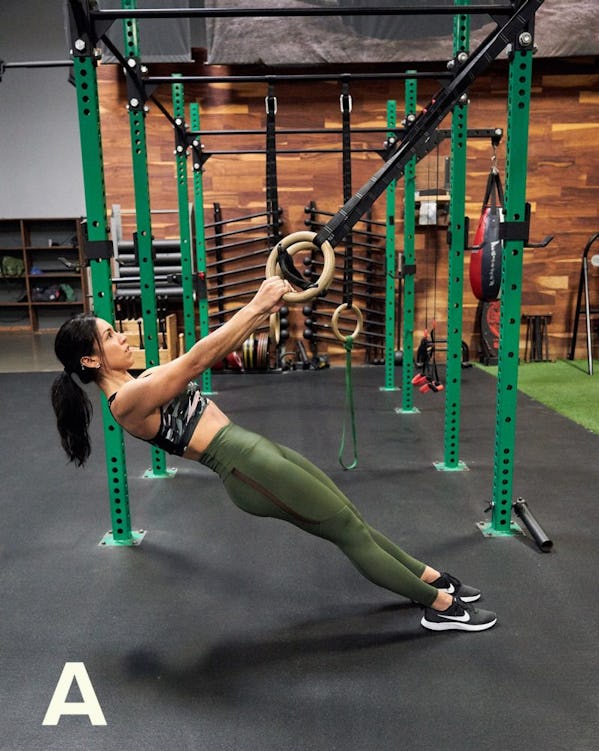

Reps: 12
Step 1. Set the handles of a suspension trainer to about hip level. Grasp the handles and hang from them with arms straight. Draw your shoulder blades together and downward (“proud chest”). Your body should form a straight line from your head to your feet. Brace your core.
Step 2. Row your body up to the handles, contracting your back fully.
2A Rear-Delt Flye
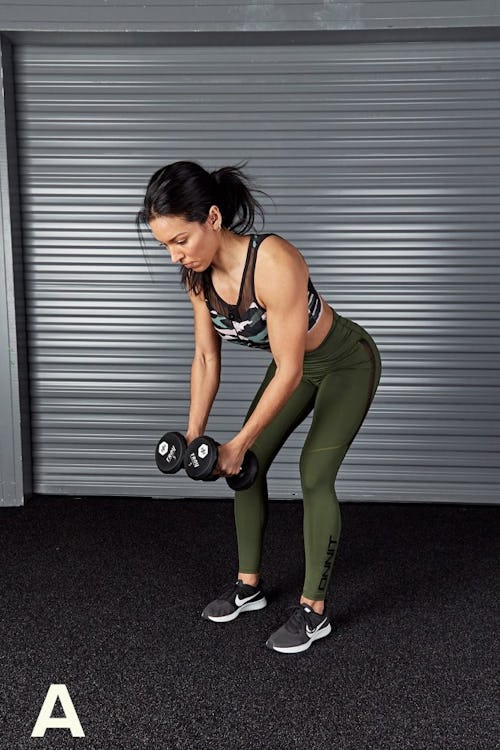
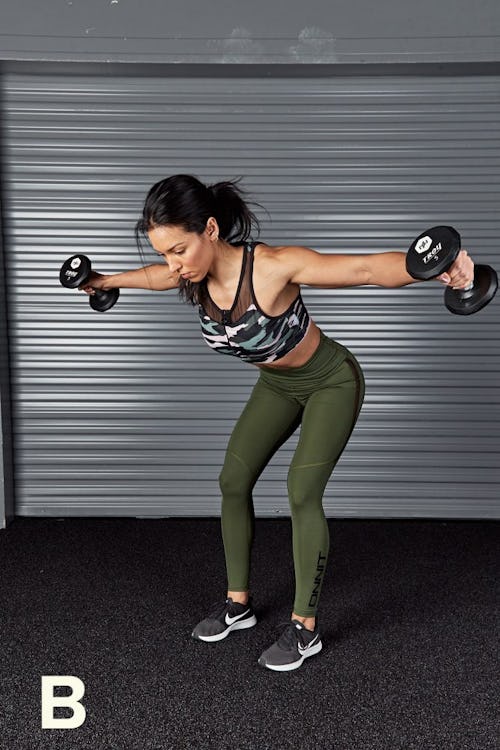
Reps: 12
Step 1. Hold a pair of dumbbells and, keeping a long spine from your head to your hips, bend your hips back so your torso is at 45 degrees to the floor.
Step 2. Raise your arms out 90 degrees, drawing your shoulders back and downward.
2B Seal Row
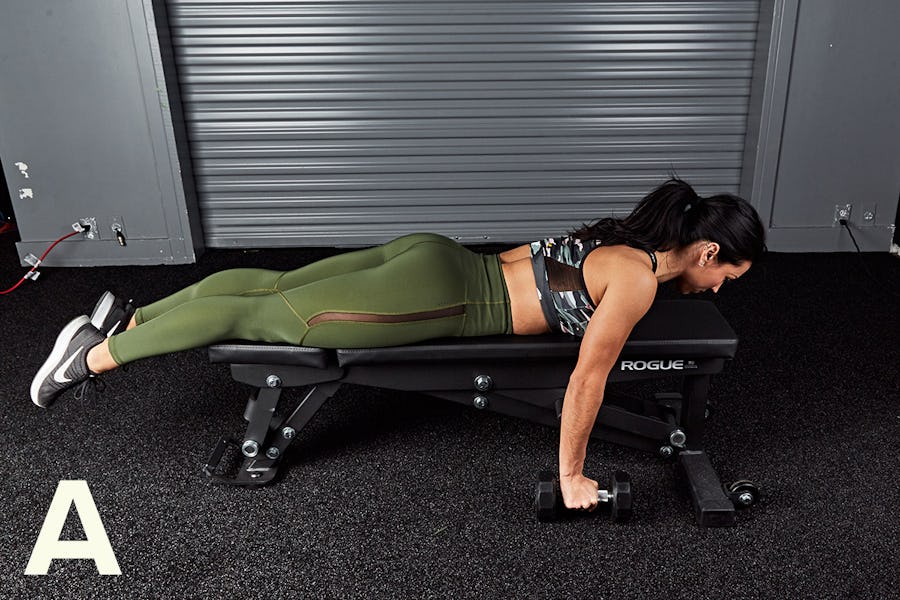
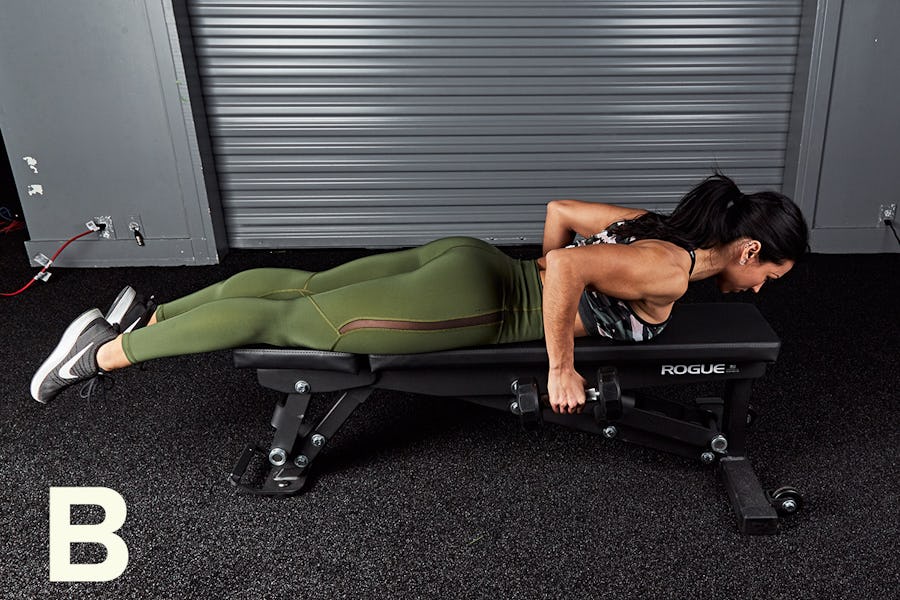
Reps: 12
Step 1. Lie chest down on a bench and hold a dumbbell in each hand.
Step 2. Take a deep breath into your belly and brace your core. Raise your torso as you row the weights to your sides. Hold the top position a moment.
2C Pilates Upper Back Lift
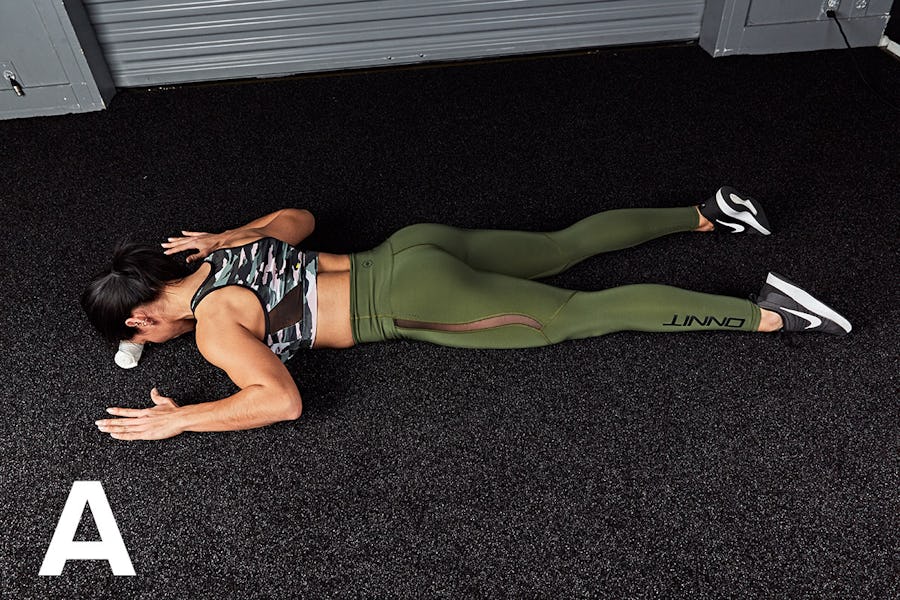

1Reps: 10
Step 1. Lie facedown on the floor (you can use a rolled up towel to cushion your forehead). Rest your arms away from your sides with elbows bent and palms flat.
Step 2. Draw your shoulder blades together and downward as you raise your arms off the floor until your feel your upper back contract fully. Hold for a moment.
3A Wide-Grip Cable Row
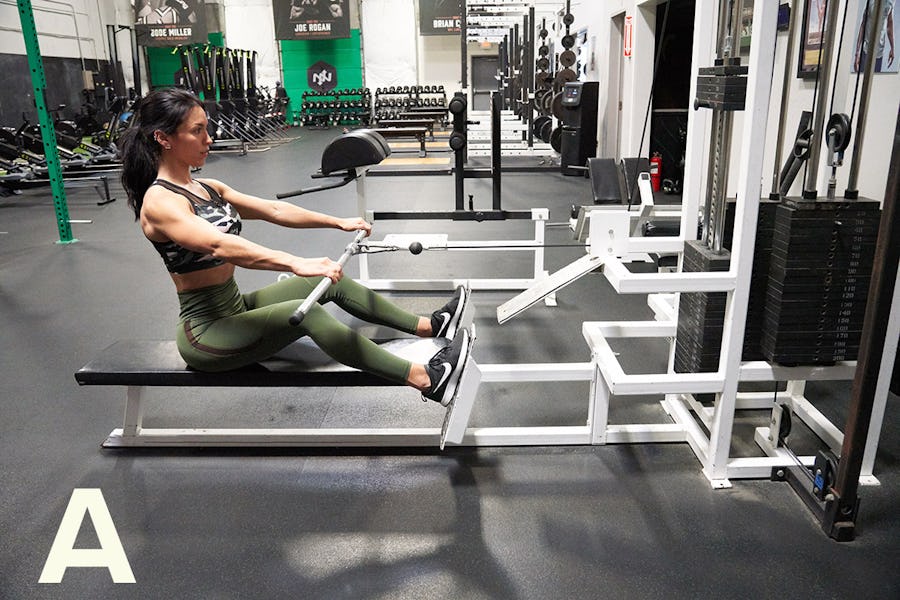
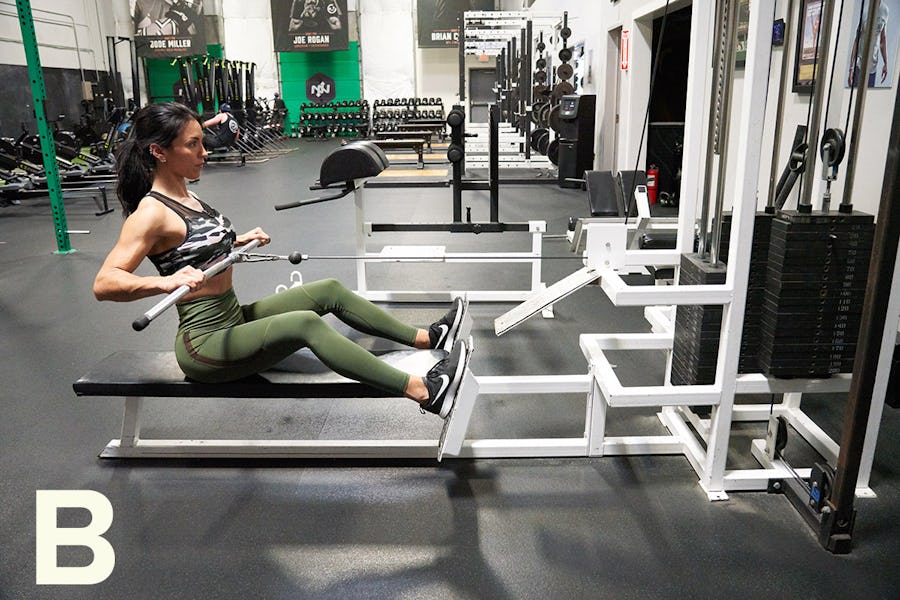
Reps: 15
Step 1. Attach a long lat bar to a seated cable row station and sit tall on the bench with knees bent. Your grip should be outside shoulder width.
Step 2. Row the bar to your sternum, drawing your shoulders back together and downward as you pull. Stay upright; don’t lean back.
3B Cable External Rotation
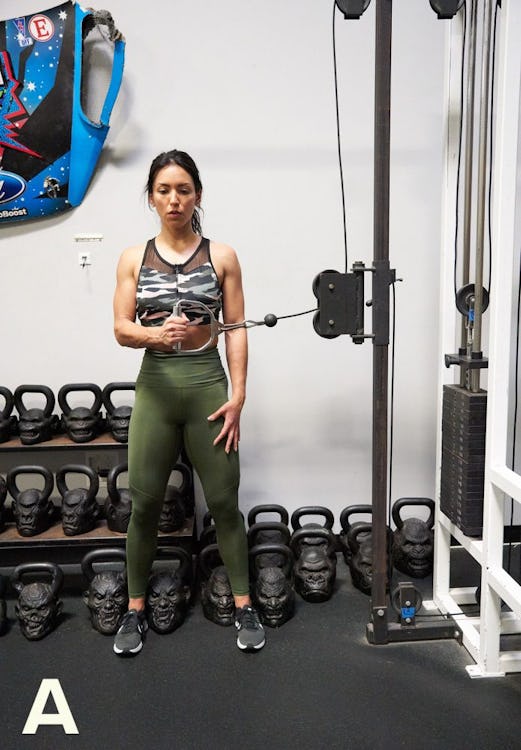
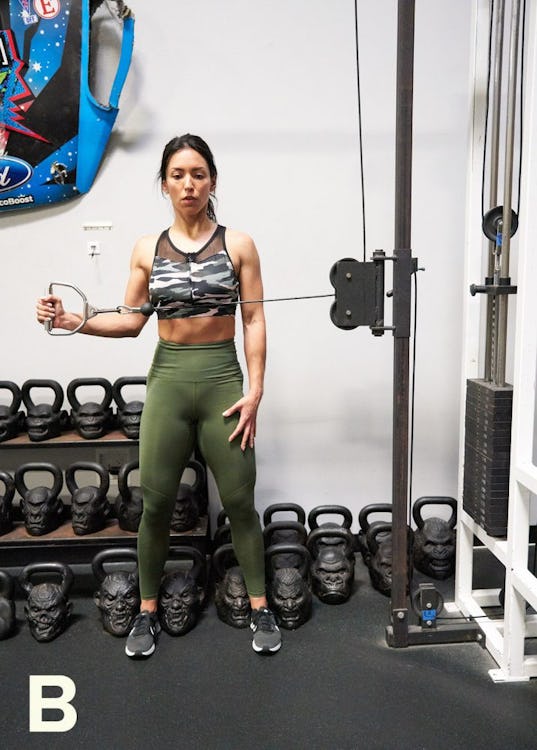
Reps: 12 (each side)
Step 1. Attach a D-handle to the cable of a pulley station. Set the pulley at about elbow height. Stand far enough away from the station so that the tension of the cable pulls your forearm gently in front of your body.
Step 2. Keeping your arm at your side, rotate your forearm outward until your knuckles point behind you.
Lower-Back Workout for Women
Virtually everyone deals with lower-back pain at one time or another—either because the person doesn’t lift at all, or because of the way that person lifts (i.e., bad form, like rounding your back on a stiff-legged deadlift, mountain climber, etc.). This routine strengthens the lower back with joint-friendly exercises that will help to alleviate pain and prevent any more of it. I borrow a lot of moves from Pilates here because they’re safe to perform and help the back feel better while you’re doing them.
Directions
The exercises are grouped and marked with letters. Do one set of 1A, then one set of 1B, and then 1C. Rest 60 seconds, and repeat for 3 total rounds. For 2A–2D, perform each exercise for 30 seconds and rest 10 seconds between moves. For the windshield wiper, just do 3 sets for the one move by itself.
1A Back Extension
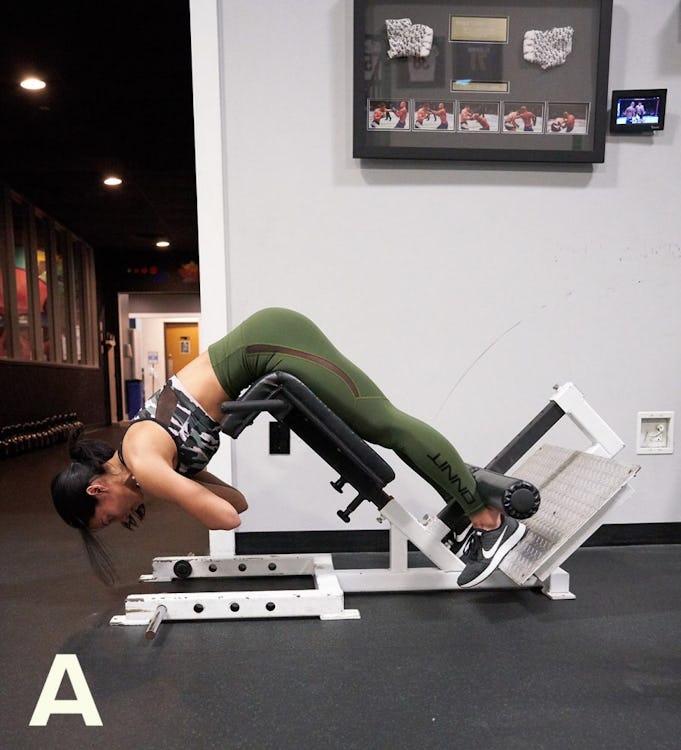
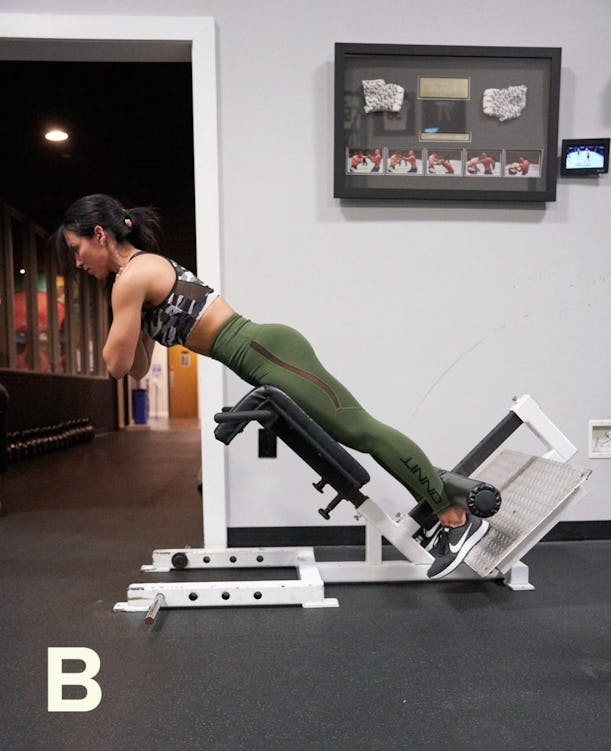
Reps: 12
Step 1. Set the pad of a back extension bench so that, when you lie on it, the top is at the crease of your hips. Set up on the bench and secure your feet behind the ankle pads. Keeping a long spine from your head to your hips, bend at the hips and lower your torso until your body is bent 90 degrees.
Step 2. Squeeze your glutes and extend your hips until your body forms a straight line. Do not hyperextend your back to come up any higher.
1B Superman
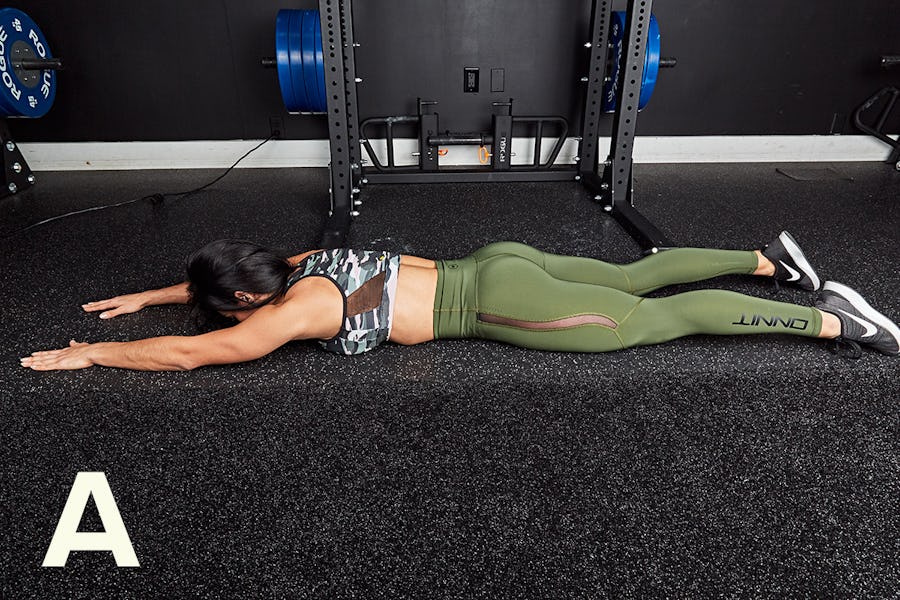
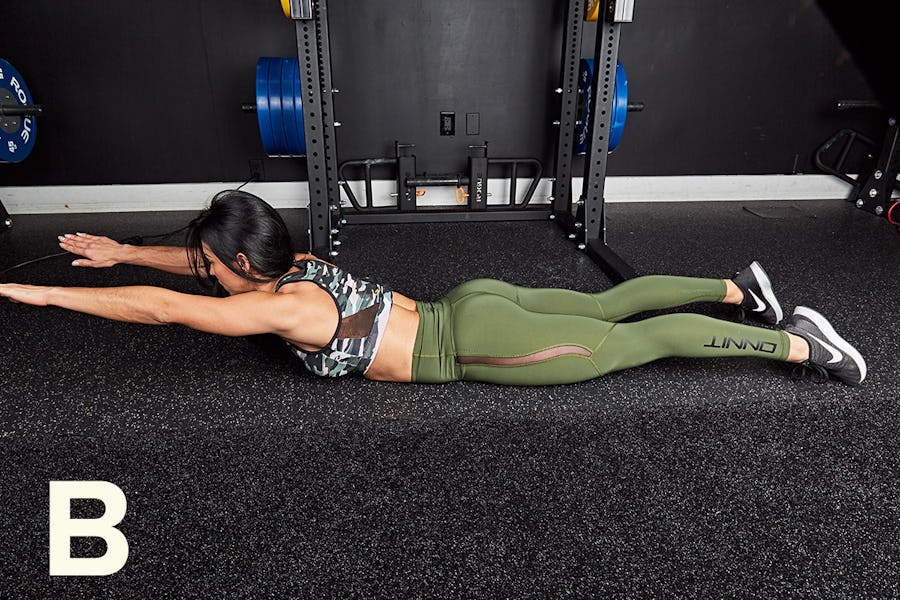
Reps: 12
Step 1. Lie on the floor facedown and extend your arms in front of you.
Step 2. Brace your core. Raise your torso and legs off the floor as high as you can while reaching forward with your arms and back with your legs. Hold the top position for a moment.
1C Pilates Flat Back Reach
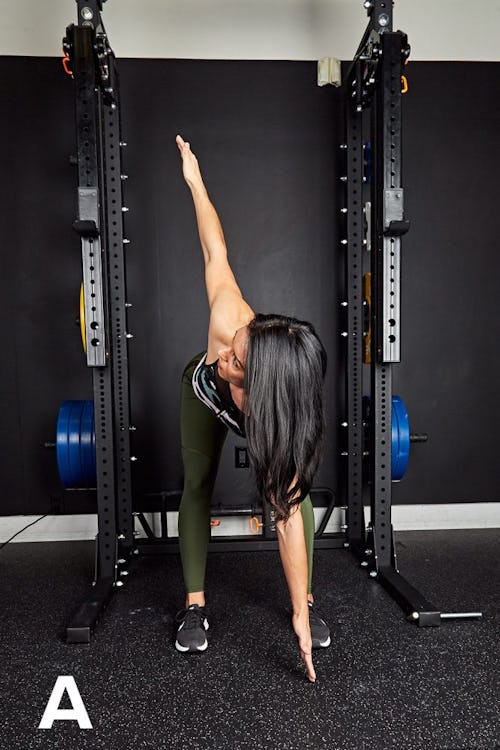
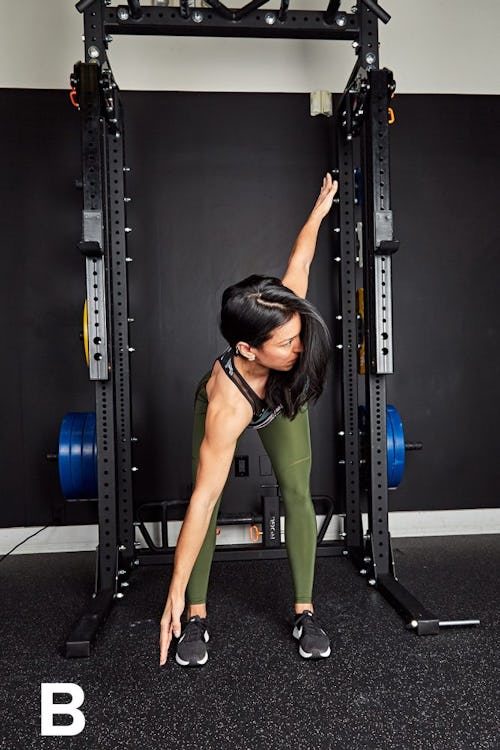
Reps: 12
Step 1. Keeping a long spine from your head to your hips, bend your hips back until your torso is parallel to the floor and reach your arms out wide. Twist your torso as far as you can to the right, keeping your arms spread as wide as possible.
Step 2. Twist as far as you can to the left. Keep your spine long with your lower back neutral. That’s one rep.
2A Swimmer
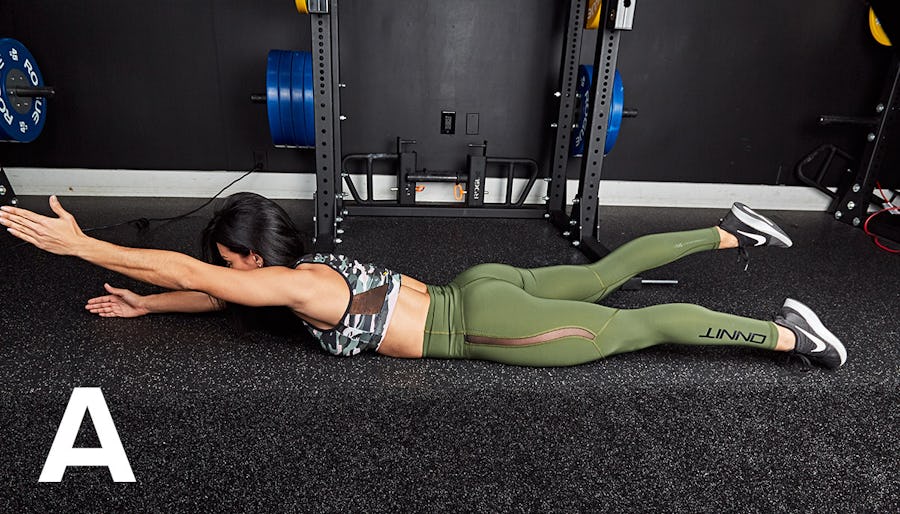
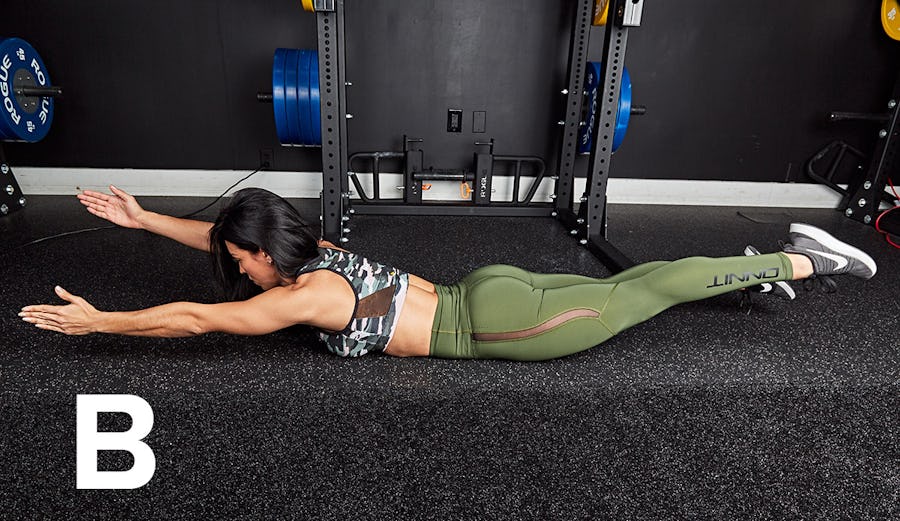
Reps: Work for 30 sec.
Step 1. Lie facedown on the floor and extend your arms and legs. Take a deep breath into your belly and brace your core.
Step 2. Raise your left arm and right leg. Lower them as you raise your right arm and left leg. Continue fluttering your legs and arms as if swimming.
2B Pilates Double Kick

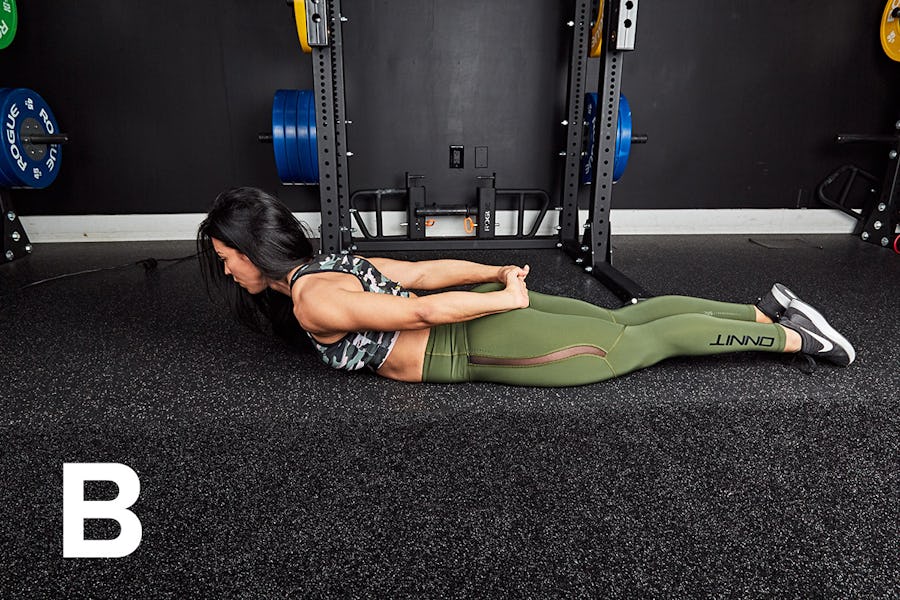
Reps: Work for 30 sec.
Step 1. Lie facedown on the floor and turn your head to rest on your right cheek. Bring your hands behind your back to rest one on top of the other. Draw your elbows out wide and down to the floor. Squeeze your legs together.Bend your knees to bring your heels to your butt—“kick” it twice—and then lower your legs to the floor again.
Step 2. Take a deep breath into your belly. Extend your arms behind you, toward the floor, and raise your torso off the floor while looking in front of you. Hold for a moment, and then turn your head to the opposite side, bend your elbows, and lower back down to rest on the other cheek. The next rep begins with another kick of the feet.
2C Swimming Superman

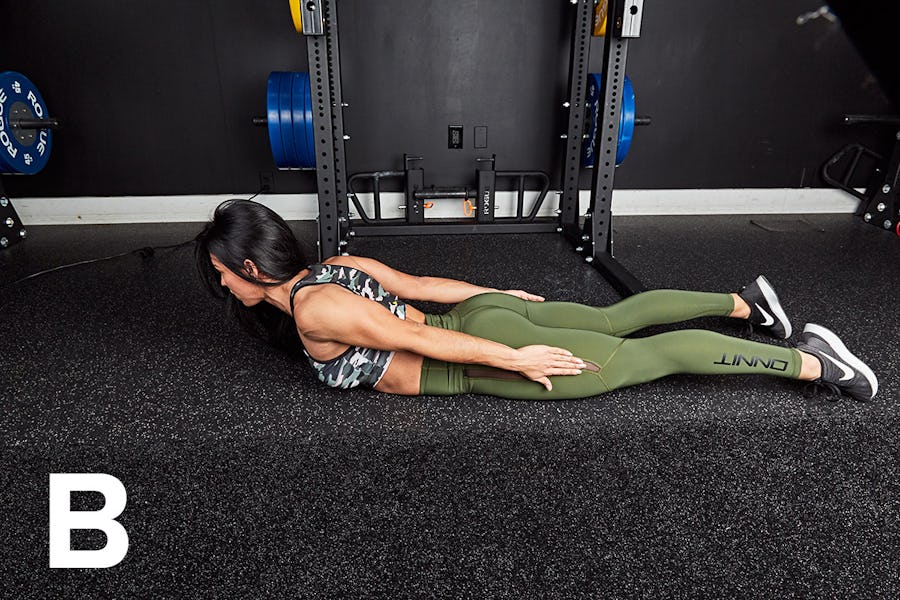
Reps: Work for 30 sec.
Step 1. Lie facedown on the floor with arms and legs extended. Tuck your tailbone slightly so that your pelvis is perpendicular to the floor. Take a deep breath into your belly and brace your core.
Step 2. Raise your torso off the floor and spread your arms out wide and then behind you—as if performing a breast stroke—until your palms touch your legs.
2D Slow Bridge
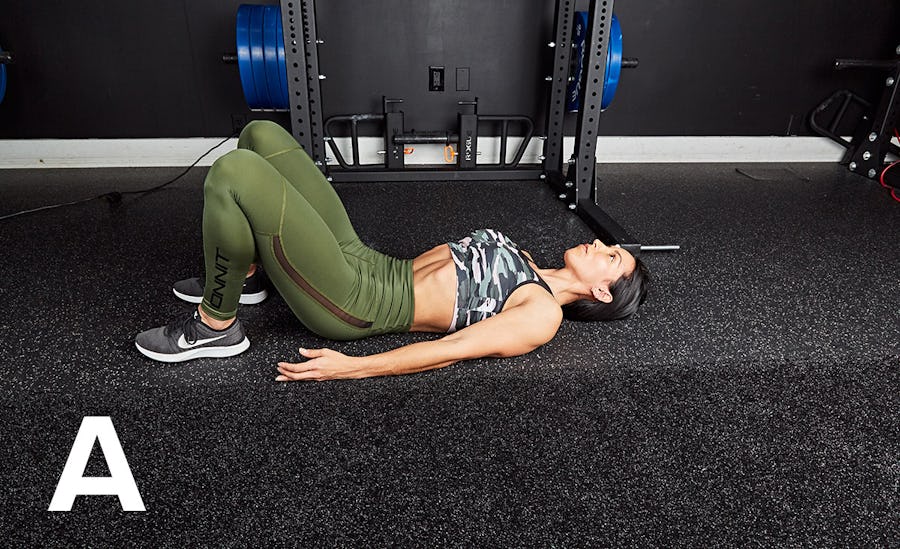
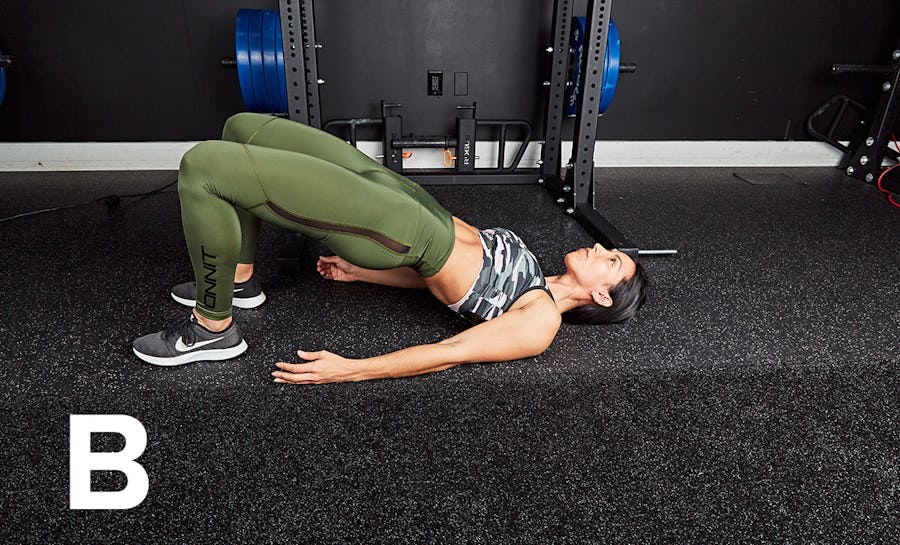
Reps: Work for 30 sec.
Step 1. Lie on your back on the floor and bend your knees so your heels are close to your butt. You’re your tailbone under and take a deep breath into your belly. Brace your core.
Step 2. Drive through your heels to raise your butt in the air. Avoid hyperextending your lower back. Lower back to the floor HOW SLOWLY?
3 Windshield Wiper
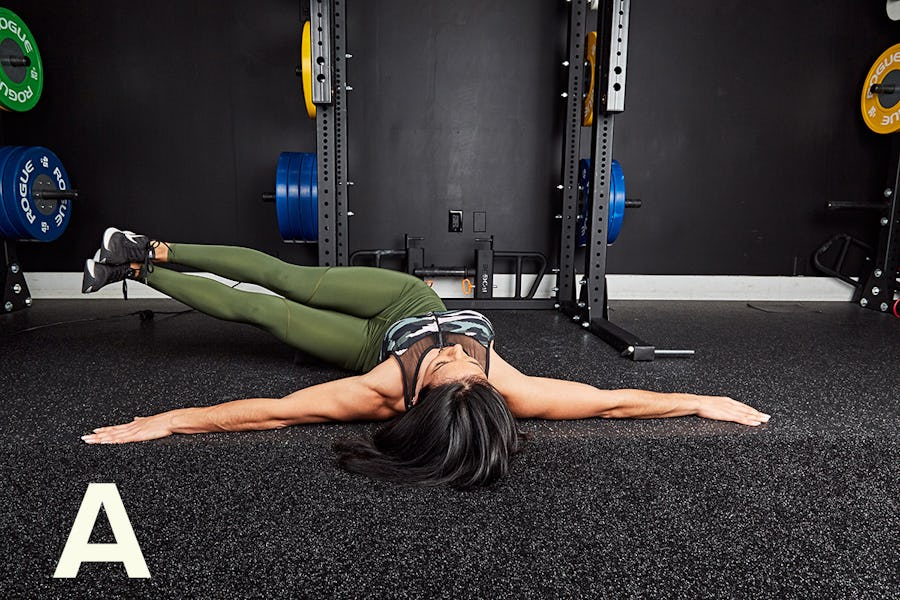
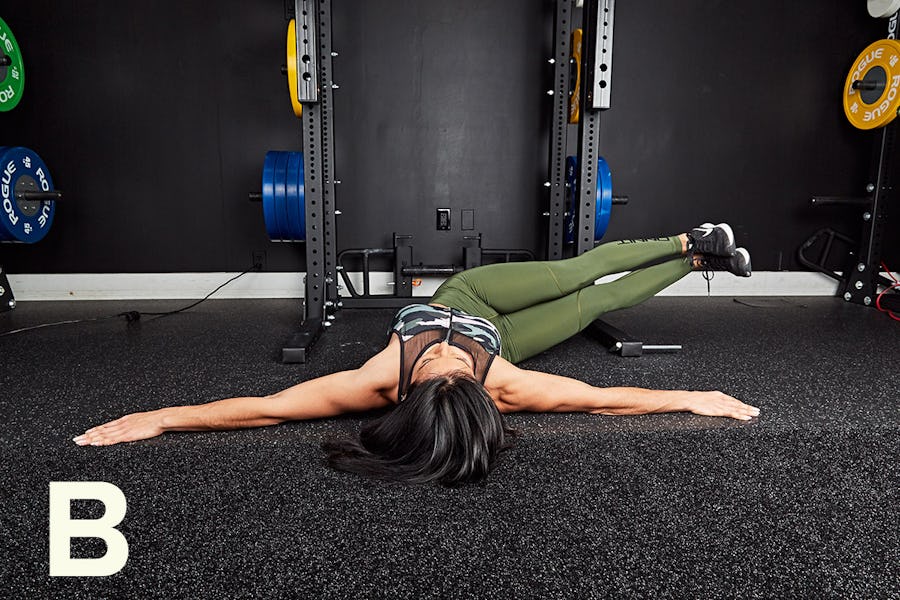
Sets: 3 Reps: 8 (each side)
Step 1. Lie on your back on the floor and extend your arms out 90 degrees to your sides. Bend your hips 90 degrees and raise your legs straight up in the air. Take a deep breath into your belly and brace your core.
Step 2. Twist your hips to the left, lowering your legs as far as you can toward the floor. Raise them back up and to the other side. That’s one rep.
Dumbbell Back Workout for Women
Whether I’m working out in a small hotel gym or in my aunt’s garage with her little pink weights, dumbbells are my secret weapon. You don’t need more than a pair or two to get in a great session. Take this routine on the road with you.
Directions
The exercises are grouped and marked with letters. Do one set of 1A, then one set of 1B, and then 1C. Rest 60 seconds, and repeat for 3 total rounds. Perform the remaining groups of exercises in the same fashion.
If you’re limited to very light weights, simply perform your reps more slowly, extending the time your muscles spend under tension. If you have them, a pair of five-pounders, 15s, and 25s would work great here.
1A Overhand Bent-Over Row
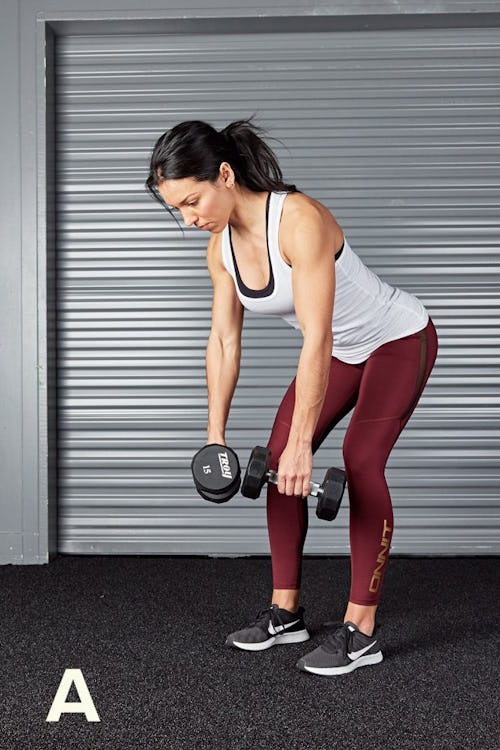
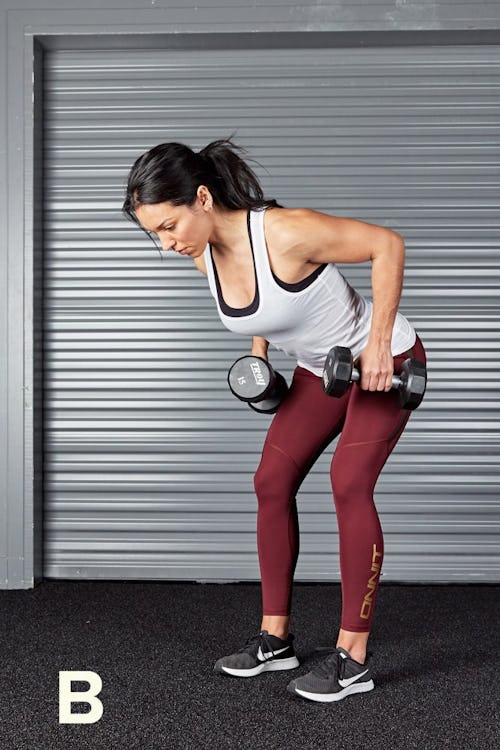
Reps: 12
Step 1. Hold a pair of dumbbells and, keeping a long spine from your head to your hips, bend your hips back until your torso is about 45 degrees to the floor.
Step 2. Draw your shoulder blades together and downward as you row the weights to your sides.
1B One-Arm Bent-Over Row
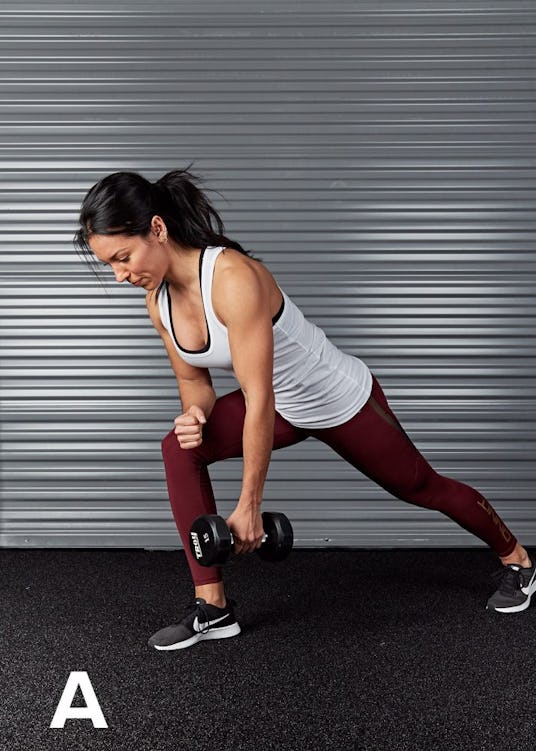
Reps: 10 (each side)
Step 1. Hold a dumbbell in one hand. Bend your hips back while keeping a long spine from your head to your hips. Rest your forearm on your lead leg to help brace you.
Step 2. Row the weight to your side.
1C Alternating Row
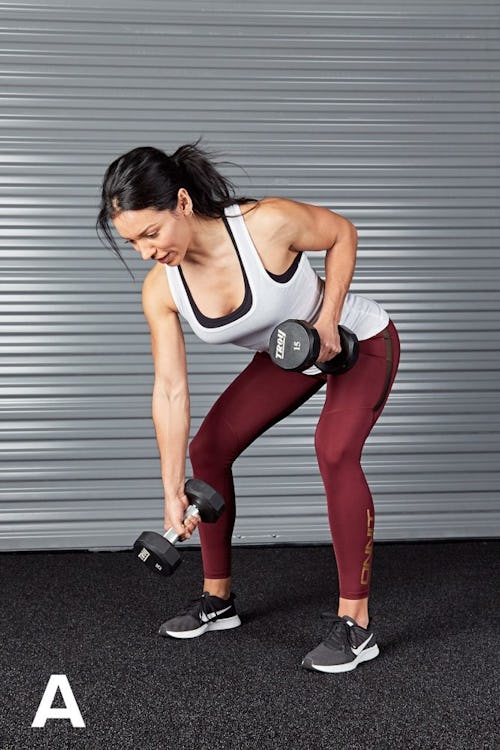

Reps: 12 (each side)
Perform as you did the bent-over row but alternate arms. Row your left and lower down, and then your right. Avoid twisting.
2A Pilates Upper-Back Lift
Reps: 12
Step 1. Lie facedown on the floor (you can use a rolled up towel to cushion your forehead). Rest your arms away from your sides with elbows bent and palms flat.
Step 2. Draw your shoulder blades together and downward as you raise your arms off the floor until your feel your upper back contract fully. Hold for a moment.
2B Alternating Bear Row


Reps: 6 (each)
Step 1. Hold a dumbbell in each hand and get on all fours on the floor. Press your hands into the dumbbells and drive your toes into the floor to raise your knees about an inch. Brace your core. Your head, spine, and pelvis should form a long line.
Step 2. Row one dumbbell to your side, replace it, and then row the other. Avoid twisting in either direction and keep your core tight.
2C Renegade Row
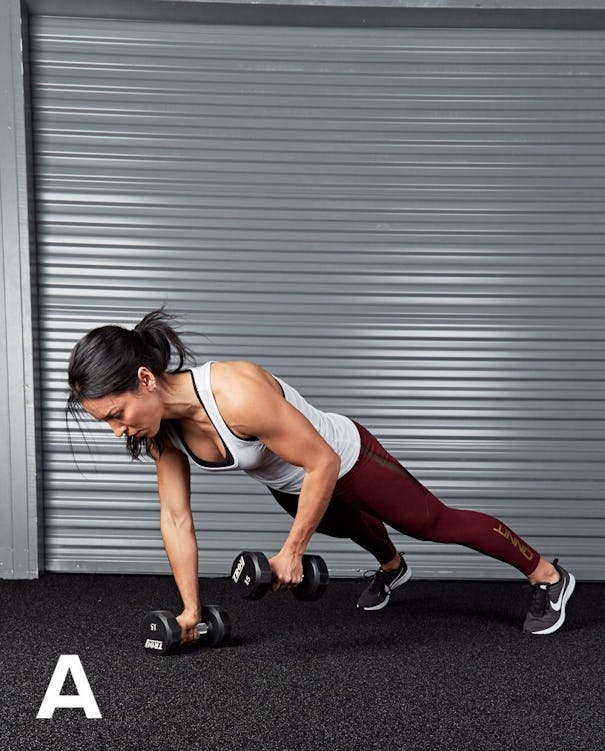
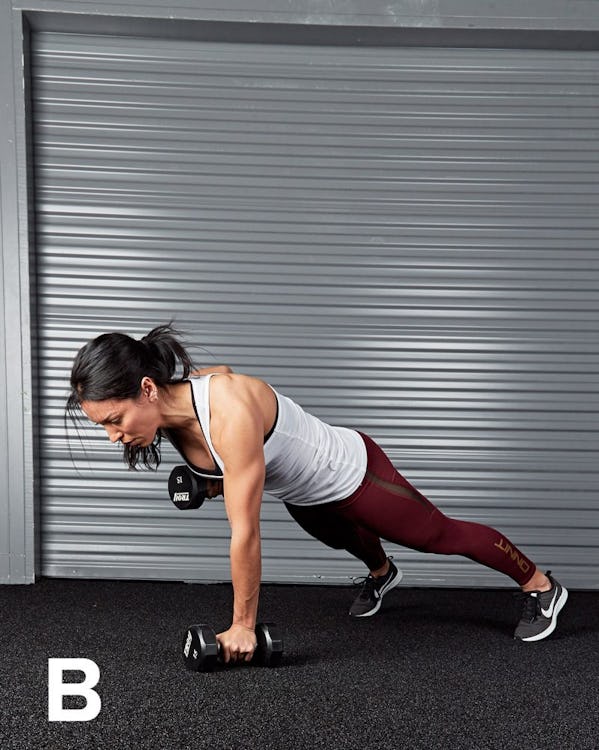
Reps: 6 (each side)
Step 1. Get into a pushup position, resting your hands on a pair of dumbbells. Take a deep breath into your belly and brace your core.
Step 2. Lean your weight to your right side, pushing that hand into the floor. Your left side will feel lighter. Now row the left-hand dumbbell to your side, but avoid twisting your hips or shoulders. Lower the weight and repeat on the other side.
3A Bent-Over Twisting Row

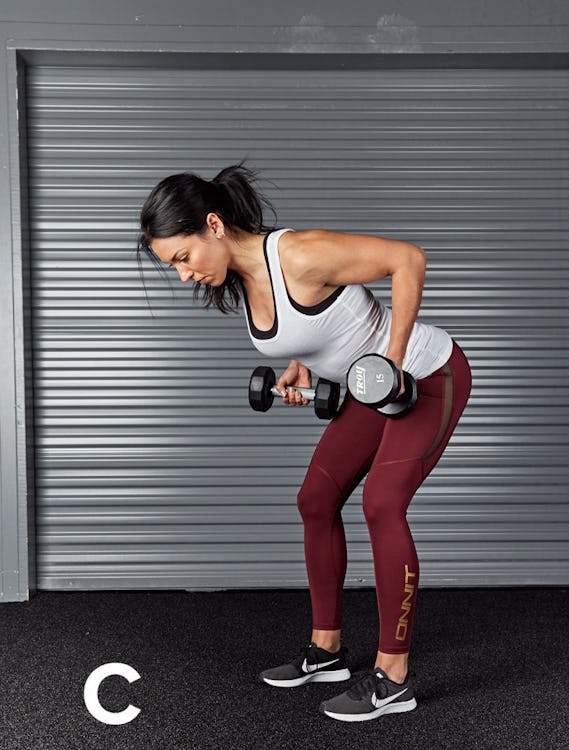
Reps: 12
Step 1. Hold a dumbbell in each hand and, keeping a long spine from your head to your hips, bend your hips back until your torso is nearly parallel to the floor.
Step 2. Row the weights to your sides, twisting your wrists outward as you pull so that your palms face up at the top of the movement.
3B Swimmer
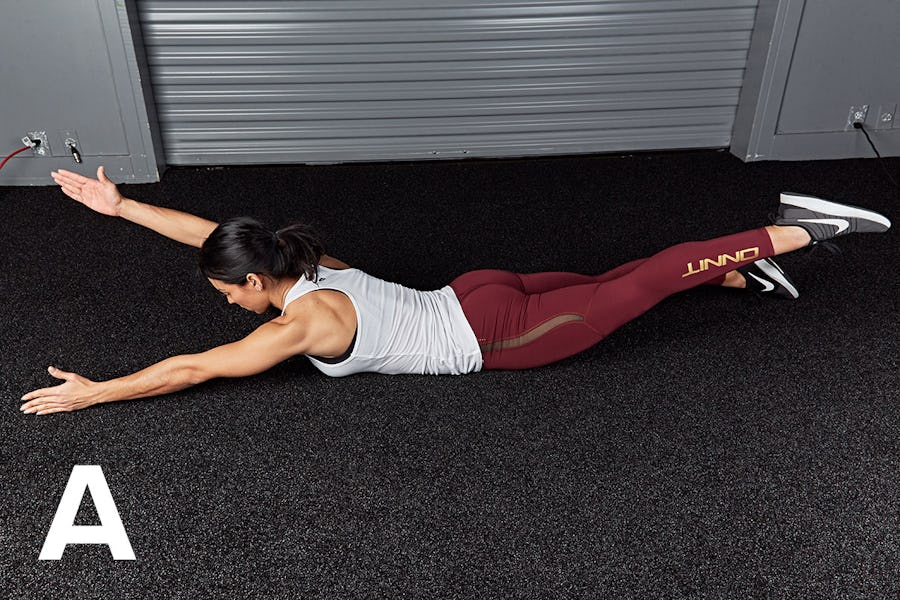
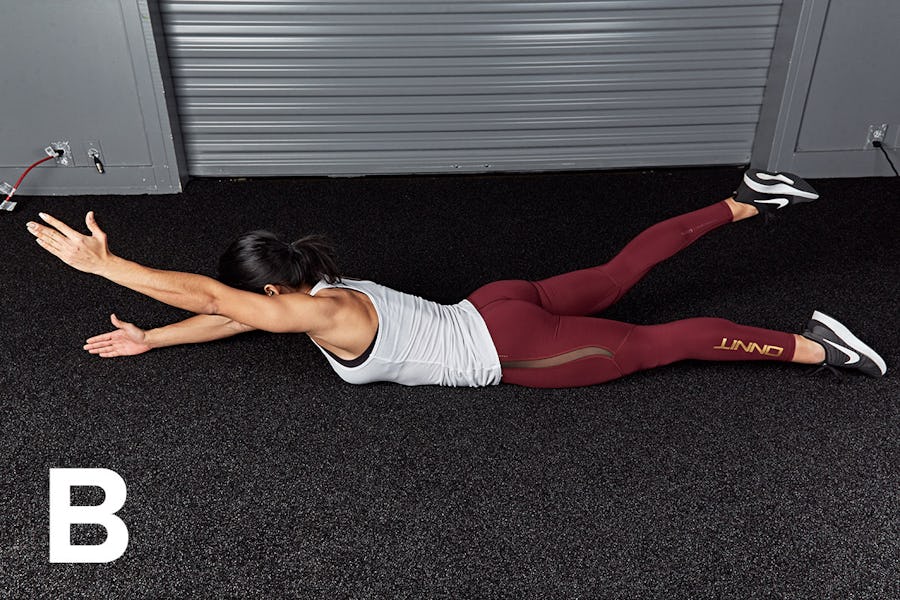
Reps: 16
Step 1. Lie facedown on the floor and extend your arms and legs. Take a deep breath into your belly and brace your core.
Step 2. Raise your left arm and right leg. Lower them as you raise your right arm and left leg. Continue fluttering your legs and arms as if swimming.
3C Swimming Superman
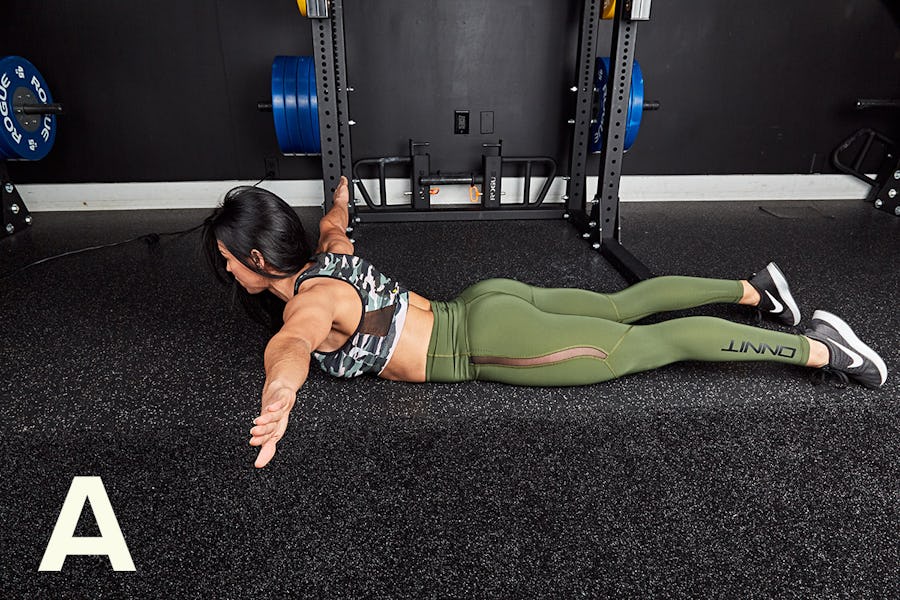

Reps: 10
Step 1. Lie facedown on the floor with your hands at your sides. Tuck your tailbone so that your pelvis is perpendicular to the floor and brace your core. Take a deep breath into your belly and extend your back to raise your torso off the floor while reaching out 90 degrees with your arms.
Step 2. Keep your torso up as you reach behind you with your arms. Lower yourself back to the floor to complete the rep.
At-Home Back Workout
Back is a muscle group that people tend to use a lot of machines to work. Cable pulleys give you a variety of ways to keep tension on the muscles in positions where there normally wouldn’t be much, such as at the bottom of a row. But bands are a good substitute for cables, and are much easier to store in a home gym. Meanwhile, old-fashioned dumbbell rows consistently come up on trainers’ lists of the best back exercises, because they work the back and core simultaneously. Both kinds of exercises form the foundation of this workout.
Directions
The exercises are grouped and marked with letters. Do one set of 1A, then one set of 1B, and then 1C. Rest 60 seconds, and repeat for 3 total rounds. Perform the remaining groups of exercises in the same fashion. To end the workout, do one set of the Pilates double kick by itself, performing reps for 60 seconds (or until failure).
1A Single-Arm Deep Bent-Over Row
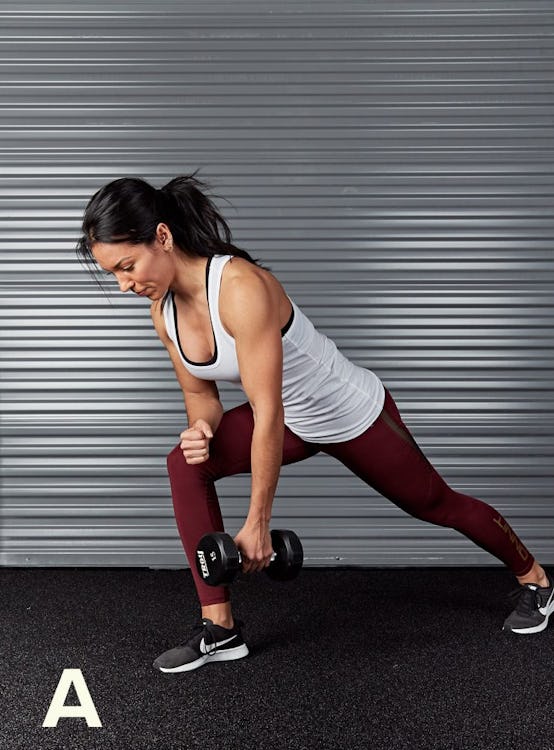
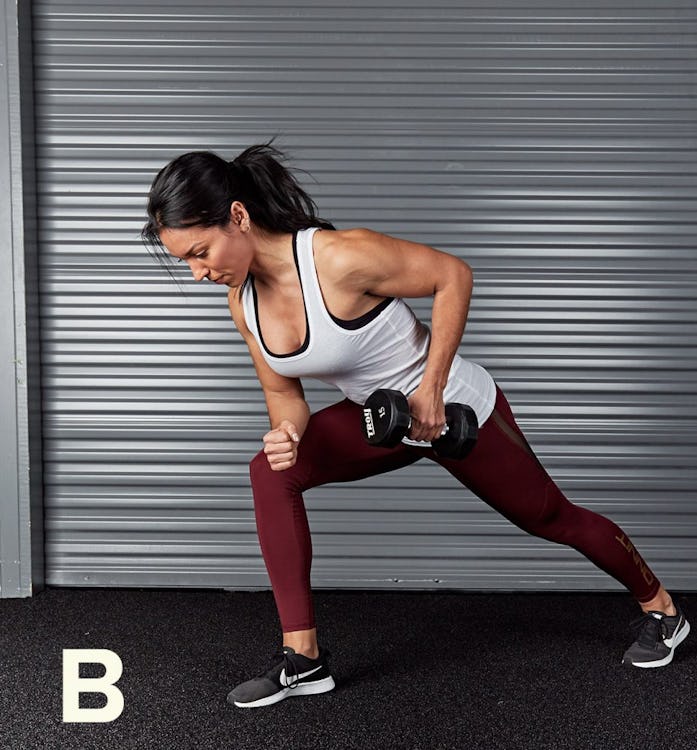
Reps: 10 (each side)
Step 1. Grasp a light dumbbell in your left hand and take a long stride forward with your right leg. Keeping a long spine from your head to your hips, bend your torso forward until it’s about 45 degrees to the floor. Brace your torso by driving your right forearm into your right leg.
Step 2. Row the weight to your hip. Avoid twisting your shoulders or hips. Complete your reps on that side and then switch sides.
1B Bent-Over Twisting Dumbbell Row
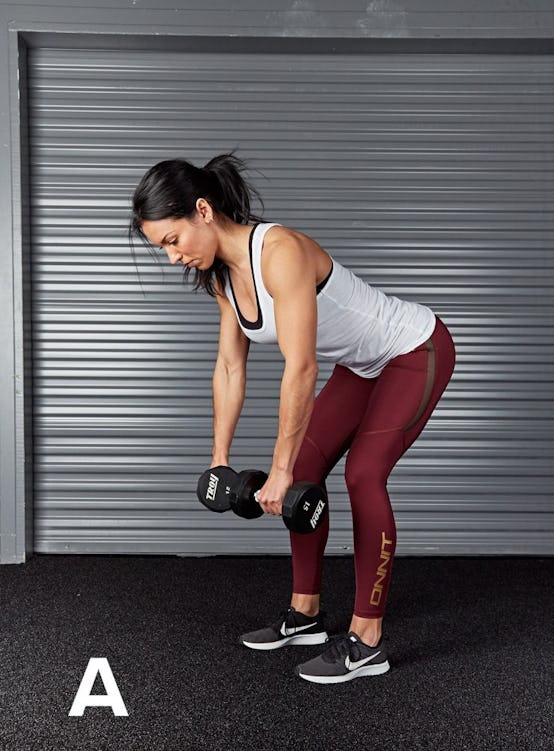

Sets: 15
Step 1. Hold a dumbbell in each hand and, keeping a long spine from your head to your hips, bend your hips back until your torso is nearly parallel to the floor.
Step 2. Row the weights to your sides, twisting your wrists outward as you pull so that your palms face up at the top of the movement.
1C Pilates Foam-Roller Pull
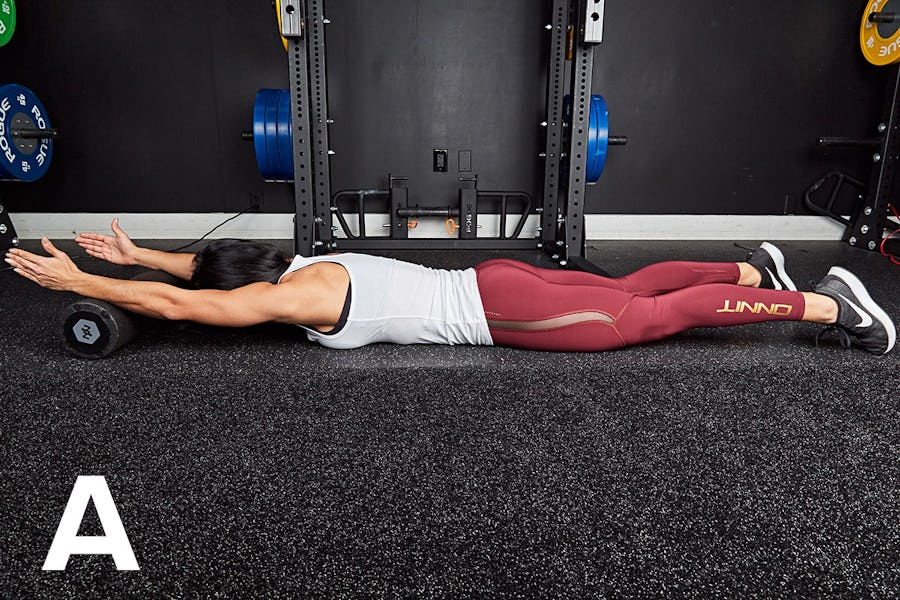
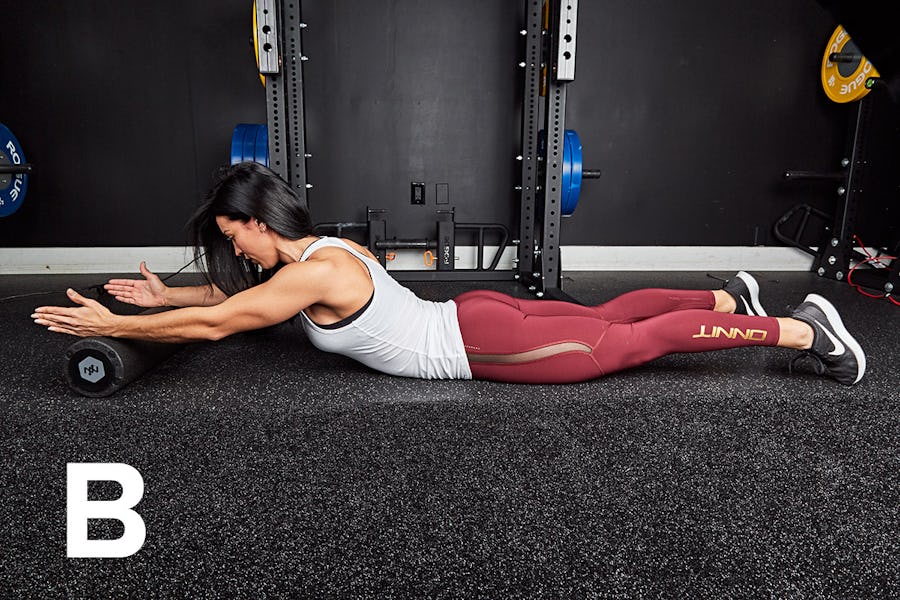
Sets: 12
Step 1. Lie facedown on the floor and extend your arms in front of you, resting them on a foam roller. Point your thumbs to the ceiling. Take a deep breath into your belly and brace your core.
Step 2. Draw your shoulder blades down and together and maintain the position as you exhale, raise your torso off the floor, and drive your forearms into the roller. The movement will roll the foam toward you a few inches.
2A Alternating Bear Row
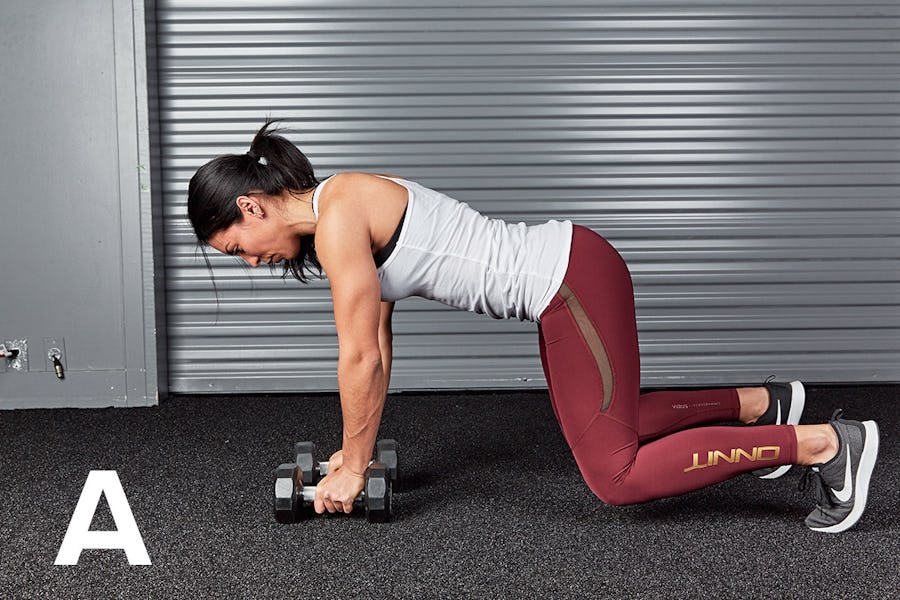
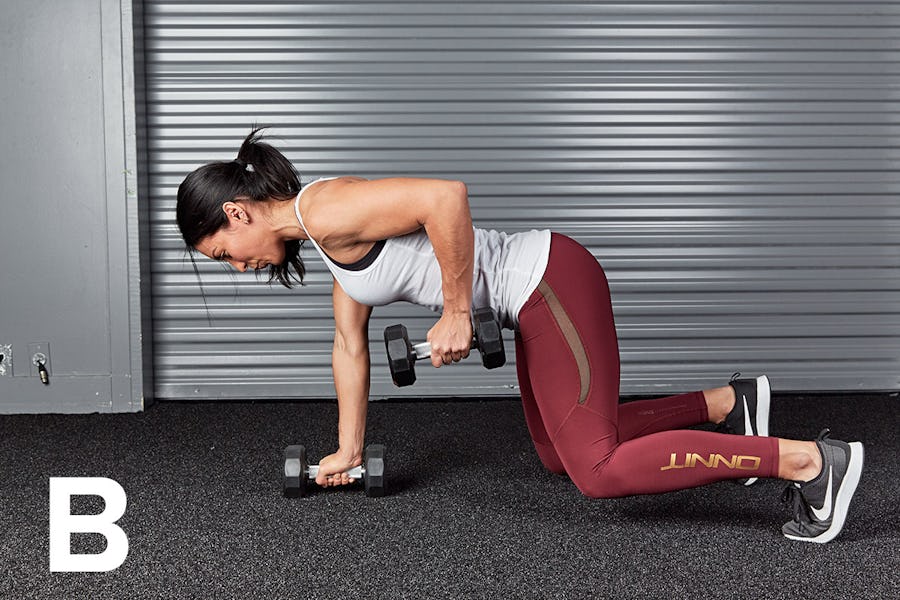
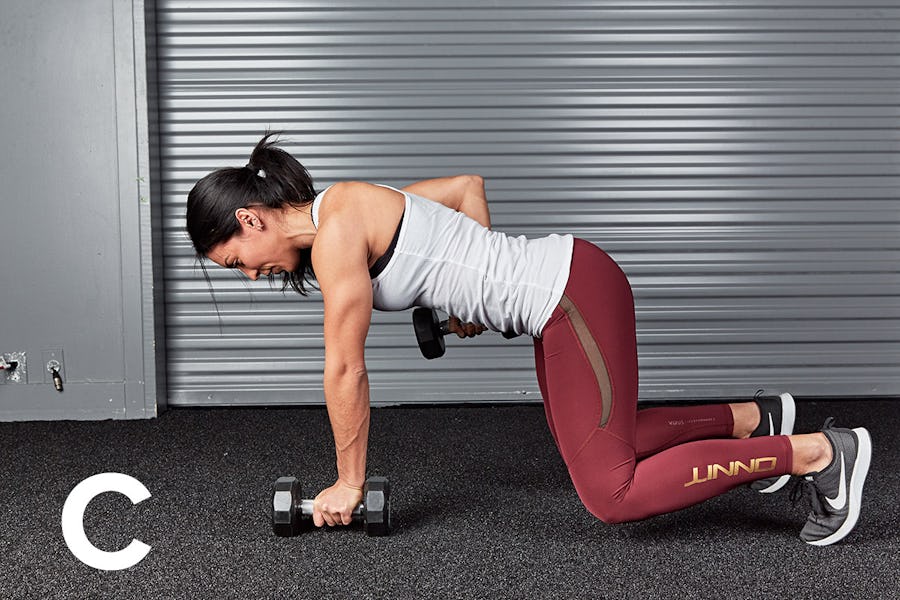
Reps: 6 (each side)
Step 1. Hold a dumbbell in each hand and get on all fours on the floor. Press your hands into the dumbbells and drive your toes into the floor to raise your knees about an inch. Brace your core. Your head, spine, and pelvis should form a long line.
Step 2. Row one dumbbell to your side, replace it, and then row the other. Avoid twisting in either direction and keep your core tight.
2B Bird Dog
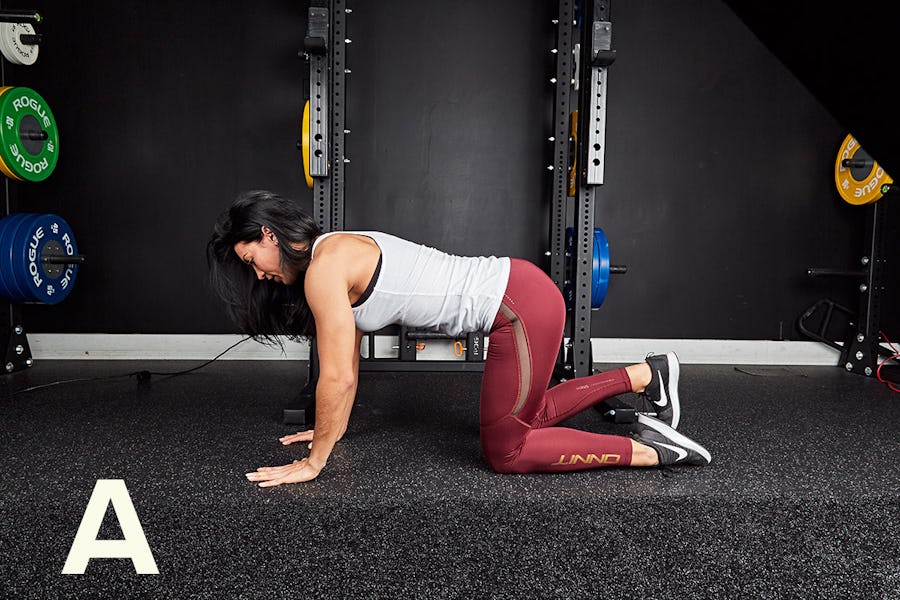

Reps: 10 (each side)
Step 1. Get on all fours and tuck your tailbone so that your pelvis is perpendicular to the floor. Brace your core.
Step 2. Simultaneously extend your right arm and left leg. Avoid twisting in any direction. Return to all fours and repeat on the opposite side.
2C Swimmer
Reps: 10 (each side)
Step 1. Lie facedown on the floor and extend your arms and legs. Take a deep breath into your belly and brace your core.
Step 2. Raise your left arm and right leg. Lower them as you raise your right arm and left leg. Continue fluttering your legs and arms as if swimming.
3A Band Row
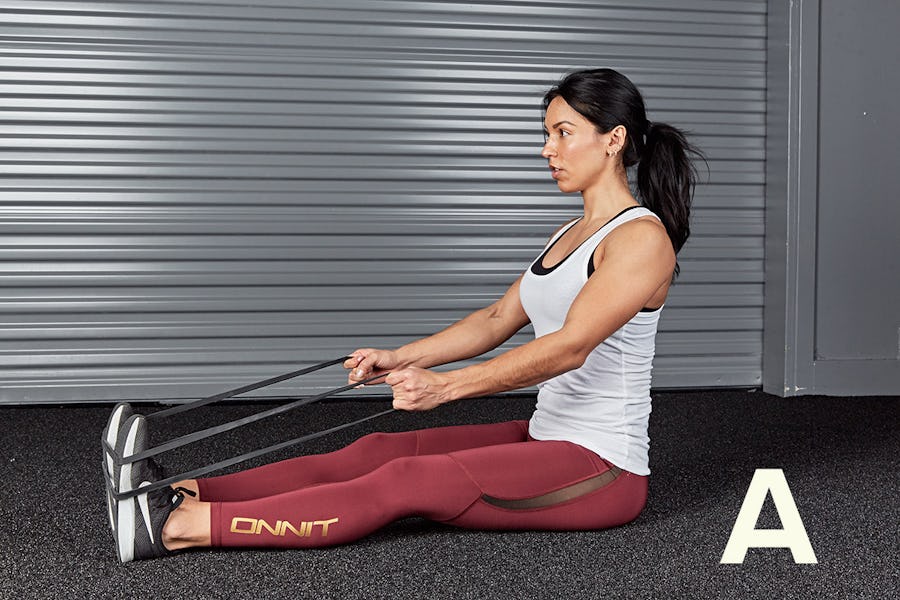
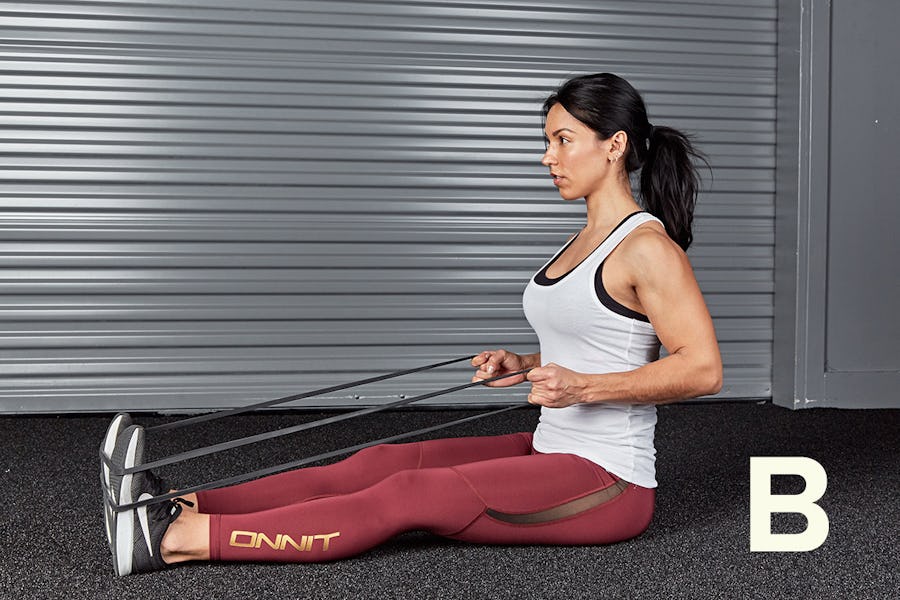
Reps: 10 (hold the last one)
Step 1. Sit on the floor and wrap a band around both feet and grasp the loop ends with both hands. Sit tall and upright.
Step 2. Row the band to your sides. Hold your last rep for 10–20 seconds.
3B Single-Arm Band Row
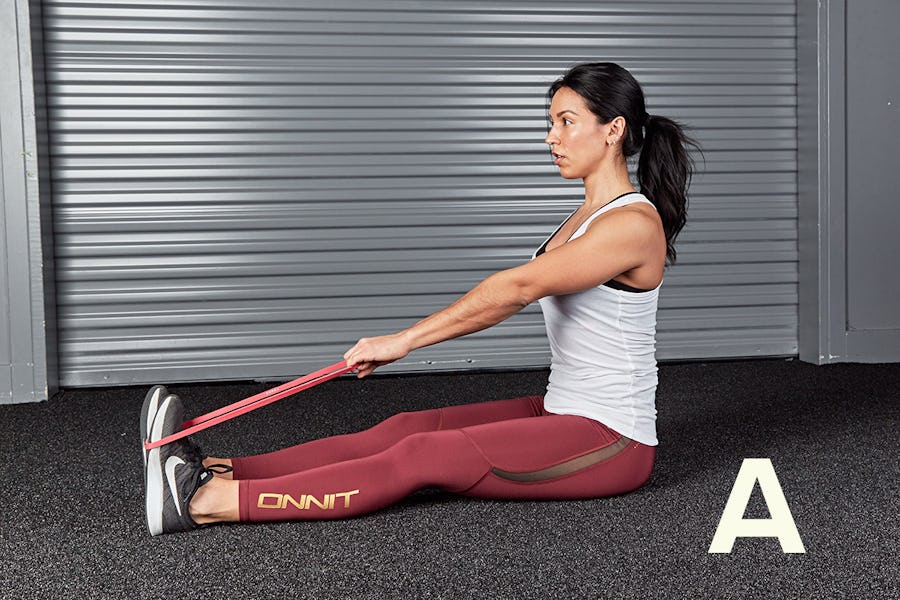
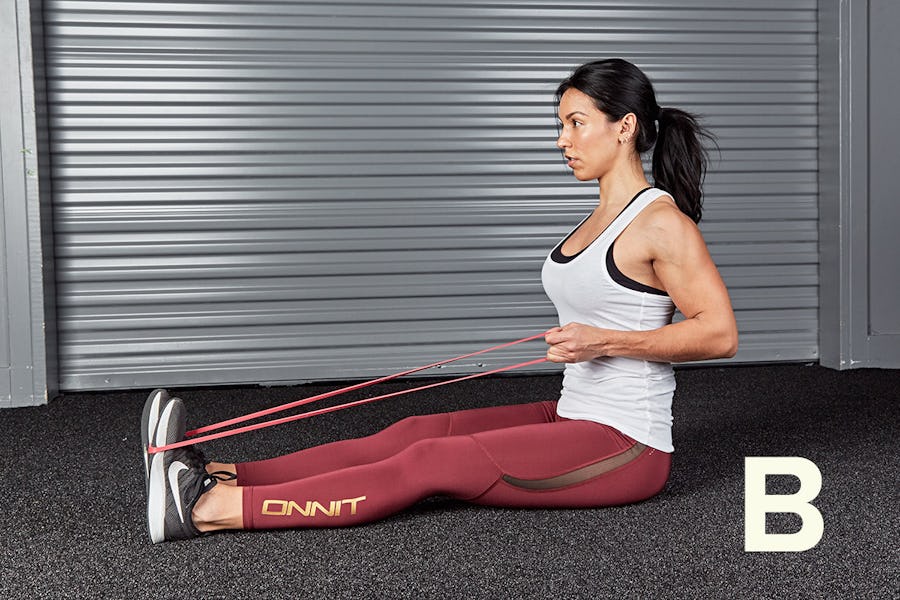
Reps: 10 (each side)
Step 1. Sit on the floor and wrap a band around your left foot. Extend your legs in front of you and sit tall. Draw your shoulder blades together and downward (“proud chest”).
Step 2. Row the band to your side. Complete your reps on that side and then switch sides.
3C Superman
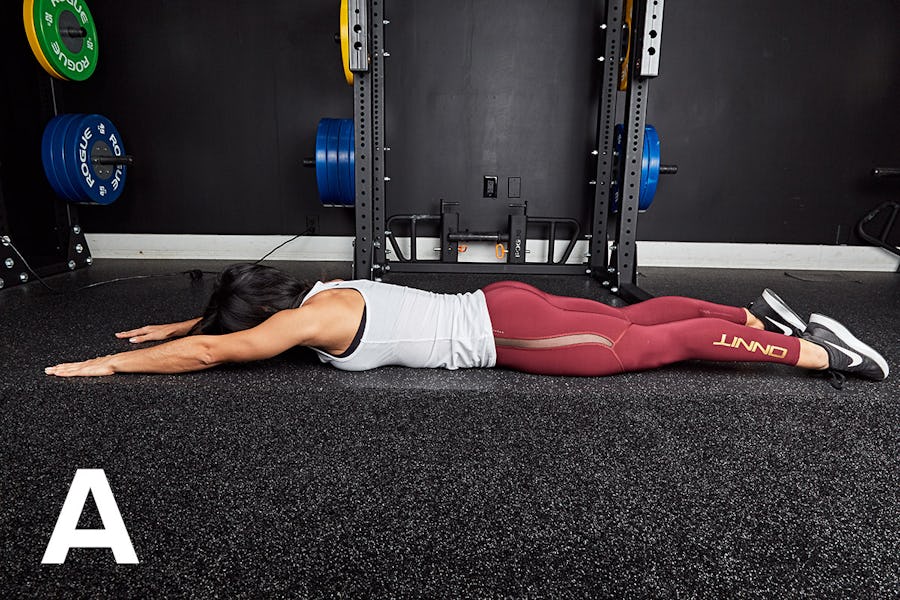

Reps: 12
Step 1. Lie on the floor facedown and extend your arms in front of you.
Step 2. Brace your core. Raise your torso and legs off the floor as high as you can while reaching forward with your arms and back with your legs. Hold the top position for a moment.
4 Pilates Double Kick
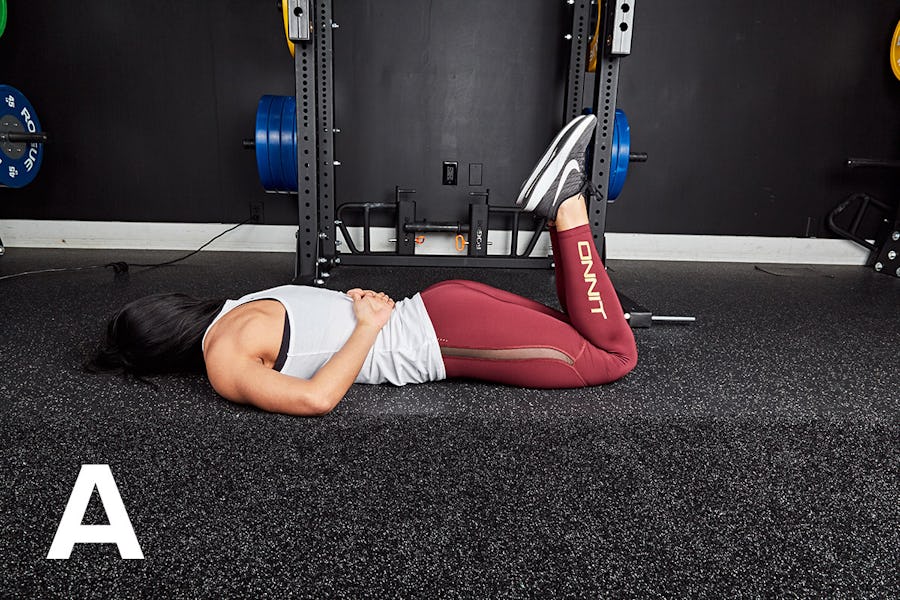
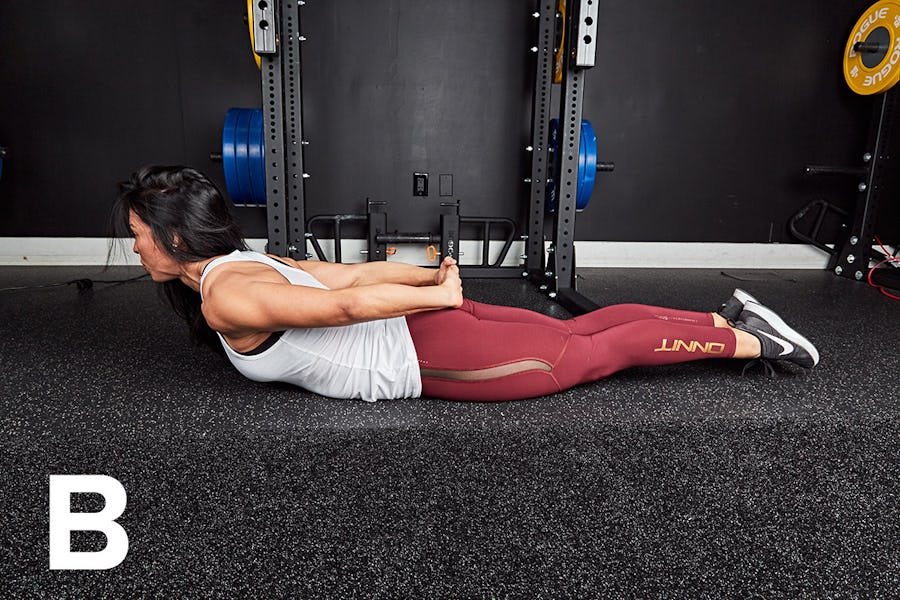
Reps: Work for 60 sec.
Step 1. Lie facedown on the floor and turn your head to rest on your right cheek. Bring your hands behind your back to rest one on top of the other. Draw your elbows out wide and down to the floor. Squeeze your legs together.Bend your knees to bring your heels to your butt—“kick” it twice—and then lower your legs to the floor again.
Step 2. Take a deep breath into your belly. Extend your arms behind you, toward the floor, and raise your torso off the floor while looking in front of you. Hold for a moment, and then turn your head to the opposite side, bend your elbows, and lower back down to rest on the other cheek. The next rep begins with another kick of the feet.
]]>